HP 1050 User manual

Category
Inkjet printers
Type
User manual
Contents
1 How Do I?..................................................................................................................................3
2 Get to know the HP All-in-One
Printer parts................................................................................................................................5
Control panel features................................................................................................................6
Status Lights...............................................................................................................................7
3Print
Print documents..........................................................................................................................9
Print photos..............................................................................................................................10
Print envelopes.........................................................................................................................11
Tips for print success................................................................................................................11
5 Copy and scan
Copy documents or photos.......................................................................................................23
Scan to a computer..................................................................................................................24
Tips for copy and scan success...............................................................................................26
6 Work with cartridges
Check the estimated ink levels.................................................................................................27
Order ink supplies.....................................................................................................................28
Replace the cartridges..............................................................................................................29
Use single-cartridge mode........................................................................................................31
Cartridge warranty information.................................................................................................31
7 Solve a problem
Improve print quality.................................................................................................................33
Clear a paper jam.....................................................................................................................35
Unable to print..........................................................................................................................37
HP support................................................................................................................................40
8 Technical information
Notice........................................................................................................................................43
Specifications...........................................................................................................................43
Environmental product stewardship program...........................................................................45
Regulatory notices....................................................................................................................48
Index..............................................................................................................................................51
1
Contents
1How Do I?
Learn how to use your HP All-in-One
Printer parts
Copy documents or photos
Load media
Replace the cartridges
Clear a paper jam
How Do I? 3
How Do I?
2 Get to know the HP All-in-One
Printer parts
Control panel features
Status Lights
Printer parts
1 Input tray
2 Paper-width guide for the input tray
3 Control panel
4 Cartridge door
5 Output tray
6 Output tray extender (also referred to as the tray extender)
7 Cartridges
Printer parts 5
Get to know the HP All-in-One
Control panel features
!
1 Power: Turns the product on or off. When the product is off, a minimal amount of power is still
used. To completely remove power, turn off the product, then unplug the power cord.
2 Cancel: Stops the current operation.
3 Start Copy Black: Starts a black-and-white copy job. Increase the number of copies (up to
10) by pressing the button multiple times. Acts as a resume button after resolving print
problems.
4 Start Copy Color: Starts a color copy job. Increase the number of copies (up to 10) by pressing
the button multiple times. Acts as a resume button after resolving print problems.
5 Attention light: Indicates that there is a paper jam, the printer is out of paper, or some event
that requires your attention.
6 Cartridge light: Indicates low ink or a print cartridge problem.
Chapter 2
6 Get to know the HP All-in-One
Get to know the HP All-in-One
Status Lights
When the product is turned on, the on button light will be lit. When the product is
processing a job, the on light will be blinking. Additional blinking lights signal errors that
you can resolve. See below to learn about blinking lights and what to do.
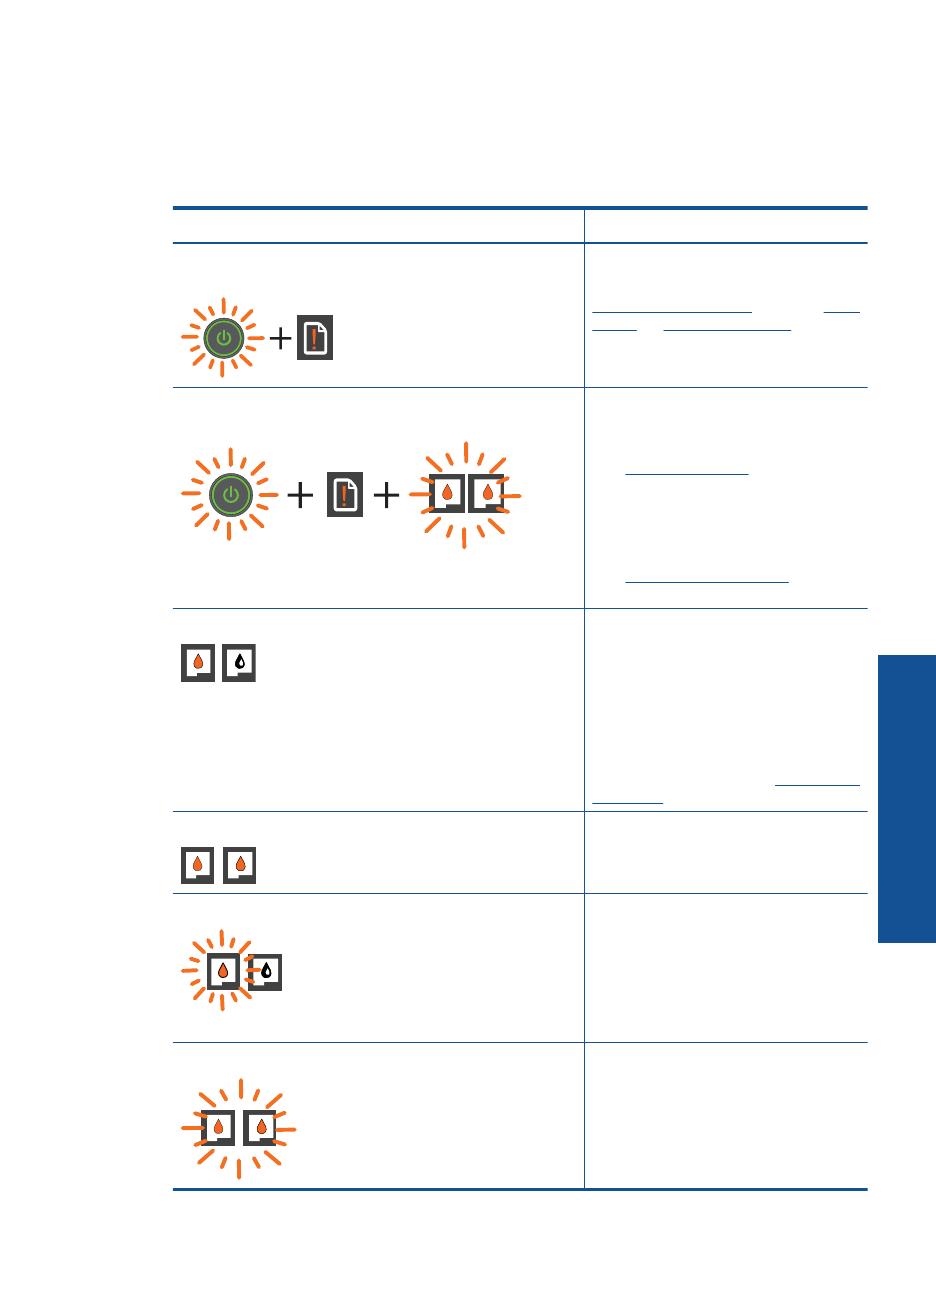
Behavior Solution
Power light is blinking and attention light is on (not
blinking)
The output tray is closed, there is no
paper, or there is a paper jam.
Replace the cartridges, correctly Load
media, or Clear a paper jam. Press
Start Copy Black or Start Copy
Color to resume.
Power light is blinking, both cartridge lights are blinking,
and the attention light is on (not blinking)
The cartridge door is open, or the
carriage is obstructed.
If the cartridge door is open, close it.
See
Prepare the trays for more
information. If the carriage is
obstructed, open cartridge door and
move the carriage to the right to clear
the obstruction. Press Start Copy
Black or Start Copy color to resume.
See
Clear the print carriage for more
information.
One cartridge light is on (not blinking) An “on” cartridge light indicates that
the corresponding cartridge still has
the tape on, is not installed, or is low
on ink.
Remove the pink tape if it is still on the
cartridge, insert a cartridge if one is
missing, or replace the cartridge when
print quality is no longer acceptable.
For more information, see
Replace the
cartridges.
Both cartridge lights are on (not blinking) Both cartridges are low on ink.
Replace both cartridges when print
quality is no longer acceptable.
One cartridge light is blinking A “blinking” cartridge light indicates
that the corresponding cartridge is not
installed correctly or is incompatible.
If the cartridge is not installed
correctly, reinsert the cartridge. If the
cartridge is incompatible, replace it
with a compatible cartridge.
Both cartridge lights are blinking Both cartridges may still have the tape
on, are missing, or are defective.
Remove the pink tape from both
cartridges if it is still on the cartridges,
install the missing cartridges or
replace the defective cartridges. See
Status Lights 7
Get to know the HP All-in-One
Behavior Solution
Identify a defective cartridge to identify
if only one cartridge is a defective.
Both cartridge lights and attention light are blinking The cartridge carriage inside the
printer has stalled.
Open cartridge door and make sure
the carriage is not obstructed, close
door, and then press the Start Copy
Black or Start Copy Color button to
resume.
Power light, both cartridge lights, and attention light are
blinking
The printer is in an error state.
To exit the error state, reset the
product.
1. Turn off the product.
2. Unplug the power cord.
3. Wait a minute, then plug the
power cord back in.
4. Turn on the product.
If the problem persists, contact
Replace the cartridges.
Chapter 2
(continued)
8 Get to know the HP All-in-One
Get to know the HP All-in-One
3Print
Choose a print job to continue.
Print documents
Print photos
Print envelopes
Print documents
To print from a software application
1. Make sure the output tray is open.
2. Make sure you have paper loaded in the input tray.
3. From your software application, click the Print button.
4. Make sure the product is the selected printer.
5. Click the button that opens the Properties dialog box.
Depending on your software application, this button might be called Properties,
Options, Printer Setup, Printer, or Preferences.
6. Select the appropriate options.
•On Layout tab select Portrait or Landscape orientation.
•On Paper/Quality tab select the appropriate paper type and print quality from the
Media drop-down list.
Click Advanced to select the appropriate paper size from the Paper/Output list.
7. Click OK to close the Properties dialog box.
8. Click Print or OK to begin printing.
Print documents 9
Print
NOTE: You can print your document on both sides of the paper, instead of just one
side. Click on the Advanced button on the Paper/Quality or Layout tab. From the
Pages to Print drop-down menu select Print Odd Pages Only. Click OK to print.
After the odd numbered pages of the document have been printed, remove the
document from the output tray. Reload the paper in the input tray with the blank side
facing up. Return to the Pages to Print drop-down menu and then select Print Even
Pages Only. Click OK to print.
Print photos
To print a photo on photo paper
1. Make sure the output tray is open.
2. Remove all paper from the input tray, and then load the photo paper print side up.
NOTE: If the photo paper you are using has perforated tabs, load photo paper
so that tabs are on top.
3. On the File menu in your software application, click Print.
4. Make sure the product is the selected printer.
5. Click the button that opens the Properties dialog box.
Depending on your software application, this button might be called Properties,
Options, Printer Setup, Printer, or Preferences.
6. Click the Paper/Quality tab.
7. Select the appropriate options.
•On Layout tab select Portrait or Landscape orientation.
•On Paper/Quality tab select the appropriate paper type and print quality from the
Media drop-down list.
Click Advanced to select the appropriate paper size from the Paper/Output list.
NOTE: For maximum dpi resolution, go to the Paper/Quality tab and select
Photo Paper, Best Quality from the Media drop-down list. Make sure you are
printing in color. Then go to the Advanced tab and select Yes from the Print in
Max DPI drop-down list. For more information, see
Print using the maximum
dpi.
8. Click OK to return to the Properties dialog box.
9. Click OK, and then click Print or OK in the Print dialog box.
Chapter 3
10 Print
Print
NOTE: Do not leave unused photo paper in the input tray. The paper might start to
curl, which could reduce the quality of your printout. Photo paper should be flat before
printing.
Print envelopes
You can load one or more envelopes into the input tray of the HP All-in-One. Do not use
shiny or embossed envelopes or envelopes that have clasps or windows.
NOTE: For specific details on how to format text for printing on envelopes, consult
the help files in your word processing software. For best results, consider using a label
for the return address on envelopes.
To print envelopes
1. Make sure the output tray is open.
2. Slide the paper guide all the way to the left.
3. Place the envelopes in the right side of the tray. The side to be printed on should face
up. The flap should be on the left side.
4. Push the envelopes into the printer until they stop.
5. Slide the paper guide firmly against the edge of the envelopes.
6. Click the button that opens the Properties dialog box.
Depending on your software application, this button might be called Properties,
Options, Printer Setup, Printer, or Preferences.
7. Select the appropriate options.
•On Paper/Quality tab select a Plain paper type.
Click the Advanced button, and select the appropriate envelope size from the
Paper Size drop down menu.
8. Click OK, and then click Print or OK in the Print dialog box.
Tips for print success
To successfully print, the HP cartridges should be functioning properly with sufficient ink,
the paper should be loaded correctly, and the product should have the appropriate
settings.
Tips for print success 11
Print
Cartridge tips
Use genuine HP ink cartridges.
Install both the black and tri-color cartridges correctly.
For more information, see
Replace the cartridges.
Check the estimated ink levels in the cartridges to make sure there is sufficient ink.
For more information, see
Check the estimated ink levels.
For more information, see
Improve print quality.
Paper loading tips
Load a stack of paper (not just one page). All of the paper in the stack should be the
same size and type to avoid a paper jam.
Load paper with side to be printed on facing up.
Ensure that paper loaded in the input tray lays flat and the edges are not bent or torn.
Adjust the paper-width guide in the input tray to fit snugly against all paper. Make sure
the paper-width guide does not bend the paper in the input tray.
For more information, see
Load media.
Printer settings tips
On the Paper/Quality tab of the print driver, select the appropriate paper type and
quality from the Media drop down menu.
Click the Advanced button, and select the appropriate Paper Size from the Paper/
Output drop-down menu.
Click the HP All-in-One desktop icon to open the Printer Software.
NOTE: You can also access the Printer Software by clicking Start > Programs
> HP > HP Deskjet 1050 J410 > HP Deskjet 1050 J410
Notes
Genuine HP ink cartridges are designed and tested with HP printers and papers to
help you easily produce great results, time after time.
NOTE: HP cannot guarantee the quality or reliability of non-HP supplies. Product
service or repairs required as a result of using a non-HP supply will not be covered
under warranty.
If you believe you purchased genuine HP ink cartridges, go to:
www.hp.com/go/anticounterfeit
Ink level warnings and indicators provide estimates for planning purposes only.
NOTE: When you receive a low-ink warning message, consider having a
replacement cartridge available to avoid possible printing delays. You do not need
to replace the cartridges until print quality becomes unacceptable.
Software settings selected in the print driver only apply to printing, they do not apply
to copying or scanning.
Chapter 3
12 Print
Print
You can print your document on both sides of the paper, instead of just one side.
NOTE: Click the Advanced button on the Paper/Quality or Layout tab. From
the Pages to Print drop-down menu select Print Odd Pages Only. Click OK to
print. After the odd numbered pages of the document have been printed, remove
the document from the output tray. Reload the paper in the input tray with the
blank side facing up. Return to the Pages to Print drop-down menu and then
select Print Even Pages Only. Click OK to print.
Print using black ink only
NOTE: If you want to print a black and white document using black ink only, click
the Advanced button. From the Print in Grayscale drop-down menu select
Black Ink Only, then click the OK button. If you see Black and White as an option
on the Paper/Quality tab or the Layout tab, select it.
Click here to go online for more information.
Print using the maximum dpi
Use maximum dots per inch (dpi) mode to print high-quality, sharp images on photo
paper.
See technical specifications for the print resolution of the maximum dpi mode.
Printing in maximum dpi takes longer than printing with other settings and requires a large
amount of disk space.
To print in Maximum dpi mode
1. Make sure you have photo paper loaded in the input tray.
2. On the File menu in your software application, click Print.
3. Make sure the product is the selected printer.
4. Click the button that opens the Properties dialog box.
Depending on your software application, this button might be called Properties,
Options, Printer Setup, Printer, or Preferences.
5. Click the Paper/Quality tab.
6. In the Media drop-down list, click Photo Paper, Best Quality.
NOTE: Photo Paper, Best Quality must be selected from the Media drop-down
list on the Paper/Quality tab to enable printing in maximum DPI.
7. Click the Advanced button.
8. In the Printer Features area, select Yes from the Print in Max DPI drop-down list.
9. Select Paper Size from Paper/Output drop-down menu.
10. Click OK to close the advanced options.
11. Confirm Orientation on Layout tab, then click OK to print.
Print using the maximum dpi 13
Print
Chapter 3
14 Print
Print
4 Paper basics
You can load many different types and sizes of paper in the HP All-in-One, including letter
or A4 paper, photo paper, transparencies, and envelopes.
This section contains the following topics:
Load media
Recommended papers for printing
If you want the best print quality, HP recommends using HP papers that are specifically
designed for the type of project you are printing.
Depending on your country/region, some of these papers might not be available.
ColorLok
HP recommends plain papers with the ColorLok logo for printing and copying of everyday
documents. All papers with the ColorLok logo are independently tested to meet high
standards of reliability and print quality, and produce documents with crisp, vivid color,
bolder blacks, and dry faster than ordinary plain papers. Look for papers with the ColorLok
logo in a variety of weights and sizes from major paper manufacturers.
HP Advanced Photo Paper
This thick photo paper features an instant-dry finish for easy handling without smudging.
It resists water, smears, fingerprints, and humidity. Your prints have a look and feel
comparable to a store-processed photo. It is available in several sizes, including A4, 8.5
x 11 inch, 10 x 15 cm (4 x 6 inch) (with or without tabs), 13 x 18 cm (5 x 7 inch), and two
finishes - glossy or soft gloss (satin matte). It is acid-free for longer lasting documents.
HP Everyday Photo Paper
Print colorful, everyday snapshots at a low cost, using paper designed for casual photo
printing. This affordable, photo paper dries quickly for easy handling. Get sharp, crisp
images when you use this paper with any inkjet printer. It is available in semi-gloss finish
in several sizes, including A4, 8.5 x 11 inch, and 10 x 15 cm (4 x 6 inch) (with or without
tabs). For longer-lasting photos, it is acid-free.
Recommended papers for printing 15
Paper basics
HP Brochure Paper or HP Superior Inkjet Paper
These papers are glossy-coated or matte-coated on both sides for two-sided use. They
are the perfect choice for near-photographic reproductions and business graphics for
report covers, special presentations, brochures, mailers, and calendars.
HP Premium Presentation Paper or HP Professional Paper
These papers are heavy two-sided matte papers perfect for presentation, proposals,
reports, and newsletters. They are heavyweight for an impressive look and feel.
HP Bright White Inkjet Paper
HP Bright White Inkjet Paper delivers high-contrast colors and sharp text. It is opaque
enough for two-sided color usage with no show-through, which makes it ideal for
newsletters, reports, and flyers. It features ColorLok Technology for less smearing, bolder
blacks, and vivid colors.
HP Printing Paper
HP Printing Paper is a high-quality multifunction paper. It produces documents that look
and feel more substantial than documents printed on standard multipurpose or copy
paper. It features ColorLok Technology for less smearing, bolder blacks, and vivid colors.
It is acid-free for longer lasting documents.
HP Office Paper
HP Office Paper is a high-quality multifunction paper. It is suitable for copies, drafts,
memos, and other everyday documents. It features ColorLok Technology for less
smearing, bolder blacks, and vivid colors. It is acid-free for longer lasting documents.
HP Iron-On Transfers
HP Iron-on Transfers (for color fabrics or for light or white fabrics) are the ideal solution
for creating custom T-shirts from your digital photos.
HP Premium Inkjet Transparency Film
HP Premium Inkjet Transparency Film make your color presentations vivid and even more
impressive. This film is easy to use and handle and dries quickly without smudging.
HP Photo Value Pack
HP Photo Value Packs conveniently package original HP cartridges and HP Advanced
Photo Paper to save you time and take the guesswork out of printing affordable
professional photos with your HP All-in-One. Original HP inks and HP Advanced Photo
Paper have been designed to work together so your photos are long lasting and vivid,
print after print. Great for printing out an entire vacation’s worth of photos or multiple prints
to share.
NOTE: At this time, some portions of the HP Web site are available in English only.
To order HP papers and other supplies, go to www.hp.com/buy/supplies. If prompted,
choose your country/region, follow the prompts to select your product, and then click one
of the shopping links on the page.
Chapter 4
16 Paper basics
Paper basics
Load media
Select a paper size to continue.
Load full-size paper
a. Raise the input tray
Raise the input tray.
b. Lower the output tray
Lower the output tray and pull out the tray extender.
Load media 17
Paper basics
c. Slide paper-width guide to the left
Slide paper-width guide to the left.
d. Load paper.
Insert stack of paper into input tray with short edge forward and print side up.
Slide stack of paper down until it stops.
Slide paper-width guide to the right until it stops at edge of paper.
Chapter 4
18 Paper basics
Paper basics
Load small-size paper
a. Raise the input tray
Raise the input tray.
b. Lower the output tray
Lower the output tray and pull out the tray extender.
Load media 19
Paper basics
c. Slide paper-width guide to the left.
Slide paper-width guide to the left.
d. Load paper.
Insert stack of photo paper with short edge down and print side up.
Slide stack of paper forward until it stops.
NOTE: If the photo paper you are using has perforated tabs, load photo
paper so that tabs are on top.
Slide paper-width guide to the right until it stops at edge of paper.
Chapter 4
20 Paper basics
Paper basics
Load envelopes
a. Raise the input tray
Raise the input tray.
b. Lower the output tray
Lower the output tray and pull out the tray extender.
c. Slide paper-width guide to the left.
Slide paper-width guide to the left.
Load media 21
Paper basics
Remove all paper from the main input tray.
d. Load envelopes.
Insert one or more envelopes into far-right side of the input tray. The side to
be printed on should face up. The flap should be on the left side and facing
down.
Slide stack of envelopes down until it stops.
Slide paper-width guide to the right against stack of envelopes until it stops.
Chapter 4
22 Paper basics
Paper basics
1 / 1

HP 1050 User manual

Category
Inkjet printers
Type
User manual

Ask a question and I''ll find the answer in the document

Finding information in a document is now easier with AI

Ask the document