Brother DCP-8070D Quick Setup Manual

Type
Quick Setup Manual

Brother DCP-8070D is a versatile and user-friendly all-in-one printer designed to meet your home or small office printing, scanning, and copying needs. With its compact size and stylish design, it seamlessly integrates into any workspace. The DCP-8070D offers crisp and professional monochrome prints with a resolution of up to 2400 x 600 dpi, ensuring sharp text and detailed graphics.

Brother DCP-8070D is a versatile and user-friendly all-in-one printer designed to meet your home or small office printing, scanning, and copying needs. With its compact size and stylish design, it seamlessly integrates into any workspace. The DCP-8070D offers crisp and professional monochrome prints with a resolution of up to 2400 x 600 dpi, ensuring sharp text and detailed graphics.

1
Start Here DCP-8070D
Quick Setup Guide
ARL/ASA/NZ/SAF/GLF Version 0
(EU only)
Before you can use the machine, read this Quick Setup Guide for the correct setup and installation.
To help you get your machine ready for use as soon as possible this guide leaves most of your machine's features
at their factory default settings. For detailed information on how to use all the features, change the default settings,
or to troubleshoot your machine please refer to the User’s Guide.
To view the Quick Setup Guide in other languages, please visit http://solutions.brother.com/.
1
Unpack the machine and check the components
WARNING
Plastic bags are used in the packaging of your machine. To avoid danger of suffocation, please keep
these bags away from babies and children.
IMPORTANT
DO NOT connect the interface cable yet.
Drum Unit Assembly
(including Standard Toner Cartridge)
CD-ROMs
(Windows®)
(Macintosh)
Quick Setup Guide User’s Guide
Philippines/Thailand Hong Kong/Malaysia/
Singapore
Australia/
New Zealand
India/
South Africa
The mains plug supplied with this
machine is a side grounded two pin plug.
The mains plug supplied with this machine is a grounded
three pin plug.
AC Power Cord
Make sure that the AC socket will accept the supplied grounded pin plug. This machine must be grounded, If in doubt, call a
qualified electrician.
2
Symbols used in this guide
CAUTION
CAUTION
When you move the machine, grasp the side hand holds that are located at the bottom of the machine. DO
NOT carry the machine by holding the scanner unit.
Note
The components included in the box may differ depending on your country.
Save all packing materials and the box in case for any reason you must ship your machine.
The interface cable is not a standard accessory. Buy the appropriate interface cable for the interface you
want to use (USB).
To ensure safe operation the supplied plug must be inserted only into a standard power outlet that is
properly grounded through the standard electrical wiring. Non grounded equipment may cause an electrical
shock hazard, and may cause excessive electrical noise radiation.
USB cable
Please make sure you use a USB 2.0 cable (Type A/B) that is no longer than 2 metres.
DO NOT connect the interface cable at this time. Connecting the interface cable is done during MFL-Pro
installation process.
When you use a USB cable, make sure you connect it to the USB port of your computer and not to a USB
port on a keyboard or non-powered USB hub.
WARNINGs tell you what to do to prevent possible personal injury.
CAUTIONs specify procedures you must follow or avoid to prevent possible
minor injuries.
IMPORTANT describes procedures you must follow or avoid to prevent
possible machine problems or machine damage, or damage to other objects.
Electrical Hazard icons alert you to a possible electrical shock.
Hot Surface icons warn you not to touch machine parts that are hot.
Note Notes tell you how you should respond to a situation that may arise or give tips
about how the current operation works with other features.
User’s Guide
Software User’s Guide
Indicates reference to the User’s Guide or Software User’s Guide.
Note
Keep a minimum gap around the machine as shown in the illustration.
WARNING
CAUTION
IMPORTANT
130 mm
500 mm
200 mm
300 mm
3
2
Install the drum unit and
toner cartridge assembly
aRemove the protective tape and film covering
the scanner glass.
bPress the front cover release button and open
the front cover a.
cUnpack the drum unit and toner cartridge
assembly.
dGently shake it from side to side several times
to distribute the toner evenly inside the
assembly.
ePut the drum unit assembly into the machine
until it clicks into place.
fClose the front cover of the machine.
IMPORTANT
DO NOT connect the interface cable yet.
1
4
3
Load paper in the paper
tray
aPull the paper tray completely out of the
machine.
bWhile pressing the blue paper-guide release
lever a, slide the paper guides to fit the paper
size you are loading in the tray. Make sure that
the guides are firmly in the slots.
cFan the stack of paper well to avoid paper jams
and misfeeds.
dPut paper in the tray, and make sure that the
paper is below the maximum paper mark a.
The side to be printed on must be face down.
ePut the paper tray firmly back in the machine.
Make sure that it is completely inserted into the
machine.
fUnfold the support flap a to prevent paper
from sliding off the face-down output tray.
Note
For Legal or Folio size paper, press the release
button a in the bottom of the paper tray and then
pull out the back of the paper tray.
(Legal or Folio size paper are not available in
some regions.)
1
1
1
IMPORTANT
Make sure the paper guides touch the sides of
the paper so it will feed correctly.
1
1
5
4
Connect the power cord
aMake sure that the machine's power switch is
off. Connect the AC power cord to the machine.
bPlug the AC power cord into an AC outlet. Turn
the power switch on.
5
Choose your language
(if needed)
aPress Menu.
bPress 1.
cPress 0.
dPress or to choose your language.
Press OK.
ePress Stop/Exit.
6
Set the LCD contrast
(if needed)
If you are having difficulty reading the LCD, try
changing the contrast setting.
aPress Menu.
bPress 1.
cPress 5.
dPress to increase the contrast.
—OR
Press to decrease the contrast.
Press OK.
ePress Stop/Exit.
IMPORTANT
DO NOT connect the interface cable yet.
6
7
Set the date and time
This setting allows the machine to name files created
when using the Scan to USB feature.
aPress Menu.
bPress 5.
cPress 1.
dEnter the last two digits of the year on the dial
pad, and then press OK.
Date&Time
Year:2009
(e.g. Enter 0, 9 for 2009.)
eEnter the two digits for the month on the dial
pad, and then press OK.
Date&Time
Month:03
(e.g. Enter 0, 3 for March.)
fEnter the two digits for the day on the dial pad,
and then press OK.
Date&Time
Day:25
(e.g. Enter 2, 5.)
gEnter the time in 24-hour format on the dial
pad, and then press OK.
Date&Time
Time:15:25
(e.g. Enter 1 5, 2 5 for 3:25 P.M.)
hPress Stop/Exit.
8
Set Daylight Saving Time
(for Asia and Oceania)
You can set the machine to change for Daylight
Saving Time. If you choose On, it will reset the time
forward one hour and if you choose Off, it will reset
the time backward one hour.
aPress Menu.
bPress 5.
cPress 2.
dPress or to choose On or Off.
ePress OK.
fPress 1 or 2 to choose 1.Change or 2.Exit.
gPress Stop/Exit.
9
Automatic Daylight
Savings Time (for
Middle East and Africa)
You can set the machine to change automatically for
daylight savings time. It will reset itself forward one
hour in the Spring and backward one hour in the
Autumn.
aPress Menu.
bPress 5.
cPress 2.
dPress or to choose On (or Off).
Press OK.
ePress Stop/Exit.
7
Windows®
USB
Macintosh
10
Choose your connection type
For USB Interface Users
Windows
®
, go to page 8
Macintosh, go to page 12
8
Windows®
USB
For USB Interface Users
(Windows
®
2000 Professional/XP/XP Professional x64 Edition/
Windows Vista
®
)
11
Before you install
aMake sure that your computer is ON and you
are logged on with Administrator rights.
bTurn off and unplug the machine from the AC
outlet and disconnect it from your computer, if
you already connected an interface cable.
12
Install MFL-Pro Suite
aPut the supplied CD-ROM into your CD-ROM
drive. If the model name screen appears,
choose your machine. If the language screen
appears, choose your language.
bThe CD-ROM top menu will appear. Click
Initial Installation.
cClick Install MFL-Pro Suite.
IMPORTANT
DO NOT connect the USB cable yet.
If there are any programs running, close
them.
Make sure a USB Flash memory drive is not
inserted into the machine.
The screen may differ depending on the
operating system.
The supplied CD-ROM includes ScanSoft™
PaperPort™ 11SE. This software supports
Windows® 2000 (SP4 or greater), XP (SP2 or
greater), XP Professional x64 Edition and
Windows Vista®. Update to the latest
Windows® Service Pack before installing
MFL-Pro Suite.
Note
If the Brother screen does not appear
automatically, go to My Computer (Computer),
double-click the CD-ROM icon, and then
double-click Start.exe.
9
Windows®
USB
Windows®
USB
Macintosh
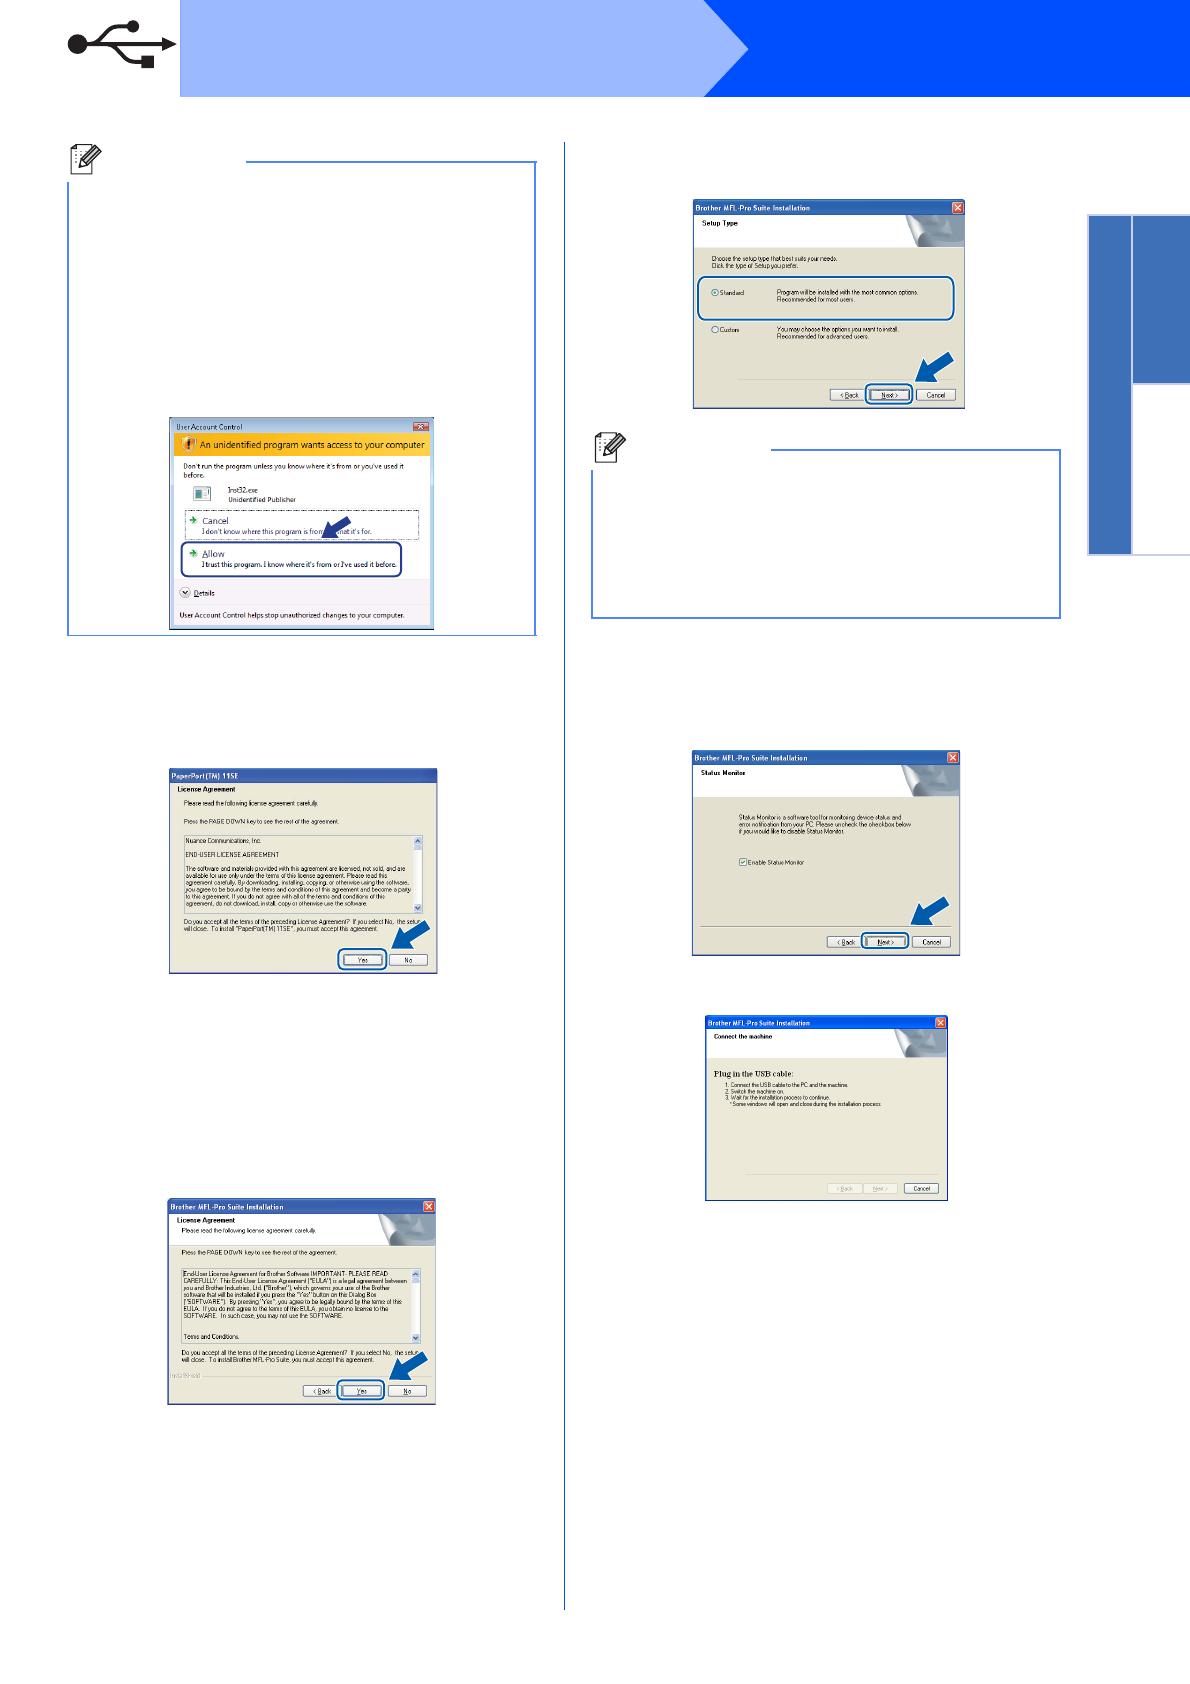
dWhen the ScanSoft™ PaperPort™ 11SE
License Agreement window appears, click
Yes if you agree to the Software
License Agreement.
eThe installation of ScanSoft™ PaperPort
11SE will automatically start and is followed by
the installation of MFL-Pro Suite.
fWhen the Brother MFL-Pro Suite Software
License Agreement window appears, click
Yes if you agree to the Software
License Agreement.
gChoose Standard, and then click Next. The
installation continues.
hIf you do not want to monitor the machine
status and error notifications from your
computer, uncheck Enable Status Monitor
and then click Next.
iWhen this screen appears, go to the next step.
Note
If the installation does not continue
automatically, open the top menu again by
ejecting and then reinserting the CD-ROM or
double-click the Start.exe program from the
root folder, and continue from step c to install
MFL-Pro Suite.
For Windows Vista®, when the
User Account Control screen appears, click
Allow.
Note
If you want to install the PS driver (Brother’s
BR-Script Driver), choose Custom and then
follow the on-screen instructions. When the
Select Features screen appears, check
PS Printer Driver, and then continue following
the on-screen instructions.
10
Windows®
USB
13
Connect the USB cable
aRemove the label covering the USB interface
connector.
bConnect the USB cable to the USB connector
on the machine marked with the symbol.
Then connect the cable to your computer.
14
Connect the power cord
aPlug the AC power cord into an AC outlet. Turn
the power switch on.
The installation of the Brother drivers will
automatically start.
The screens appear one after another.
bWhen the On-Line Registration screen is
displayed, make your selection and follow the
on-screen instructions. Once you have
completed the registration process, close your
web browser to return to this window.
Then click Next.
IMPORTANT
DO NOT connect the machine to a USB port
on a keyboard or a non-powered USB hub.
Connect the machine directly to your
computer.
IMPORTANT
DO NOT cancel any of the screens during the
installation. It may take a few seconds for all
screens to appear.
11
Windows®
USB
Windows®
USB
Macintosh
15
Finish and restart
aClick Finish to restart your computer.
After restarting the computer, you must be
logged on with Administrator rights.
bIn the Check for Firmware Updates screen,
choose the firmware update setting you want
and click OK. If you disabled the Status Monitor
setting in step h the screen will not appear.
Note
If an error message appears during the software
installation, run the Installation Diagnostics
located in Start/All Programs/Brother
/DCP-XXXX (where DCP-XXXX is your model
name).
Note
Internet access is required for the firmware
upgrade.
Finish The installation is now
complete.
Note
XML Paper Specification Printer Driver
The XML Paper Specification Printer Driver is the
most suitable driver when printing from the
applications that use the XML Paper Specification
documents. Please download the latest driver by
accessing the Brother Solutions Center at
http://solutions.brother.com/.
12
Macintosh
USB
For USB Interface Users
(Mac OS X 10.3.9 or greater)
11
Before you install
aMake sure your machine is connected to the
power and your Macintosh is ON. You must be
logged on with Administrator rights.
12
Connect the USB cable
aRemove the label covering the USB interface
connector.
bConnect the USB cable to the USB connector
on the machine marked with the symbol.
Then connect the cable to your computer.
13
Install MFL-Pro Suite
aPut the supplied CD-ROM into your CD-ROM
drive.
bDouble-click Start Here OSX to install.
Please wait, it will take a few seconds for the
software to install. After the installation, click
Restart to finish installing the software.
IMPORTANT
Make sure a USB Flash memory drive is not
inserted into the machine.
IMPORTANT
DO NOT connect the machine to a USB port
on a keyboard or a non-powered USB hub.
Connect the machine directly to your
Macintosh.
Note
Please see the Software User’s Guide on the
CD-ROM if you want to install the PS driver.
(Brother’s BR-Script Driver)
13
Macintosh
USB
Windows®
USB
Macintosh
cThe Brother software will search for the Brother
device. During this time the following screen
will appear.
dChoose the machine from the list, and then
click OK.
eWhen this screen appears, click OK.
14
Install
Presto! PageManager
When Presto! PageManager is installed OCR
capability is added to Brother ControlCenter2. You
can easily scan, share and organize photos and
documents using Presto! PageManager.
aDouble-click Presto! PageManager and follow
the on-screen instructions.
The installation of MFL-Pro Suite is now
complete.
Go to step 14 on page 13.
Finish The installation is now
complete.
Options and Consumables
14
Options
For more details about the optional compatible SO-DIMM Memory please see the User’s Guide or visit
http://solutions.brother.com/.
Replacement consumables
When the time comes to replace consumable items, an error message will be indicated on the LCD. For more
information about the consumables for your machine, visit http://www.brother.com/original/ or contact your local
Brother re-seller.
SO-DIMM Memory
You can expand the memory by installing a (144-pin
SO-DIMM) memory module.
Toner cartridge Drum unit
TN-3250 (Standard Yield)/TN-3290 (High Yield) DR-3215 (DR-3217 for India)
Trademarks
The Brother logo is a registered trademark of Brother Industries, Ltd.
Brother is a registered trademark of Brother Industries, Ltd.
Multi-Function Link is a registered trademark of Brother International Corporation.
Windows Vista is either a registered trademark or a trademark of Microsoft Corporation in the United States and other countries.
Microsoft, Windows and Windows Server and Internet Explorer are registered trademarks of Microsoft Corporation in the United States and/or
other countries.
Apple, Macintosh, Safari and TrueType are trademarks of Apple Inc., registered in the United States and other countries.
Nuance, the Nuance logo, PaperPort and ScanSoft are trademarks or registered trademarks of Nuance Communications, Inc. or its affiliates
in the United States and/or other countries.
Each company whose software title is mentioned in this manual has a Software License Agreement specific to its proprietary programs.
All other trademarks are the property of their respective owners.
Compilation and Publication
Under the supervision of Brother Industries, Ltd., this manual has been compiled and published, covering the latest product descriptions and
specifications.
The contents of this manual and the specifications of this product are subject to change without notice.
Brother reserves the right to make changes without notice in the specifications and materials contained herein and shall not be responsible for
any damages (including consequential) caused by reliance on the materials presented, including but not limited to typographical and other
errors relating to the publication.
Copyright and License
©2009 Brother Industries, Ltd.
  • Page 1 1
  • Page 2 2
  • Page 3 3
  • Page 4 4
  • Page 5 5
  • Page 6 6
  • Page 7 7
  • Page 8 8
  • Page 9 9
  • Page 10 10
  • Page 11 11
  • Page 12 12
  • Page 13 13
  • Page 14 14
  • Page 15 15

Brother DCP-8070D Quick Setup Manual

Type
Quick Setup Manual

Brother DCP-8070D is a versatile and user-friendly all-in-one printer designed to meet your home or small office printing, scanning, and copying needs. With its compact size and stylish design, it seamlessly integrates into any workspace. The DCP-8070D offers crisp and professional monochrome prints with a resolution of up to 2400 x 600 dpi, ensuring sharp text and detailed graphics.

Ask a question and I''ll find the answer in the document

Finding information in a document is now easier with AI