Page is loading ...

BestRest Products, LLC
www.bestrestproducts.com 6908 - 220th St. SW (425) 673-1023
info@bestrestproducts.com Mountlake Terrace, WA 98043 fax (425) 673-0502
R1200GS
ADVENTURE LightBar
(not for the standard R1200GS)
The R1200GS ADVENTURE LightBar
provides a sturdy mounting platform for an
auxiliary lighting system. It will also mount
the BMW fog lights. We recommend
installing high quality IPF lighting systems
available through BestRest, but you can also
mount other light systems of your choosing.
Thank you for purchasing a BestRest
LightBar. We appreciate every order. If you
have problems with installation please call us
at the number above or send us an email.
May the Lord God bless you, watch over you,
and keep you safe as you travel the world on
your motorcycling adventures.
David & Judy Petersen
Tools needed for installation:
10mm box or open-end wrench
10mm socket
T27 torx wrench
19mm box or open wrench
Your parts package should contain:
1 – Adventure LightBar
2 – Extender plates (large flat pieces)
2 – Upper brackets (angled)
2 – Fog light mounting clips (u-shaped)
2 – Black plastic spacers
7 – M6x16 bolts
1 – flat washer (large)
5 – lock washers (small)
9 – flat washers (small)
2 – M6 flat nuts
5 – M6 nylon locknuts
2 – M10 bolts
2 – M10 nuts
4 – lock washers (large)
4 – nylon zip ties
Installation
Read and follow these instructions carefully.
Improper installation may result in damage to
your motorcycle or personal injury. Do not
attempt installation unless you can perform it
in a safe and professional fashion.
It’s very important to use the hardware we
provide and carefully follow these instructions
for the proper application of that hardware.
Each nut, bolt, and washer has a specific
application and cannot be substituted for
another use. We really mean this!
BestRest recommends using a semi-
permanent thread-locking compound (blue
Loctite) on all fasteners, nuts and bolts.
1. If your bike has the BMW fog lights,
disconnect the wiring connector from the rear
of the light assembly. Pinch the connector to
release the locking lugs, then wiggle the
connector downward until it comes free.
2. Remove the bolts that hold the fog lights
onto the mounting tabs.
3. Remove the screws that hold the fog light
bar to the crash bars. In the above photo
above remove the screws that attach the fog
light bar to the crash bar. In the photo
below, remove the screw in the middle of the
fog light bar.
4. Remove the cable ties that hold the
electrical wires onto the BMW fog light bar.
Protect the wires from damage.
If you plan to re-mount the BMW fog lights,
follow Step 5.
If you’re not mounting the BMW fog lights,
skip ahead to Step 6.
5. To prevent the clips from rotating due to
vibration, you must follow these steps very
carefully.
a. Place a lock washer on an M6x16 bolt,
then put the bolt thru the hole in the next
photo.
b. Place a large locking washer over the end
of the bolt, then fit the clip over the end of the
bolt.
c. Finally, place a small lock washer and flat
nut onto the end of the bolt. DON’T use a
nylon locknut; you’ll need it for a later step.

d. Align the clips so they face toward the
front of the LightBar (at right in this photo),
then tighten the nut and bolt securely.
2
The large serrated locking washer will
prevent the clip from rotating on the LightBar.
6. Fit the LightBar up underneath the fender.
Attach it to the crash bar using an M6x16
bolt, with a locking washer and a large flat
washer. LEAVE THE BOLT LOOSE
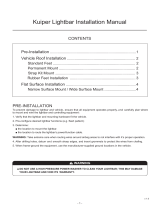
7. Mount the upper brackets as shown in
these next photos. Use M6x16 bolts, flat
washers, and nylon locknuts. The brackets
are mirror images of each other; it will be
apparent which one goes on which side. This
is the left side, front of bike to the left.
LEAVE THE BOLTS LOOSE FOR NOW !!!
8. The LightBar is designed with elongated
assembly holes so it can accommodate
variations between the crash bar and the
frame. Adjust the bar so it’s centered left-
and-right.
9. Wiggle the LightBar back and forth a bit so
that the brackets and hardware work out any
stress points.
10. Now go back and tighten all the nuts and
bolts. Use common sense and don’t over-
tighten. “Snug but gently firm” works for us.
Remember to tighten the screw in the middle
that holds the LightBar to the BMW crash bar.
Be careful that you don’t strip this screw –
torque to 6 ft-lbs (8 Nm)
11. If you plan to mount the BMW fog lights
you must reconfigure one of the metal
bushings in the fog light plastic tabs.
12. Use a penknife to gently pry ONE of the
bushings out of the inside of the plastic tab.
13. Replace the bushing so that it’s on the
outside of one of the tabs. In this position the
plastic tabs will easily fit over the fog light
mounting clip. It’s important that these tabs
are not stressed when they’re bolted onto the
clips. “Test fit” the fog light onto the mounting
clip and make any adjustments as needed.
The brackets go on TOP of the tabs
on the LightBar, not underneath
14. Slip the plastic spacers into the clips.
These spacers prevent the clips from bending
inward when you’re tightening the bolts that
hold the fog lights onto the clips.
15. Fit the BMW fog lights onto the clips, and
hold them in place with the screws that
originally held the lights onto the BMW bar.
16. Reconnect the wiring harness by pushing
the male fitting up into the socket.
17. Use the zip ties to secure the wiring
harness to the LightBar.
18. Tighten the screws that hold the fog
lights to the clips. Snug but firm.
This completes installation of the LightBar
and the BMW fog lights.
First remove the screw that holds the
crash bar to the frame, and replace i
t
with the bolt and nut we provide Press fit metal bushings
Centered
on the bike

3
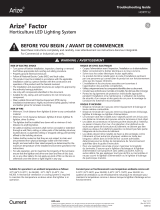
Ready to mount a set of auxiliary lights?
Depending on the size and type of lights you
have several options.
We prefer reconfiguring the light assembly so
that the stud projects from the side, that way
it will neatly bolt into the large round flange of
the LightBar.
If this doesn’t setup work for you, then you
can use the extenders that came in your
parts kit.
Extenders can be used to mount large
diameter lights, or lights that have a vertical
stud mount system, or lights that require a flat
horizontal surface. For really large lights you
can order oversized 2” longer Super
Extenders from BestRest.
Use the two large 10mm bolts, 2 large lock
washers and 2 nuts to connect the Extenders
to the LightBar. Rotate the Extenders to the
desired configuration and tighten the bolts
securely. Use adhesive pads or drill holes as
required to mount your lights. Lights can be
mounted above … or below the extenders.
As these photos demonstrate, you can mount
almost any lighting system on the BestRest
LightBar. Use your imagination!
Safety & Other Notices
The BestRest Adventure LightBar is
constructed from hot rolled 12-gauge steel
with a black powder coat finish. The design
is extremely sturdy and under most
conditions exceeds expected performance
requirements.
Use caution when mounting any large or
heavy auxiliary lighting system. Off-road
travel or washboard surfaces places high
stress loadings on the mounting system, as
does an accident or collision. Off road travel
can lead to premature metal fatigue and/or
structural failure.
Very Important Note: When
making adjustments to the aiming
point of the BMW fog lights, it may be
necessary to loosen the bolt that holds
the clip to the LightBar. Do not use
the fog light body as a lever to twist
the clip side-to-side, because the
plastic tabs on the fog light will be
damaged.
You can make adjustments to the fog
light by slipping a screwdriver into clip,
and using that as a lever to gently
adjust the lateral aiming points of the
fog lights.
If structural failure occurs your lighting
system could fall downward and interfere with
the wheel, resulting in handling or control
problems. It‘s very important to check the
brackets on a daily basis for signs damage,
metal fatigue, and/or loose or missing
hardware. If these are discovered you should
immediately remove the LightBar from
service until repairs can be made.
Do not proceed with product installation
unless you are qualified to complete the
installation in a safe fashion and as described
herein. Do not use these products unless
you have read all instructions and understand
how these products work and what
limitations, if any, they may have.
BestRest shall not be held responsible for
any personal injury or damage caused by
installation of an electrical component or
auxiliary lighting system. In other words,
don't blame us if these techniques didn't work
for you!
It is the responsibility of the Consumer to
evaluate the suitability of these products for
personal use. Consumers must evaluate
whether these products meet their needs and
whether these products can be mounted and
used in a safe fashion. The Consumer
accepts full and complete responsibility for
selection of products and for mounting and
maintenance of these products. The
Consumer agrees to follow and abide by all
instructions, warnings, recommendations, or
other information supplied or published by
BestRest Products.
It is the Consumer's responsibility to inspect
all screws, fasteners and fittings on a daily
basis, tighten or replace them as necessary,
and to regularly inspect the entire BestRest
LightBar and mounting hardware for signs of
missing parts, excessive wear, metal fatigue,
or imminent failure. Should any of these be
observed the assembly should be removed
from the motorcycle and not used until
inspected and repaired by BestRest.
BestRest Products, it's employees, agents,
and owners assume no liability whatsoever
for property damage, personal injury or other
losses resulting from the Purchaser's failure
to properly maintain the products, for
unauthorized modifications of any kind, for
use of unauthorized parts (including
bushings, screws, pins, or other fasteners), or
for use of any BestRest Product in a fashion
not intended by BestRest or described as a
suggested application in BestRest literature.
LightBar
10 mm bolts connect the extenders to the
r
ou
n
d
fl
a
n
ge
s
o
f
t
h
e
Li
g
h
t
B
ar


We folded any excess wire and neatly stored
it just above the ABS system. Even though
nobody would see our work once the tank
was in place, we believe neatness counts
and helps to insure that the entire wiring
process is done correctly.
5
The harness has two separate power leads
that go the lights. We ran a lead along each
side of the frame to an IPF light. We zip-tied
the lead to the LightBar and frame tubes.
We ran the power switch to the left handlebar
and mounted it above the high beam switch,
using the supplied adhesive pad. We zip-tied
the wire to the handlebar at 4” intervals.
We then ran the wiring harness back toward
the battery where we connected the main
power lead to one circuit of a Centec fuse
panel. We eliminated the in-line, 25-amp
fuse supplied by IPF, and relied on the
Centec fuse panel to protect the wiring circuit.
The YELLOW wire on the IPF wiring harness
is the relay command circuit.
We picked up power for our command circuit
by tapping into the positive (+) lead that goes
to the BMW accessory outlet. We tapped
into the accessory line as it ran forward, near
the ABS pump. We routed the small fuse on
the yellow wire to a point where we could
inspect or replace it without the need for
removing the gas tank.
(On our bike we have a second auxiliary
power outlet that runs forward to the front
fairing – if you don’t have one of these you
can tap into the power outlet under the rider’s
left leg.)
Centec Fuse Panel
Because we run auxiliary lights, electric
clothing, radar detector, GPS, and a host of
other accessories, we need a fuse panel that
can handle all the circuits and still work
independently from the BMW wiring system.
The Centec AP1 and AP2 fuse panels are
perfect for this application because they’re
capable of 8 different circuits and 5
independent fuse ratings. They’re available
from BestRest for about $55.00
Refer to our website for a schematic of these
fuse panels.
We mounted the Centec just above the
battery, on the back of the plastic air box.
We drilled 4 small holes in the air box to
mount the Centech. When we finished
drilling the holes we removed the air filter and
cleaned out any debris generated by the
drilling process. This is a very important
step, otherwise small plastic shavings can
clog your fuel injection system.
We picked up our "hot lead" for the IPF relay
by tapping into the positive (+) side of the
BMW accessory socket. This is described in
the column to the left.
If you choose not to use a Centec fuse panel,
you can connect your harness directly to the
terminals of the battery, according to the
instructions that came with your lights.
It's a relatively simple matter of routing the
power cables to each light, and routing the
on/off switch to the handlebar. Use zip-ties,
work carefully, and be neat and orderly in
your wiring. Check your work carefully before
you hook up your circuits to the battery. You
seldom get second chances when you make
a mistake in a wiring system!
Replace the body panels. Make sure all
mounting fittings are properly installed to
keep the panels from coming loose.
Following is information on
removing the gas tank from a
standard R1200GS.
These drawings differ from what
you’ll encounter on the Adventure,
but the principles remain the
same.
Refer to the official BMW service manual or
CD for complete instructions.
Drain the tank before beginning this
procedure, or at the very least ride the bike
until it’s nearly empty. A full Adventure gas
tank weighs nearly 90 pounds, so you don’t
want to be lifting it off the bike while it’s got
gasoline in it !!!

Danger !!! Fire Hazard, possibility of leaking gasoline, fire, or
explosion. Extinguish all flames or remove all ignition sources
before you begin. Do not attempt these procedures unless you
follow proper safety procedures for handling flammable liquids.
6
Fig 1. Remove side panels. Remove knee covers #1 and side
panel #4 by releasing the quick release fasteners #3. On the
Adventure, there’s one screw at the back of the tank, and one
screw under the tank as shown in these arrows.
Fig 2. Remove protective cap #1. Remove quick release fuel line
by pinching clamp #3. Remove electrical connections #4.
Fig 3. On right side of tank, remove quick release fuel hose #5.
Remove vent lines #6. Mark them carefully so you don't mix them
up. One line has white markings. On the Adventure these fitting
are on the top-left of the gas tank.
Fig 4. On the right side, remove Bolt #1 and bracket #2.
Fig. 5. Remove two screws holding upper gas tank body panel to
front gas tank cowling panel, as shown with the black arrow.
There's one screw on each side at the top of the tank. On the left
side of the tank remove bolt #4. The front of the tank is held by a
rubber bushing #9, do not remove this bolt. The entire tank
assembly, along with the upper tank panels can be removed from
the frame by gently pulling rearward and upward #8. Set the tank
carefully on the ground.
Fig 6. Once the tank is removed you can route the wiring harness
for your lights. To mount a Piaa relay we used zip ties and Velcro
and mounted it directly below the VIN plate, as indicated by #4. To
mount an IPF relay we used the screw on the left side of the
steering head, just in front of the VIN plate as indicated by #5.
When your work is complete, reverse the above steps to reinstall
the gas tank and body panels.
Piaa rela
y
IPF rela
y
/