Rasonic RC-S240H User manual

Category
Split-system air conditioners
Type
User manual

This manual is also suitable for

Rasonic RC-S240H is a powerful air conditioner with a cooling capacity of 24000 BTU/h, suitable for large rooms. It features an energy-saving inverter technology, remote control operation, and various operating modes, including cooling, dehumidifying, and fan-only modes. With its efficient performance and user-friendly features, the RC-S240H ensures a comfortable indoor climate.

Rasonic RC-S240H is a powerful air conditioner with a cooling capacity of 24000 BTU/h, suitable for large rooms. It features an energy-saving inverter technology, remote control operation, and various operating modes, including cooling, dehumidifying, and fan-only modes. With its efficient performance and user-friendly features, the RC-S240H ensures a comfortable indoor climate.

Window Type Air Conditioner(Inverter Cooling)
Thank you for purchasing Rasonic window type air conditioner. Please read the user
manual carefully before installation and well keep user manual for your later reference.
Model:RC-S70H
RC-S90H
RC-S120H
RC-S180H
RC-S240H
OPERATING INSTRUCTIONS
Function
8
13
8
15
CONTENTS
16
17
18
Structure mechanism and Installation
Operating condition
power requirement
Installation
Notes for installation
9
Part identification
Air direction adjustment
3
3
Remote control operation procedure
Remote control panel
Operation tips
4
7
Operation procedure
2
Precautions 1
Care and maintenance
19
NOTICE:
CAUTION
Care and maintenance
Trouble shooting guide
After service
Please read this operating manual carefully before operating the unit.
The figures in this manual may be different with the material objects, please refer to the material objects
for reference.
The appliance shall be installed in accordance with national wiring regulations.
If the supply cord is damaged, it must be replaced by the manufacturer, its service agent
or similarly qualified persons in order to avoid a hazard.
This appliance is not intended for use by persons (including children) with reduced physical, sensory or
mental capabilities, or lack of experience and knowledge, unless they have been given supervision or
instruction concerning use of the appliance by a person responsible for their safety.
Children should be supervised to ensure that they do not play with the appliance.
Thank you for choosing air conditioner. Our design is based on the best efficiency and the lowest
noise operation and it can keep the room comfortable. Please read this operating manual carefully before
operating the unit and keep it for consultation.
Explanation of Symbols
Indicates a hazardous situation that, if not avoided, will
result in death or serious injury.
Indicates a hazardous situation that, if not avoided, could
result in death or serious injury.
Indicates a hazardous situation that, if not avoided, may
result in minor or moderate injury.
Indicates important but not hazard-related information,
used to indicate risk of property damage.
Indicates a hazard that would be assigned a signal word
WARNING or CAUTION.
DANGER
WARNING
CAUTION
NOTICE
- 1 -
Precautions
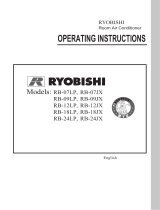
Working temperature range
WARNING
Indoor side DB/WB(°C)
Operating Temperature Range
32/23 Outdoor side DB/WB(°C)
43/-
Do disconnect power supply when cleaning air conditioner. Otherwise, it may cause
electric shock.
The operating temperature range (outdoor temperature) for cooling only unit is
18°C~ 43°C.
Maintenance must be performed by qualified professionals.Otherwise, it may cause
injury or damage.
Do not repair air conditioner by yourself. It may cause electric shock or damage.
Please contact dealer when you need to repair air conditioner.
The appliance is not to be used by persons (including children) with reduced physical,
sensory or mental capabilities, or lack of experience and knowledge, unless they
have been given supervision or instruction.
Maximum cooling
Children being supervised not to play with the appliance.
Please install the devices for short-circuit protection and electrical leakage protection
when installing the air conditioner.
According to the local safety regulations, use qualified power supply circuit and circuit
break.
Do not connect air conditioner to multi-purpose socket.Otherw
hazard.
The air conditioner should be installed in accordance with national wiring regulations.
Air Conditioner should be properly grounded. Incorrect grounding may cause electric
shock.
Do not extend fingers or objects into air inlet or air outlet. It may cause personal
injury or damage.
Do not step on air conditioner, or put heavy objects. It may cause damage or
personal injury.
Do install the air switch. If not, it may cause malfunction.
Do not spill water on the remote controller, otherwise the remote controller may
be broken.
ise, it may cause fire
Do not spray water on air conditioner. It may cause electric shock or malfunction.
Do not block air outlet or air inlet. It may cause malfunction.
This appliance can be used by children aged from 8 years and above and persons
with reduced physical, sensory or mental capabilities or lack of experience and
knowledge if they have been given supervision or instruction concerning use of the
appliance in a safe way and understand the hazards involved.
Children shall not play with the appliance.
Cleaning and user maintenance shall not be made by children without supervision.
Function
Introduction
Autumn
Spring Window type room air conditioners can regulate the room
temperature and dry the room. It is convenient for your work,study
and life. It can be widely used in residence, shop, hotel, office, library
and laboratory, and so on.
Summer Winter
Dry
(Only for the models with fresh air function)
Fresh Air
- 2 -
Room
temp.
Wind
direction
Dehumidifying in rainy or
humid season
Without reducing the room temp., air conditioner can
dehumidify and make the room air dry and
comfortable.
Exchange fresh air
Open ventilation lever to keep the fresh air in the room.
Cooling in summer
In hot summer, Air conditioner can cool down
the room air by transferring heat out.
- 3 -
Operating Condition
Please operate air conditioner in the correct conditions as following.
Power requirement
COOL mode operation
DRY mode operation
Outdoor temperature should be in range of 18 to 43 ,
otherwise it is possible for air conditioner to breakdown.
Outdoor temperature should be in range of 18
to 43 , otherwise it is possible for air conditioner
to breakdown.
Room humidity should be lower than 90%.
Otherwise, it is possible for air conditioner to dew
at air conditioner surface and even drop water af-
ter running for so much time. But this is normal.
Water pipe
The electric components will be damaged when the voltage is too high.
If the voltage is too low, the compressor will vibrate violently to dam-
age the refrigerant system and easily cause the compressor and elec-
tric components not work.
The ground must be connected.
Special socket must be used. Furthermore, the socket and wiring
must conform to the wiring regulations. And the earthing method
must be reliable.
In fixed circuit, there must be electricity leakage protection switch
of enough power capacity and air switch with enough space.
Earth wire To ensure the reliable earthing, please do not connect earth wire to the following places:
4
Installation
Installation precaution:
Location:
Window type conditioner is so valuable and the improper installa-
tion of it will cause a lot of damage! Please associate the profes-
sional technician to install the unit and don’t install it by yourself.
Otherwise, we are not responsible for the damage like this.
How to install:
Avoid other heat sources or direct sun light.
Avoid a place where is easy for children to touch.
Don't use the unit in the immediate surroundings of
a laundry, a bath, a shower or a swimming pool.
For window type air conditioner with remote
control, install in a location where is strong elec-
tromagnetic disturbance, you should contact the
seller in advance to avoid the malfunction in use.
and polluted by sulphurous gas, or other special areas, please
contact the seller before use.
Avoid a place where is possible for inflammable gas to leak out.
It’s not allowed to be installed on the unstable or motive base
structure (such as truck) or in the corrosive environment
(such as chemical factory).
The condensation water must be drained away conveniently.
Install air conditioner unit far away from TV set or radio
etc. to avoid disturbing video or voice.
In salt and coastal area or place where is near thermal springs
Choose a location where there are no any obstacle surrounding
the unit, and the plug is accessible.
Prepare the installation hole slightly bigger than unit size.
Choose the installation space according to the following diagram.
- 5 -
Installation procedure:
Remove the sticker from the front panel.1)
3)
2)
Fill up sews in the cabinet with sponge
or foam.
Installation assistance:
(Shown at right figure.)
The installation place should be strong
enough to avoid the enlargement of
noise or vibration.
Use iron support
The installation hole should be stro-
ng enough to support the air condit-
ioner.
If it cannot, iron support has to
be used
outdoors. Iron support sho-
it block the air inlet at the side grille.
alling the sunshade board. When in-
stalling the sunshade board, don’t let
Wall Sunshade
board
Rubber
plate
Support
Horizontal line
condensation water can be drain
Put the unit into the installation hole.
When installing the unit, it should slant
down to the back to make sure the
away conveniently.(Slant about 3 1 )
ed
+
-
6-10mm
Use sunshade board
Air conditioner should avoid anything
to be dropped into it and avoid direct
sunshine. If there is no cover on it,
you should contact the seller for inst- Over
1000mm
1. There is a drainage outlet at the back of the unit.
Remove cover from the drainage outlet, and then connect drainage joint to it with screw.2.
3. Connect the drain hose to the outlet.
Note:
Drain hose or tubing can be purchased locally
to satisfy your particular needs.
Remove
Drainage outlet
Washer Cover
Install
Drainage joint
Drain water for another style:
Drain water for one style:
To get the maximum cooling efficiency, the air conditioner is designed to splash the condensate on the
condenser coil.
If the splashing sound annoys you, you can provide an outside drain by using the following procedure,
which may however cause a small loss of performance.
- 6 -
Slide out the chassis from the cabinet.
Remove the rubber plug from the body base plate.
Install the drain pan to the corner of the cabinet with 2 screws.
Connect the drain hose to the outlet on the drain pan bottom.
Slide the chassis into its original place in the cabinet.
To get the maximum cooling efficiency, the air conditioner is designed to splash the condensation water on the
condenser coil. Please install the drainage box when installing the air conditioner.
To the cooling only unit, If the splashing sound annoys you, you can provide an outside drain by using the follo
-wing procedure, which may however cause a small loss of performance.
1.
2.
3.
4.
5.
Note:
Drain pan and drain hose must be installed before using reverse cycle models.
Drain hose or tubing can be purchased locally to satisfy your particular needs.
Notes for installation
- 7 -
Remove
Before removing air conditioner to the other place, you should
contact the seller firstly.
Then it must be done under the direction of the professional
technician. In addition, the charge of this must be paid.
Noise
Install in a location where is firm enough to avoid the enlargement of noise
and vibration.
Don’t put anything in front of the outlet of the unit to avoid increasing
noise.
Be sure that hot air or oise will not inconvenience neighbors.
Please contact the seller as soon as there is strange noise during operation.
Please use the safety support.
Electric wiring
Must connect with ground reliably.
The exclusive circuit must be used. But removable socket can’t be used because poor
contact of it can cause over heat or fire.
Don’t pull the power cord strongly.
In fixed circuit, there must be electricity leakage protection switch and leakage current
is less than 30mA.
Air switch (thermal-magnetic breaker) should be installed in the circuit and its capacity is
10A (RC-S70HRC-S90HRC-S120H) and 16A(RC-S180HRC-S240H).
Connecting method between air conditioners and power cord and interconnecting method
of each individual element with one another should accord with wiring diagram on the unit.
The air conditioner should be installed in accordance with national wiring regulations.
An all-pole disconnection switch having a contact separation of at least 3mm in all poles
should be connected in fixed wiring,fixed wiring should be at least 1.5mm(RC-S70H
RC-S90HRC-S120H) and 2.5mm(RC-S180HRC-S240H)
If the supply cord is damaged, it must be replaced by the manufacturer o our dealer
or a qualified person to avoid a hazard.
All he ectrical work must be done according to the local wiring regulations.
Part identification
Panel outlook picture, just for reference, please take the real unit as standard.
Air direction adjustment
- 8 -
(Airflow direction adjustment up and down)
The vertical airflow direction vane is controlled by
positioning the vane to discharge the air upwards,
downwards or straight out.
Front grille
Air inlet louver
Cabinet
Air filter
behind the front intake grille
Front intake grilleRemote control panel Power cord
Panel outlook picture, just for reference, please take the real unit as standard.
- 9 -
Remote control operation procedure
Dry HeatCoolAuto Fan
Only
1On/Off button
Press this button to turn on the unit.
Press this button again to turn off the unit.
2Mode button
Press this button to select your required operation mode. Corresponding
indicator will be on.
Cool: Under this mode, air conditioner operates under cooling mode. Cooling
indicator will be on. Press “Fan Speed” button can adjust the fan speed.
Auto: Under this mode, the unit will operate automatically according to
ex-factory setting. In this case, set temperature cannot be adjusted.
Note:
This is a general use remote controller, it could be used for the air conditioners
with multifunction; For some function, which the model doesn’t have, if press the
corresponding button on the remote controller that the unit will keep the original
running status.
(not applicable for cooling only model)
3
1On/Off button
2Mode button
+ / - button
4 Swing button
5 Fan button
6 Sleep button
7 Timer button
8 Health button(not applicable)
9 Light button
2
4
7
9
8
6
5
3
1
- 10 -
5Fan button
This button is used for setting Fan Speed in the sequence that goes from AUTO,
6Sleep button
Press this button to go into the Sleep operation mode. Press it again to cancel
this function. This function is available in COOL, HEAT (Only for models with
heating function) mode to maintain the most comfortable temperature for you.
NOTE: There are 3 speeds for the Fan Speed of this model.
, , to then back to Auto.
Auto
Speed 1 Speed 2
Speed 3
3 + / - button
Pressing “+” or “-” button once will increase or decrease set temperature
by 1°F(°C).
Hold “+” or “-” button for 2s, set temperature on remote controller will change
quickly.
Release the button after your required set temperature is reached.
Under timer setting status, after each pressing of “+” or “-” button, time will
increase or decrease 0.5h . Hold “+ or “-” button, 2s later, time displayed
on dual-8 nixie tube will change quickly. Loosen the button until the time is
reached to your set time.
4Swing button
Press this button to turn “ON” & “OFF” swing.
Heat: Under this mode, air conditioner operates under heating mode.
Press “Fan Speed” button can adjust the fan speed.(Cooling only unit won’t
receive heating mode signal. If setting heat mode with remote controller, press
ON/OFF button can’t start up the unit).
Fan Only: Under this mode, air conditioner will not cool or heat, only blow
wind. Fan indicator will be on. Press “Fan Speed” button can adjust the fan
speed.
Dry: Under this mode, the unit runs in low fan speed for dehumidification and
the corresponding indicator is on; under dry mode, the fan speed cannot be
adjusted.
- 11 -
7Timer button
This function is not applicable for this model.
8 Health button
Under ON status, press this button to set timer OFF; Under OFF status, press
this button to set timer ON.
Press this button once and the characters of HOUR ON (OFF) will flash to be
displayed. Meanwhile, press “+button or “-” button to adjust timer setting (time
will change quickly if holding “+” or “-” button). Time setting range is 0.5~24hours.
Press this button again to confirm timer setting and the characters of HOUR ON
(OFF)will stop flashing.
If the characters are flashing but you haven’t press timer button,timer setting
status will be quit after 5s.If timer is confirmer, press this button again to cancel
timer.
Function introduction for combination buttons
Temperature display switchover function
Under OFF status, press "-" and "Mode" buttons simultaneously to switch temp-
erature display between °C and °F
9 Light button
Press "Light" button to turn on or off the lights on the display panel of the window
air conditioner.
- 12 -
Replacement of batteries in remote controller
The distance between signal sender and receiving window should be no more
than 8m, and there should be no obstacles between them.
conditioner when using the remote controller.
Replace new batteries of the same model when replacement is required.
When you don’t use remote controller for a long time, please take out the
batteries.
NOTICE
1. Press the back side of remote controller marked
the cover of battery box along the arrow direction.
2. Replace two 7# (AAA 1.5V) dry batteries, and
make sure the position of "+" polar and "-" polar
are correct.
3. Reinstall the cover of battery box.
signal sender battery
Cover of battery box
remove
reinstall
1
2
3
Remote control panel
- 13 -
Note:
If wireless remote controller is lost, you can use the remote control panel and
operate manually.
FAN SPEED BUTTON
Select the fan speed LOW,MID, HIGH and AUTO in sequence.
4 TIME/TEMP BUTTON
SWING BUTTON
Activate the automatic air swing function.
Press the keypad to increase the set (operating) temperature of the unit.
Press the keypad to decrease the set (operating) temperature of the unit.
The temperature setting range is from 16~30°C.Press the keypad also t o
increase the selected time in 0.5 hour increments, and Press the dapyek
to decrease the selected time in 0.5 hour decrements, The time setting range
ON/OFF BUTTON
Operation starts when pressing this button, and stops when pressing this
button again.
5
21
6
3
4
74
6
5 SIGNAL RECEIVER
MODE BUTTON
Select the operation mode COOL, DRY, FAN HEAT (for reverse cycle
model) or COOL, DRY, FAN (for cooling only model).
is from 0~10 hours. Press the keypad also to increase the selected time in
1 hour increments, and Press the keypad to decrease the selected time in
1 hour decrements, The time setting range is from 0~24 hours.
- 14 -
7 FILTER BUTTON
This feature is a reminder to clean the Air Filter (See Care and Cleaning) for
more efficient operation and cooling. The LED (light) will illuminate after 250
hours of operation. To reset after cleaning the filter, press the "Check Filter"
button and the light will go off. Before the LED(light) illuminate, press the
"Check filter" button until after 3 seconds, the accumulated time of operation
will be canceled.
Operation Tips
Operation for comfort and economy
Do not overcool the room
temperature. This is not good
for health and wastes electricity.
Keep blind or curtains closed.
Do not let sunshine enter the
room directly when the air con-
ditioner is in operation.
Keep the room temp. uniform.
Adjust the vertical and horizon-
tal airflow direction to ensure a
uniform temperature in the room.
Air can’t be discharged to the di-
rection of air-in.
Make sure that the doors and win-
dows are tightly closed. Avoid open-
ing doors and windows as much as
possible to keep air conditioning in the
room.
Clean the air filter regularly.
Blockages in the air filter re-
duce dehumidifying effects.
Clean the air filter at least once
every two weeks.
15
Since windows are kept closed, it
is a good idea to open them and
ventilate the room now and then.
When starting the unit, curtains or
windows should be closed to pre-
vent the cool leakage.
Ventilate the room occasionally.
16
Do not use the air conditioner
for other purposes except for
cooling the room.
Do not use the air conditioner
for other purposes such as
drying clothes, preserving
foods, or cultivating
vegetables.
Do not block the air intake and
outlet vents
This causes lowered perfor-
mance and irregular operation.
Do not insert sticks or other
objects into these vents as it is
dangerous to touch the electric
components and the fan.
Always wait at least 3 minutes before switching the
air conditioner on again after you have switched it
off during cooling.
Always wait
at least 3 minutes
Do not pull out the power cord.
Damage to the cord may result
in serious electric shocks.
s
plastic parts will melt if exposed to
excessive heat.
Avoid exposing the body directly to
a continuous unidirectional air flow
for long periods.
This is not recommended for health
reason.
Select the most appropriate
temperature.
Pay attention to adjust the tempera-
ture to suit the conditions.
Rooms occupied by infants,the
elderly, or the sick should be kept at
an appropriate temperature.
Do not use heating apparatuses in
the vicinity.The air conditioner
CAUTION
Operations for safety and health
1) The plug must be accessible after the appliance is positioned.
2) Do not use this appliance in the laundry.
3) If the power cord is damaged, it must be replaced by the manufacture or its service agent in avoid of hazard.
  • Page 1 1
  • Page 2 2
  • Page 3 3
  • Page 4 4
  • Page 5 5
  • Page 6 6
  • Page 7 7
  • Page 8 8
  • Page 9 9
  • Page 10 10
  • Page 11 11
  • Page 12 12
  • Page 13 13
  • Page 14 14
  • Page 15 15
  • Page 16 16
  • Page 17 17
  • Page 18 18
  • Page 19 19
  • Page 20 20
  • Page 21 21
  • Page 22 22
  • Page 23 23
  • Page 24 24

Rasonic RC-S240H User manual

Category
Split-system air conditioners
Type
User manual
This manual is also suitable for

Rasonic RC-S240H is a powerful air conditioner with a cooling capacity of 24000 BTU/h, suitable for large rooms. It features an energy-saving inverter technology, remote control operation, and various operating modes, including cooling, dehumidifying, and fan-only modes. With its efficient performance and user-friendly features, the RC-S240H ensures a comfortable indoor climate.

Ask a question and I''ll find the answer in the document

Finding information in a document is now easier with AI