ON/OFF button
ON/OFF
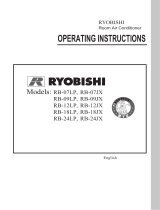
Remote control
Signal transmitter
AUTO
COOL
DRY
FAN
Middle fan
Press this button, Auto, Cool,Dry, Fan,
Heat mode can be selected circularly.
MODE button
MODE
Auto mode is default while power on.
Under Auto mode, the temperature will not
be displayed; Under Heat mode, the
Press this button, Sleep On and Sleep
Off can be selected. After powered on, Sleep
SLEEP button
SLEEP
Off is defaulted. After the unit is turned
off, the Sleep function is canceled. After
Sleep function set up, the signal of Sleep
will display. In this mode, the time of timer
can be adjusted. Under Fan and Auto
modes, this function is not available.
Press this button, Auto, Low, Middle, High
speed can be circularly selected. After
powered on, Auto fan speed is default.
Under DRY mode, Low fan speed only
can be set up.
FAN button
FAN
Low fan
High fan
AUTO button
AUTO
Press this button, the clock can be set up,
signal blink and display.Within 5
CLOCK button
CLOCK
seconds, the value can be adjusted by
pressing + or - button, if continuously
press this button for 2 seconds above,
in every 0.5 seconds, the value on ten place
of Minute will be increased 1.During blinking,
repress the Clock button or Confirm button,
signal will be constantly displayed and
it denotes the setting succeeded. After
powered on, 12:00 is defaulted to display
and signal will be displayed. If there is
current time value is Clock value, otherwise
is Timer value.
signal be displayed that denotes the
Press this button, the unit will be turned
on, press it once more, the unit will be
turned off. Sleep function will be canceled,
while unit off.
(only for cooling and heating unit
HEAT
initial value is 28 Under other
modes, the initial value is 25
(oF);
82
(oF).
77
Operation of wireless remote control (Applicable to Remote Control Models ONLY)
Name and function of wireless remote control
Note:
Besure that there are no obstructions between receiver and remote controoler; Don't
drop or throw the remote control; Don't let any liquid in the remote control and
put the remote control directly under the sunlight or any place where is very hot.
9
the signal of heating operation.)
have any action when it receives
As for cooling only unit, it won’t
Press this button to active the "AUTO"
function and the unit will be running
according to room temperature.