Page is loading ...

Dummy Page - To be discarded before printing
Use this template with A7MotoPortraitProduct1
StructApps. See the Reference Pages for template
user instructions.
MOTO ROLA
EX212
68016172001_no warranty.fm Page -1 Friday, June 3, 2011 10:10 AM

68016172001_no warranty.fm Page 0 Friday, June 3, 2011 10:10 AM

1Congratulations
Congratulations
elegant. None of those extra complications.
• Dual SIM slots. No need to change SIM cards. Use
two SIM cards at the same time.
• Stylish notification. Your phone lights up when you
receive a call or have a notification.
• Entertainment always. Listen to music or use your
phone’s camera to take photos and send them to
your friends.
We’ve crammed all the main features of your phone
into this handy guide, and in a matter of minutes we’ll
show you just how easy your phone is to use. You may
be surprised at what you discover.
More
• Support: Go to www.motorola.com/support.
• Accessories: Find accessories for your phone at
www.motorola.com/products
.
Caution: Before assembling, charging or using your
phone for the first time, please read “Safety,
Regulatory & Legal” on page 34.
68016172001_no warranty.fm Page 1 Friday, June 3, 2011 10:10 AM
Your MOTOROLA EX212 with DUAL SIM is slim and

2 Congratulations
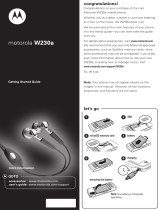
Your phone
the important keys & connectors
Note: Your phone might look a little different.
Right Soft Key
Power/End
Key
Call/Answer
Key
Select Key
Left Soft Key
Navigation
Key
Display
Volume Key
Back
cover
release
Headset
port
Charger
connector
68016172001_no warranty.fm Page 2 Friday, June 3, 2011 10:10 AM

3Contents
Contents
Your phone . . . . . . . . . . . . . . . . . . . . . . . . . . . . . . . . 2
Let’s go . . . . . . . . . . . . . . . . . . . . . . . . . . . . . . . . . . . 4
Home screen . . . . . . . . . . . . . . . . . . . . . . . . . . . . . . 7
Calls . . . . . . . . . . . . . . . . . . . . . . . . . . . . . . . . . . . . . 9
Contacts . . . . . . . . . . . . . . . . . . . . . . . . . . . . . . . . . . 11
Messaging . . . . . . . . . . . . . . . . . . . . . . . . . . . . . . . . 13
Web . . . . . . . . . . . . . . . . . . . . . . . . . . . . . . . . . . . . . 15
Bluetooth™ wireless . . . . . . . . . . . . . . . . . . . . . . . . 16
Manage your life . . . . . . . . . . . . . . . . . . . . . . . . . . . . 18
Tips & tricks . . . . . . . . . . . . . . . . . . . . . . . . . . . . . . 21
Personalize . . . . . . . . . . . . . . . . . . . . . . . . . . . . . . . 22
Text entry . . . . . . . . . . . . . . . . . . . . . . . . . . . . . . . . 24
Photos. . . . . . . . . . . . . . . . . . . . . . . . . . . . . . . . . . . 25
Media player . . . . . . . . . . . . . . . . . . . . . . . . . . . . . . 27
Radio. . . . . . . . . . . . . . . . . . . . . . . . . . . . . . . . . . . . 29
Security. . . . . . . . . . . . . . . . . . . . . . . . . . . . . . . . . . 30
Troubleshooting . . . . . . . . . . . . . . . . . . . . . . . . . . . 32
Safety, Regulatory & Legal . . . . . . . . . . . . . . . . . . . 34
68016172001_no warranty.fm Page 3 Friday, June 3, 2011 10:10 AM

4 Let’s go
Let’s go
let’s get you up and running
Assemble & charge
Caution: Please read “Battery Use & Safety” on
page 34.
1 cover off 2 SIM cards in
3 micro SD in 4 battery in
5 cover on 6 charge up
4
H
68016172001_no warranty.fm Page 4 Friday, June 3, 2011 10:10 AM

5Let’s go
Turn it on & off
To turn your phone on or
off, press and hold .
Activate SIM cards
Your phone supports two
SIM cards. When two SIM cards are installed, you can
activate one or both of them.
1 Press > Settings > DUAL SIM settings.
2 Select Dual SIM open, Only SIM1 open, or Only
SIM2 open.
Note: If only one SIM card is installed, your phone
activates it by default.
Make & answer calls
To make a call from the home screen, enter a number,
then press .
Note: If two SIM cards are activated, choose which
SIM card you want to use.
To answer a call, press . To turn off the incoming
call alert, press the Volume Key down.
To end a call, press .
Power/End
Key
68016172001_no warranty.fm Page 5 Friday, June 3, 2011 10:10 AM

6 Let’s go
Adjust volume
Press the volume keys to
change the ring volume
(in the home screen),
or the earpiece volume
(during a call).
Cool content & more
Surf the web for cool content and more “Web” on
page 15. An optional microSD memory card can be
installed in your phone—you can load it up with
photos, videos, and music from your computer.
Up/Down
Volume
Key
68016172001_no warranty.fm Page 6 Friday, June 3, 2011 10:10 AM

7Home screen
Home screen
quick access to the things you need most
Quick start: Home screen
You see the home screen when you turn on the phone
or press End from a menu. It’s basically like this:
Note: Your home screen might look a little different.
MenuMenu
00:00
2011.01.01 Sat
MusicMusicMusic Menu
00:00
SIM1 Carrier
SIM2 Carrier
Battery level
Right
Soft
Key
Left
Soft
Key
SIM card
status
68016172001_no warranty.fm Page 7 Friday, June 3, 2011 10:10 AM

8 Home screen
Main menu
From the home screen, select Menu (the right soft
key) to see the main menu
Use to scroll left, right, up, or down through the
menu options. Press to select a highlighted option.
Phone status & notifications
The status bar at the top of the screen contains icons
that tell you about messages and phone status.
status indicators
Signal Strength Music Player On
Active Voice Call Silent Mode
Missed Call Ringer On
Phone Lock Vibrate On
Alarm Lock Ringer & Vibrate On
New Messages Headset
New Multimedia
Messages
Bluetooth
New Web Push
Messages
Battery
Java running Roaming Service
G GPRS running
68016172001_no warranty.fm Page 8 Friday, June 3, 2011 10:10 AM

9Calls
Calls
it’s good to talk
In-call options
During a call, select H-Free to turn the speakerphone
on.
Note: If two SIM cards are activated, choose which
SIM card you want to use to make a call.
Note: Using a mobile device or accessory while
driving may cause distraction and may be illegal.
Always obey the laws and drive safely.
Redial
1 Press > Call center > Call history
> SIM1 call history, or SIM2 call history.
2 Scroll to the contact you want to call, and then press
Call .
Save a contact
1 Enter a number using the number keys.
2 Press Options > Save to Phonebook
> Add new contact or Replace existing.
3 Enter contact details and select Done, then Yes.
68016172001_no warranty.fm Page 9 Friday, June 3, 2011 10:10 AM

10 Calls
Emergency calls
Note: Your service provider programs one or more
emergency phone numbers (such as 911 or 112) that
you can call under any circumstances, even when your
phone is locked. Emergency numbers vary by country.
Your pre-programmed emergency number(s) may not
work in all locations, and sometimes an emergency
call cannot be placed due to network, environmental,
or interference issues.
1 Enter the emergency number.
2 Press Call to call the emergency number.
68016172001_no warranty.fm Page 10 Friday, June 3, 2011 10:10 AM

11Contacts
Contacts
contacts like you’ve never had before
Quick start: Contacts
Find it: > Phonebook
Tip: To see more contacts, scroll up or down.
Phonebook
honebook
P
Add new contact
Add new contact
Keith Zang
Alex Pico
Alex Pico
Dan Smith
1919234777
Luke Carmody
Options
Options
Back
ack
B
00:59
abc
Contacts List
Tap to view contact
information.
Details
Press to see a
contact’s details.
Groups
Create and use
caller groups.
Select Options to
call, text, or edit the
contact.
68016172001_no warranty.fm Page 11 Friday, June 3, 2011 10:10 AM

12 Contacts
Create contacts
Find it: > Phonebook > Add new contact
Select whether to store it on the SIM card or the
phone. Enter the contact name and details, then select
Done > Yes.
Call contacts
Select a contact, then press Call .
Tip: Press the volume keys to scroll to a contact, then
press Call .
Create call groups
Create a group to send a message to many people at
once.
Note: You can add contacts to a group only if they are
stored in the phone memory and not on your memory
card.
Find it: > Phonebook, press right to select
the groups tab, then select Add new group
Enter a name for the new group. Then select Options
> Done. Save the group. Then, select the group and
select Add to add contacts.
68016172001_no warranty.fm Page 12 Friday, June 3, 2011 10:10 AM

13Messaging
Messaging
sometimes its best to text or email...
Create & send messages
Find it: > Messaging > Write message
Select text or multimedia message, then use the
keypad to enter your message. Press Options to
insert a picture, sound, or video. When you finish
composing the message, press Options > Send to to
enter phone numbers or select message recipients
from your phonebook. To send the message,
press Options > Send.
Note: If two SIM cards are activated, choose which
SIM card you want to use to send a message.
Receive a message
When you receive a message, your phone plays an
alert and shows at the top of the screen.
To read the new message, select View.
To read messages stored in your inbox, select
> Messaging > Inbox.
68016172001_no warranty.fm Page 13 Friday, June 3, 2011 10:10 AM

14 Messaging
Note: If you can’t send or receive a multimedia
message, check with your service provider. To check
your data account settings, press > Settings
> Connectivity > Data account. To see your
messaging settings, press > Messaging
> Messaging settings > Multimedia message
> Profiles > SIM1/SIM2.
Email
Set up an account
Find it: > Messaging > Email
> Email accounts, select Options > New account
> Yes
The email setup wizard will guide you through setting
up your email account.
Create a new email
Find it: > Messaging > Email > Write Email
Enter the recipient email address and message, then
select Done > Send.
68016172001_no warranty.fm Page 14 Friday, June 3, 2011 10:10 AM

15Web
Web
surf the web with your phone
Note: To use the browser, you must have data service
activated for your account (additional fees may apply
for this service).
Use your phone’s browser to surf your favorite Web
sites, upload videos to a video blog, and download files
and applications to your phone. Log onto your
internet-based email account to check your email.
Find it: > Browser
• To go to your home page, select Homepage.
• To go to a Web page, select Input address.
• To bookmark a Web page, select Bookmarks.
• To go to a link on a Web page, select it.
Note: If you can’t connect, contact your service
provider.
68016172001_no warranty.fm Page 15 Friday, June 3, 2011 10:10 AM

16 Bluetooth™ wireless
Bluetooth™ wireless
lose the wires and go wireless
Turn Bluetooth power on or off
Find it: > Settings > Connectivity
> Bluetooth > Power
When Bluetooth power is on, the Bluetooth
indicator appears in the home screen.
Note: To extend battery life, turn off Bluetooth power
when not in use.
Connect new devices
To connect with a new device, you need to pair with it.
You only need to do this once for each device—to
connect again, see “Reconnect devices” on page 17.
1 Make sure the device you are pairing with is in
discoverable mode (see device instructions).
2 Select > Settings > Connectivity
> Bluetooth > Power ON > Search audio device.
3 Your phone lists the devices it finds within range.
Select a device to connect.
4 If necessary, enter the device passkey (like 0000) to
connect to the device.
68016172001_no warranty.fm Page 16 Friday, June 3, 2011 10:10 AM

17Bluetooth™ wireless
Tip: For specific information about a device, check the
instructions that came with it. For more Bluetooth
support, go to www.motorola.com/Bluetoothsupport
.
For maximum Bluetooth security, always connect
Bluetooth devices in a safe, private environment.
Note: Using a mobile device or accessory while
driving may cause distraction and may be illegal.
Always obey the laws and drive safely.
Reconnect devices
To automatically reconnect your phone with a paired
device, simply turn on the device.
To manually reconnect your phone with a paired
device, select the device name in the My device list.
Disconnect devices
To automatically disconnect your phone from a
paired device, simply turn off the device.
To manually disconnect your phone from a paired
device, select the device name in the My device list.
68016172001_no warranty.fm Page 17 Friday, June 3, 2011 10:10 AM

18 Manage your life
Manage your life
stay on top of things
Calendar
Find it: > Tools > Calendar
To view your calendar in different ways select Options
> Jump to date, or Go to weekly view.
Add calendar events
From any calendar view, select Options > Add event
and select the event type. Enter event details and
select Done > Yes.
Edit calendar events
To edit an event, select Options > View > Option
> Edit. Edit event details, then select Done > Yes.
Tasks
Find it: > Tools > Tasks
To add a task, select Add.
Alarm
Find it: > Tools > Alarm
To turn on an alarm, select one, scroll to On and select
Done.
68016172001_no warranty.fm Page 18 Friday, June 3, 2011 10:10 AM
/