Page is loading ...

Braketronic
™
Mondel Braketronic Instruction Manual
Part Number: 140-10292-R1
February 2006
© Copyright 2006 Magnetek Material Handling

SUPPLEMENTS FORMING PART OF THIS MANUAL:
DATE OF MANUFACTURE:
APPLICABLE DIMENSION PRINT:
EXPLODED VIEW:
PARTS LIST:
6/7/2006 Page 2 of 20 Braketronic Instruction Manual
140-10292-R1
Installation and Maintenance
Instructions
Braketronic

Table of Contents
Chapter 1.0: Braketronic Warnings and Cautions...............................................................................4
Chapter 2.0: General Description........................................................................................................5
Chapter 3.0: Installation ....................................................................................................................10
Chapter 4.0: Electrical Connections..................................................................................................11
Chapter 5.0: Operational Test...........................................................................................................12
Chapter 6.0: Parameter Settings / Timing Charts.............................................................................13
Chapter 7.0: Servicing.......................................................................................................................19
6/7/2006 Page 3 of 20 Braketronic Instruction Manual
140-10292-R1
Chapter 8.0: Long Term Storage.......................................................................................................20

Chapter 1.0: Braketronic Warnings and Cautions
Read and Understand All Warnings And Notices Printed In This Manual Before Commencing
Installation, Adjustment Or Repair.
Anyone involved in the installation or service of this brake must have:
• Received specific training.
• Had experience on similar equipment.
• Knowledge of the equipment on which the brake is installed.
• The ability to understand the terminology.
• The ability to understand the diagrams.
Do not proceed unless technically qualified for the work involved.
Chapter 4.0: ELECTRICAL CONNECTIONS – Warnings and Cautions
Unexpected movement or hazardous voltage can cause injury or death. Disconnect,
lock out, and tag out the power source that feeds this device to prevent power from being applied
while work is carried out.
Before working on a Braketronic system, ensure that power has been disconnected for at least 3
minutes. Internal capacitors hold a charge and hazardous voltages remain present at terminals
and components up to 3 minutes after power is turned off.
Do not connect power directly to terminals T1, T2 and T3 under any circumstances.
Chapter 5.0: OPERATIONAL TEST – Warnings and Cautions
Review and verify the following checklist before switching on the power source feeding this
system:
• Components are as supplied by the factory.
• Writing is correct per relevant diagram.
• Enclosures are grounded in accordance with local electrical codes.
• Power supply is within the specified range, and the correct voltage/polarity is available at
the power supply input terminals.
• Brake adjustments are complete in accordance with the relevant brake instruction manual.
Before conducting an operational test, remove all tools, chocks and other equipment which may
create a hazard when the machine is operating.
6/7/2006 Page 4 of 20 Braketronic Instruction Manual
140-10292-R1
Before attempting to operate any motion in any application, advise and account for the location
and security of all personnel involved.

Chapter 2.0: General Description
2.1: The Braketronic system provides a means of varying the braking torque developed by spring
applied, thruster released, shoe and disk brakes.
2.2: Single, or multiple, brakes may be operated in parallel from one Braketronic Controller.
2.3: Braking torque modulation is achieved by either of the following methods:
2.3.(a): Continuous variation controlled by external means, (usually a pedal operated
potentiometer).
2.3.(b): Preset rate variation controlled by an internally generated ramp signal.
2.4: Control of torque is achieved by modulating the electrical supply voltage and frequency to the
thruster pump motor. This varies the speed of the pump impeller and thus the pressure and volume
of hydraulic fluid delivered to the thruster piston.
2.5: The thruster piston extends offsetting the torque spring force applied to the brake shoes as follows:
2.5.(a): Maximum frequency & voltage supplied to the thruster produce full motor speed with
maximum pump output. Piston output will overcome torque-spring force and move the shoes away
from the brake wheel; braking torque falls to zero and shoe clearance reaches its maximum .
2.5.(b): Thruster piston output force varies with pump motor speed. As pump speed and piston
force decrease, the torque-spring force available to the brake shoes increases. This allows the
shoes to close on the brake wheel. Braking torque develops and increases as thruster pump output
decreases.
2.5.(c): Maximum brake torque is generated as motor and pump speed fall to the level at which the
thruster piston is no longer able to offset torque-spring force.
NOTE: Interruption of power to the thruster produces the maximum available braking
torque.
2.6: When using the pedal, or similar remote control and all conditions for operation are met, the output
voltage and frequency produced by the Braketronic controller will vary, depending upon the position
of the pedal, as follows:
2.6.(a): With the pedal released (OFF), the Braketronic supplies rated voltage and frequency to the
thruster motor. The motor will run at its rated RPM to fully release the brake.
2.6.(b): When foot pressure is applied to the pedal, and internal switch trips after the pedal leaves
the released (OFF) position. This switch signal causes the controller output to decrease, at a
preset ramp rate, quickly moving the shoes into light “kiss” contact with the brake wheel.
2.6.(c): As pressure on the pedal increases, a potentiometer arranged to sense pedal position,
adjusts the controller to produce a gradual increase in braking torque.
2.6.(d): When the pedal is fully depressed, the controller output continues to decrease to the point
where the thruster is unable to offset any torque spring force and maximum braking torque is
produced.
6/7/2006 Page 5 of 20 Braketronic Instruction Manual
140-10292-R1
2.6.(e): A small decrease in pedal pressure changes the position of the controller potentiometer,
producing an increase in controller output which increases the thruster motor RPM. The thruster
motor speed increase acts to offset torque spring force and decrease the braking torque.

2.6.(f): When pressure on the foot pedal is completely removed, the internal switch resets to
produce maximum controller output and quickly move the shoes clear of the wheel.
Note: When circumstances permit, ramp rate parameters are factory set for operation
with a specified brake, or brakes. However, a digital operator is supplied with each
Braketronic controller to allow on-site modification of any parameter.
2.7: “Wireless Remote Control”, (supplied by others), can be used to regulate the output of a
Braketronic controller. Braking characteristics are similar to those offered by the pedal operator
while allowing the operator considerable mobility. Operation is generally as follows:
2.7.(a): When the wireless “Brake Master Switch” is not operated, the Braketronic unit supplies
rated voltage and frequency to the thruster motor, and fully releases the brake.
2.7.(b): Initial movement of the “Brake Master Switch” activates a primary relay. This sets the
controller output to a value that quickly moves the shoes into light “kiss” contact with the brake
wheel.
2.7.(c): Advancing the “Brake Master Switch” to nearly full travel, produces a continued, but
slower, decrease in controller output with a corresponding increase in brake torque.
2.7.(d): When the “Brake Master Switch” reaches full travel, controller output continues to
decrease to the point where the thruster is unable to offset any torque spring force and maximum
braking torque is produced.
2.7.(e): Gradually allowing the “Brake Master Switch” to return to its starting position increases
controller output and thruster motor RPM. The thruster motor speed increase acts to offset torque
spring force and decrease the braking torque.
2.7.(f): When the “Brake Master Switch” returns to its starting position, the primary relay releases
to produce maximum controller output and quickly move the shoes clear of the wheel.
2.8: Pre-programmed “Fixed Rate Ramp Control” is available as an alternative to variable rate
braking. With “Fixed Rate Ramp Control”, the controller produces an output whose voltage and
frequency emulate pedal operation.
Ramp function parameters are factory pre-programmed, but can be modified onsite
using the digital operator provided with each Braketronic Controller.
2.8.(a): Ramp operation is initiated by closing a voltage free contact. This causes the output
frequency and voltage of the controller to decrease relatively quickly moving the shoes into light
“kiss” contact with the brake wheel.
2.8.(b): As soon as the “kiss” stage is reached, controller output decreases more slowly to produce
a ramp controlled increase in braking torque. At the end of this ramp period, controller output
decreases to the point where the thruster is unable to offset torque spring force to produce
maximum attainable torque.
6/7/2006 Page 6 of 20 Braketronic Instruction Manual
140-10292-R1
2.8.(c): Opening the voltage-free contact, signals the Braketronic output to increase at the
predetermined ramp rate(s). The frequency and voltage will ramp to maximum and the brake will
return to the fully released state. The brake will remain released until “Ramp Control” mode is
selected and the voltage free ramp initiation contact closes, or power to the Braketronic system is
interrupted.

2.9: Pedal Unit
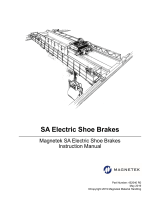
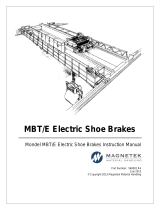
2.9.(a): Figure 2 and 3 show the standard foot pedal units. It consists of a floor mounted, NEMA 4,
cast aluminum enclosure containing 3 switches and a potentiometer. The pedal drives the
potentiometer via a gear set and the switches via independently adjustable cams.
6/7/2006 Page 7 of 20 Braketronic Instruction Manual
140-10292-R1
Do you require more information? Contact Magnetek at 1-800-288-8178

Figure 2
Standard Duty Foot Pedal
6/7/2006 Page 8 of 20 Braketronic Instruction Manual
140-10292-R1

Figure 3
Mill Duty Foot Pedal
6/7/2006 Page 9 of 20 Braketronic Instruction Manual
140-10292-R1

Chapter 3.0: Installation
3.0.(a): These notes form part of the scope of supply for Braketronic systems when used with
Mondel spring applied, thruster released brakes. These notes are valid only when the equipment
is installed in accordance with drawings and supporting documentation specific to the equipment.
3.0.(b): Magnetek will not be responsible for modifications made by others, after this equipment
leaves the factory, unless prior written authorization has been obtained from Magnetek.
3.0.(c): Based on data furnished to us by the purchaser or his agents, Magnetek will adjust and
calibrate Braketronic controllers to suit specific brake applications.
3.0.(d): The installer is responsible for compliance with all relevant safety codes and regulations.
3.1: Locating the Braketronic controller
3.1.(a): Mount the control enclosure with the hinge vertical to ensure the effectiveness of internal
cooling fins.
3.1.(b): Allow 4” minimum clearance all around the enclosure for ventilation. Protect from
unreasonable amounts of dust, grease, liquids or gases.
6/7/2006 Page 10 of 20 Braketronic Instruction Manual
140-10292-R1
3.1.(c): Mount in a shaded location out of direct sunlight, and provide radiant heat shielding,
where necessary, to protect the temperature-sensitive components.

Chapter 4.0: Electrical Connections
4.0.(a): Wiring diagrams specific to the Braketronic Controller are shipped with each unit.
External (user) connections are shown on sheet 1 of 2.
4.1: Power Supply Connections
4.1.(a): Select appropriate conductor size, insulation, jacket and branch circuit protection in
accordance with local electrical codes. Connect power only to the power supply terminals as
shown on the wiring diagram. Verify polarity when a direct current supply is specified.
4.1.(b): Internal fuses or circuit breakers, suitable for the application, are provided. The
fuse/breaker rating is shown on the wiring diagram.
4.1.(c): A ground stud is provided on the sub-panel to receive all connections from power line
protective ground wire conductors.
4.1.(d): External electrical wiring must be connected only at the terminal block; wiring diagrams
will show connection details.
4.1.(e): Conduit/cable entries must be located in the bottom face of the enclosure to minimize
moisture entry. Use separate conduits for power line input and control wiring.
4.1.(f): Ground all enclosures and components as required by local electrical codes.
4.2: Power Connection To The Brake Thruster
4.2.(a): Select appropriate conductor size, insulation and jacket in accordance with local
electrical codes. Specific electrical characteristics will be found on the Thruster nameplate. Use
a separate conduit to connect from the brake thruster terminals to terminals on the controller.
Shielded conductors are unnecessary under most conditions, however output cable runs
exceeding 150 feet, require motor line reactors to be installed. For information concerning
unusual operating conditions Contact Magnetek at 1-800-288-8178.
4.3: Control Connection
6/7/2006 Page 11 of 20 Braketronic Instruction Manual
140-10292-R1
4.3.(a): The control lines (16 to 20 AWG., low voltage 0 – 15VDC) between the controller and
the pedal unit or any other remote control devices, must be shielded. Ground the control
conductor shields only at the Braketronic terminal block. Run the control wiring in a separate
conduit containing no other circuits.

Chapter 5.0: Operational Test
5.1: Comply with the owners’ safety procedures and heed all warnings and cautions, both in the
BRAKETRONIC and BRAKE instruction manuals.
5.2: Follow all standards and local statues.
5.3: As a preliminary test, operate the brake system without load and proceed as follows:
5.4: Pedal Controlled Variable Torque
5.4.(a): Switch on the power supply to the Braketronic unit. The brake must quickly release the
load.
5.4.(b): Without delay, apply light pressure to the brake pedal; the shoes should quickly move
into light “kiss” contact with brake wheel.
5.4.(c): Apply more force to the pedal; braking torque will increase as shoe pressure on the
brake wheel increases.
5.4.(d): Just before the pedal reaches its fully depressed position maximum brake shoe to wheel
pressure is achieved; full torque is developed to hold the load stationary.
5.4.(e): If the brake fails to respond as above, repair or re-adjust the brake as necessary.
Visually inspect the brake during operation to ensure all adjustments are correct. If successful,
continue with longer duration tests until confident that the brake and Braketronic system is
operating satisfactorily.
5.5: Ramp Controlled Torque, Optional Feature
5.5.(a): Switch on the power supply to the Braketronic unit. The brake must quickly release the
load.
5.5.(b): Initiate the ramp signal contact; the shoes should move quickly into light “kiss” contact
with the brake wheel.
5.5.(c): After the “kiss” contact stage is reached, shoe movement slows and increases pressure
to the wheel; braking torque rises as shoe pressure on the brake wheel increases.
5.5.(d): The time taken from ramp contact initiation to the development of full torque is
determined by the duration of the ramp signal.
5.5.(e): When the ramp signal duration times out, the controller output decreases to produce
maximum brake shoe to wheel pressure; full torque is developed to hold the load stationary.
5.5.(f): If the brake fails to respond as above, repair or re-adjust the brake as necessary. Visually
inspect the brake during operation to ensure all adjustments are correct. If successful, continue
with longer duration tests until confident that the brake and Braketronic system is operating
6/7/2006 Page 12 of 20 Braketronic Instruction Manual
140-10292-R1
satisfactorily.

Chapter 6.0: Parameter Settings / Timing Charts
6/7/2006 Page 13 of 20 Braketronic Instruction Manual
140-10292-R1
PARAMETER SETTINGS FOR IMPULSE G+ DRIVE
230/460/575VAC BRAKETRONIC APPLICATIONS
CAB RADIO PARAMETER
PARAMETER DESCRIPTION
SETTING SETTING DESCRIPTION
A1-03 Parameter set to match motion of the application
0 Decelerate motor to stop upon removal of run command
A1-04 Parameter set to define input terminals
5 2-SPD Multi-Step - Defines terminal 3 as 2nd Speed Reference (60 Hz)
B1-10 Parameter set to select reference terminal
1 Higher reference automatically selects the fastest input frequency
B5-01 Acceleration time setting - time from brake set to fully open
1 Time for brake to release to full open is set to 1 second
B5-02 Deleration time setting - time from fully open to brake set
1 Time for brake to set from full release is set to 1 second
D8-03 Dwell frequency at stop
30* Determines braking torque level, factory set to 30 Hz
D8-04 Dwell time at stop
10** Time brake is held at torque level set by D8-03
D9-01 S-Curve characteristic
0 Acceleration at start is set to 0 seconds
D9-02 S-Curve characteristic
0 Acceleration at end is set to 0 seconds
D9-03 S-Curve characteristic
0 Deceleration at end is set to 0 seconds
H1-05 Multi-Function inputs - Terminal 7
4C Dwell function enable/disable
H3-02 Auto speed reference signal gain - Cab Kiss Frequency Setting
75 Cab Kiss Frequency gain is 75%
H3-03 Bias multiplier for terminal 13 analog input signal - Min frequency of thruster
33.3 Minimum thruster frequency is 33.3% of D1-03
O2-10 Run at power-up - drive protection
1 Enabled - allows drive to start running immediately upon power-up
- Do not change paramete
r
* - Adjust lower for greater braking torque
** - Set time to the time from full speed to stop
XX
XX
XX
XX
XX
X
X
XX
XX
XX
X
X
X
XX

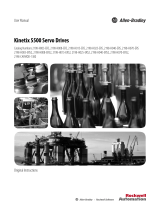
Timing Charts
Impulse G+ Drive – Cab Control
6/7/2006 Page 14 of 20 Braketronic Instruction Manual
140-10292-R1

Impulse G+ Drive – Radio Control
6/7/2006 Page 15 of 20 Braketronic Instruction Manual
140-10292-R1

6/7/2006 Page 16 of 20 Braketronic Instruction Manual
140-10292-R1
PARAMETER SETTINGS FOR YASKAWA G5 DRIVE
230VDC BRAKETRONIC APPLICATIONS
CAB RADIO PARAMETER
PARAMETER DESCRIPTION
SETTING SETTING DESCRIPTION
A1-01 Setting determines which parameters are accessible
4 Allow access to advanced programming parameters
A1-02 Determines method of control
0 V/f Control Method
B6-03 Dwell frequency at stop
30* Determines braking torque level, factory set to 30 Hz
B6-04 Dwell time at stop
10** Time brake is held at torque level set by B6-03
C1-01 Acceleration time (1) - Brake release time
0.3 Time for brake to release to full open is 0.3 seconds
C1-02 Deceleration time (1) - Approx time from Full-On to Kiss Frequency is 0.3 sec.
0.3 Decel time from 60 Hz to Kiss Frequency is 0.3 seconds
C1-03 Acceleration time (2) - Brake release time when frequency is below L4-01
0.3 Time for brake to release to full open from frequency below 50 Hz is 0.3 sec.
C1-04 Deceration Time (2) - Approx elapsed time to full brake torque
20 Time for brake achieve full braking torque from full release is 20 seconds
D1-03 Frequency reference (3) - Full release frequency
60 Brake is fully release at 60 Hz
H1-05 Multi-Function input - (Terminal 7)
7 Activates the C1-04 Decel (2) Parameter
H2-01 Multi-Function output (Terminal 9 & 10)
4 Activates Acel (2) and Decel (2) Parameters
H3-02 Auto speed reference signal gain - Cab Kiss Frequency Setting
75 Cab Kiss Frequency is 75% of 60 Hz
H3-03 Bias multiplier for terminal 13 analog input signal - Min frequency of thruster
33.3 Minimum thruster frequency is 33.3% of D1-03 (20 Hz)
L2-01 Momentary power loss detection setting - provides voltage sag protection
1 Activates power loss ride through
L2-02 Momentary power loss time setting - provides drive protection
2 Drive will ride through a power loss for 2 seconds
L2-05 Under-Voltage detection - prevents nusience falts
151 Under voltage dection setting is 151 Volts
L4-01 When the frequency drops below this level, Alt Acel/Decel are enabled
50 Alt Acel/Decel enabled below 50Hz
- Do not change paramete
r
* - Adjust lower for greater braking torque
** - Set time to the time from full speed to stop
X
XX
XX
X
XX
X
X
XX
X
X
X
XX
XX
X
X
XX
XX

Timing Charts
Yaskawa G5 Drive – Cab Control
6/7/2006 Page 17 of 20 Braketronic Instruction Manual
140-10292-R1

Yaskawa G5 Drive – Radio Control
6/7/2006 Page 18 of 20 Braketronic Instruction Manual
140-10292-R1

Chapter 7.0: Servicing
6.0.(a): Maintain cleanliness and ensure that all covers and doors are sealed to exclude dirt.
6/7/2006 Page 19 of 20 Braketronic Instruction Manual
140-10292-R1
6.0.(b): Parameter adjustments and trouble shooting guidelines for the integral solid state drive
are beyond the scope of this publication. Refer to the Technical Manual supplied with the
Braketronic system for related information.

Chapter 8.0: Long Term Storage
6/7/2006 Page 20 of 20 Braketronic Instruction Manual
140-10292-R1
7.1: If the equipment will not be installed immediately, it can be stored indoors in a dry location
indefinitely or outdoors for a reasonable time if adequately protected from moisture and
corrosive atmosphere. The equipment must always be protected from direct exposure to the
elements unless specifically treated at the factory for use in that environment. Covering with
plastic sheeting is not acceptable unless provision is made to prevent condensation under the
plastic.
/