Page is loading ...

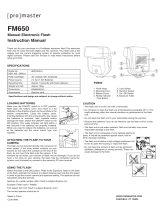
LOADING BATTERIES
Make sure the ON/OFF switch is in OFF position. Slide open the battery
cover and insert 4 x AA batteries in the direction shown by the symbols in
the battery compartment. Close the battery cover. Inserting batteries with
the wrong polarity may cause the batteries to overheat, leak, explode
and/or damage the flash. Switch the ON/OFF switch to the ON position.
The ready indicator will light within a few seconds if the batteries are
properly installed. When you need to replace the batteries, be sure all of
the batteries are the same brand, type and capacity.
ATTACHING THE FLASH TO YOUR CAMERA
Loosen the lock ring. Slide the flash into camera accessory shoe. Tighten
the flash with the lock ring. If hot shoe socket contacts on your camera do
not match the contacts on the foot of the flash, do not mount the flash
onto the camera. If the contacts do not match, your camera or flash may
be damaged. If you do not have a hot shoe on your camera, the flash
may be connected using the synchro cord (included) to connect to the
camera’s PC sync terminal.
REMOVING THE FLASH
Loosen the lock ring and slide the flash off of the hot shoe.
ON/OFF SWITCH AND FLASH TEST OPERATION
Slide the ON/OFF switch to ON position. After a few seconds the Ready lamp should glow indicating that the
flash is ready to shoot. Press the TEST key to make sure that your flash works properly. If the flash
discharges, wait until the Ready lamp glows again.
OPERATING THE FLASH
Mount the flash onto your camera. Switch on the flash. Make sure that your flash is not in the slave mode
(See the section Slave Mode). Select the appropriate output power using the MODE key (See the section
Power Ratio) on the back of the flash. When the flash ready light glows, press the camera shutter button.
The flash should fire. You should set your camera according to the settings indicated on the flash’s LCD. By
choosing the film speed (in ISO measurement) and aperture value (f/stop) using the ISO key and the
F/STOP key on the back of the flash, you will get the correct flash to subject distance for proper exposure.
LCD PANEL BACK LIGHT
You can switch on the back light of the LCD panel by pressing the LIGHT button. Every time the “LIGHT” key
is pressed, the LCD display will be illuminated for about 5 seconds.
POWER RATIO
Push the MODE key until a “M” symbol shows on the LCD. Then press the SET key to choose the output
power. The setting will change in the following sequence: M 1/1 (Full Power)
M 1/2
M 1/4
M 1/8
M 1/16
M 1/32
M 1/1
AUTO APERTURE
This flash is equipped with an Auto Aperture function. There are 5 auto aperture settings f/2.0, f/2.8, f/4.0,
f/5.6, f/8.0 available for use. Note that the aperture settings of both the camera and the flash must be the
same. For example, when the camera is set at ISO100 and the aperture set at f4.0, the flash has to be set
to an aperture of f4.0 so that your photos are exposed correctly. Within the effective range, the flash will
automatically control the correct amount of light output. The OK Indicator will light when the pictures are
correctly exposed.
You can choose the auto aperture mode as follows:
(1) Press the MODE key until an “A” symbol shows up at the bottom right of the LCD.
(2) Then press the SET key. The auto aperture value will change in the following sequence: A F2.0
A F2.8
A F4.0
A F5.6
A F8.0
A F2.0. Choose the appropriate value that suits your need.
OK INDICATOR
The green OK indicator shows you whether the flash is giving the correct amount of light output in the manual
(at output 1/2, 1/4, 1/8, 1/16, and 1/32), auto aperture, and slave modes. It will light after you have triggered
the flash when the flash output is correct.
POWER SAVE FUNCTION
In order to conserve battery life, the flash switches to the power save mode automatically after being idle for
approximately 3 minutes when in the manual or auto aperture mode. The “OFF” sign will appear on the LCD.
The Ready light will be off in the power save mode. To reactivate the flash, simply press any button below
the LCD or turn the flash off and on. The flash is not completely powered down in power save mode, however
power consumption is drastically reduced. If you are not going to use your flash for an extended period of
time, we recommend you to turn the flash off.
DC POWER SOCKET
This flash comes with a DC power socket so you can power the flash by an external DC power supply or the
AC-DC power adapter provided.
SLAVE MODES
10 slave modes are available for users to choose from when the flash is set to fire using the optical slave mode.
To use the slave mode, you first press the MODE key until a “S” symbol shows on the LCD. Then press the
SET key to select the desired slave mode in the following sequence:
Mode 0 (S0)
Mode 1 (S1)
Mode 2 (S2)
Mode 3 (S3)
Mode 4 (S4)
Mode 5 (S5)
Mode 6 (S6)
Mode 7 (S7)
Mode 8 (S8)
Mode 9 (S9)
back to Mode 0 (S0)
The slave modes work as followings:
S0 - the flash fires at once when triggered by an external strobe light source.
S1 - the flash skips 1 flash and fires when it detects the 2nd flash.
S2 - the flash skips 2 flashes and fires when it detects the 3rd flash.
Etc., up to
S8 - the flash skips 8 flashes and fires when it detects the 9th flash.
S9 - the flash skips 9 flashes and fires when it detects the 10th flash.
The power output in the slave mode depends on what Manual Power or Auto Aperture setting you have
previously selected on the flash.
(1) If you previously selected M1/1 (full power) and then switch the flash to slave mode, the flash will fire a 1/1
power. If you previously selected M1/8 and then switch the flash to slave mode, the flash will fire at 1/8 power.
(2) If have selected the Auto Aperture function and then you switch the flash to slave mode, the flash will fire
full power.
SYNCHRONIZING THE FLASH THRU MINIPHONE JACK (CAMERA X-SYNC)
SOCKET OR THE OPTICAL SLAVE SENSOR
This flash can be fired from your camera’s hotshoe, or thru the miniphone jack (camera x-sync) socket, or as
a slave unit utilizing the built-in optical slave.
INSTANTLY SYNCHRONIZE THE FLASH THRU THE MINIPHONE JACK (CAMERA
X-SYNC) SOCKET
Set the flash to manual or auto aperture mode. Connect an external device (e.g. camera) to this flash’s
miniphone jack (camera x-sync) socket using the supplied PC-Miniphone synchro cable. The external device
can then control the firing of the flash.
FIRE THE FLASH USING OPTICAL SLAVE
You can use an external strobe light source to trigger the flash. Select the appropriate slave mode as described
in the section “SLAVE MODE”. The flash will detect the flash from a secondary source and fire according to
your settings. Many modern flashes have a pre-trigger function which emits several pre-flashes before the
main flash to obtain correct TTL metering or reduce red-eye. You will need to know the number of pre-flashes
your camera emits and then set the flash unit to a slave mode that allows you to skip all the pre-flashes from
the transmitting flash to obtain proper exposure. The built-in optical slave is very sensitive to strobe light, but
for increased sensitivity, swivel the flash base so the optical slave is facing your triggering light source.
INTERCONNECTING MULTIPLE FLASH UNITS FOR CREATIVE LIGHTING
If you have multiple DSS6000 flash units you can use these flashes as follows to create many different lighting
effects for your scene:
(1) Connect a wireless radio receiver to the miniphone jack socket of Flash A and link this flash to the
miniphone jack socket of Flash B by a PC-Miniphone cable. Then the two connected flashes can be triggered
by your radio device.
(2) Connect a camera, Flash A, and Flash B using PC-miniphone cables. A flash chain is created here with the
camera as the triggering device. Both flashes will fire simultaneously when the camera’s shutter is pressed.
You can daisy chain as many pieces of this flash as you like to create the lighting effect
you need for your scene.
BOUNCE AND SWIVEL FLASH
This flash’s head can be tilted to an angle of 45o, 60o, 75o, or 90o and rotated
horizontially 180o to the left and 90o to the right. You can also tilt or rotate the flash
head to bounce the light off the ceiling or walls. While shooting indoors, this technique
can help to create more natural-looking pictures of people with softer shadows.
In order to have your pictures correctly exposed using bounce or swivel flash, we offer
the following recommendations:
(1) Select white or reflective surfaces to bounce the light off, or your pictures will come
with an unnatural color cast similar to that of the reflecting surface.
(2) Use a wider aperture, as 2 or 3 stops of light can be lost when using indirect flash
ZOOM HEAD
The zoom flash head covers focal lengths of 28-35-50-85mm in four stops. To choose
these positions, simply pull or push the flash head. The zoom position will be shown
on the LCD. Make sure that the flash is set to a focal length equal to or wider than the
camera lens’ focal length to assure proper coverage.
CAUTION
• This flash unit is not for use with a camcorder.
• Do not leave or store the flash unit at temperature exceeding 40oC. This might
adversely affect the internal structure or performance of the flash unit. Do not leave
the flash unit in your automobile during the summer.
• Remove the batteries if you do not intend to use the flash unit for a long period of time.
• The flash unit is not water-resistant. Rain and humidity may cause irreparable damage to the flash.
• The flash unit is composed of very delicate electronic parts. It should be protected against shock, falls or
other improper handling.
• The flash unit contains a high voltage condenser. Do not try to open the housing or repair the flash.
• Do not clean the surface of flash unit by petroleum distillates, detergents or strong solvents. These can
cause damage to the flash.
0
°
30
°
°
09
°
021
°
051
°
180
°
09
°
°
30
°
60
60
0°
90°
75°
60°
45°
USE OF WIDE ANGLE DIFFUSER
F/STOPMODE SET
LIGHTISO
OK READY
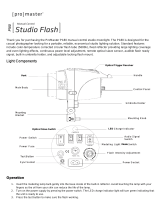
DSS6000
Digital Studio Slave Flash
Instruction Manual
Zoom Head
Lock Ring
Mounting Foot
Bounce Angle
Indication
ISO Button
Ready Light
OK Light
3.5mm Miniphone Jack Socket
/Camera X-Sync
(External Signal Input)
Power ON/OFF
Switch
LCD Panel
LIGHT Button
SET Button
F/STOP Button
Battery Cabinet
PC Socket
(Signal
Output)
DC Power
Socket
MODE Button
Zoom Position
O
K
M
O
D
E
F
/
S
T
O
P
S
E
T
I
S
O
L
I
G
H
T
28
45
o
60
o
75
o
Test Button
Thank you for your purchase of a ProMaster electronic
flash.This electronic flash may be used with both digital and
film cameras. Your flash uses a low voltage and low current
triggering system to provide protection for most digital
cameras. Please take few minutes to read these instructions
before using your flash.
Guide No. (ISO100 / DIN21) @85mm 148ft/45m
Flash Head Zoom Position 28-35-50-85mm
Bounce Angle 0
o
, 45
o
, 60
o
, 75
o
, 90
o
Swivel Angle Right 0
o
- 90
o
; Left 0
o
-180
o
Power Ratio 1/1, 1/2, 1/4, 1/8, 1/16, 1/32
Auto Aperture f/2.0, f/2.8, f/4.0, f/5.6, f/8.0
Built-in Slave Function S0-S9
Power Source Four 1.5V AA size batteries
Flash Duration 1/500-1/30000 sec.
Recycling Time 0.3-7 sec. with fresh batteries
Dimensions 72 (W) x 132 (H) x 102 (D) mm
Weight w/o Battery 270g
Accessories 2m Miniphone-PC Synchro cord X 2;
Flash Stand; Pouch; AC-DC Power Adapter
Wide Angle Diffuser and Reflecting Panel
Specifications and design are subjecct to change without notice.
SPECIFICATIONS
Code 9097 Made in China www.promaster.com • Fairfield, CT 06825
/