1
Model / Modelo / Modelé: WDB20Y0W
DRYER STACKING RACK
SOPORTE PARA SECADORA DE ROPA
ÉTAGÈRE D'EMPILEMENT DE SÉCHOIR
INSTRUCTION MANUAL
MANUAL DE INSTRUCCIONES
MANUEL D’INSTRUCTIONS
BEFORE USE, PLEASE READ AND FOLLOW ALL SAFETY RULES AND OPERATING
INSTRUCTIONS.
Avanti has a policy of continuous improvement on its products and reserves
the right to change materials and specifications without notice.
Avanti Products LLC
P.O. Box 520604
Miami, FL 33152
www.avantiproducts.com

2
Before beginning to assemble this product, review and ensure that you have received all the parts as
listed / shown below:
** Part I: 2 additional pieces are supplied as spares.
Components Included
Part Code:
Description
Quantity
A
Bottom Support Frame
1
B
Middle Support Frame
1
C
Top Shelf
1
D
Rear Leg (Bottom section)
2
E
Rear Leg (Top section)
2
F
Front Leg (Bottom section)
2
G
Anti-Tip Safety Bracket (Part 1 of 2)
2
H
Anti-Tip Safety Bracket (Part 2 of 2)
2
I
Shelf / Frame Support Clips
30**
J
Spanner Wrench
1
K
Nut (For Anti-Tip Safety Bracket Assembly)
2
L
Wall Anchor
2
M
Phillips Head Self-Tapping Screw
2
N
Phillips Head Metal Screw (For Anti-Tip Safety Bracket
Assembly)
2
O
Logo / Support Bar
1
P
Front Leg (Top section)
2

3
Assembled Dimensions

4
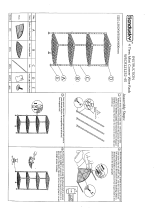
Your Washer / Dryer Stacking Rack is designed to accommodate both top loading or front loading
washing machines. Follow the assembly instructions below to assemble the Rack to fit your specific
washing machine type. Images shown in this instruction guide are for assembly for use with a TOP-Load
washer.
Step 1: Assembling the legs:
When using with a TOP- Load washer.
• Assemble the rear legs by screwing together all two sections of the
rear leg.
Part D – Rear Leg (Bottom section)
Part E –Rear Leg (Top section)
• Assemble the front legs by screwing together all two sections of the
front leg.
Part F – Front Leg (Bottom section)
Part P – Front Leg (Top section)
Step 2: Assembling the Bottom Support Frame.
We suggest that you put the U shaped bottom support frame
(Part A) in a vertical position. As this will allow you to insert
the legs and the Shelf / Frame support clips with ease.
a) Lay the Bottom support frame (Part A) on its back with
each side bar facing upwards.
b) Insert each of the rear legs (assembled in step one)
into the holes at both rear corners of the support
frame.
c) Using the Shelf / Frame support clips (Part I) insert
the plastic tapered clips into the appropriate grooves
on each leg. (See the image).
d) Slightly press the bottom support frame downward on
to the support clips.
e) Insert each of the FRONT legs in the remaining corner
holes of the support frame and repeat Step C.
f) Stand the unit upright to continue the remainder of
this assembly.
g) Press each corner downward firmly to ensure the
support frame is fully locked into position.

5
Step 3: Assembling the Middle Support
Frame and Logo / Support Bar.
The Middle support frame (Part B) MUST be installed to
maintain the stacking Rack square and stable.
a) Using the Shelf / Frame support clips (Part I) insert
the plastic tapered clips into the appropriate
grooves on each leg. (See the image).
b) Align the corner holes of the Middle support
frame (Part B) with each of the legs and gently
lower onto the support clips. Press each corner
downward firmly to ensure the support frame is
fully locked into position.
c) Using the Shelf / Frame support clips (Part I) insert
the plastic tapered clips into the appropriate
grooves on each of the rear legs. (See the image).
d) Align the holes on each end of the LOGO /
Support Bar (Part O) with each of the rear legs
and slightly lower onto the support clips.
Step 4: Assembling the Top Shelf:
a) Using the Shelf / Frame support clips (Part I) insert
the plastic tapered clips into the appropriate
grooves on each of the rear legs. (See the image).
b) Align the holes at each corner of the Top Shelf
(Part C) with each of the legs and gently lower
onto the support clips.

6
Step 5: Installing the Anti-Tip Safety Rack:
a) Attach the Anti-Tip Safety Rack (Parts G and H) to
the Stacking bracket as shown. By joining the two
(2) parts using the Phillips Head Screw and Nut
(Parts K and N).
b) Align the assembled Stacking bracket in place and
mark where the Anti-Tip Safety Rack is to be
attached to the wall.
c) Using the Wall Anchors and Self Tapping Phillips
head screws (Parts L and M) included to attach the
assembled Stacking bracket to the wall.
Step 6: Installing Your Avanti Dryer (Model D110) to the
top shelf.
In order to place your Avanti Dryer (Model D110) on the stacking kit
you must first remove the four (4) leveling legs from the bottom of the
dyer.
a) Place the Dryer on the top shelf.
b) Re-install the four (4) leveling legs previously removed through
the underside of the top shelf and tighten until the dryer is
secure.
Page is loading ...
Page is loading ...
Page is loading ...
Page is loading ...
Page is loading ...
Page is loading ...
Page is loading ...
Page is loading ...
Page is loading ...
Page is loading ...
Page is loading ...
Page is loading ...

19
REGISTRATION INFORMATION
Thank you for purchasing this fine Avanti product. Please fill out this form and return it to the following
address within 100 days from the date of purchase and receive these important benefits:
Avanti Products LLC.
P.O.Box 520604 – Miami, Florida 33152
Ø Protect your product:
We will keep the model number and date of purchase of your new Avanti product on file to help
you refer to this information in the event of an insurance claim such as fire or theft.
Ø Promote better products:
We value your input. Your responses will help us develop products designed to best meet your
future needs.
-------------------------------------------------------(detach here)------------------------------------------------------------
Avanti Registration Card
Name
Model # Serial #
Address
Date Purchased Store / Dealer Name
City State Zip
E-mail Address
Area Code Phone Number
Occupation
Did You Purchase An Additional Warranty
As your Primary Residence, Do You:
£ Extended
£ Own £ Rent
£ None
Your Age:
Reason for Choosing This Avanti Product:
Please indicate the most important factors
That influenced your decision to purchase this
product:
£
under 18
£
18-25
£
26-30
£ 31-35 £ 36-50 £ over 50
Marital Status:
£ Married £ Single
£
Price
£ Product Features
£ Avanti Reputation
£ Product Quality
£ Salesperson Recommendation
£ Other: ___________________
£ Friend / Relative Recommendation
£ Warranty
£ Other: ___________________
Is This Product Used In The:
£ Home £ Business
How Did You Learn About This Product:
£ Advertising
£ In-Store Demo
£ Personal Demo
Comments:

20
WDB20Y0W - 07242018
PRINTED IN CHINA
/