1
INSTRUCTION MANUAL
MANUAL DE INSTRUCCIONES
Model Number/ No. de Modelo: WDB101
CLOTHES DRYER STACKING BRACKET
CAUTION:
BEFORE USE, PLEASE READ AND FOLLOW ALL SAFETY RULES AND OPERATING
INSTRUCTIONS.
Avanti has a policy of continuous improvement on its products and reserves the right to change materials and
specifications without notice.
Avanti Products
P.O. Box 520604 - Miami, Florida 33152
www.avantiproducts.com

2
Beforebeginningtoassemblethisproduct,reviewandensurethatyouhavereceivedallofthepartsas
listed/shownbelow:
**PartI:2additionalpiecesaresuppliedasspares.
ComponentsIncluded
PartCode: Description Quantity
A BottomSupportFrame 1
B MiddleSupportFrame 1
C TopShel
f
1
D RearLeg(Bottomsection) 2
E Front/RearLeg(Topsection) 4
F FrontLeg(Bottomsection) 2
G Anti‐TipSafetyBracket(Part1of2) 2
H Anti‐TipSafetyBracket(Part2of2) 2
I Shelf/FrameSupportClips 30**
J SpannerWrench 1
K Nut(ForAnti‐TipSafetyBracketAssembly) 2
L WallAnchor 2
M PhillipsHeadSel
f
‐TappingScrew 2
N PhillipsHeadMetalScrew (ForAnti‐TipSafetyBracket
Assembly)
2
O Logo/SupportBar 1
P Front/RearLeg(Middlesection) 4
Q PlasticPad
(Notforinstallation.Forpackingprotectiononly)
4

3
AssembledDimensions

4
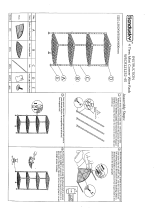
YourWasher/DryerStackingBracketisdesignedtoaccommodatebothtoploadingorfrontloading
washingmachines.Followtheassemblyinstructionsbelowtoassemblethebrackettofityourspecific
washingmachinetype.ImagesshowninthisinstructionguideareforassemblyforusewithaTOP‐Load
washer.
Step1: Assemblingthelegs:
WhenusingwithaTOP‐Loadwasher.
Assembletherearlegsbyscrewingtogetherallthreesectionsofthe
rearleg.
PartD–RearLeg(Bottomsection)
PartP–Front/RearLeg(Middlesection)
PartE–Front/RearLeg(Topsection)
Assemblethefront
legsbyscrewingtogetherallthreesectionsofthe
frontleg.
PartF–FrontLeg(Bottomsection)
PartP–Front/RearLeg(Middlesection)
PartE–Front/RearLeg(Topsection)
WhenusingwithaFRONT‐Loadwasher.
Assembletherearlegsbyscrewingtogether
onlythebottomandtop
sectionsoftherearleg
(PartsD&E).
Assemblethefrontlegsbyscrewingtogetheronlythebottomandtop
sectionsofthefrontleg
(PartsF&E).
Step2:AssemblingtheBottomSupportFrame.
WesuggestthatyouputtheUshapedbottomsupportframe
(PartA)inaverticalposition.Asthisw illallowyoutoinsert
thelegsandtheShelf/Framesupportclipswithease.
a) LaytheBottomsupportframe(PartA)onitsbackwith
eachsidebar
facingupwards.
b) Inserteachoftherearlegs(assembledinstepone)
intotheholesatbothrearcornersofthesupport
frame.
c) UsingtheShelf/Framesupportclips(PartI)insertthe
plastictaperedclipsintotheappropriategrooveson
eachleg.(Seetheimage).
d) Slightly
pressthebottomsupportframedownwardon
tothesupportclips.
e) InserteachoftheFRONTlegsintheremainingcorner
holesofthesupportframeandrepeatStepC.
f) Standtheunituprighttocontinuetheremainderof
thisassembly.
g) Presseachcornerdownwardfirmlyto
ensurethe
supportframeisfullylockedintoposition.

5
Step3:AssemblingtheMiddleSupport
FrameandLogo/SupportBar.
TheMiddlesupportframe(PartB)MUSTbeinstalledto
maintainthestackingbracketsquareandstable.
a) UsingtheShelf/Framesupportclips(PartI)insert
theplastictaperedclipsintotheappropriate
groovesoneachleg.(Seetheimage).
b) AlignthecornerholesoftheMiddle
support
frame(PartB)witheachofthelegsandgently
lowerontothesupportclips.Presseachcorner
downwardfirmlytoensurethesupportframeis
fullylockedintoposition.
c) UsingtheShelf/Framesupportclips(PartI)insert
theplastictaperedclipsintotheappropriate
groovesoneachoftherearlegs.(Seetheimage).
d) AligntheholesoneachendoftheLOGO/Support
Bar(PartO)witheachoftherearlegsandslightly
lowerontothesupportclips.
Step4:AssemblingtheTopShelf:
a) UsingtheShelf/Framesupportclips(PartI)insert
theplastictaperedclipsintotheappropriate
groovesoneachoftherearlegs.(Seetheimage).
b) AligntheholesateachcorneroftheTopShelf
(PartC)witheachofthelegsandgentlylower
onto
thesupportclips.

6
Step5:InstallingtheAnti‐TipSafetyBracket:
a) AttachtheAnti‐TipSafetyBracket(PartsGandH)to
theStackingbracketasshown.Byjo iningthetwo
(2)partsusingthePhillipsHeadScrewandNut
(PartsKandN).
b) AligntheassembledStackingbracketinplaceand
markwheretheAnti‐TipSafety
Bracketistobe
attachedtothewall.
c) UsingtheWallAnchorsandSelfTappingPhillips
headscrews(PartsLandM)includedtoattachthe
assembledStackingbrackettothewall.
Step6:InstallingYourAvantiDryer(ModelD110) tothe
topshelf.
InordertoplaceyourAvantiDryer(ModelD110)onthestackingkityou
mustfirstremovethefour(4)levelinglegsfromthebottomofthedyer.
a) PlacetheDryeronthetopshelf.
b) Re‐installthefour(4)levelinglegspreviouslyremovedthrough
theundersideof
thetopshelfandtightenuntilthedryeris
secure.
/