JVC Speaker RV-NB20W User manual

Category
Home audio sets
Type
User manual

This manual is also suitable for

INSTRUCTIONS
LVT1614-001A
[J]
POWERED WOOFER CD SYSTEM
RV-NB20B/RV-NB20W
For Customer Use:
Enter below the Model No. and Serial No.
which are located either on the rear,
bottom or side of the cabinet. Retain this
information for future reference.
Model No.
Serial No.
RV-NB20[J].book Page 1 Tuesday, August 22, 2006 3:28 PM
G-1
Warnings, Cautions and Others
Mises en garde, précautions et indications diverses
(For U.S.A.)
(For U.S.A.)
CAUTION ON/STANDBY button!
Disconnect the mains plug to shut the power off completely (the
STANDBY lamp goes off). When installing the apparatus, ensure
that the plug is easily accessible. The ON/STANDBY button in
any position does not disconnect the mains line.
When the unit is on standby, the STANDBY lamp lights red.
When the unit is turned on, the STANDBY lamp goes off.
The power can be remote controlled.
ATTENTION
Touche ON/STANDBY!
Déconnectez la fiche secteur pour mettre l’appareil complètement
hors tension (le témoin STANDBY l s’éteint). Lors de l’installation de
l’appareil, assurez-vous que la fiche soit facilement accessible. La
touche ON/STANDBY dans n’importe quelle position ne
déconnecte pas l’appareil du secteur.
Quand l’appareil est en mode d’attente, le témoin STANDBY est
allumé en rouge.
Quand l’appareil est sous tension, le témoin STANDBY s’éteint.
L’alimentation ne peut pas être commandée à distance.
CAUTION
To reduce the risk of electrical shocks, fire, etc.:
1. Do not remove screws, covers or cabinet.
2. Do not expose this appliance to rain or moisture.
ATTENTION
Afin d’éviter tout risque d’électrocution, d’incendie, etc.:
1. Ne pas enlever les vis ni les panneaux et ne pas ouvrir le coffret de
l’appareil.
2. Ne pas exposer l’appareil à la pluie ni à l’humidité.
(For U.S.A.)
The lightning flash with arrowhead symbol,
within an equilateral triangle is intended to
alert the user to the presence of uninsulated
“dangerous voltage” within the product’s
enclosure that may be of sufficient magnitude
to constitute a risk of electric shock to
persons.
The exclamation point within an equilateral
triangle is intended to alert the user to the
presence of important operating and
maintenance (servicing) instructions in the
literature accompanying the appliance.
This equipment has been tested and found to comply with the
limits for a Class B digital device, pursuant to part 15 of the
FCC Rules. These limits are designed to provide reasonable
protection against harmful interference in a residential
installation. This equipment generates, uses, and can radiate
radio frequency energy and, if not installed and used in
accordance with the instructions, may cause harmful
interference to radio communications. However, there is no
guarantee that interference will not occur in a particular
installation. If this equipment does cause harmful interference
to radio or television reception, which can be determined by
turning the equipment off and on, the user is encouraged to try
to correct the interference by one of the following measures:
Reorient or relocate the receiving antenna.
Increase the separation between the equipment and receiver.
Connect the equipment into an outlet on a circuit different from
that to which the receiver is connected.
Consult the dealer or an experienced radio/TV technician for
help.
Caution
Changes or modifications not approved by JVC could void the
user’s authority to operate the equipment.
For Canada/pour le Canada
THIS DIGITAL APPARATUS DOES NOT EXCEED THE
CLASS B LIMITS FOR RADIO NOISE EMISSIONS
FROM DIGITAL APPARATUS AS SET OUT IN THE
INTERFERENCE-CAUSING EQUIPMENT STANDARD
ENTITLED “DIGITAL APPARATUS,” ICES-003 OF THE
DEPARTMENT OF COMMUNICATIONS.
CET APPAREIL NUMERIQUE RESPECTE LES
LIMITES DE BRUITS RADIOELECTRIQUES
APPLICABLES AUX APPAREILS NUMERIQUES DE
CLASSE B PRESCRITES DANS LA NORME SUR LE
MATERIEL BROUILLEUR: “APPAREILS
NUMERIQUES”, NMB-003 EDICTEE PAR LE
MINISTRE DES COMMUNICATIONS.
RV-NB20[J].book Page 1 Tuesday, August 22, 2006 3:28 PM
G-2
IMPORTANT FOR LASER PRODUCTS
1. CLASS 1 LASER PRODUCT
2. CAUTION: Do not open the top cover. There are no user
serviceable parts inside the unit; leave all servicing to qualified
service personnel.
3. CAUTION:
(For U.S.A.) Visible and/or invisible class II laser radiation when
open. Do not stare into beam.
(For Canada) Visible and/or invisible class 1M laser radiation when
open. Do not view directly with optical instruments.
4. REPRODUCTION OF LABEL: CAUTION LABEL, PLACED INSIDE
THE UNIT.
IMPORTANT POUR PRODUITS LASER
1. PRODUIT LASER CLASSE 1
2. ATTENTION: N’ouvrez pas le couvercle supérieur. Il n’y a aucune
pièce réparable par l’utilisateur à l’intérieur de l’appareil; confiez
toute réparation à un personnel qualifié.
3. ATTENTION:
(Pour les Etats-Unis) Radiation laser de classe II visibles et/ou
invisible si l’appareil est ouvert. Ne regardez pas le rayon.
(Pour le Canada) Rayonnement laser visible et/ou invisible de
classe 1M une fois ouvert. Ne pas regarder directement avec des
instruments optiques.
4. REPRODUCTION DE L’ÉTIQUETTE: ÉTIQUETTE DE
PRÉCAUTION PLACÉE À L’INTERIEUR DE L’APPAREIL.
CAUTION:
Do not block the ventilation openings or holes. (If the ventilation
openings or holes are blocked by a newspaper or cloth, etc., the
heat may not be able to get out.)
Do not place any naked flame sources, such as lighted candles,
on the apparatus.
When discarding batteries, environmental problems must be
considered and local rules or laws governing the disposal of
these batteries must be followed strictly.
Do not expose this apparatus to rain, moisture, dripping or
splashing and that no objects filled with liquids, such as vases,
shall be placed on the apparatus.
ATTENTION:
Ne bloquez pas les orifices ou les trous de ventilation. (Si les
orifices ou les trous de ventilation sont bloqués par un journal un
tissu, etc., la chaleur peut ne pas être évacuée correctement de
l’appareil.)
Ne placez aucune source de flamme nue, telle qu’une bougie, sur
l’appareil.
Lors de la mise au rebut des piles, veuillez prendre en
considération les problèmes de l’environnement et suivre
strictement les règles et les lois locales sur la mise au rebut des
piles.
N’exposez pas cet appareil à la pluie, à l’humidité, à un
égouttement ou à des éclaboussures et ne placez pas des objets
remplis de liquide, tels qu’un vase, sur l’appareil.
[European Union Only]
[Union européenne seulement]
RV-NB20[J].book Page 2 Tuesday, August 22, 2006 3:28 PM
1
Thank you for purchasing the JVC Powered Woofer CD System.
Before operating this system, read this manual carefully and thoroughly to obtain the best possible performance from your system, and retain
this manual for future reference.
Here are some of the things that make your system both powerful and simple to use.
General
With JVC’s COMPU PLAY you can turn on the system and start playing the iPod connected to the iPod jack with a
single touch, as well as the radio and disc player. (Only when AC power is used.)
• Shoulder strap with carrying case for the iPod and carrying handle
• Active Clear Sound (ACS) circuit for enhancing sound reproduction
• Super woofer volume control that provides powerful bass
Sound mode control—reproducing various sound fields
Remote control unit that operates the disc, tuner, and iPod functions
• Locking mechanism for disc door
• Microphone/guitar input
With Quick Portable Link (QP Link) function, the system automatically switches the source to AUX when the connected auxiliary
equipment starts to play.
Disc playback mode includes Skip Play, Search Play, Repeat Play, Random Play, and Program Play.
A 45-station preset capability (30 stations in FM band and 15 stations in AM band) in addition to auto-seek and manual tuning.
Clock/timer functions, timer on/off with preset volume function, and sleep timer.
1. Where to place the system
Select a place which is level, dry and neither too hot nor too cold (between 5°C and 35°C or 41°F and 95°F).
Leave sufficient distance between the system and a TV.
Do not use the system in a place subject to vibrations.
2. Power cord
Do not handle the power cord with wet hands!
Some power is always consumed as long as the power cord is connected to the wall outlet.
When unplugging the system from the wall outlet, always pull the plug, not the power cord.
3. When carrying the system
Remove a disc from the system.
Disconnect all the cords from the system.
4. Malfunctions, etc.
There are no user serviceable parts inside. In case of system failure, unplug the power cord and consult your dealer.
Do not insert any foreign object into the system.
The system is not waterproof or dust proof.
Table of contents
Features............................................................................ 1
IMPORTANT CAUTIONS.............................................. 1
Index of parts and controls .................................. 2
Getting started....................................................... 3
Basic operations ................................................... 7
Listening to the radio............................................ 9
Playing back discs ................................................ 10
Listening to the iPod............................................. 13
Listening to auxiliary equipment ......................... 14
Using the microphone/guitar ............................... 15
Using the timer ...................................................... 15
Care and maintenance .......................................... 17
Troubleshooting .................................................... 17
Specifications ........................................................ 18
Features
iPod is a trademark of Apple Computer, Inc., registered in the U.S. and other countries.
IMPORTANT CAUTIONS
RV-NB20[J].book Page 1 Tuesday, August 22, 2006 3:28 PM
2
Index of parts and controls
See pages in parentheses for details.
1 ON/STANDBY button (7)
2 Shoulder strap hooks (4)
3 AUX button (3, 14)
Pressing this button also turns on the system.
4 SOUND button (8)
5 SUPER WOOFER VOLUME +/– control knob (8)
6 LOCK/RELEASE knob (for disc) (10)
7 Disc compartment door (10)
8 VOLUME +/– control knob (7)
9 PRESET TUNING button (9)
p FM MODE button (9)
q ACTIVE CLEAR SOUND button (8)
w iPod jack (6)
e AUX jack (6)
r ACS (Active Clear Sound) indicators (8)
ON, LEVEL
t STANDBY lamp (7)
y Remote sensor (4)
u MULTI CONTROL buttons (9 – 13)
4 (reverse skip), 7, x (forward skip)
i Source and play mode buttons (3, 9 – 13)
•CD 6, iPod 6, FM/AM
Pressing one of these buttons also turns on the system.
Display window
o Timer indicators (16)
(timer), ON, OFF
; SLEEP indicator (15)
a CLOCK indicator (8, 15)
s QP LINK indicator (14)
d iPod indicator (13)
f FM mode indicators (9)
STEREO, MONO
g MP3 indicator (11)
h Repeat indicators (12)
, ALL, GROUP
j Main display
k PRGM (program) indicator (12)
l RANDOM indicator (12)
/ Frequency unit indicators (8, 9)
•kHz, MHz
Display window
How to open the cover
RV-NB20[J].book Page 2 Tuesday, August 22, 2006 3:28 PM
3
See pages in parentheses for details.
1 Number buttons (9, 11)
2 SLEEP button (15)
3 Multi control buttons (9, 11, 15, 16)
GROUP UP, GROUP DOWN
4, 7, x
4 Source buttons (3, 9 – 14)
iPod 6, CD 6, AUX, FM/AM
Pressing one of these buttons also turns on the system.
5 PLAY MODE button (12)
6 REPEAT button (12)
7 SOUND button (8)
8 ACS (Active Clear Sound) button (8)
9 ON/STANDBY button (7, 15, 16)
p DISPLAY button (8)
q CANCEL button (12, 15, 16)
w SET button (10, 15, 16)
e CLOCK/TIMER button (15, 16)
r FM MODE button (9)
t QP LINK button (14)
y MUTING button (8)
u VOLUME +/– button (7)
i SUPER WOOFER VOLUME +/– buttons (8)
With One Touch Operation you can play a disc, an iPod, or turn on the radio with a single press of the play button for that function. The system
turns on and starts playing the source if it is ready.
The COMPU PLAY buttons are: On the system and remote control
iPod 6 button
CD 6 button
AUX button
FM/AM button
Note: The COMPU PLAY feature is not effective when the system is operated on batteries or car battery (DC12V).
Getting started
Check that you have all the following items, which are supplied for the system.
Power cord (1)
Remote control (1)
Shoulder strap with carrying case for the iPod (1)
iPod cable (1)
iPod stand (1)
If any of these items are missing, contact your dealer immediately.
Remote control
COMPU PLAY — One Touch Operation
Accessories
RV-NB20[J].book Page 3 Tuesday, August 22, 2006 3:28 PM
4
Using the carrying handles
Be sure to hold both handles when you carry the system.
If you carry the system by only one handle, because of the length
of the system, the end may drag on the ground and be damaged as a
result.
Do not lift the system by the woofer ducts, and do not insert any
foreign objects into them.
Using the shoulder strap
Attach the supplied shoulder strap (adjustable in length) to each
end of the system as illustrated.
To detach the shoulder strap, press in the metal fitting and unhook
it from the shaft.
Installing the batteries
CAUTION:
To avoid battery leakage or explosion:
Remove batteries when the remote control is not in use for an
extended period of time.
When you need to replace the batteries, replace both batteries at
the same time with new ones.
Do not use different types of batteries together.
Point the remote control at the remote sensor on the system’s
control panel (from a distance of up to 7 m or 23 feet). If you point
the remote control from the slant direction, the distance will be
shortened.
Do not expose the remote sensor to strong direct sunlight or
artificial lighting.
Make sure there are no obstacles between the remote sensor and
the remote control.
This system has been designed to operate an iPod (see page 13).
Compatible iPod types:
If the iPod does not play correctly, please update your iPod
Software to the latest version.
For details about updating your iPod, check on the Apple web site
<http://www.apple.com>.
Carrying the system
Woofer duct
Carrying handle
Shoulder strap
(supplied)
iPod (not supplied)
iPod case (supplied)
Shoulder strap
Using the remote control — RM-SRVNB20A
Match the polarity (+ and –) on the batteries with the +
and – markings in the battery compartment.
R6(SUM-3)/AA(15F)
(not supplied)
Remote sensor
Checking the type of your iPod
iPod nano 1G/2G/4G
iPod mini
iPod (4th Generation) 20G/40G
iPod photo (4th Generation) 20G/30G/40G/60G
iPod video (5th Generation) 30G/60G
RV-NB20[J].book Page 4 Tuesday, August 22, 2006 3:28 PM
5
Connections
Connecting the microphone/guitar
(See page 15.)
Connecting the AC power cord
Connecting to the car battery
Power cord
CAUTIONS:
ONLY USE THE JVC POWER CORD PROVIDED FOR
THIS SYSTEM TO AVOID MALFUNCTION OR
DAMAGE TO THE SYSTEM.
BE SURE TO UNPLUG THE POWER CORD FROM THE
OUTLET WHEN GOING OUT OR WHEN THE SYSTEM
IS NOT IN USE FOR AN EXTENDED PERIOD OF
TIME.
CAUTIONS:
Be sure to use the specified car adapter (JVC model CA-R120) to prevent
mishaps or damage resulting from different polarity design.
For safety, stop the car before performing operations.
Be sure to start the engine when you use the car adapter; otherwise, the car
battery will be exhausted.
During transport, stabilize the system in a box, etc.
To prevent malfunctions, do not leave the system in a car for a long time.
If the power is supplied through the car battery, the display will be blank
with the system turned off (at standby).
Unplug the AC power cord from the system to supply the power
through the car battery; otherwise, the system does not work.
Memory backup batteries
“R6(SUM-3)/AA(15F)”
size batteries (not
supplied)
Match the polarity (+ and –) on the batteries
with the + and – markings in the battery
compartment.
Battery cover
To car’s cigarette
lighter socket (DC12V)
Car adapter JVC model
CA-R120 (not supplied)
Rear view
(Not supplied)
(Not supplied)
Connecting the headphones (See page 7.)
(Not supplied)
Stereo mini plug
CAUTION: Make all connection before plugging the system into an AC power outlet.
RV-NB20[J].book Page 5 Tuesday, August 22, 2006 3:28 PM
6
Match the polarity (+ and –) on the
batteries with the + and – markings in
the battery compartment.
Battery cover
To remove the batteries, remove battery
“3” first.
Notes:
• The memory backup batteries will not be
consumed as long as the power is supplied
from an AC outlet, loaded 10 batteries, or
car battery (DC12V). However, if no
power is supplied to the system, the
memory backup batteries should be
replaced with new ones approximately
every 12 months to securely maintain the
contents of the memory.
• Before replacing the memory backup
batteries, always connect the AC power
cord to the system to prevent the contents
of memory from being erased.
• When a power failure occurs, the time
indication disappears from the display to
save the battery power of the memory
backup batteries.
CAUTION:
To avoid battery leakage or explosion:
• When you need to replace the batteries,
replace all batteries at the same time with
new ones. Before replacing, you need to
supply AC power to the system.
• Do not use an old battery with new ones.
Do not use different types of batteries
together.
Operating the system on
batteries
“R20/D(13F)” size
batteries (not supplied)
To remove the batteries, remove battery
“10” first.
Notes:
When you operate the system on mains
(AC) power or on car battery (DC12V), the
power source automatically switches from
batteries to AC or DC12V. However, you
should remove the 10 batteries when
operating on AC power or car battery
(DC12V).
• When the batteries are exhausted, the
following symptoms will occur:
Mistracking occurs during disc playback.
“DC OFF” flashes on the display, then the
power goes off.
If this happens, replace the batteries.
CAUTION:
To avoid battery leakage or explosion:
Remove the 10 batteries when the system is
not in use for an extended period of time.
• When you need to replace the batteries,
replace all batteries at the same time with
new ones.
• Do not use different types of batteries
together.
If the power is supplied through the
batteries, the display will be blank with the
system turned off (at standby).
Unplug the AC power cord from the
system to supply the power through the
batteries; otherwise, the system does
not work.
Front view
Connecting the iPod (See page 13.)
iPod (not supplied)
iPod cable
(supplied)
iPod stand
(supplied)
To dock connector
Disconnecting the iPod
When disconnecting the iPod, make sure the
system is turned off.
To remove the iPod cable from the iPod,
hold the buttons on the sides and pull.
Connecting the auxiliary equipment
(See page 14.)
Auxiliary equipment (not supplied)
Stereo mini plug cable (not supplied)
To headphones jack
Disconnecting the auxiliary equipment
When disconnecting the auxiliary equipment, make sure the
system is turned off.
RV-NB20[J].book Page 6 Tuesday, August 22, 2006 3:28 PM
7
Basic operations
Note: The lighting condition for the STANDBY lamp and for the
display differs depending on the power source.
* If no source is playing and no operation is done for about 4
minutes, “DC OFF” starts flashing on the display for about one
minute before the system turns off automatically (except when
the source is FM/AM or AUX, or when the microphone/guitar is
used).
Turning on the system
Press ON/STANDBY.
When the system is operated on batteries or car battery (DC12V),
press ON/STANDBY on the system.
The STANDBY lamp goes off when the system is operated on AC
power.
The display comes on and the system is ready to continue in the
mode it was in when the power was last turned off.
Turning off the system
Press ON/STANDBY again.
The STANDBY lamp lights up when the system is operated on AC
power.
When the AC power is used, the CLOCK indicator and the time
are displayed without backlighting.
Some power is always consumed even though power is turned
off (called standby mode).
To disconnect the system from mains (AC) supply completely,
unplug the AC power cord from the AC outlet. When you
unplug the AC power cord, the clock will be reset to
AM12:00” if no memory backup batteries are installed.
You can adjust the volume level between 0 and 50.
Turn the VOLUME +/– control clockwise to
increase the volume or turn it
counterclockwise to decrease the volume.
Press VOLUME + to increase the volume or
press VOLUME – to decrease it.
When you press and hold VOLUME + or –, the volume changes
rapidly.
CAUTION:
DO NOT start playing any source without setting
the volume to minimum first, as a sudden blast of
sound can damage your hearing, speakers and/or
headphones.
For private listening
Connect a pair of headphones to the PHONES jack on the rear of
the system (see page 5). No sound comes out of the speakers.
Be sure to turn down the volume before connecting or putting on
the headphones.
SUPER WOOFER
VOLUME +/–
STANDBY lamp
VOLUME +/–
ON/STANDBY
ACS ON/LEVEL
indicator
SUPER WOOFER
VOLUME +/
VOLUME +/
DISPLAY
ON/STANDBY
SOUND
ACS
SOUND
ACTIVE CLEAR
SOUND
MUTING
Turning the power on and off
Power source STANDBY lamp/display
AC power The STANDBY lamp lights when power is
turned off.
Backlighting of the display is illuminated
when power is turned on.
• Batteries or car
battery
(DC12V)*
The STANDBY lamp does not light.
Backlighting of the display is not
illuminated.
With the system turned off (at standby), no
indication is shown on the display.
or
On system
On remote control
Adjusting the volume
Using the system
Using the remote control
or
On system
On remote control
RV-NB20[J].book Page 7 Tuesday, August 22, 2006 3:28 PM
8
Press MUTING.
“MUTING” appears on the display.
To restore the sound, press MUTING again or adjust the volume
(see page 7).
During play, you can adjust the bass level between BASS 1
(minimum) and BASS 6 (maximum).
Turn the SUPER WOOFER VOLUME +/–
control clockwise to increase the bass level
or turn it counterclockwise to decrease the
bass level.
Press SUPER WOOFER VOLUME + to
increase the bass level or press SUPER
WOOFER VOLUME – to decrease it.
Note: This function is not effective when the headphones are in
use.
The Active Clear Sound (ACS) circuit emphasizes high-frequency
sound without lowering the signal-noise ratio, while adjusting its
output according to the input signal level. This results in a better
balance between the high-frequency sound and the low-frequency
heavy bass.
Press ACS (active clear sound) to turn it on
or off.
When it is turned on, the ACS ON indicator lights in red.
The ACS LEVEL indicator flashes in green according to the
input signal level.
Sound modes can be selected to enhance the type of music being
played.
Press SOUND to select the sound mode.
Each time you press the button, the sound mode changes as
follows:
Sound mode selection:
BEAT: Set to this position for music with a heavy
beat, such as rock and disco music.
POP: Set to this position for light music including
popular and vocal music.
CLEAR: Set to this position for crisp and clear
sounding music with transparent highs.
FLAT (no effect): Set to this position not to apply any sound
mode.
While the power is turned on, you can see the current time (clock)
at any time, as follows.
Press DISPLAY.
Each time you press the button, the display changes as follows:
Current sound source (e.g. FM103.5 MHz) O (clock)
Note: To let the clock work, you need to set the clock first. (See
“Setting the clock” on page 15.)
Turning off the sound
temporarily
Using the remote control only
Adjusting the super woofer
volume
Using the system
Using the remote control
Activating clear sound
On remote control
or
On system
On remote control
Selecting the sound mode
Showing the time
Using the remote control only
or
On system
On remote control
RV-NB20[J].book Page 8 Tuesday, August 22, 2006 3:28 PM
9
Listening to the radio
You can listen to FM and AM stations. Stations can be tuned in manually, automatically, or from preset memory storage.
Before listening to the radio, fully extend the FM telescopic antenna.
1. Press FM/AM repeatedly to select either
FM or AM.
Each time you press FM/AM, the band changes between FM
and AM.
The system tunes in to the last tuned station. The following
information appears on the display.
When “Manual Tuning” or “Auto Tuning” was used to tune
in to the last tuned station (see below), the band frequency
appears.
When “Preset Tuning” was used to tune in to the last tuned
station (see the right column), the preset number (displayed
as “P-XX” on the display) and then the band frequency
appear.
2. Select a station using one of the following
methods.
When you tune in to an FM stereo broadcast, the STEREO
indicator lights up and you can hear stereo effect.
If an FM stereo broadcast is hard to receive or
noisy, press FM MODE. The MONO indicator lights up and
the sound becomes monaural, but the reception improves.
When you tune in to another station, the MONO indicator
goes off and stereo effect restores automatically.
Note: AM broadcasts are monaural.
Manual Tuning
Press 4 or x repeatedly to move from frequency to
frequency until you find the station you want.
OR
Auto Tuning
Press and hold 4 or x for one second or more.
The frequency changes automatically until a station frequency
is found.
OR
Preset Tuning (possible only after presetting stations)
Select the desired preset number using PRESET TUNING on
the system or the number buttons on the remote control. The
preset number and then the band frequency appear on the
display.
PRESET TUNING button: Each time you press the button, the
preset number increases.
Number buttons: To select P-5, press 5.
To select P-15, press +10 then 5.
To select P-20, press +10 once then
press 10.
Notice: To adjust the reception condition
For FM:
Adjust the FM telescopic antenna’s length, angle and
direction until the best reception is obtained.
For AM:
Change the direction of the system to obtain the best
reception.
Placing the system near the window, for example, will
improve AM reception.
FM/AM
PRESET TUNING
4
x
FM/AM
4
x
Number buttons
FM MODE
SET
FM MODE
Tuning in to a station
(After one second)
RV-NB20[J].book Page 9 Tuesday, August 22, 2006 3:28 PM
10
You can preset up to 30 FM stations and 15 AM stations.
Note: Preset numbers may have been set to factory test
frequencies prior to shipment. This is not a malfunction.
You can preset the stations you want into memory as
follows:
There is a time limit in doing the following steps. If the setting is
canceled before you finish, start again from step
.
1. Press FM/AM repeatedly to select either
FM or AM.
2. Press 4 or x to tune in to a station.
3. Press SET.
4. Press the number buttons to select the
preset number you want.
To select 5, press 5.
To select 15, press +10 then 5.
To select 20, press +10 once then press 10.
5. Press SET.
“STORED” appears on the display and the station is stored.
6. Repeat above steps to for each
station you want to store into memory with
a preset number.
To change the preset stations, repeat the same steps as
above to overwrite a new station.
CAUTION:
To prevent the preset stations from being erased
because of a power failure, etc., install memory
backup batteries in the system. (See pages 5 and
6.)
Playing back discs
This system has been designed to play back the following discs—
CD, finalized CD-R/CD-RW (recorded in audio CD format) and
CD-R/CD-RW (in MP3 format).
This system is not compatible with the other discs such as DVD,
DVD-R, and DVD-RW.
Notes on MP3:
The system can only recognize files (tracks) with “MP3” or
“mp3” as the extensions, which can be in any combination of
upper and lower case.
• It is recommended that you record your material at a 44.1 kHz
sampling rate, using the 128 kbps data transfer rate.
• You can play back the discs containing the tracks in music CD
format or MP3 files in ISO 9660 format.
• Some MP3 tracks or discs may not be played back because of
their characteristics or recording conditions.
• MP3 discs require a longer readout time than normal discs.
This system recognizes up to 999 tracks on a disc (or less
depending on the recording condition of a disc).
1. Turn the LOCK/RELEASE knob
counterclockwise to open the disc
compartment door.
2. Place a disc, with its label side up as
shown above.
3. Close the disc compartment door and turn
the knob to “LOCK” position.
To remove the disc, open the disc compartment door in stop
mode.
You can place an 8 cm (3-3/16") disc without an adapter.
If the disc cannot be read correctly (because it is scratched, for
example), “NO PLAY” or “NO DISC” appears on the display.
You can place a disc while listening to the other source.
Presetting stations
Using the remote control only
7
4
x
Number
buttons
REPEAT
CD 6
PLAY MODE
GROUP UP
GROUP DOWN
CANCEL
x
7
4
CD 6
LOCK/RELEASE
knob
Group with its play order
MP3 track with its play order
Hierarchy
Level 1 Level 2 Level 3 Level 4 Level 5
Setting a disc
RV-NB20[J].book Page 10 Tuesday, August 22, 2006 3:28 PM
11
To play a disc
1. Set a disc.
2. Press CD 6.
The first track of the disc starts playing.
For CDs:
For MP3 discs:
When playing an MP3 disc, the file name (then ID3 Tag if
any) is displayed at the beginning of each track.
If no disc is inserted, “NO DISC” appears on the display and
the system remains in stop mode.
The system automatically stops when the last track of the disc
has finished playing.
To stop playing the disc, press 7.
The following information for the disc is displayed.
For CDs
:
For MP3 discs:
To pause, press CD 6. The playback time flashes on the
display.
To cancel pause, press the same button again. Playback
continues from the point where it was paused.
Note: Do not turn the LOCK/RELEASE knob during playback.
Skip Play
Press 4 or x to select the track you
want to play during playback.
•Press x once to skip to the beginning of the next track.
•Press 4 to skip to the beginning of the track being played.
Press 4 twice quickly to skip to the beginning of the previous
track.
You can also select a track in stop mode with the same buttons.
For CD: Selected track and its playback time are shown on the
display.
For MP3: Group and track numbers (then ID3 Tag if any) are
shown on the display.
To start playback, press CD 6.
Search Play
Press and hold 4 or x to fast forward/
reverse the disc during playback.
You can quickly find a particular passage in the track you are
listening to. During search play, you can hear the sound of approx.
one forth level.
To locate a track directly
Press the number buttons to directly play a
track.
To directly play track 5, press 5.
To directly play track 15, press +10 then 5.
To directly play track 20, press +10 once then press 10.
(Only for MP3 discs)
To directly play track 109, press +100 once then press 9.
To directly play track 125, press +100, +10, +10 then 5.
To select a group (for MP3 disc)
Press GROUP UP or GROUP DOWN to
select the group you want to play during
playing the MP3 disc.
Press GROUP UP to skip to the next group.
Press GROUP DOWN to skip to the previous group.
You can also select a group in stop mode with the same buttons.
To play the group after selection, press CD 6.
Using the disc player—Normal
Play
Track number Playback time
MP3 indicator
Total playback time
Total track
number
Total track
number
Total group
number*
* If a disc includes more than 99 groups, “G – –” will appear on
the display.
MP3 indicator
Using the remote control only
RV-NB20[J].book Page 11 Tuesday, August 22, 2006 3:28 PM
12
You can program up to 50 tracks in any desired order including
the same tracks.
You can only make a program when the system is stopped.
While making a program, you cannot specify a group number to
select a track.
1. Set a disc.
2. Press CD 6.
3. Press 7 to stop the disc.
4. Press PLAY MODE repeatedly to select
“PROGRAM.”
The system enters the programming mode and the PRGM
indicator lights up.
5. Press the number buttons to select the
track to program.
For detailed operations, see “To locate a track directly” on
page 11.
Example: For track 7, press 7.
* Total playback time will not appear while making a program
using an MP3 disc.
6. Repeat step to select other tracks for
the program.
To cancel the last track programmed, press CANCEL once.
7. Press CD 6.
The system plays the tracks in the same order as you have
programmed them.
You can skip to a particular programmed track by pressing 4
or x during program play.
While stopped:
To confirm the programmed tracks, press 4 or x
repeatedly; the tracks making up the program will successively
be displayed in the programmed order.
• To add a track to the end of the program, simply press the
number buttons.
To delete the tracks in the program, press CANCEL
repeatedly. Each time you press the button, the last track will be
erased.
To delete the entire program, press and hold CANCEL
until “CLEAR!” appears on the display.
Turning off the power will clear the program.
To exit from program mode, press PLAY MODE
repeatedly until the PRGM indicator goes off.
Each time you press the button, the play mode changes as
follows:
Normal play = PROGRAM = RANDOM = (back to the
beginning)
Note:
(For CDs) If the total playback time of the programmed tracks
exceeds 99 minutes 59 seconds, “– – : – –” will appear on the
display.
The tracks will play in no special order when you use this mode.
1. Set a disc.
2. Press CD 6.
3. Press 7 to stop the disc.
4. Press PLAY MODE repeatedly to select
“RANDOM.”
The RANDOM indicator lights up on the display.
5. Press CD 6.
The tracks are played in random order once.
To skip a track during playback, press x to skip to another
track in the random sequence. The 4 button works only to go
back to the beginning of the current track.
While stopped:
To exit from random mode, press PLAY MODE repeatedly
until the RANDOM indicator goes off.
Each time you press the button, the play mode changes as
follows:
Normal play = PROGRAM = RANDOM = (back to the
beginning)
You can repeat the tracks or individual track as many times as you
like.
Press REPEAT.
Each time you press the button, repeat indicator changes as
follows:
For CDs:
ALL = = canceled = (back to the beginning)
ALL: Repeats all the tracks on the disc.
: Repeats the current track.
For MP3 discs:
ALL = GROUP = = canceled = (back to the
beginning)
ALL: Repeats all the tracks on the disc.
GROUP: In normal play mode, repeats all the tracks in a
group.
In program and random play modes, group repeat
cannot be selected.
: Repeats the current track.
Repeat mode (except “ GROUP”) remains in effect even
when you change the play mode.
To exit from repeat mode, press REPEAT repeatedly until the
repeat indicator on the display goes off.
Programming the playing order
of the tracks
Using the remote control only
(After 2 seconds)
Program order number
Total playback time of the programmed tracks*
Last programmed track
Random play
Using the remote control only
Repeating tracks
Using the remote control only
RV-NB20[J].book Page 12 Tuesday, August 22, 2006 3:28 PM
13
Listening to the iPod
You can operate an iPod through the system.
Before connecting your iPod to the system, check its type and
software version (see page 4).
Remember you cannot send any data to your iPod from the
system.
You can also operate the iPod directly even while it is connected
to the system. For details of the operation, refer to the instructions
of your iPod.
CAUTIONS:
The iPod battery is charged while the system is turned on. See the
iPod instruction manual about charging times.
Sound distortion may occur when playing back audio sources
with high recording levels. Adjusting the ipod’s equalizer to
“Flat” is recommended. For information on operating the iPod,
see the iPod instruction manual.
• JVC is not responsible for any loss of or damage to iPod that
might result from the use of this product.
• When you connect your iPod to the cable, make sure it connects
all the way in.
Do not carry the system with iPod connected. You might drop it
down or it might cause damages to the connector part.
Do not touch or hit the iPod terminal pins or the connector pins
directly. It might cause damages to the connector part.
• Remove the iPod from the cable when you do not use.
To play the iPod
1. Set the volume level to minimum.
2. Press iPod 6.
The iPod is turned on and starts playing.
3. Adjust the volume to the desired listening
level.
To pause, press iPod 6.
To cancel pause, press the same button again. Playback
continues from the point where it was paused.
Skip Play
Press 4 or x to select the track you
want to play during playback.
•Press x once to skip to the beginning of the next track.
•Press 4 to skip to the beginning of the track being played.
Press 4 twice quickly to skip to the beginning of the previous
track.
You can also select a track with the same buttons while the iPod is
paused.
To start playback, press iPod 6.
Search Play
Press and hold 4 or x to fast forward/
reverse the track during playback.
You can quickly find a particular passage in the track you are
listening to. During search play, you can hear the sound of approx.
one forth level.
NOTE:
When iPod is selected as the source...
“CONNECT” appears on the display with the iPod connected.
“NO CONNECT” scrolls on the display without the iPod
connected.
Press and hold iPod 6 for about 2 seconds.
Turning off the system* or changing iPod to another source also
turns off the iPod.
* Turning off the system may not turn off the iPod depending on
the current source.
iPod 6
iPod 6
x
4
4x
Playing the iPod
iPod indicator
(After 2 seconds)
Turning off the iPod
About the battery charge of the iPod
When the system is operated on the AC power:
The iPod battery is always charged except while FM/AM is
selected as the source.
When the system is operated on the batteries or the car battery
(DC12V):
The iPod battery is charged only while the system is turned on
without FM/AM selected as the source.
The iPod battery will not be charged while “DC OFF” is
flashing on the display (see page 6).
RV-NB20[J].book Page 13 Tuesday, August 22, 2006 3:28 PM
14
Listening to auxiliary equipment
You can listen to auxiliary equipment.
First make sure that the auxiliary equipment is properly connected to the system. (See pages 5 and 6.)
Note: For operation of the auxiliary equipment, refer to its instructions.
1. Set the volume level to minimum.
2. Press AUX.
AUX” appears on the display.
To listen to the auxiliary equipment, start playing the
auxiliary equipment.
3. Adjust the volume to the desired listening
level.
4. Apply sound effects, if you wish.
Adjust the super woofer volume to reinforce the bass sound.
Quick Portable Link (QP Link) automatically switches the source
to AUX as the auxiliary equipment connected to the AUX jack
starts playback.
To activate QP Link
Press QP LINK repeatedly to show “QPL
ON” on the display.
The QP LINK indicator appears on the display in the following
cases to inform you that QP Link is ready to work:
When an auxiliary equipment is connected to the AUX jack.
When AUX is selected as the source.
To cancel, press QP LINK repeatedly to show “QPL OFF” on the
display.
How does QP Link work?
While QP Link is activated, starting playback performs the
following:
While listening to another source,
Changes the source to AUX.
When the power is supplied through the AC outlet and the
system is turned off,
Turns on the system and selects AUX as the source.
NOTES:
When the sound signal from the auxiliary equipment is too weak,
QP Link may not function correctly. In this case, turn up the
volume of the auxiliary equipment so that the system can detect
the sound signal properly.
If you change the source from AUX with QP Link turned on, QP
Link will be deactivated temporarily. In this case, the following
reactivate QP Link:
When the auxiliary equipment is unplugged from the AUX
jack, then plugged in again.
When the sound signal from AUX jack stops or becomes very
weak for about 30 seconds.
If the system is turned off while QP Link is working, QP Link
will be deactivated temporarily. In this case, QP Link is
reactivated when the sound signal from AUX jack stops or
becomes very weak for about 30 seconds after the system is
turned off.
While QP Link is activated, QP Link may start working when
you just connect the auxiliary equipment to the AUX jack or
unplug it. This is not a malfunction.
You can change the AUX jack sensitivity when QP Link
mistakenly works with detecting non-playback signals from the
auxiliary equipment, such as its switching noise.
Press and hold QP LINK.
Each time you press and hold QP LINK, the sensitivity level
changes between QPL LV1 and QPL LV2.
QPL LV1: Normally select this (initial setting).
QPL LV2: Select this when QP Link works mistakenly.
AUX
QP LINK
AUX
Listening to auxiliary
equipment
Switching to AUX
automatically—QP Link
Using the remote control only
Bubbles appear when the
system detects the sound
signal.
QP LINK indicator
Changing the AUX jack
sensitivity
Using the remote control only
RV-NB20[J].book Page 14 Tuesday, August 22, 2006 3:28 PM
15
Using the microphone/guitar
Using a microphone or a guitar (not supplied), you can mix its
sound with a source sound.
1. Make sure the MIC/GUITAR LEVEL control
on the rear of the system is properly set.
When using a microphone, make sure the knob is pressed in
().
When using a guitar, make sure the knob is released ( ).
2. Set the MIC/GUITAR LEVEL control to MIN
by turning it fully counterclockwise.
3. Connect a microphone or a guitar into the
MIC/GUITAR INPUT jack on the rear of the
system.
4. Start a source: disc, tuner, iPod, or
auxiliary equipment.
5. Adjust the VOLUME +/– control and the
MIC/GUITAR LEVEL control, as you play the
microphone or the guitar.
CAUTION:
DO NOT connect a bass guitar to the MIC/
GUITAR INPUT jack, as it may damage the
system.
Using the timer
The timers let you control the listening functions automatically.
When the power is first supplied, the CLOCK indicator and
AM12:00” flash on the display. Set the clock.
Note:
The clock must be correctly set for the timers to work.
1. Press ON/STANDBY.
2. Press CLOCK/TIMER repeatedly until the
CLOCK indicator lights up.
The hour digit flashes on the display.
3. Press x or 4 to select the hour.
When you press and hold the button, the hour digit changes
continuously.
4. Press SET to set the hour.
The minutes digits start flashing on the display.
5. Press x or 4 to select the minute.
When you press and hold the button, the minute digit changes
continuously.
If you want to change the hour setting, press CANCEL.
6. Press SET to finish setting the clock.
CAUTION:
If memory backup batteries are exhausted or not
installed, and the AC power cord is plugged in
again after being disconnected, or power is
restored after a power failure, the CLOCK
indicator will flash on the display. Set the
current time (clock) again.
Use the sleep timer to turn the system off after a certain number of
minutes when it is playing. By setting the sleep timer, you can fall
asleep to the music and know that your system will turn off by
itself rather than playing all night.
You can set the sleep timer only when the system is turned on.
1. Press SLEEP.
The SLEEP indicator lights up on the display.
Microphone/guitar mixing
4
x
CLOCK/TIMER
SET
CANCEL
SLEEP
ON/STANDBY
Setting the clock
Using the remote control only
Setting the sleep timer
Using the remote control only
SLEEP indicator
RV-NB20[J].book Page 15 Tuesday, August 22, 2006 3:28 PM
16
2. Set the length of time you want the source
to play before shutting off.
Each time you press the button, it changes the number of
minutes shown on the display in this sequence:
10 = 20 = 30 = 60 = 90 = 120 = OFF = (back to
the beginning)
After setting the number of minutes for the sleep timer, the
indication will stop flashing and go off.
The system is now set to turn off after the number of minutes you
set.
To confirm the sleep time:
When SLEEP is pressed, the remaining sleep time is displayed.
Wait until the display returns to the original display.
To cancel the sleep timer:
Press SLEEP repeatedly to select “OFF.” Turning off the system
also cancels the sleep timer.
Once the timer has been set, it will be activated at the same time
everyday until the timer is turned off.
While the timer is being set, the timer indicator ( ) lights up.
After the timer has been set, the timer indicator ( ) also lights
up if the power is supplied through the AC outlet.
• While the timer is working, the timer indicator ( ) flashes.
1. Press ON/STANDBY.
2. Press CLOCK/TIMER.
“TIMERON?” appears.
Press SET to activate the timer setting you have made before.
Press CANCEL to cancel the timer.
Go to the next step to set the timer first time (or reset the
timer).
3. Press CLOCK/TIMER again, so that the
timer indicator ( ) and ON indicator light
up.
The hour digit of the current ON time flashes on the display.
4. Set the on-time you want the system to
turn on.
(1) Press x or 4 to select the hour, then press SET.
(2) Press x or 4 to select the minute, then press SET.
The OFF indicator lights up.
Press and hold the button to change the time rapidly.
If you want to change the time setting, press CANCEL.
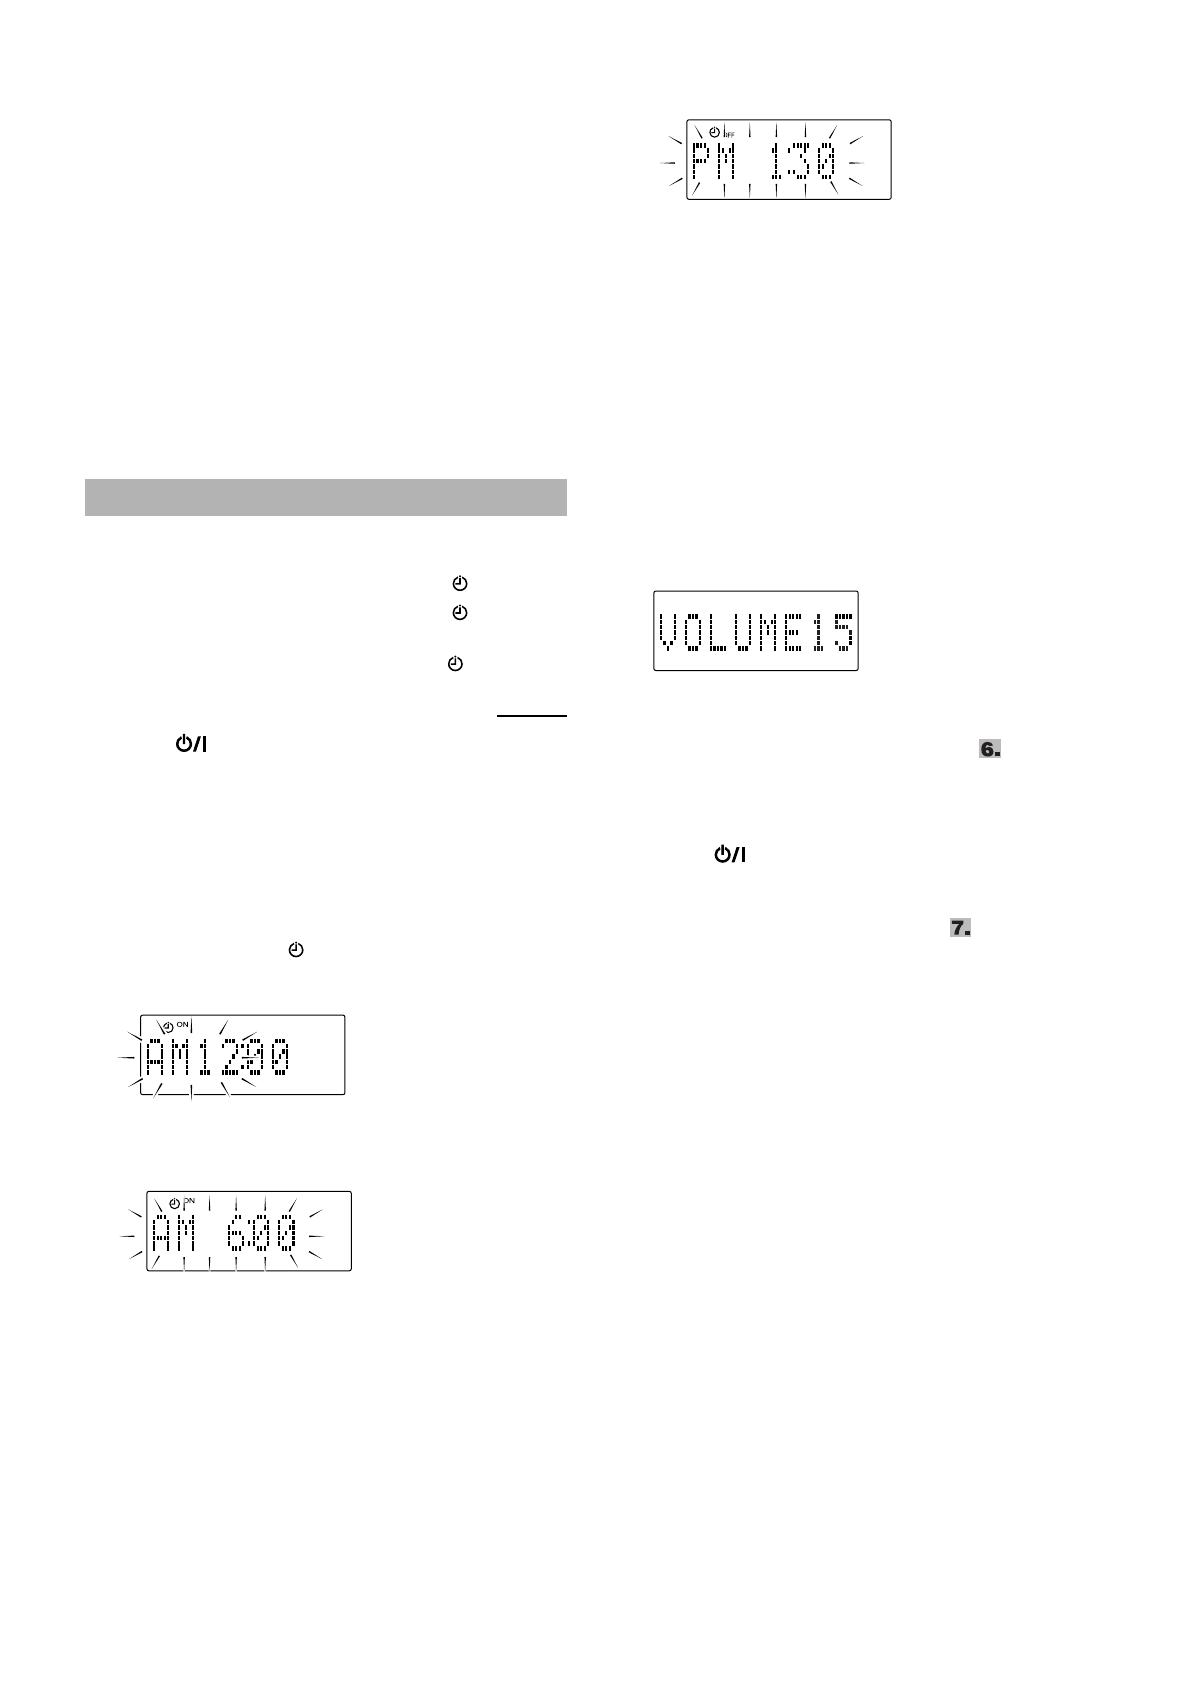
5. Set the OFF time (example: PM1:30).
(1) Press x or 4 to select the hour, then press SET.
(2) Press x or 4 to select the minute, then press SET.
Press and hold the button to change the time rapidly.
If you want to change the time setting, press CANCEL.
6. Press x or 4 to select the music
source you want to listen to, then press
SET.
Each time you press the button, the display changes as shown
below:
TUNER = CD = iPod = (back to the beginning)
7. Press x or 4 to select the volume level,
then press SET.
– –: The current volume level will be used.
0 to 50: When the timer is turned on, the volume will be
automatically set to the selected level.
The current timer setting appears for confirmation.
8. Before turning off the system, prepare the
music source selected in step .
TUNER: Tune in to the desired frequency (FM/AM).
CD: Set a disc.
iPod: Connect an iPod to the iPod jack.
9. Press ON/STANDBY to turn off the
system.
When the timer turns on, the volume level gradually increases
from 0 (zero) to the preset level in step .
However, if the volume has been set to “– –”, the volume
level will be set to the last level directly.
To cancel the operation, press CLOCK/TIMER until the
display returns to the original one.
To cancel the timer, press CLOCK/TIMER once, then press
CANCEL. (“TIMEROFF” appears, only when power is on.)
To reactivate (or confirm) the canceled timer, press
CLOCK/TIMER once, then press SET. (The current timer setting
appears for confirmation.)
Notes:
The timer cannot be set if on-time and off-time are the same.
The timer does not work if the system is not in the standby mode
(the system needs to be in standby mode at least one minute
before the on-time).
CAUTION:
If memory backup batteries are exhausted or not
installed, and the AC power cord is disconnected
or there is a power failure, time settings will be
erased from memory. If this happens, set the
current time (clock) and perform the timer
setting again.
Setting the daily timer
Using the remote control only
RV-NB20[J].book Page 16 Tuesday, August 22, 2006 3:28 PM
17
Care and maintenance
Handle your discs carefully, and they will last a long time.
Compact discs
This system can play back the following discs:
Audio CD
Finalized CD-R/CD-RW recorded in audio
CD format or MP3 format
However, continued use of irregular shape
discs (heart-shape, octagonal, etc.) can damage
the system.
Remove the disc from its case by holding it at
the edges while pressing the case’s center hole
lightly.
Do not touch the shiny surface of the disc, or
bend the disc.
Put the disc back in its case after use to prevent
warping.
Be careful not to scratch the surface of the disc
when placing it back in the case.
Avoid exposure to direct sunlight, temperature
extremes, and moisture.
• A dirty disc may not play correctly. If a disc
does become dirty, wipe it with a soft cloth in a
straight line from center to edge.
CAUTION:
Do not use any solvent (for example,
conventional record cleaner, spray thinner,
benzine, etc.) to clean a disc.
General notes
In general, you will have the best performance by keeping your
discs and the mechanism clean.
• Store discs in their cases, and keep them in cabinets or on
shelves.
• Keep the disc compartment door closed when not in use.
Cleaning the lens
If the lens in the pickup is dirty, dropout, etc., could degrade sound.
Open the disc compartment door and clean the lens as shown.
Use a blower (available at camera stores) to blow dust off the
lens.
If there are fingerprints, etc. on the lens, gently wipe clean with a
cotton swab.
Moisture condensation
Moisture may condense on the lens inside the
system in the following cases:
After turning on heating in the room.
In a damp room.
If the system is brought directly from a cold to
a warm place.
Should this occur, the system may malfunction.
In this case, leave the system turned on for a few
hours until the moisture evaporates, unplug the
AC power cord, and then plug it in again.
Troubleshooting
If you are having a problem with your system, check this list for a possible solution before calling for service.
If you cannot solve the problem from the hints given here, or the system has been physically damaged, call a qualified person, such as your
dealer, for service.
Blower
Lens
Symptom Possible cause Action
Power does not come on. The power cord is not connected to an
AC outlet.
• Insert the plug into the socket.
• No sound is heard. Connections are incorrect, or loose.
Headphones are connected.
MP3 disc is recorded with “packet
writing.
Check all connections and make
corrections. (See pages 5 and 6.)
Disconnect the headphones.
• It cannot be played. Replace the disc.
Poor FM reception. The FM telescopic antenna is not
properly extended and positioned.
• Fully extend the FM telescopic antenna
and turn it for the best reception.
RV-NB20[J].book Page 17 Tuesday, August 22, 2006 3:28 PM
  • Page 1 1
  • Page 2 2
  • Page 3 3
  • Page 4 4
  • Page 5 5
  • Page 6 6
  • Page 7 7
  • Page 8 8
  • Page 9 9
  • Page 10 10
  • Page 11 11
  • Page 12 12
  • Page 13 13
  • Page 14 14
  • Page 15 15
  • Page 16 16
  • Page 17 17
  • Page 18 18
  • Page 19 19
  • Page 20 20
  • Page 21 21
  • Page 22 22
  • Page 23 23
  • Page 24 24
  • Page 25 25
  • Page 26 26
  • Page 27 27
  • Page 28 28
  • Page 29 29
  • Page 30 30
  • Page 31 31
  • Page 32 32
  • Page 33 33
  • Page 34 34
  • Page 35 35
  • Page 36 36
  • Page 37 37
  • Page 38 38
  • Page 39 39
  • Page 40 40
  • Page 41 41
  • Page 42 42
  • Page 43 43
  • Page 44 44
  • Page 45 45
  • Page 46 46
  • Page 47 47
  • Page 48 48
  • Page 49 49
  • Page 50 50
  • Page 51 51
  • Page 52 52
  • Page 53 53
  • Page 54 54
  • Page 55 55
  • Page 56 56
  • Page 57 57
  • Page 58 58
  • Page 59 59
  • Page 60 60
  • Page 61 61
  • Page 62 62
  • Page 63 63
  • Page 64 64
  • Page 65 65
  • Page 66 66
  • Page 67 67
  • Page 68 68

JVC Speaker RV-NB20W User manual

Category
Home audio sets
Type
User manual
This manual is also suitable for

Ask a question and I''ll find the answer in the document

Finding information in a document is now easier with AI