Panasonic RP-HTX90NE-W Owner's manual
- Category
- Headphones
- Type
- Owner's manual
This manual is also suitable for

E
Operating Instructions
Digital Wireless Stereo Headphones
Model No. RP-HTX90N
Thank you for purchasing this product.
Please read these instructions carefully before using this product, and save this manual for future use.
TQBM0334
until
2018/12/10

2
Safety precautions
∫Unit
• Avoid using or placing this unit near sources of heat.
• Do not listen with this unit at high volume in places where you need to hear sounds from the surrounding
environment for safety, such as at railroad crossings, and construction sites.
• Wide band characteristic voltage equal or larger than 75 mV.
∫Allergies
• Discontinue use if you experience discomfort with the ear pads or any other parts that directly contact your
skin.
• Continued use may cause rashes or other allergic reactions.
∫Precautions for listening with the Headphones
• Excessive sound pressure from earphones and headphones can cause hearing loss.
• Do not use your headphones at a high volume. Hearing experts advise against continuous extended play.
• If you experience a ringing in your ears, reduce volume or discontinue use.
• Do not use while operating a motorised vehicle. It may create a traffic hazard and is illegal in many areas.
• You should use extreme caution or temporarily discontinue use in potentially hazardous situations.
WARNING:
To reduce the risk of fire, electric shock or product damage,
• Do not expose this unit to rain, moisture, dripping or splashing.
• Do not place objects filled with liquids, such as vases, on this unit.
• Use the recommended accessories.
• Do not remove covers.
• Do not repair this unit by yourself. Refer servicing to qualified service personnel.
Avoid the use in the following conditions
• High or low extreme temperatures during use, storage or transportation.
• Disposal of a battery into fire or a hot oven, or mechanically crushing or cutting of a battery, that can result in an
explosion.
• Extremely high temperature and/or extremely low air pressure that can result in an explosion or the leakage of
flammable liquid or gas.
This unit may receive radio interference caused by mobile telephones during use. If such interference occurs,
please increase separation between this unit and the mobile telephone.
Use only the supplied USB charging cord when connecting to a computer.
This unit is intended for use in moderate and tropical climates.

3
About Bluetooth
®
∫Frequency band used
This unit uses the 2.4 GHz frequency band.
∫Certification of this unit
• This unit conforms to frequency restrictions and has received certification based on frequency laws. Thus, a
wireless permit is not necessary.
• The actions below are punishable by law in some countries:
– Taking apart/modifying this unit.
– Removing specification indications.
∫Restrictions of use
• Wireless transmission and/or usage with all Bluetooth
®
equipped devices is not guaranteed.
• All devices must conform to standards set by Bluetooth SIG, Inc.
• Depending on the specifications and settings of a device, it can fail to connect or some operations can be
different.
• This unit supports Bluetooth
®
security features. But depending on the operating environment and/or settings,
this security may not be sufficient. Transmit data wirelessly to this unit with caution.
• This unit cannot transmit data to a Bluetooth
®
device.
∫Range of use
Use this unit at a maximum range of 10 m.
The range can decrease depending on the environment, obstacles or interference.
∫Interference from other devices
• This unit may not function properly and troubles such as noise and sound jumps may arise due to radio wave
interference if this unit is located too close to other Bluetooth
®
devices or the devices that use the 2.4 GHz
band.
• This unit may not function properly if radio waves from a nearby broadcasting station, etc. is too strong.
∫Intended usage
• This unit is for normal, general use only.
• Do not use this system near an equipment or in an environment that is sensitive to radio frequency
interference (example: airports, hospitals, laboratories, etc.).
Panasonic bears no responsibility for data and/or information that is compromised during a wireless
transmission.

4
Table of contents
Safety precautions ...................................................................................................................................... 2
About Bluetooth
®
......................................................................................................................................... 3
Before use
Accessories................................................................................................................................................. 5
Maintenance................................................................................................................................................ 5
Part names.................................................................................................................................................. 6
Regarding the availability of operations by connection type............................................................. 7
Preparation
Charging...................................................................................................................................................... 8
Operation
Using noise cancelling ................................................................................................................................ 9
Using Bluetooth
®
....................................................................................................................................... 10
• Turning the power on/off..................................................................................................................... 10
• Connecting a Bluetooth
®
device ..........................................................................................................11
Pairing (Registration) this unit with the Bluetooth
®
device for connection ....................................... 11
Connecting a paired Bluetooth
®
device .......................................................................................... 12
• Listening to music............................................................................................................................... 13
Remote controlling.......................................................................................................................... 13
Enhancing the bass (Bass enhancer)............................................................................................. 14
• Making a phone call ........................................................................................................................... 15
• Useful functions.................................................................................................................................. 16
Activating voice functions ............................................................................................................... 16
Guidance messages....................................................................................................................... 16
Battery level notification.................................................................................................................. 16
Auto power off................................................................................................................................. 16
Resetting the unit............................................................................................................................ 16
Using the detachable cord (supplied)........................................................................................................ 17
Other
Restoring to the factory settings................................................................................................................ 18
Copyright, etc. ........................................................................................................................................... 18
Troubleshooting......................................................................................................................................... 19
• Sound and audio volume.................................................................................................................... 19
• Bluetooth
®
device connection .............................................................................................................19
• Phone Calls ........................................................................................................................................ 19
• General............................................................................................................................................... 20
• Power supply and charging ................................................................................................................ 20
• Guidance messages........................................................................................................................... 20
Specifications ............................................................................................................................................ 21
To remove the battery when disposing of this unit .................................................................................... 22

Before use
5
Accessories
Please check and identify the supplied accessories.
Maintenance
Clean this unit with a dry and soft cloth.
• Do not use solvents including benzine, thinner, alcohol, kitchen detergent, a chemical wiper, etc. This might cause the
exterior case to be deformed or the coating to come off.
Keeping the battery performance
• During the long period of disuse, full charge this unit once every 6 months to keep the battery performance.
Expressions used in this document
• Pages to be referred to are indicated as “l ±±”.
• The product illustrations may differ from the actual product.
1 x USB charging cord
1 x Detachable cord

Before use
6
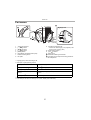
Part names
*1 Lighting (green): Noise cancelling is ON
*2 Examples of lighting/blinking patterns
*3 Í/I: Standby/ON
*4 The battery is low when it is blinking in red. (
l 16, “Battery level notification”)
1 Audio input terminal
2[j (:)] button
3[1/;/ ] button
4[i (9)] button
5 [BASS] button
6 [NC] (Noise cancelling) switch (l 9)
7 Noise cancelling LED
*1
8 Ear pads
9 Charging terminal (DC IN)
• Connect the USB charging cord (supplied) to this
terminal when charging. (
l 8)
10 Power/pairing LED
*2
11 [Í/I ( )] button
*3
12 Microphone
A Raised dot indicating the left side
B This allows you to adjust the housing position of
the headphones.
Lighting (red): Charging is in progress
Blinking alternately in blue and red: Bluetooth
®
pairing (registration) standby
Blinking slowly (blue)
*4
: Bluetooth
®
connection standby
Blinking twice about every 2 seconds
(blue)
*4
:
A Bluetooth
®
pairing (registration) has been established or a call is in
progress
Blinking (blue)
*4
: A call is being received
4 5 6 7
8
321
9
10
11
12
Right (R) side

Before use
7
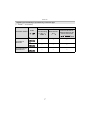
(±: Available, —: Not available)
Regarding the availability of operations by connection type
Connection method
Power
Operation
Noise cancelling
Bass enhancer
Play / Pause / Volume /
Forward to the start of
next track / Return to the
start of current track
Connecting via
Bluetooth
®
ON
±± ±
OFF
± ——
Connecting with the
detachable cord
OFF
± ——
NC ONOFF
BASS

Preparation
8
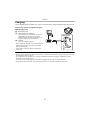
Charging
The rechargeable battery (installed in the unit) is not charged initially. Charge the battery before using the unit.
Connect this unit to a computer using the
USB charging cord.
• The power/pairing LED lights in red when charging is in
progress. When charging is completed, the power/
pairing LED will go out.
• It takes approx. 4 hours to charge the battery from
empty to full.
Note
• Charge in a room temperature between 10 oC and 35 oC. Outside of this temperature range, charging may stop and
the power/pairing LED may go out.
• It is not possible to turn the power on or connect to Bluetooth
®
devices during charging. In addition, the noise
cancelling function cannot be used.
• Do not use any other USB charging cords except the supplied one. Doing so may cause malfunction.
• Charging may not be performed or may stop if the computer is in or switched to standby or sleep mode.
A
: Power/pairing LED
B
: USB charging cord (supplied)
• Check the direction of the terminals and plug in/out
straight holding onto the plug. (It may result in
malfunction by the deforming of the terminal if it is
plugged in obliquely or in wrong direction.)
C
: Computer
• Turn on the computer in advance.
A
B
C
Right (R) side

Operation
9
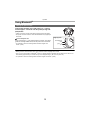
Using noise cancelling
Setting noise cancelling to ON changes the volume and sound quality.
1 Set the [NC] switch to ON.
• When noise cancelling is set to ON, the noise cancelling LED (green)
lights.
2 Adjust the volume of the playback device.
Note
• It is possible to use noise cancelling even with the unit powered off.
• Battery power is consumed even if the unit is powered off when the [NC] switch is ON. We recommend setting the
[NC] switch to OFF when not using noise cancelling.
• While using the noise cancelling function, a very small amount of noise which is generated from the circuit that
reduces noise may be heard, but this is normal and not indicative of any trouble. (This very-low-level noise may be
heard in quiet places or in the blank parts between tracks.)

Operation
10
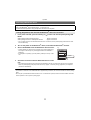
Using Bluetooth
®
In the power-off state, press and hold [Í/I ( )] of this
unit for approx. 3 seconds until the power/pairing LED
(blue) blinks.
• A beep will sound, and the power/pairing LED (blue) will blink slowly.
• The power cannot be turned on when the detachable cord (supplied) is
connected.
∫ To turn the power off
Press and hold [Í/I ( )] for approximately 3 seconds. An English
guidance message will be heard, and the power will be turned off.
• It is possible to switch the audio guidance between English and
French. (
l 16)
Note
• Battery power is consumed even if the unit is powered off when the [NC] switch is ON.
• If the unit is not connected to a Bluetooth
®
device, an English guidance message will be heard and turn off the unit
automatically approximately 5 minutes after you have stopped using it. (
l 16, “Auto power off”)
• It is possible to switch the audio guidance between English and French. (
l 16)
Turning the power on/off
Power/pairing
LED
[Í/I ( )]
Right (R) side

Operation
11
1 In the power-off state, press and hold [Í/I ( )] of this unit until the power/pairing LED
blinks.
• The unit starts to search for the Bluetooth
®
device for connection, and the power/pairing LED will blink in blue
and red alternately.
2 Turn on the power of the Bluetooth
®
device, and enable the Bluetooth
®
function.
3 Select “RP-HTX90N” from the Bluetooth
®
device’s menu.
• A MAC address (an alphanumeric character string that is displayed by
and unique to the device) may be displayed before “RP-HTX90N” is
displayed.
• If prompted for a passkey, input the passkey “0000 (four zeros)” of this
unit.
4 Check the connection with the Bluetooth
®
device on the
unit.
• The power/pairing LED will blink in blue and red alternately until the connection with the device is completed.
When the power/pairing LED (blue) blinks twice every approx. 2 seconds, pairing (registration) is completed.
(Connection established)
Note
• If connection to a device is not established within approximately 5 minutes, the unit will be turned off. Perform pairing
again.
• You can pair up to 8 Bluetooth
®
devices with this unit. If a 9th device is paired, the device with the oldest connection
will be replaced. To use it, perform pairing again.
Connecting a Bluetooth
®
device
Preparation
• Place the Bluetooth
®
device within approx. 1 m from the unit.
• Check the device operation using its operation instructions as required.
Pairing (Registration) this unit with the Bluetooth
®
device for connection
When pairing a device for the first time: approx. 3 seconds
When pairing a second or subsequent devices: approx. 5 seconds
Bluetooth
Bluetooth ON
RP-HTX90N
Device
e.g.
Select

Operation
12
1 Turn on this unit.
• Press and hold [Í/I ( )] of this unit for approx. 3 seconds until the power/pairing LED (blue) blinks.
• A beep will sound, and the power/pairing LED (blue) will blink slowly.
2 Perform steps 2 and 3 of “Pairing (Registration) this unit with the Bluetooth
®
device for
connection”. (
l 11)
• When the power/pairing LED (blue) blinks twice every approx. 2 seconds, pairing (registration) is completed.
(Connection established)
Note
• This unit remembers the device lastly connected. Connection may be automatically established after step 1 (see
above).
• If connection to a device is not established within approximately 5 minutes, the unit will be turned off. Turn on the unit
again.
Connecting a paired Bluetooth
®
device

Operation
13
If the Bluetooth
®
compatible device supports the “A2DP” and “AVRCP” Bluetooth
®
profiles, music can be
played back with remote control operations on the unit.
• A2DP (Advanced Audio Distribution Profile): Transmits audio to the unit.
• AVRCP (Audio/Video Remote Control Profile): Allows remote control of the device using the unit.
1 Connect the Bluetooth
®
device and the unit. (l 11, “Connecting a Bluetooth
®
device”)
2 Select and play the music on the Bluetooth
®
device.
• The unit's headphones will output the music or the audio of the video being played back.
• Operating time:
The maximum playback time is approximately 24 hours. (It may become shorter depending on the usage
conditions.)
∫ Attention
• The unit might leak sound depending on the volume level.
• When the volume is increased to near maximum level, music may sound distorted. Decrease the volume until the
distortion is cleared.
You can control the Bluetooth
®
device using the unit.
• Depending on the Bluetooth
®
device or the app, even if you press buttons on the unit, some functions may not
respond or may operate differently from the descriptions below.
(Operation example)
Note
• The volume can be adjusted in 16 levels. When the maximum or minimum volume is reached, a beep will sound.
Listening to music
Remote controlling
Function Operation
Play / Pause Press [1/;/].
Increase the volume Press [i (9)].
Decrease the volume Press [j (:)].
Forward to the start of next
track
Press and hold [i (9)] for approximately
2 seconds.
Return to the start of current
track
Press and hold [j (:)] for approximately
2 seconds.
Right (R) side

Operation
14
You can enjoy music with enhanced bass.
Press [BASS].
∫ To turn off the bass enhancer function
When [BASS] is pressed and held, a beep sound will be heard and the bass enhancer function will turn off.
• Even when the power is turned off, the setting before turning it off will be stored to memory.
Note
• A notification beep sound will be heard when [BASS] is switched on/off.
• The effect may not be clear, depending on the music you are listening to.
Enhancing the bass (Bass enhancer)

Operation
15
With Bluetooth
®
enabled phones (cell phones or smartphones) that support the “HSP” or “HFP” Bluetooth
®
profile, you can use the unit for phone calls.
• HSP (Headset Profile):
This profile can be used to receive monaural sounds and establish two-way communication using the
microphone on the unit.
• HFP (Hands-Free Profile):
In addition to the HSP functions, this profile has the incoming and outgoing calls function.
(This unit does not have a function that allows you to make phone calls independently of a Bluetooth
®
enabled
phone.)
1 Connect the Bluetooth
®
device and the unit. (l 11, “Connecting a Bluetooth
®
device”)
2 Press [1/;/ ] on the unit and answer the incoming call.
• During an incoming call, ringtone will sound from the unit and the power/
pairing LED will blink.
• (HFP only) To reject the incoming call, press [1/;/ ] twice quickly.
3 Start talking.
• The power/pairing LED will repeatedly blink 2 times during a call.
• The volume can be adjusted during a phone call. For setting instructions, see page 13.
4 Press [1/;/ ] to end the phone call.
• A beep will sound.
Note
• There may be instances when hands free setting needs to be done on the Bluetooth
®
enabled phone.
• Depending on the Bluetooth
®
enabled phone, you may hear incoming and outgoing call ringtones of the phone from
the unit.
• (HFP only) It may be difficult to hear phone conversations when the unit is used in locations with loud ambient noise
or in outdoor or other locations exposed to powerful winds. In that case, change the calling location or switch the
calling device to the Bluetooth
®
enabled phone to continue the call. (Press [1/;/ ] on the unit twice quickly to
switch.)
• You can have the Bluetooth
®
enabled phone make phone calls by using the microphone of the unit and an app of the
Bluetooth
®
enabled phone. (l 16, “Activating voice functions”)
Making a phone call
[1/;/]

Operation
16
You can activate Siri or other voice functions with a button on the unit.
1 Connect the Bluetooth
®
device and the unit. (l 11, “Connecting a Bluetooth
®
device”)
2 Press and hold [1/;/ ] on this unit until the voice function is activated.
Note
• For details about voice function commands, refer to the operating instructions for the Bluetooth
®
device.
• The voice function may not work depending on the smartphone specifications and the app version.
The unit is equipped with an a function that provides an audio notification when you turn off the unit, connect a
Bluetooth
®
device or change a setting, for example.
• This unit has English and French messages for the audio guidance.
• The audio guidance function cannot be disabled.
• The audio guidance volume cannot be adjusted.
∫ Switching the audio guidance language
Press and hold [j (:)] and [Í/I ( )] for at least 5 seconds.
• When the unit is turned off, an English guidance message will be heard indicating the battery level.
• When the battery starts running low during use of the unit, the blinking power/pairing LED will turn from blue to
red. A beep will sound every 1 minute.* When the battery runs out, an English guidance message will be
heard and the power will turn off.
* If you press [Í/I ( )] twice quickly, an English guidance message will be heard and you can check the battery
level.
• It is possible to switch the audio guidance between English and French. (
l above)
If the unit is not connected to a Bluetooth
®
device, an English guidance message will be heard and turn off the
unit automatically approximately 5 minutes after you have stopped using it.
• It is possible to switch the audio guidance between English and French. (l above)
This unit can be reset when all operations are rejected. To reset the unit, press and hold [Í/I ( )] for 10
seconds or more. All the previous operations will be cancelled. (The pairing device information will not be
deleted.)
Useful functions
Activating voice functions
Guidance messages
Battery level notification
Auto power off
Resetting the unit

Operation
17
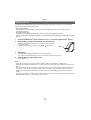
Using the detachable cord (supplied)
While the unit is turned off, it can be used as normal
headphones by connecting the detachable cord (supplied).
• If you connect the detachable cord (supplied) during Bluetooth
®
connection, the power will turn off.
• Controls other than the [NC] switch do not work when the
detachable cord (supplied) is connected.
• Do not use any other detachable cords except the supplied one.
Left (L) side

Other
18
Restoring to the factory settings
When you want to delete all pairing device information, etc., you can restore the unit to the factory settings
(original settings upon purchase). Charge the battery before restoring the unit.
1 While the unit is turned off, press and hold [Í/I ( )] for at least 5 seconds until the
power/pairing LED starts blinking alternately in blue and red.
2 While the power/pairing LED is blinking alternately in blue and red, press and hold
[i (9)] and [j (:)] at the same time for at least 5 seconds.
• The default settings will be restored after the power/pairing LED (blue) blinks fast and the unit turns off.
∫ Attention
• When pairing a device again, delete the registering information (Device: “RP-HTX90N”) from the Bluetooth
®
device’s
menu, and register this unit with the Bluetooth
®
device again. (l 11)
Copyright, etc.
The Bluetooth
®
word mark and logos are registered trademarks owned by Bluetooth SIG, Inc. and any use of
such marks by Panasonic Corporation is under license.
Other trademarks and trade names are those of their respective owners.
Siri is a trademark of Apple Inc., registered in the U.S. and other countries.
Other system names and product names appearing in this document are in general the registered
trademarks or trademarks of the respective developer companies.
Note that the
TM
mark and
®
mark do not appear in this document.
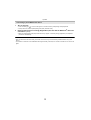
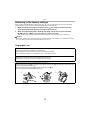
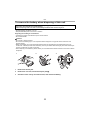
Remove the right ear pad to view authentication information. (1)
Authentication information (A) is indicated on the speaker plate portion (B), which becomes visible when the
right ear pad (R side) is removed. (2)
To attach the ear pad, fit the part D of the ear pad into the part C. (3)
Do not pull the ear pad with force when attaching.
12 3

Other
19
Troubleshooting
Before requesting service, make the following checks. If you are in doubt about some of the check points, or if
the remedies indicated do not solve the problem, consult your dealer for instructions.
No sound.
• Make sure that the unit and the Bluetooth
®
device are connected correctly. (l 11)
• Check if music is playing on the Bluetooth
®
device.
• Make sure that the unit is turned on and the volume is not set too low.
• Pair and connect the Bluetooth
®
device and the unit again. (l 11)
• Check if the Bluetooth
®
compatible device supports “A2DP” profile. For details on profiles, see “Listening to music”
(
l 13). Also refer to the operating manual for the Bluetooth
®
compatible device.
Low volume.
• Increase the volume of the unit. (l 13)
• Increase the volume on the Bluetooth
®
device.
Sound from the device is cut off. / Too much noise. / Sound quality is bad.
• Sound may be disrupted if signals are blocked. Do not fully cover this unit with the palm of your hand, etc.
• The device may be out of the 10 m communication range. Move the device closer to this unit.
• Remove any obstacle between this unit and the device.
• Switch off any wireless LAN device when not in use.
The device cannot be connected.
• You can pair up to 8 Bluetooth
®
devices with this unit. If a 9th device is paired, the device with the oldest connection
will be replaced.
• Delete the pairing information for this unit from the Bluetooth
®
device, then pair them again. (l 11)
You cannot hear the other person.
• Make sure that the unit and the Bluetooth
®
enabled phone are turned on.
• Check if the unit and the Bluetooth
®
enabled phone are connected. (l 11)
• Check the audio settings of the Bluetooth
®
enabled phone. Switch the calling device to the unit if it is set to the
Bluetooth
®
enabled phone. (l 11)
• If the volume of the other person’s voice is too low, increase the volume of both the unit and the Bluetooth
®
enabled
phone.
Cannot make a phone call.
• Check if the Bluetooth
®
compatible device supports “HSP” or “HFP” profile. For details on profiles, see “Listening to
music” (
l 13) and “Making a phone call” (l 15). Also refer to the operating manual for the Bluetooth
®
enabled
phone.
Sound and audio volume
Bluetooth
®
device connection
Phone Calls

Other
20
The unit does not respond.
• This unit can be reset when all operations are rejected. To reset the unit, press and hold [Í/I ( )] for 10 seconds or
more. (
l 16)
• The power cannot be turned on when the detachable cord (supplied) is connected. (
l 17)
Cannot charge the unit. / The power/pairing LED does not light or flashes during charging. / Charging
takes longer.
• Is the USB charging cord connected firmly to the USB terminal of the computer? (l 8)
• Make sure to charge in a room temperature between 10 oC and 35 oC.
• Make sure the computer is turned on and is not on standby or sleep mode.
• Is the USB port you are currently using working properly? If your computer has other USB ports, unplug the connector
from its current port and plug it into one of the other ports.
• If the measures mentioned above are not applicable, unplug the USB charging cord and plug it in again.
• It takes approx. 4 hours to charge the battery from empty to full.
• If the charge time and operating time become shortened, the battery may have run down. (Number of charging times
of the installed battery: Approximately 300)
• The power/pairing LED lights in red when charging is in progress. When charging is completed, the power/pairing
LED will go out.
The power does not turn on. / The power turns off.
• Is the unit being charged? The power cannot be turned ON during charging. (l 8)
• The power cannot be turned on when the detachable cord (supplied) is connected. (
l 17)
• The battery is low when the power/pairing LED is blinking in red. Charge the unit.
• Is auto power off active? (
l 16)
Noise cancelling can be activated, but the power does not turn on.
• Charge the unit. (l 8)
The audio guidance language has changed.
• The audio guidance language can be switched. (l 16)
General
Power supply and charging
Guidance messages
Page is loading ...
Page is loading ...
Page is loading ...
Page is loading ...
Page is loading ...
-
 1
1
-
 2
2
-
 3
3
-
 4
4
-
 5
5
-
 6
6
-
 7
7
-
 8
8
-
 9
9
-
 10
10
-
 11
11
-
 12
12
-
 13
13
-
 14
14
-
 15
15
-
 16
16
-
 17
17
-
 18
18
-
 19
19
-
 20
20
-
 21
21
-
 22
22
-
 23
23
-
 24
24
-
 25
25


Panasonic RP-HTX90NE-W Owner's manual
- Category
- Headphones
- Type
- Owner's manual
- This manual is also suitable for
Ask a question and I''ll find the answer in the document
Finding information in a document is now easier with AI
Related papers
-
Panasonic RPHTX80BE Operating instructions
-
-
-
-
-
-
-
Panasonic Digital Wireless Stereo Headphones Owner's manual
-
-
Other documents
-
König CSHPIER200BU Datasheet
-
-
-
Technics EAH-AZ70W Digital Wireless Stereo Earphones User manual
-
Sony WF-1000X Owner's manual
-
Sony WF-SP700N Help Manual
-
-
Sony WI-1000X Owner's manual
-
-