Page is loading ...

Use, Care, and Installation Guide
www.zephyronline.com
Model number:
Serial Number:
Date of Purchase:
Sales Dealer:
MAY15.0101 © Zephyr Ventilation LLC.
Airflow Control Technology
TM
C
Airflow Control Technology
TM
C
Typhoon
AK2100BS, B,W
AK2136BS, B,W
AK2142BS
AK2148BS
Hurricane
AK2500BS, B, W
AK2536BS, B,W
Cyclone
AK6500BS, B,W
AK6536BS, B,W
AK6542BS

9
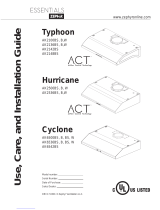
Installation – Ducting Options
WARNING FIRE HAZARD
NEVER exhaust air or terminate duct work into spaces between walls, crawl spaces, ceiling, attics or garages.
All exhaust must be ducted to the outside.
Use metal ductwork only.
)DVWHQDOOFRQQHFWLRQVZLWKVKHHWPHWDOVFUHZVDQGWDSHDOOMRLQWVZLWKFHUWL¿HG6LOYHU7DSHRU'XFW7DSH
Some Ducting Options
side wall cap
w/gravity damper
cabinet
cabinet
soffit or crawl space
side wall cap
w/gravity damper
3-1/4”x10” rear
ducting w/side
wall gravity damper
roof pitch w/
flashing & cap

10
www.zephyronline.com
Installation – $.6SHFL¿FDWLRQV
3
1/16
”
1
7/16
”
9
15/16
”
(30”) 28
1/16
”, (36”) 34”
(42”) 39
3/4
”, (48“) 45
3/4
”
5
1/16
”
2
3/4
”
8
5/8
”
(30”) 11
5/16
”, (36”) 12
1/2
”
(42”) 12
1/2
”, (48“) 12
1/2
”
1
15/16
”
elec
k/o
(30”) 29
3/4
”, (36”) 35
3/4
”
(42”) 41
3/4
”, (48“) 47
11/16
”
(30”) 14”, (36”) 17”
(42”) 19
7/8
”, (48“) 22
7/8
”
C/L
13
9/16
”
20
3/4
”
7
7/8
”
1
3/8
”
9
15/16
”
1
1/16
”
(30”) 11
5/16
”
(36”) 12
1/2
”
(42”) 12
1/2
”
(48“) 12
1/2
”
C/L
3
1/16
”
6
7/8
”
6
7/8
”
elec
k/o
TOP
SIDE
FRONT BACK

11
Installation – $.6SHFL¿FDWLRQV
(30”) 29 3/4”, (36”) 35 7/8”
14
3/4”
7”
1
7/8”
9 15/16”
1 1/16”
(30”) 11 3/8”
(36”) 14
3/8”
C/L
3 1/16”
6 7/8”
elec
k/o
TOP
SIDE
FRONT BACK
10 1/4”
1 5/8”
Ø 6
7/8
”
(30”) 27 7/8” (36”) 34”
C/L
(30”) 11
3/8” (36”) 14
3/8
”
2 1/4”
4
3/4”
22
1/8”
2 1/8”

12
www.zephyronline.com
Installation – $.6SHFL¿FDWLRQV
3
1/16
”
1
7/16
”
9
15/16
”
(30”) 27
7/8
”, (36”) 33
7/8
”, (42”) 39
7/8
”
4
1/2
”
1
7/8
”
8
5/8
”
12”
2”
elec
k/o
(30”) 29
3/4
”, (36”) 35
3/4
”, (42”) 41
3/4
”
(30”) 14”, (36”) 17”, (42”) 20”
C/L
15
3/8
”
22
1/4
”
6
3/8
”
1
3/8
”
9
15/16
”
1
1/16
”
C/L
3
1/16
”
5
7/8
”
5
7/8
”
elec
k/o
TOP
SIDE
FRONT BACK
12”
5
1/2
”

13
Installation – 3-1/4”x10” rectangular ducting preparation
%\GHIDXOWWKH7\SKRRQDQG+XUULFDQHDUHSUHFRQ¿JXUHGIRUURXQGYHUWLFDOGXFWLQJ
%\GHIDXOWWKH&\FORQHLVSUHFRQ¿JXUHGIRUURXQGYHUWLFDOGXFWLQJ
1. Using a Philips-head screwdriver remove the screws and
round vertical transition adapter from top of hood body.
2. Replace round vertical transition adapter with
rectangular transition adapter. Do not secure to hood body
yet.
3ODFH[UHFWDQJXODUFROODURQWRSRIUHFWDQJXODU
transition adapter. Secure rectangular adapter and
rectangular collar to hood body using the previously
removed screws from step 1.
3-1/4"x10" Rectangular Vertical Ducting

14
www.zephyronline.com
Installation – 3-1/4”x10” rectangular ducting preparation
%\GHIDXOWWKH7\SKRRQDQG+XUULFDQHDUHSUHFRQ¿JXUHGIRUURXQGYHUWLFDOGXFWLQJ
%\GHIDXOWWKH&\FORQHLVSUHFRQ¿JXUHGIRUURXQGYHUWLFDOGXFWLQJ
1. Using a Philips-head screwdriver remove the screws and
round vertical transition adapter from the top of the hood.
4. Replace round vertical transition adapter with
rectangular transition adapter. Do not secure to hood body
yet.
3ODFH[UHFWDQJXODUFROODURQEDFNRIKRRG
and secure using the screws that previously secured the
rectangular cover plate.
3-1/4"x10" Rectangular Horizontal Ducting
3ODFH[UHFWDQJXODUFRYHUSODWHRYHUWKH
rectangular opening on top of hood from step 4. Secure
rectangular transition adapter and cover plate to hood body
using the previously removed screws from step 1.
3. Typhoon ONLY. Remove the two plastic air diverter
blocks. The blocks are located in the hood and can be
accessed from the top when the round transition adapter is
removed.
2. Using a Philips-head screwdriver, remove the screws
DQG[UHFWDQJXODUFRYHUSODWHIURPEDFNRIKRRG

15
Installation – Preparing Electrical
ELECTRICAL
WARNING
$OO(OHFWULFDOZRUNPXVWE\SHUIRUPHGE\TXDOL¿HGHOHFWULFLDQRUSHUVRQZLWKVLPLODUWHFKQLFDO
knowledge and background.
For personal safety, remove house fuse or open circuit breaker before beginning installation. Do not use
extension cord or adapter plug with this appliance.
Follow national electrical codes or prevailing local codes and ordinances.
Electrical Supply:
This appliance requires a 120V 60Hz electrical supply, and connected to an individual, properly
grounded branch circuit, protected by a 15 or 20 ampere circuit breaker or time delay fuse. Wiring must
be 2 wire w/ ground. Please refer to Electrical Diagram labeled on product.
Cable Lock:
$FDEOHORFNLQJFRQQHFWRUQRWVXSSOLHGPLJKWDOVREHUHTXLUHGE\ORFDOFRGHV&KHFNZLWKORFDO
requirements and codes, purchase and install appropriate connector if necessary.
Cable Lock

16
www.zephyronline.com
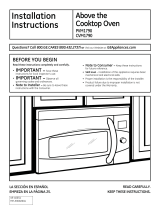
Installation – Mounting the Range Hood
3UHSDUHGXFWORFDWLRQRQKRRGYHUWLFDORU
KRUL]RQWDO5HIHUWR3DJHVIRUGXFWLQJ
options.
2. Measure and cut out duct and electrical
openings in cabinet or wall to match up with
the hood. Ducting and electrical dimensions
can be found on Pages 10-12. Note: Make
sure duct opening is large enough to apply
aluminum duct tape.
3. Reinforce cabinet bottom with wood strips
if additional strengthening is required or if
cabinets are framed.
4. Remove bottom panel from hood using a
Philips head screwdriver to remove each of
the screws. Also disconnect lighting harness
by pressing in on the clip to release the lights
from the internal wiring.
,QVWDOOZRRGVFUHZVWRFDELQHWERWWRP
by following the installation screw hole
dimensions on Page 10. These screws will be
used to secure the hood to the cabinet.
6. Lift hood onto screws located on cabinet
bottom and lock into place. Make sure all
NH\KROHVFRYHUWKHVFUHZV7LJKWHQHDFK
screw to secure hood to cabinet. Note: For
30” Typhoon models you will need an 8” - 10”
long shaft for your screwdriver/drill to reach the
front screws.
7. Install electrical.
8. Install duct work and seal with aluminum duct
tape.
9. Power up hood and check for leaks around
duct tape and test all functions.
10. Reinstall bottom panel and re-connect lighting
harness.
11. Slide residue cups into their openings on the
bottom of the hood. Install safety grilles over
each blower opening and secure with the two
safety grille screws.
Hood is designed for installation under a
kitchen cabinet. See Fig. 1 for details.
bottom panel &
lighting harness
wood blocking
installation screws
and key-holes
duct work
residue cups &
safety grilles
electrical
duct tape
Fig 1

17
&RQWUROV$&79HUL¿FDWLRQ±AK21 Capacitive Touch
Q 2 3
1
Power / Delay Off
4
Lights On/Off
5 Speed Indicators
Fan Speed Decrease
Fan Speed Increase3
1
Power / Delay Off Button
- Button will turn power on and off for entire hood (fan and lights).
- Hood will remember the last speed and light level it was last turned off at.
(Example: Press button to turn off hood when on fan speed 3 and high lights.
Press button again and the hood will turn back on at speed 3 and high lights.)
Delay Off
- With the fan on, press and hold the button for two seconds. The fan will change to
speed Q and the 5 minute delay off timer will start.
- Speed indicators starting with level 5 will illuminate and blink in accordance with the time
remaining until the fan an lights automatically turn off.
- Pressing button while delay off function is enabled will turn the hood off and cancel
the delay off function.
ACT Verification
- Airflow Control Technology (ACT) allows the installer to set the maximum fan CFM to
align with local codes and regulations.
- To verify the maximum fan CFM:
- With hood off, hold the button for five seconds. If all speed level indicators
illuminate = default maximum CFM. If speed Q, 2 & 3 level indicators illuminate =
390 maximum CFM. If speed Q & 2 level indicators illuminate = 290 maximum CFM
2
Fan Speed Decrease Button
- Press this button to decrease fan speed. 6, 5, 4, 3, 2, Q (Quiet).
- If fan is off, press this button to turn on fan at last speed it was turned off at.
3
Fan Speed Increase Button
- Press this button to increase fan speed. Fan on, Q (Quiet), 2, 3, 4, 5, 6
- If fan is off, press this button to turn on fan at last speed it was turned off at.
4
Lights Button
- Lights are two levels, high and low.
- From off, press one time for high. Press again for low. Press again to power lights off.
5
Speed Level Indicators
- Fan is six speed levels. Q (Quiet), 2, 3, 4, 5 and 6.
4 5 6

18
www.zephyronline.com
&RQWUROV$&79HUL¿FDWLRQ±AK25 Electronic Touch
1
Power / Delay Off Button
- Button will turn power on and off for entire hood (fan and lights.)
- Hood will remember the last speed and light level it was last turned off at.
(Example: Press button to turn off hood when on fan speed 3 and high lights.
Press button again and the hood will turn back on at speed 3 and high lights.)
Delay Off
- With the fan on, press and hold the button for two seconds. The fan will change to
speed 1, the button will blink on and off indicating the 5 minute delay off timer has started.
- Pressing button while delay off function is enabled will turn the hood off and cancel
the delay off function.
ACT Verification
- Airflow Control Technology (ACT) allows the installer to set the maximum fan CFM to align with
local codes and regulations.
- To verify the maximum fan CFM:
- With hood off, hold the button for five seconds. If all three fan speed indicators
illuminate = default maximum CFM. If speed level 1 and 2 indicators illuminate = 390
maximum CFM. If only speed level 1 indicator illuminates = 290 maximum CFM.
2
Lights Button
- Lights are two levels, high and low.
- From off, press one time for high. Press again for low. Press again to power lights off.
3
Speed Level Indicators
- Fan is three speed levels. 1 for low speed, 2 for medium speed, and 3 for high speed.
/
123
1
Power / Delay Off
2
Lights On/Off
3 Speed Indicators
/
/
/
/
/
/
/
/
/