Page is loading ...

Aspire 3020/5020 Series
Service Guide
PRINTED IN TAIWAN
Service guide files and updates are available
on the ACER/CSD web; for more information,
please refer to http://csd.acer.com.tw
download service manual and resetter printer at http://printer1.blogspot.com

II
Revision History
Please refer to the table below for the updates made on Aspire 3020/5020 service guide.
Date Chapter Updates
download service manual and resetter printer at http://printer1.blogspot.com

III
Copyright
Copyright © 2005 by Acer Incorporated. All rights reserved. No part of this publication may be reproduced,
transmitted, transcribed, stored in a retrieval system, or translated into any language or computer language, in
any form or by any means, electronic, mechanical, magnetic, optical, chemical, manual or otherwise, without
the prior written permission of Acer Incorporated.
Disclaimer
The information in this guide is subject to change without notice.
Acer Incorporated makes no representations or warranties, either expressed or implied, with respect to the
contents hereof and specifically disclaims any warranties of merchantability or fitness for any particular
purpose. Any Acer Incorporated software described in this manual is sold or licensed "as is". Should the
programs prove defective following their purchase, the buyer (and not Acer Incorporated, its distributor, or its
dealer) assumes the entire cost of all necessary servicing, repair, and any incidental or consequential
damages resulting from any defect in the software.
Acer is a registered trademark of Acer Corporation.
Intel is a registered trademark of Intel Corporation.
Pentium and Pentium II/III are trademarks of Intel Corporation.
Other brand and product names are trademarks and/or registered trademarks of their respective holders.
download service manual and resetter printer at http://printer1.blogspot.com

IV
Conventions
The following conventions are used in this manual:
SCREEN MESSAGES Denotes actual messages that appear
on screen.
NOTE Gives bits and pieces of additional
information related to the current
topic.
WARNING Alerts you to any damage that might
result from doing or not doing specific
actions.
CAUTION Gives precautionary measures to
avoid possible hardware or software
problems.
IMPORTANT Reminds you to do specific actions
relevant to the accomplishment of
procedures.
download service manual and resetter printer at http://printer1.blogspot.com

V
Preface
Before using this information and the product it supports, please read the following general information.
1. This Service Guide provides you with all technical information relating to the BASIC CONFIGURATION
decided for Acer's "global" product offering. To better fit local market requirements and enhance product
competitiveness, your regional office MAY have decided to extend the functionality of a machine (e.g.
add-on card, modem, or extra memory capability). These LOCALIZED FEATURES will NOT be covered
in this generic service guide. In such cases, please contact your regional offices or the responsible
personnel/channel to provide you with further technical details.
2. Please note WHEN ORDERING FRU PARTS, that you should check the most up-to-date information
available on your regional web or channel. If, for whatever reason, a part number change is made, it will
not be noted in the printed Service Guide. For ACER-AUTHORIZED SERVICE PROVIDERS, your Acer
office may have a DIFFERENT part number code to those given in the FRU list of this printed Service
Guide. You MUST use the list provided by your regional Acer office to order FRU parts for repair and
service of customer machines.
download service manual and resetter printer at http://printer1.blogspot.com

VIdownload service manual and resetter printer at http://printer1.blogspot.com

Chapter 1 1
Features
Below is a brief summary of the computer’s many feature:
Platform and memroy
Aspire 3020 Series
TMobile AMD SempronTM processor 2600+/3000+ or higher with 128 KB L2 cache, or
TMobile AMD SempronTM processor 2800+/3100+ or higher with 256 KB L2 cacher
Aspire 5020 Series
TAMD TurionTM 64 ML-28/ML-32 processor at 1.6/1.8 GHz or higher with 128 KB L1 cache and 512
KB L2 cache, or
TAMD TurionTM 64 ML-30/ML-34/ML-37/ML-40 processor at 1.6/1.8/2.0/2.2 GHz or higher with 128
KB L1 cache and 1MB L2 cache
TATI RS480M and SB400 chipset
T256/512 MB of DDR333 memory, upgradeable to 2 GB using two soDIMM modules
Display
TThim-Film Transistor (TFT) displaying at :
t15.0” XGA (1024 x 768)
t15.0” SXGA+ (1400 x 1050)
t15.4” WXGA (1280 x 800)
t15.4” WXGA+ (1680 x 1050)
TATI MOBILITYTM RADEONTM X600 or ATI MOBILITYTM RADEONTM X700
TSimultaneous display on LCD and CRT display
TDualViewTM support
TMPEG-2/DVD hardware-assisted capability
Storage subsystem
TOne 40 GB or harger hard disk drive
TOptical drive options:
tDVD-Super Multi
tDVD-Dual
tDVD/CD-RW combo
T6-in-1 card reader (MS/MS PRO/MMC/SD/SM/xD-Picture Card
Input devices
T88/89-key keyboard
TTouchpad with 4-way integrated scroll button
TSix easy-launch buttons
System Specifications
Chapter 1
download service manual and resetter printer at http://printer1.blogspot.com

2Chapter 1
Audio
TAudio system with two built-in speakers
TMS-Sound compatible
Communication
TModem: 56K ITU V.90/V.92 modem with PTT approval; wake-on ring ready
TLAN: 10/100/1000 Mbps Fast Ethernet (for selected models); wake-on-LAN ready
TWLAN (manufacturing option): integrated 802.11b/g dual band (for selected models), or 802.11a/b/
g tri-mode WI-Fi CERTIFIEDTM WLAN solution (for selected models); Acer SignalUp wireless
technology support
TWPAN (manufacturing option): integrated Bluetooth®
Human-centric design and ergonomics
TRugged, yet extremely portable design
TStylish appearance
TFull-size keyboard with four programmable launch keys
TErgonomically-centered touchpad pointing device
TInternet 4-way scroll button
I/O Ports
TFour USB 2.0 ports
TIEEE 1394 port
TEthernet (RJ-45) port
TModem (RJ-11) port
TExtternal display (VGA) port
TS-video/TV-out port
TMicrophone/line-in jack
THeadphones/speaker/line-out port
TInfrared (FIR) port
TType II PC Card slot
T6-in-1 card reader
TDC-in jack for AC adaptor
download service manual and resetter printer at http://printer1.blogspot.com
Chapter 1 3
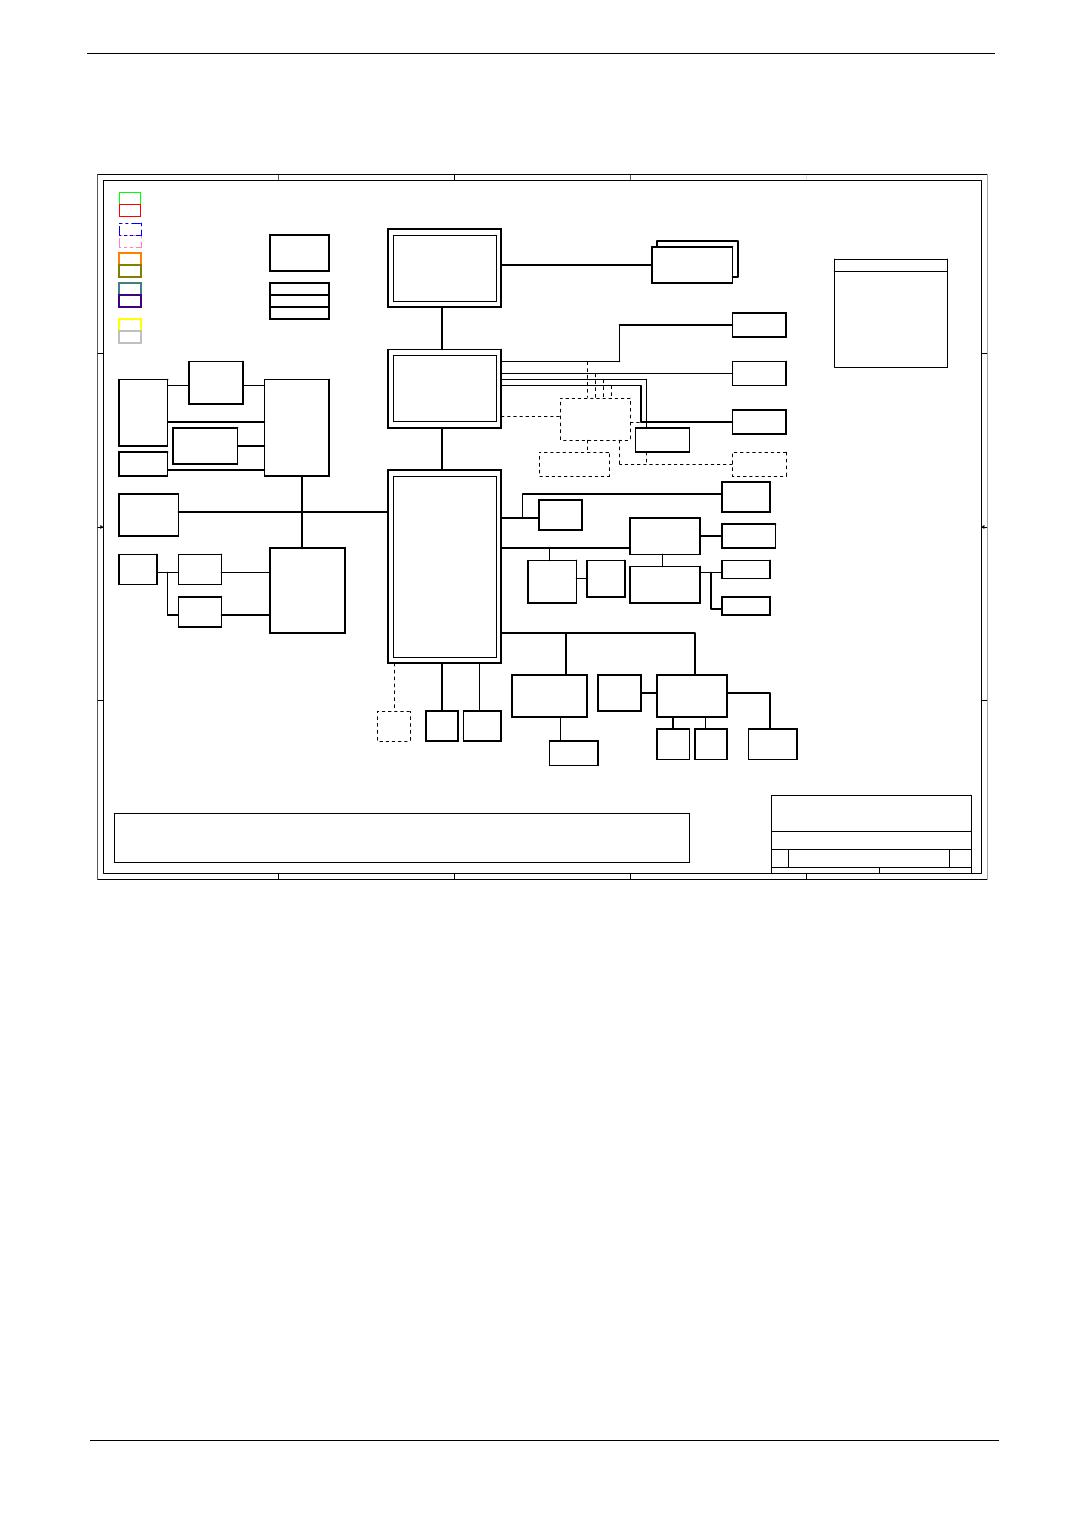
System Block Diagram
5
5
4
4
3
3
2
2
1
1
D D
C C
B B
A A
Title
Size Document Number Rev
Date: Sheet of
Bolsena
SB
BLOCK DIAGRAM
A3
158Monday, February 14, 2005
<Variant Name>
Title
Size Document Number Rev
Date: Sheet of
Bolsena
SB
BLOCK DIAGRAM
A3
158Monday, February 14, 2005
<Variant Name>
Title
Size Document Number Rev
Date: Sheet of
Bolsena
SB
BLOCK DIAGRAM
A3
158Monday, February 14, 2005
<Variant Name>
VRAM x4
53,54(M26/M24 diff.)
DVI-D
TMDS
Bolsena Block Diagram
ISA ROM
SVIDEO/COMP
RGB CRT
LVDS
CRT
TVOUT
LCD
ATA 133
M26/M24
LPC Bus / 33MHz
6-CH
AC97 2.2
LPC I/F
HyperTransport
6.4GB/S 16b/8b
35W/25W
AMD CPU
DDR x2
200-PIN DDR SODIMM
KBC
KB3910
Touch
Pad
Int.
KB
ATI
SB400
ACPI 2.0
PCI 6xUSB 2.0
ATI
AGTL+ CPU I/F + UMA
CLK GEN
PCI-Express
x2
802.11a/b/g
Mini-PCI
PCI Bus / 33MHz
PCB Layer Stackup
RS480M
34
35 35
31
18,19,20,21,22
11,12,13,14
4,5,6,7
3
50,51,52
17
16
16
ATI
PCI Express x16
DDR 333/400
8,9,10
TSP2220A
1* Slot Cardbus
1* 1394
CardReader
28
PCMCIA I/F
PCI 7411
TI
28
PCMCIA
SLOT
1394 4pin
Conn
Support
TypeII
PWR SW
26,27
28
IDT CV137
PIDE
DVD/
CD-RW
25
SIDE
HDD
25
AC97
MDC Card OP AMP
G1421
3324
MODEM
Line In
MIC In
33
Line Out
33
NS SIO
PC87392
37
10/100Mb
USB x 4
24
RJ11
CONN
CODEC
32
ALC655
Int. SPKR
33
PCI LAN
Realtek
RTL8110SBL
1000/100/10
RTL8100C
100/10
TXFM
30
RJ45
30
1000Mb
TXFM
30
L1: Signal 1
L2:VCC
L3: Signal 2
L4: Signal 3
L5: GND
L6: Signal 4
30
37
FIR
Thermal
& Fan
G792
23
15
29
36
XBUS
91.4C501.001 (04243)
MS/xD
SM/MMC/SD
5 in 1
28
SATA
25
RJ45-11 LINE
OUT
Port Replicator 4 (124 PIN)
PRINTER
AC
IN CRT PS2 LINE IN
SEARIAL
PORT MIC
TV
OUT
DVI PCIeX2 SMBUS
BlueTooth
miniUSB
24
(EZ4 only )
Dummy when use 'UMA'
Dummy when use 'DIS'
Dummy when 'USE EZ4'
Dummy when 'NO EZ4'
Dummy when use '10/100'
Dummy when use 'GIGA'
Dummy when use 'SATA'
Dummy when use 'IDE'
CH7307C
15
LEDs
17
BUTTONs
35
RTC BAT.
18
See 'TEXT' in 0MEMO or 1MEMO property in component
Power Block Diag -> Page 40
Dummy when use ''M26'
Dummy when use ''M24'
download service manual and resetter printer at http://printer1.blogspot.com
4Chapter 1
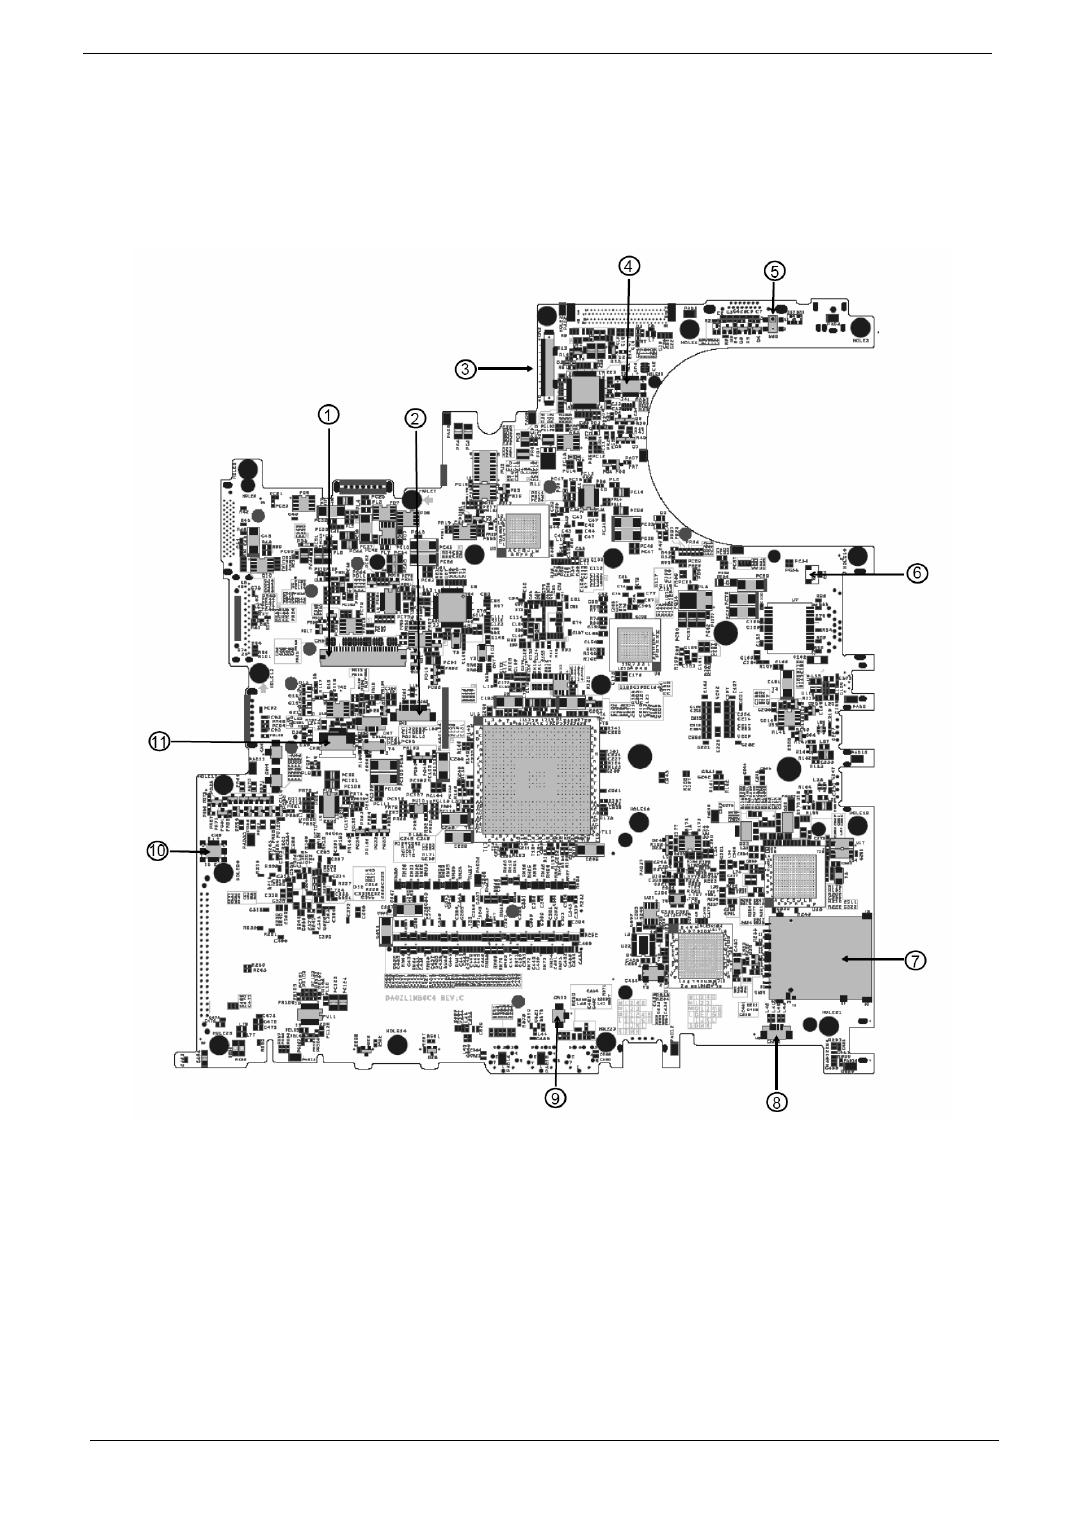
Board Layout
Top Vi e w
1 Keyboard Connector 7 3 in 1 Connector
2 Bluetooth Board Connector 8 Speaker Connector
3 LCD Cable Connector 9 Internal Microphone Connector
4 LED Board Connector 10 Modem Board Connector
5 Lid Switch 11 Touchpad Board Connector
6 Modem Cable Connector
download service manual and resetter printer at http://printer1.blogspot.com
Chapter 1 5
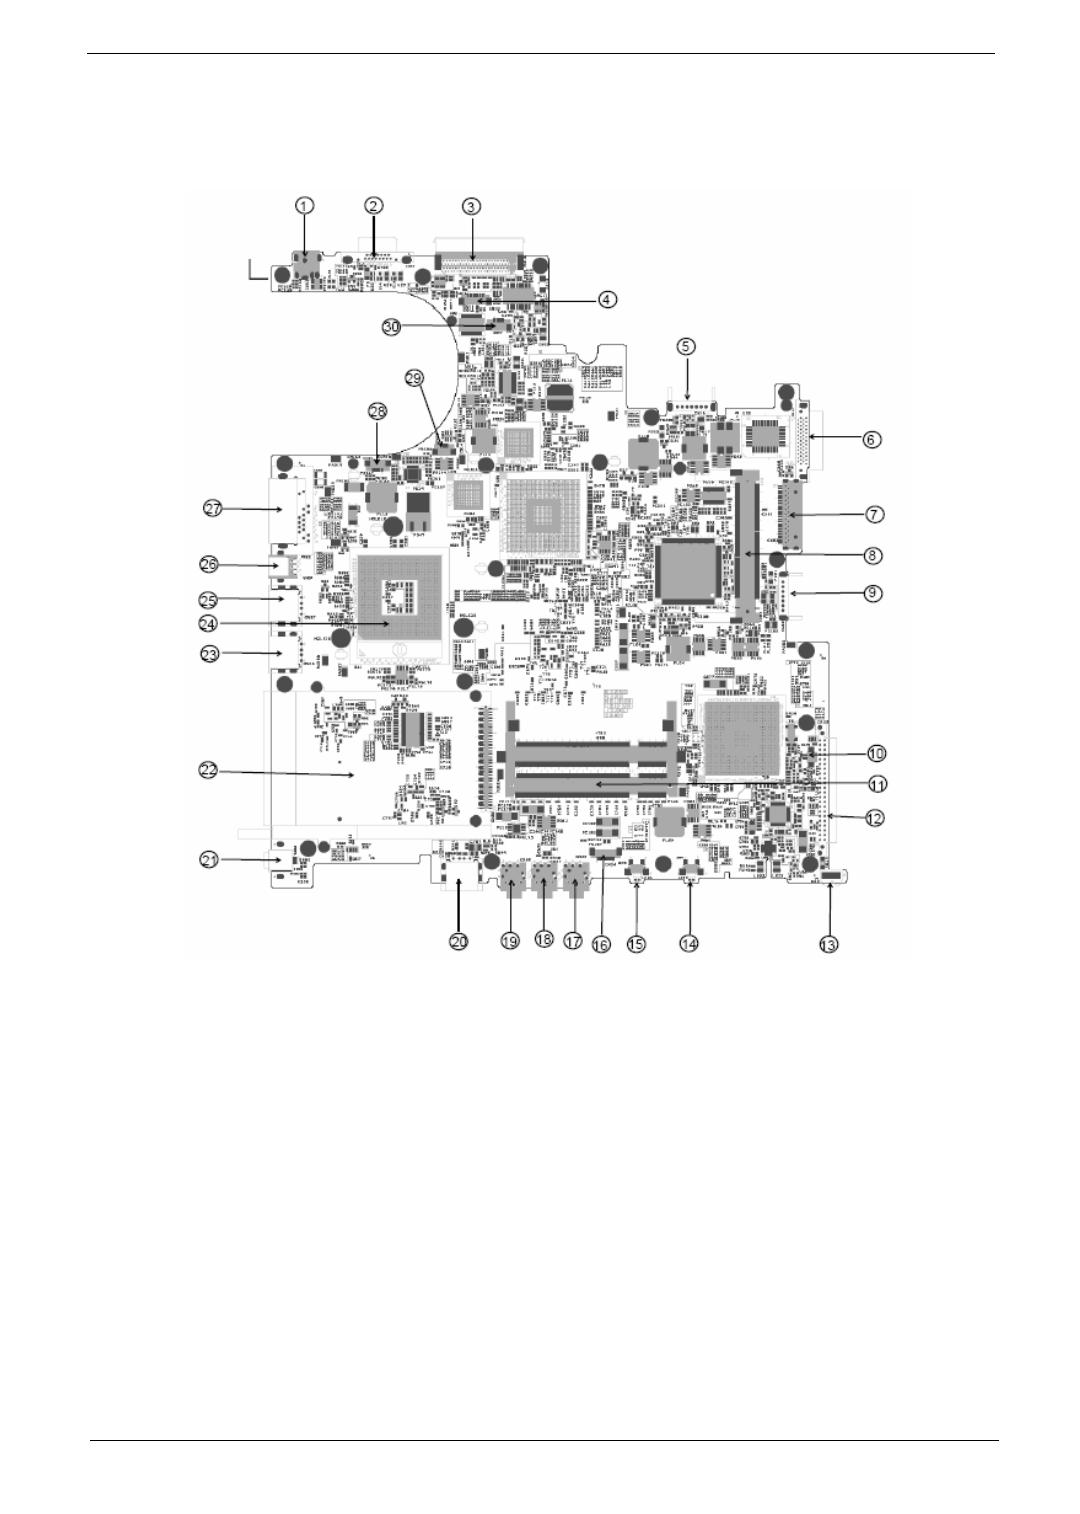
Bottom View
1 Power Jack 16 Audio Cable Connector
2 CRT 17 Line-in Connector
3 Docking 18 Headphone Out Connector
4 Audio Cable Connector 19 Microphone-in Connector
5 Main Battery Connector 20 USB Connector
6 ODD Connector 21 IEEE 1394 Connector
7 Media Bay Connector 22 PCMCIA
8 Mini PCI Slot 23 USB Connector
9 Second Battery Connector 24 CPU Socket
10 RTC Battery Connector 25 USB Connector
11 DDR DIMM Connector 26 S-Video
12 HDD Connector 27 RJ45 and RJ11 Connector
download service manual and resetter printer at http://printer1.blogspot.com

6Chapter 1
13 IR 28 LAN Cable Connector
14 Bluetooth Switch 29 FAN Connector
15 Wireless Switch 30 LAN Cable Connector
download service manual and resetter printer at http://printer1.blogspot.com
Chapter 1 7
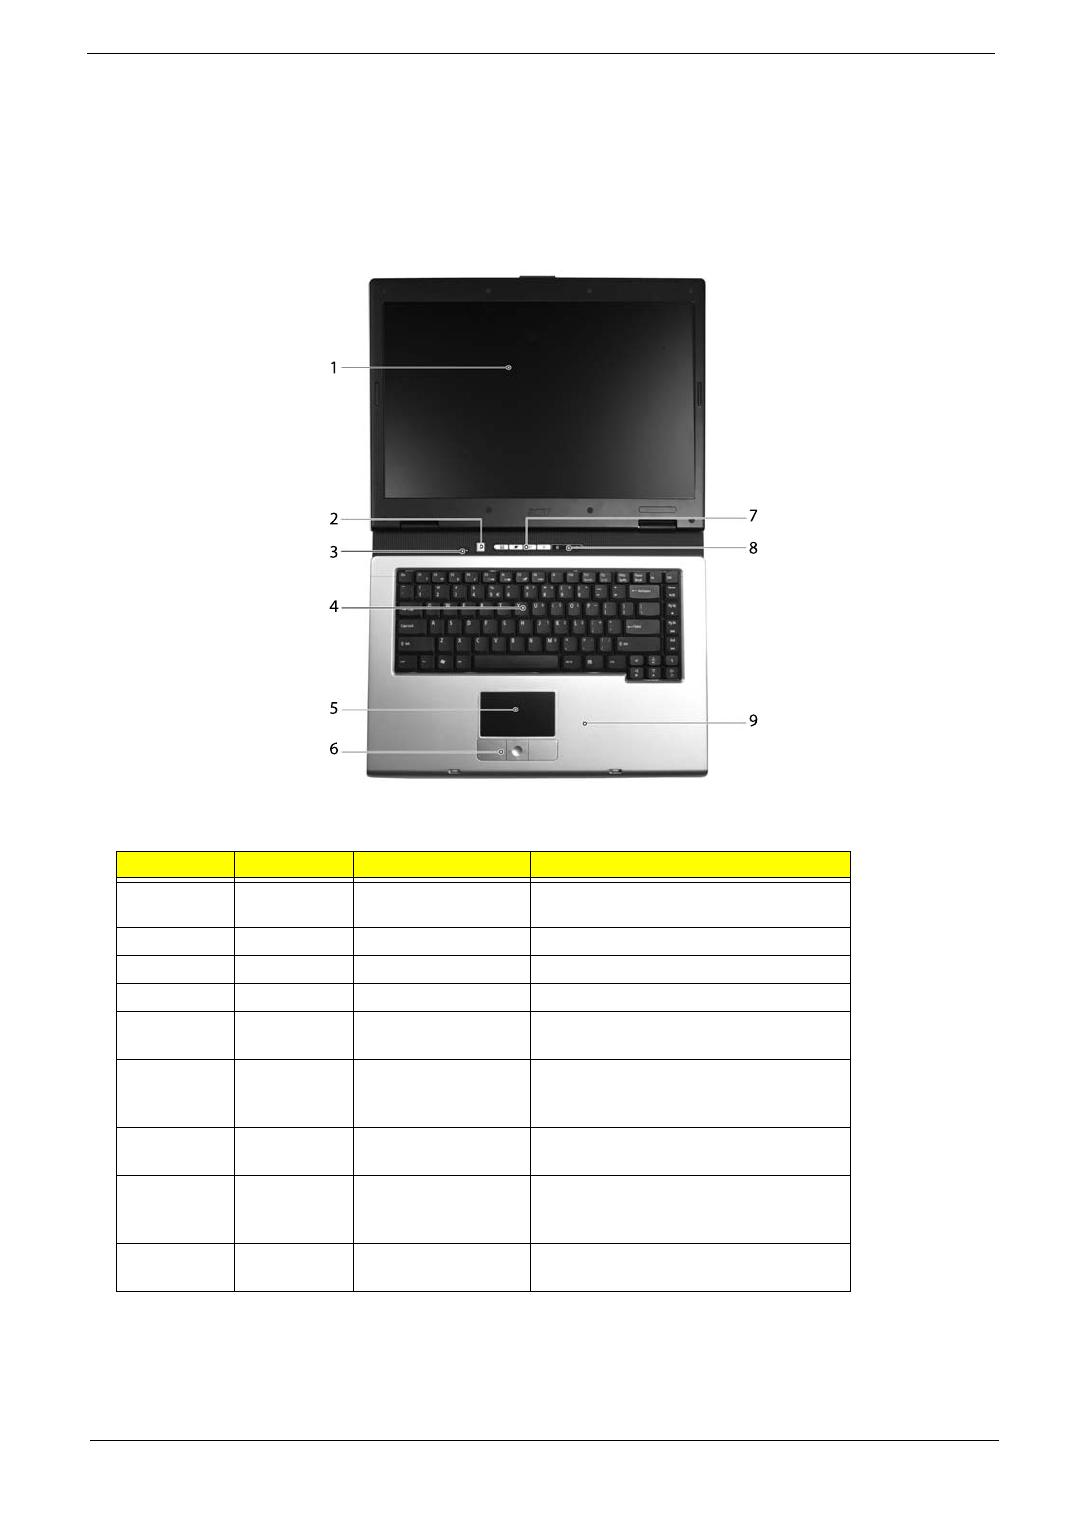
An Aspire tour
After knowing your computer features, let us show you around your new TravelMate computer.
Front View
#Icon Item Description
1 Display screen Also called LCD (liquid-crystal display),
displays computer output.
2 Power button Turns the computer on and off.
3 Microphone Internal microphone for sound recording.
4 Keyboard For entering data into your computer.
5 Touchpad Touch-sensitive pointing device which
functions like a computer mouse.
6 Click buttons (left,
center and right)
The left and right buttons function like the
left and right mouse buttons; the center
button serves as a 4-way scroll button.
7 Launch keys Buttons for launching frequently used
programs.
8 Status indicators Light-Emitting Diodes (LEDs) that turn on
and off to show the status of the
computer’s function and components.
9 Palmrest Comfortable support area for our hands
when you use the computer.
Just for Starters...
# Item Description
download service manual and resetter printer at http://printer1.blogspot.com
8Chapter 1
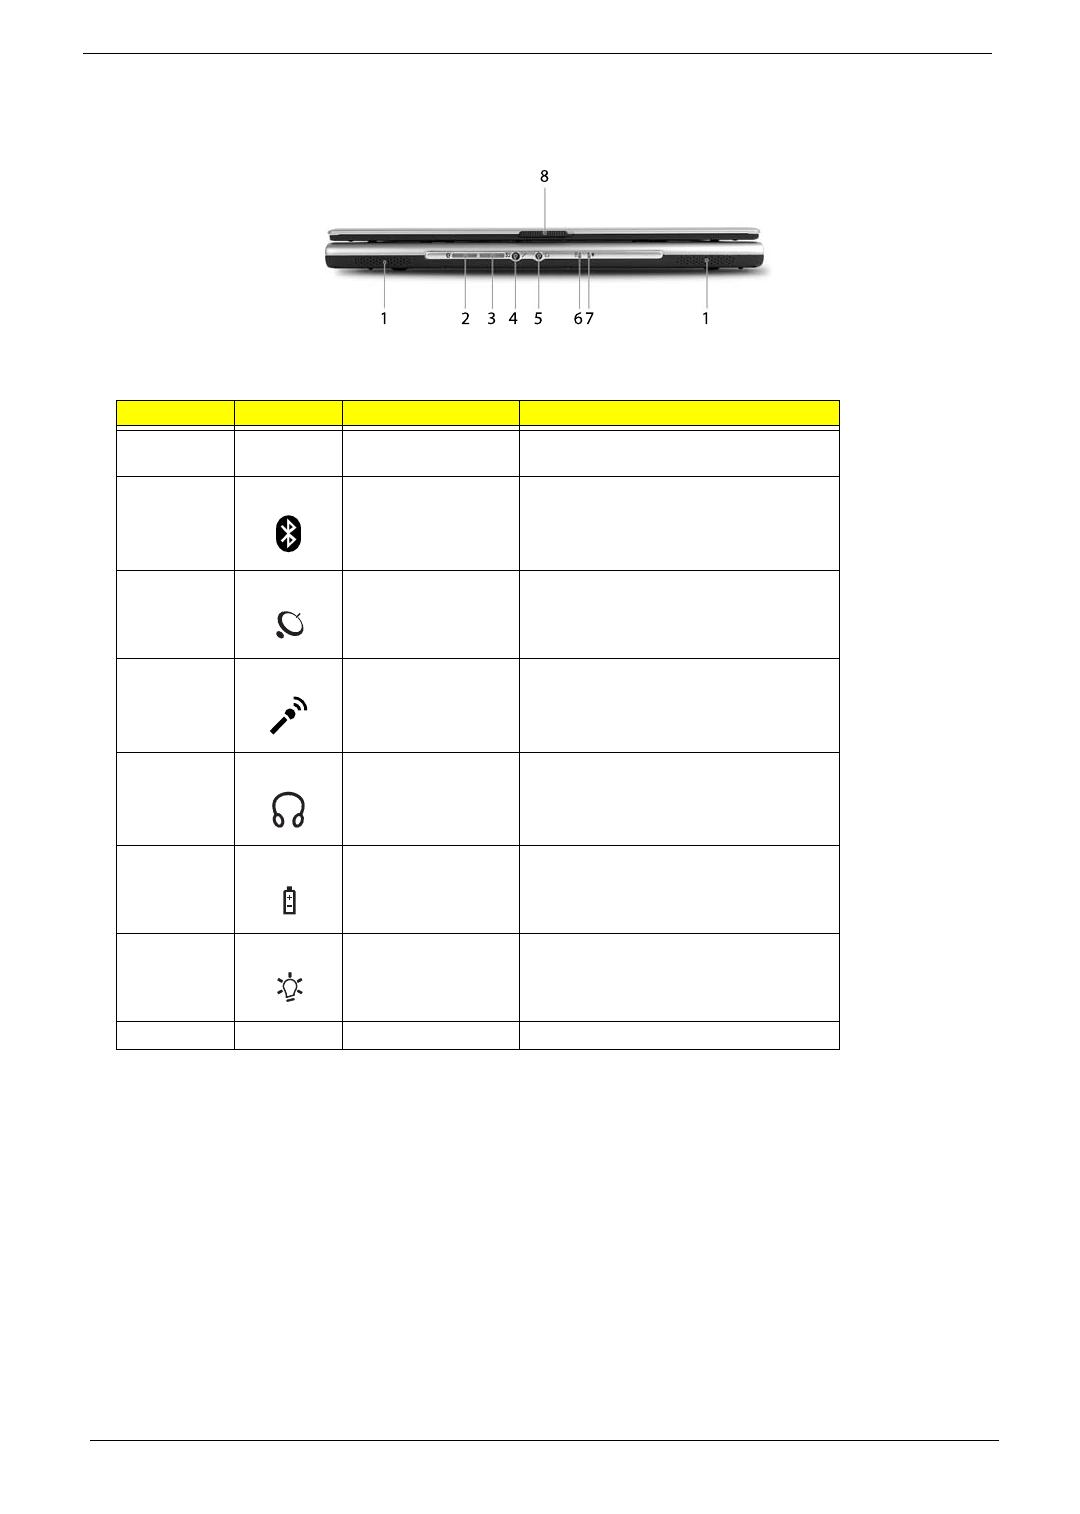
Closed Front View
#Icon Item Description
1 Speakers Left and right speakers deliver stereo audio
output.
2Bluetooth®
communication button/
indicator
Press to enable/disable Bluetooth function.
Lights to indicate the status of Bluetooth-
communications (manufacturing option).
3 Wireless
communication button/
indicator
Press to enable/disable Wireless function.
Lights to indicate the status of wireless
LAN communications. (manufacturing
option).
4 Line-in/mic-in jack Accepts input from external microphones.
5 Speaker/Line-Out/
Headphone jack
Connects to audio line-out devices (e.g.,
speakers, headphones).
6 Battery indicator Lights when the battery is being charged
7 Power indicator Lights when the computer is on.
8 Latch Locks and releases the lid.
"Launch keys" on page 10
# Icon Item Description
# Item Description
download service manual and resetter printer at http://printer1.blogspot.com
Chapter 1 9
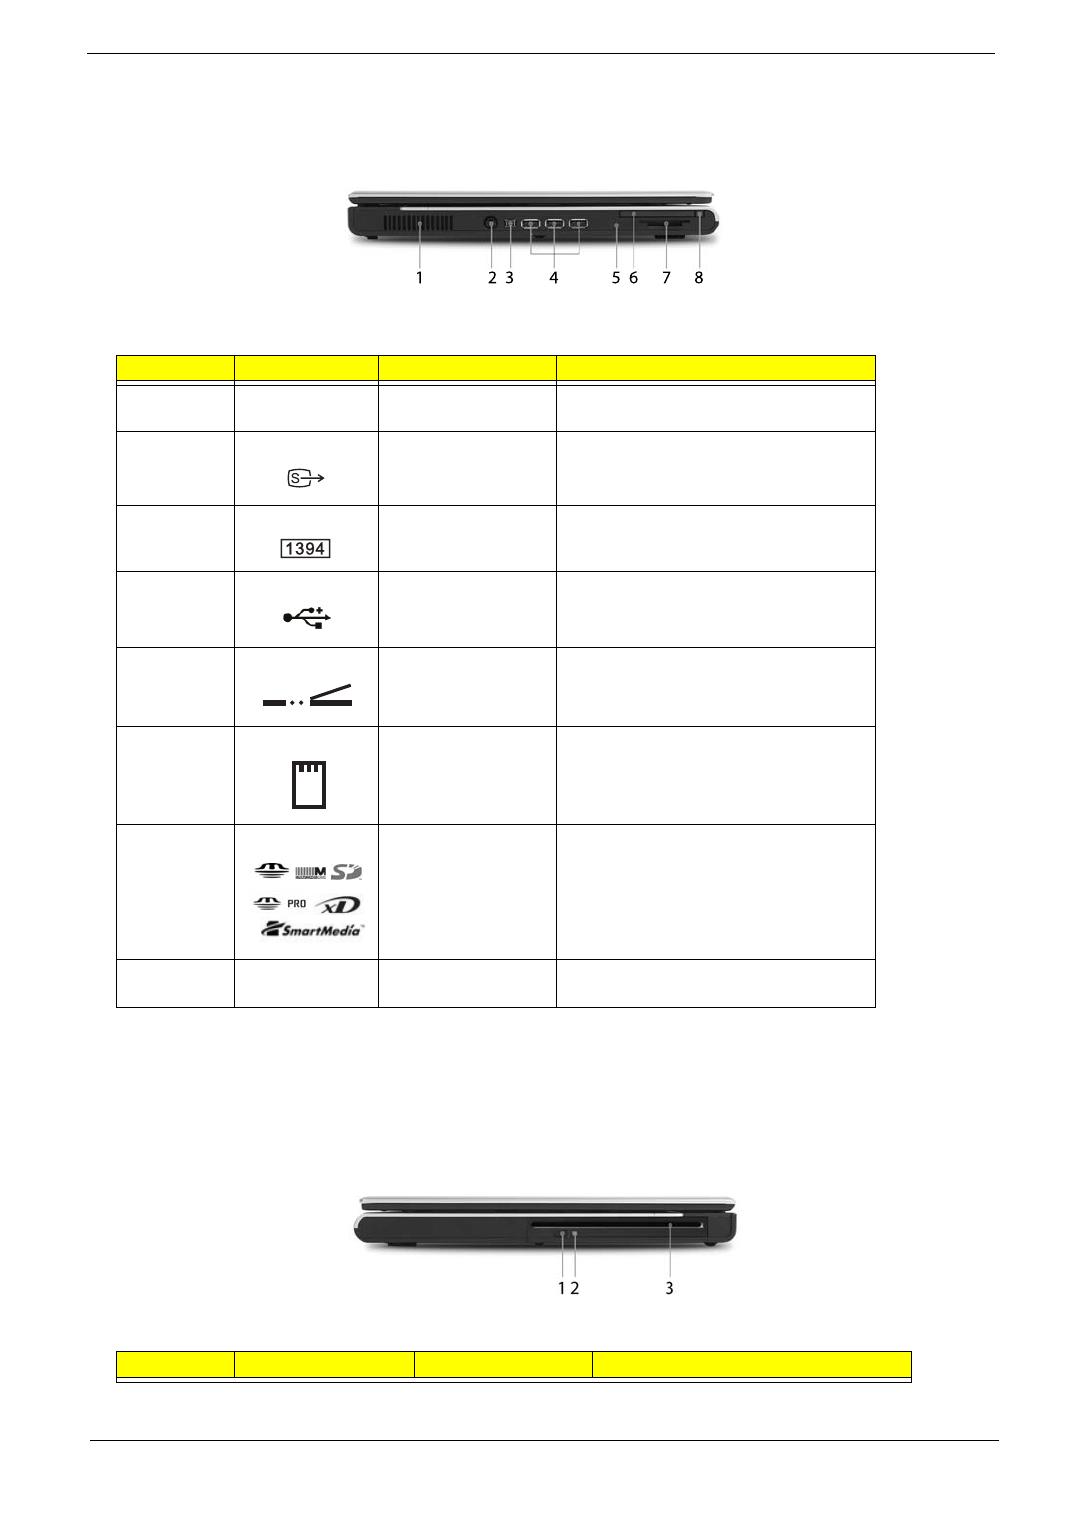
Left View
Right View
#Icon Item Description
1 Ventilation slots Enable the computer to stay cool, even
after prolonged use.
2 S-video/TV-out port Connects to a television or display device
with S-video input (manufacturing option).
3 IEEE 1394 port Connects to IEEE 1394 devices
(manufacturing option).
4 3 USB 2.0 ports Connects to USB 2.0 devices (e.g., USB
mouse, USB camera).
5 Infrared port Interfaces with infrared devices like infrared
printer and IR-aware computer
(manufacturing option).
6 PC Card slot Connects to one Type II PC Card.
7 6-in-1 card reader Accepts and MS, MS PRO, MMC, SD, SM
or xD-Picture card (manufacturing option).
Note: Only one card can operate at any
given time.
8 PC Card slot eject
button
Ejects the PC Card from the slot.
#Icon Item Description
# Icon Item Description
Note:
# Icon Item Description
Note:
# Item Description
# Icon Item Description
download service manual and resetter printer at http://printer1.blogspot.com

10 Chapter 1
Rear Panel
1 Optical drive eject
button
Ejects the optical drive tray from the drive.
2 Optical disk access
indicator
LED that indicates when an optical disk is
being read or written.
3 Optical drive Internal optical drive; accepts CDs or DVDs
depending on the optical drive type.
#Icon Item Description
1 Security Keylock Connects toa Kensington-compatible
computer security lock.
2 Power jack Connects to an AC adaptor.
3 Modem jack (RJ-11) Connects to a phone line.
4 Network jack Connects to an Ethernet 10/100/1000-
based network.
5 USB 2.0 port Connects to USB 2.0 devices (e.g., USB
mouse, USB camera).
6 External display port Connects a display device (e.g., external
monitor, LCD projector).
7 Ventilation slots Enable the computer to stay cool, even
after prolonged use.
Note:
# Item Description
# Icon Item Description
download service manual and resetter printer at http://printer1.blogspot.com

Chapter 1 11
Bottom Panel
Indicators
The computer has four easy-to-read status indicators on the upper-right above the keyboard, and four on the
front panel.
The power, battery and wireless communication status indicators are visible even when the LCD display is
closed.
#Item Description
1 Wireless LAN bay Houses the computer’s wireless LAN.
2 Battery lock Locks the battery in place.
3 Battery release latch Releases the battery for removal.
4 Battery bay Houses the computer’s battery pack.
5 Cooling fan Helps keep the computer cool.
Note: Do not cover or obstruct the opening
of the fan.
6 Memory and hard disk
bay
Houses the computer’s main memory and
hard disk (secured by a screw).
# Item Description
Note
# Icon Item Description
download service manual and resetter printer at http://printer1.blogspot.com

12 Chapter 1
NOTE: 1. Charging: The light shows amber when the battery is charging. 2. Fully charged: The light shows
green when in AC mode.
Launch Keys
Located at the upper-right, above the keyboard are four buttons. These buttons are called launch keys. The
are: mail, Web browser, Acer Empowering key “ “ and one user-programmable button.
Press “ “ to ru the Acer eManager. Please see “Acer eManager”. The mail and Web buttons are pre-set to
email and Internet programs, but can be reset by users. To set the Web browser, mail and programmable keys,
run the Acer Launch Manager.
Icon Function Description
Cap lock Lights when Cap Lock is activated
Num lock Lights when Num Lock is activated.
Media Activity Indicates when the hard disc or optical
drive is active.
Bluetooth Indicates the status of Bluetooth
communication.
Wireless LAN Indicates the status of wireless LAN
communication.
Power Lights up when the computer is on.
Battery Lights up when the battery is being
charged.
download service manual and resetter printer at http://printer1.blogspot.com
Chapter 1 13
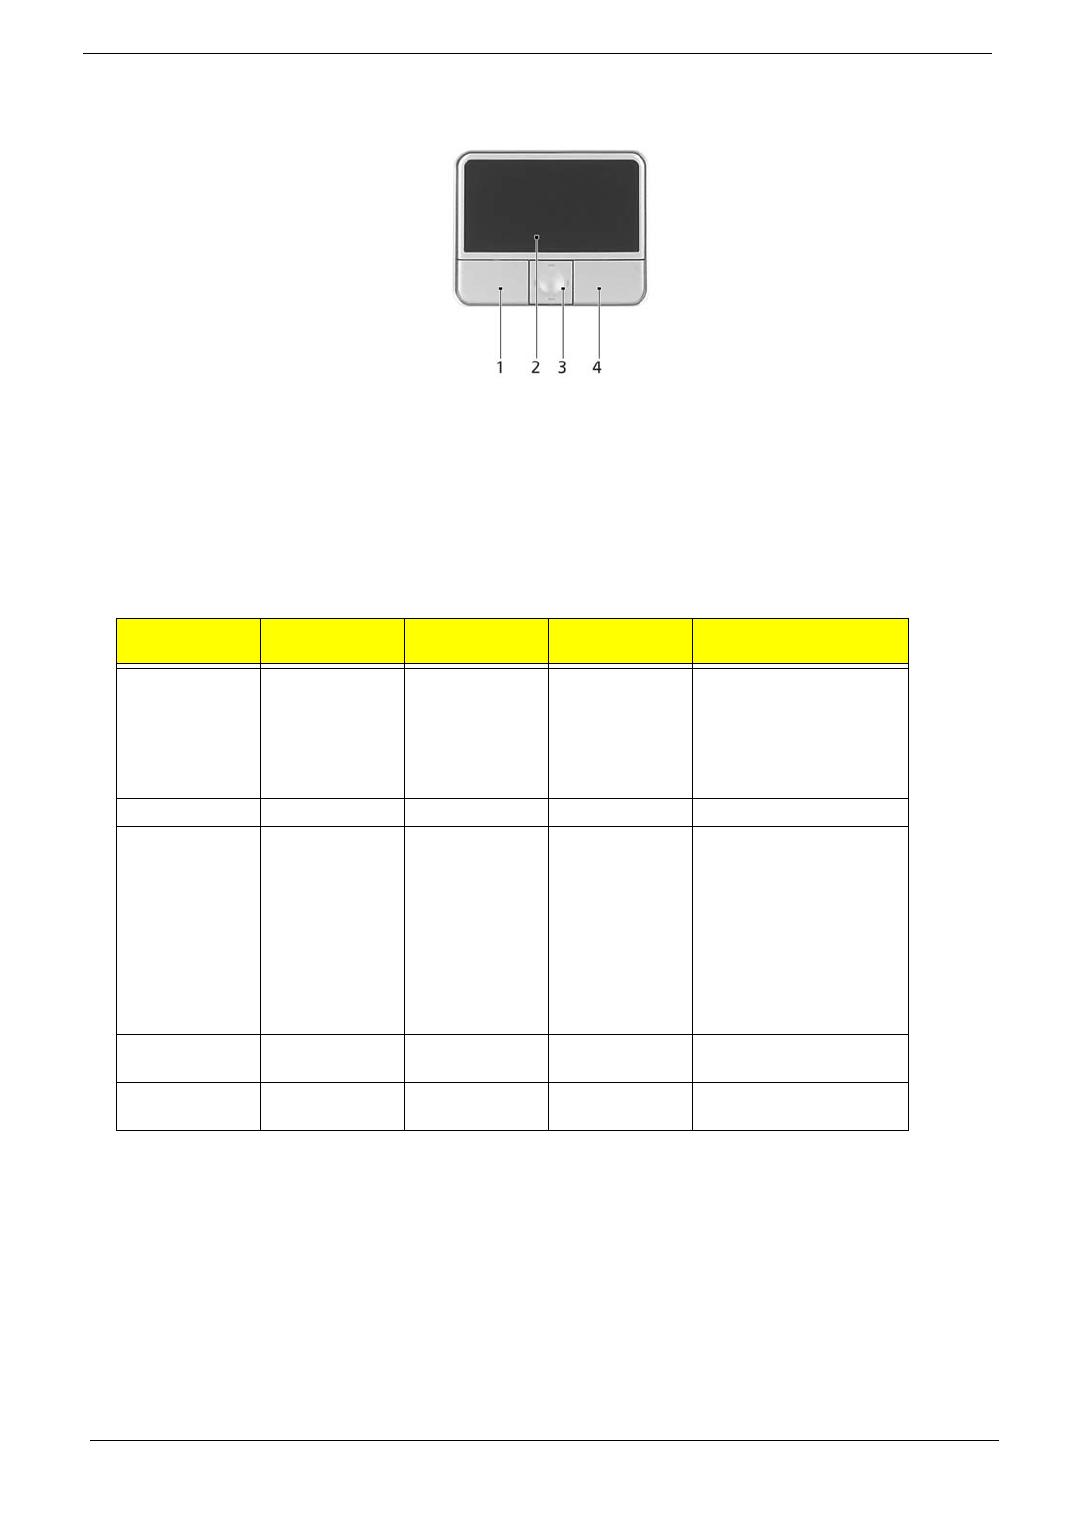
Touchpad
The built-in touchpad is a pointing device that senses movement on its surface. This means the cursor
responds as you move your finger across the surface of the touchpad. The central location on the palmrest
provides optimum comfort and support.
Touchpad Basics
The following teaches you how to use the touchpad:
Launch key Default application
Mail Email application (user-programmable)
Web browser Internet browser (user-programmable)
Acer eManager (user-programmable)
P User-programmable
download service manual and resetter printer at http://printer1.blogspot.com
14 Chapter 1
TMove your finger across the touchpad (2) to move the cursor.
TPress the left (1) and right (4) buttons located beneath the touchpad to perform selection and
execution functions. These two buttons are similar to the left and right buttons on a mouse.
Tapping on the touchpad is the same as clicking the left button.
TUse the 4-way scroll (3) button to scroll up or down and move left or right a page. This button
mimics your cursor pressing on the right scroll bar of Windows applications.
NOTE: Keep your fingers dry and clean when using the touchpad. Also keep the touchpad dry and clean. The
touchpad is sensitive to finger movements. Hence, the lighter the touch, the better the response.
Tapping too hard will not increase the touchpad’s responsiveness.
Function Left Button (1) Right Button
(4)
Main touchpad
(2) Center button (3)
Execute Click twice
quickly
Tap twice (at
the same speed
as double-
clicking the
mouse button)
Select Click once Tap once
Drag Click and hold,
then use finger
to drag the
cursor on the
touchpad
Tap twice (at
the same speed
as double-
clicking a
mouse button)
then hold finger
to the touchpad
on the second
tap to drag the
cursor.
Access context
menu
Click once
Scroll Click and hold to move
up/down/left/right.
download service manual and resetter printer at http://printer1.blogspot.com
/