Page is loading ...

Installation and Operating Instructions For
AP1610SS, AP2610SS, SST1H1,
SST1HA, SST2HA, SST2HB
Stainless Steel Water Filters
INSTR2071 1007
Installer: Please leave manual with homeowner.
Homeowner: Please retain for operation and
future maintenance instructions.

SAFETY INFORMATION
EXPLANATION OF SIGNAL WORD CONSEQUENCES
WARNING
CAUTION
IMPORTANT NOTES
Read, understand, and follow all safety information contained in these instructions prior to
installation and use of the AP1610SS, AP2610SS, SST1H1, SST1HA, SST2HA & SST2HB Stain-
less Steel Water Filters. Retain these instructions for future reference.
Intended use:
The AP1610SS, AP2610SS, SST1H1, SST1HA, SST2HA & SST2HB Stainless Steel Water Filters are intended for
use in fi ltering potable water in homes and have not been evaluated for other uses. These systems must be
installed as specifi ed in the installation instructions.
C
CAUTION
WARNING
Indicates a potentially hazardous situation, which, if not avoided, could result in
death or serious injury and/or property damage.
Indicates a potentially hazardous situation, which, if not avoided, may result in
minor or moderate injury and/or property damage.
Indicates a potentially hazardous situation, which, if not avoided, may result in
property damage.
To reduce the risk associated with choking:
• Do not allow children under 3 years of age to have access to small parts during the installation of this product.
To reduce the risk associated with ingestion of contaminants:
• Do not use with water that is microbiologically unsafe or of unknown quality without adequate disinfection before or
after the system.
To reduce the risk associated with a hazardous voltage due to an installer drilling through existing electric wiring
or water pipes in the area of installation:
• Do not install near electric wiring or piping which may be in the path of a drilling tool when selecting the position
to mount the fi lter bracket.
To reduce the risk of physical injury:
• Shut off inlet water supply and depressurize system as shown in manual prior to cartridge removal.
To reduce the risk of fi re or explosion:
• Use fi lter for liquid service only. Not for continuous gas service.
To reduce the risk associated with property damage due to water leakage:
• Read and follow Use Instructions before installation and use of this system.
• Installation and Use MUST comply with all state and local plumbing codes.
• Protect from freezing, remove fi lter cartridge when temperatures are expected to drop below 40°F (4.4°C).
• Do not install if water pressure exceeds 300 psi (2,070 kPa). If your water pressure exceeds 80 psi (552 kPa),
you must install a pressure limiting valve. Contact a plumbing professional if you are uncertain how to check your
water pressure.
• Do not install where water hammer conditions may occur. If water hammer conditions exist you must install a
water hammer arrester. Contact a plumbing professional if you are uncertain how to check for this condition.
• Do not use a torch or other high temperature sources near fi lter system, cartridges, plastic fi ttings or plastic
plumbing.
• On plastic fi ttings, never use pipe sealant or pipe dope. Use PTFE thread tape only, pipe dope properties may
deteriorate plastic.
• Take care when using pliers or pipe wrenches to tighten plastic fi ttings, as damage may occur if overtightening
occurs.
• Do not install in direct sunlight or outdoors without protection from precipitation.
• Mount fi lter in such a position as to prevent it from being struck by other items used in the area of installation.
• Ensure that the location and fasteners will support the weight of the system.
• Ensure all tubing and fi ttings are secure and free of leaks.
• The disposable fi lter cartridge MUST be replaced ever 6 months, at the rated capacity or if a noticeable reduc-
tion in fl ow rate occurs.
• Failure to follow instructions may void warranty.
• Allow a minimum of 2” (5.1 cm) clear space under fi lter to facilitate cartridge change.
• Install with the inlet and outlet ports as labeled. Make sure not to reverse connections.
CAUTION

GETTING STARTED
CAUTION
To reduce the risk associated with property damage due to water leakage:
• Installation and Use MUST comply with all state and local plumbing codes.
• Protect from freezing, remove fi lter cartridge when temperatures are expected to drop below 40°F (4.4°C).
• Mount fi lter in such a position as to prevent it from being struck by other items used in the area of installation.
WARNING
To reduce the risk associated with a hazardous voltage due to an installer drilling through existing electric wiring or
water pipes in the area of installation:
• Do not install near electric wiring or piping which may be in the path of a drilling tool when selecting the position to
mount the fi lter bracket.
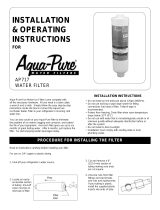
Your new Aqua-Pure® Stainless Steel Water Filter can be installed on your hot or cold water line, depending on the filter
cartridge used. Filter can be adapted to various pipe sizes by using reducing adapters on either end. Installation fit-
tings can be either sweated or threaded. Use galvanized fittings for installation on galvanized pipe.
City Water
Hot Water
Well Water Bypass Section can be installed around unit if desired using
either sweated or threaded valves.
Meter
Aqua-Pure
Sediment/
Rust Filter
Aqua-Pure Taste/
Odor Undersink
Filter
Aqua-Pure
AP400SS Scale
Filter
Hot Water
Heater
Aqua-Pure
Sediment/
Rust Filter
Aqua-Pure
Sediment/
Rust Filter
Aqua-Pure Taste/
Odor Undersink
Filter
Pressure
Tank

Tools and Parts Required
(not included):
1) 3/4” CXM Cast Union
2) 3/4” x M ST Adapter Wrought
3) PTFE Tape
4) Tube Cutter
5) 3/4” SW Gate Valve
Identify all parts as shown in diagram. Read all instructions
carefully before attempting to start installation.
1
2
4
3
5
IMPORTANT INSTALLATION INSTRUCTIONS
FOR INSTALLING AQUA-PURE SEDIMENT/RUST FILTER ON HOT OR COLD
WATER LINE (DEPENDING ON FILTER USED)
Step 1: Snug fit all component
parts and calculate length of tub-
ing to be removed.
Step 2: Cut tubing. Step 3: Install sweat side of CXM
cast union onto tube.
Step 4: Sweat SW gate valve onto line
backwards so drain can later be used to
release pressure when changing filter.
Step 5: Cover threads of M ST adapter
with PTFE Tape and screw firmly into
filter head making a tight connection.
Step 6: Sweat M ST adapter with filter
head attached to valve making sure
that filter head is vertical. (It may
be necessary to temporarily support
weight of filter until filter bracket is
installed. See Step 9.)
Step 7: Screw CM part of union into
filter. It may be necessary to slightly
spring tubing temporarily out of align-
ment in order for tubing to enter union.
Step 8: Connect two halves of union
and tightn, making sure filter is in
straight vertical position.
Step 9: Mount filter bracket to wall or
suitable support.

Tools and Parts Required
(not included):
1) 3/4” x M ST Adapter Wrought
2) SW Elbow
3) PTFE Tape
4) Tube Cutter
5) 3/4” SW Gate Valve
6) 3 Ft. (0.9 M) Piece of 3/4” Copper Tubing
Identify all parts as shown in diagram. Read all instructions
carefully before attempting to start installation.
1
2
4
3
5
IMPORTANT INSTALLATION INSTRUCTIONS (CONT.)
FOR INSTALLING AQUA-PURE TASTE/ODOR FILTER UNDER KITCHEN SINK
ON COLD WATER LINE
Step 1: Cut out approximately 8” (20
cm) section of pip starting 12” (30.5
cm) for 1 high units and 22” (56 cm)
for 2 high units off the floor.
Step 2: Sweat SW gate valve onto
water line. Sweat SW elbow onto
piece of copper tubing and sweat tub-
ing to valve.
Step 3: Sweat SW elbow to one
adapter using piece of copper
tubing.
Step 4: Cover threads of both adapters
with PTFE tape and screw one adapter
into “IN” side of filter.
Step 5: Mount filter bracket to wall or
suitable support.
Step 6: Screw remaining adapter into
“OUT” side of filter, then sweat a piece
of tubing to the adapter.
Step 7: Sweat elbow to tube connected
to “right” adapter.
Step 8: Loose fit “A” elbow to water line
coming down from sink. Measure “B”
and cut tubing to go across filter. Loose
fit “C” elbow at end of tubing. Measure
“D” and cut tubing to fit to elbow sweat-
ed to”right” adapter on filter.
Step 9: Now proceed to sweat remain-
ing fitting.
6

Original cartridge may have shorter than normal life due to disturbing pipes on installation.
1. Close gate vlave on inlet and open a faucet nearest the filter to relieve pressure in filter. Close outlet valve.
2. Insert wrench into hole provided in ring nut and unscrew to remove nut.
3. Remove housing and cartridge and empty water.
4. Lubricate gasket with silicone based lubricant.
5. Place new Aqua-Pure® cartridge* on seal plate in housing. Bring ring nut over housing and hand tighten to head.
6. Open both gate valves and faucet until water appears, then close faucet.
7. If filter should leak, tighten ring nut with wrench until leak stops. DO NOT OVERTIGHTEN.
* Double cartridge filters have cartridge slipped over centering post.
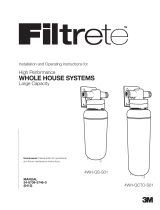
REPLACEMENT PARTS
10 Year Limited Warranty
CUNO Incorporated warrants this Product (excluding disposable filter cartridge(s)) to be free from defects in material
and workmanship for ten (10) years from the date of purchase. The disposable filter cartridge is warranted from defects
in material and workmanship for a period of one year from the date of purchase. This warranty does not cover failures
resulting from abuse, misuse, alteration or damage not caused by CUNO or failure to follow installation and use instruc-
tions. If the Product is defective CUNO will replace the Product or refund your Product purchase price. CUNO will not be
liable for any indirect, special, incidental, or consequential damages arising from the use of this Product. Some states do
not allow the exclusion or limitation of incidental or consequential damages, so the above limitation may not apply to you.
To obtain warranty service, mail your request to Warranty Claims, CUNO Incorporated, 400 Research Parkway, Meriden,
CT 06450. Proof of purchase (original sales receipt) must accompany the warranty claim, along with a complete descrip-
tion of the Product, model number and alleged defect. This warranty gives you specific legal rights and you may have
other rights which vary from state to state, or country to country.
LIMITED WARRANTY
FILTER CARTRIDGE REPLACEMENT INSTRUCTIONS
CAUTION
To reduce the risk associated with property damage due to water leakage:
• The disposable fi lter cartridge MUST be replaced ever 6 months, at the rated capacity or if a noticeable reduction in
fl ow rate occurs.
IMPORTANT NOTES
• Allow a minimum of 2” (5.1 cm) clear space under fi lter to facilitate cartridge change.
A
B
C
D
E
H
F
G
Centering Guide - 6357102C
Wrench - 6356201C
Mounting Bracket - 3558101C
Head 3/4” NPT - 6445331C
Head 1” NPT - 6698102C
Head Gasket - 3473713C
Ring Nut - 6448631C
Taste/Odor Cartridge - AP117 (For cold
water use only)
Sediment/Rust Cartridge - AP110, AP124
Housing for 1 High Units - 6362604C
Housing for 2 High Units - 6446202C
Replacement cartridges and parts are available
through your local Aqua-Pure
®
dealer.
A
B
C
D
E
F
G
H

CUNO and Aqua-Pure are trademarks of 3M Company used under license.
© 2008 3M Company. All rights reserved.
®
ynapmoc
M3
a
CUNO Incorporated
400 Research Parkway
Meriden, CT 06450 USA
Toll Free: 1-800-222-7880
Worldwide: 203-237-5541
Fax: 203-238-8701
www.aquapure.com • www.cuno.com
/