Page is loading ...

KEEP THIS INSTRUCTION BOOKLET FOR FUTURE REFEREN
CE
,PSRUWDQW3OHDVHUHJLVWHU\RXUSURGXFWRQOLQHDWZZZVDQWHFIDXFHWFRP
ZLWKLQ
GD\V RISXUFKDVH 6DQWHF UHVHUYHV WKHULJKWWR UHTXHVWDGGLWLRQDO
GRFXPHQWVEHIRUHVHUYLFLQJ warrantyUHTXHVWV
6$17(&KDVWKHULJKWWRPDNHQHFHVVDU\GHVLJQFKDQJHVZKHn applicable
,OOXVWUDWLRQPD\QRWGHSLFWDFWXal SURGXFWV
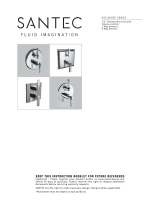
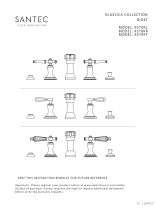
1/2 " Thermostatic trim with
Volume control/TH-8010
2-Way diverter /TH-8210, TH-8212
3-Way diverter /TH-8310, TH-8313
1/2 " Thermostatic trim
Installation Instruction

1/2” THERMOSTATIC VALVE AND TRIM
01
4 6 58 15 11 2016
7
13
19
12
3
1
18
14222
21
17
ITEM NO.
PART NUMBER
DESCRIPTION
QTY.
1
PH1313
BAROSA CAP
1
2
P00019-1
Thermostatic Threaded Sleeve
1
3
PH0099 Rev B
Barosa Thermostatic Handle
1
4
PH29899 Rev A
Square Modern Therm Plate
1
5
PM-955
All Thread
1
6
PM-956
Nut
1
7
PH0098 Rev B
Barosa Diverter
1
8
PM-007-1
20T Broach Extension
1
9
PM-099
Teflon Washer
2
10
PM-017
O-Ring
1
11
PM-021
Set Screw
1
12
PH2601-3
Spring
1
13
PM-1074
#4-40 x 0.5 Set Screw
1
14
PM-494
M5 x 8 mm Set Screw
1
15
PM-974
Teflon Washer
1
16
PM-346
Brass Nut
1
17
SA255
1
18
PM-344
Metropoli Cover Plug O-ring
1
19
PH9706
TH-7000 Dial Scold Buttom
1
20
PH1031-RC
1
21
SA255
Broach Extension
1
22
PM-5-4X
Screw
1
TH-7000-1
TH-3000-3
TH-8010,-02,-12,-03,-13
PM-1207
Mud Guard
Temperature Restrictor
Complete Thermostatic Valve
Hex Screw
1
1
1
1
23
24
25
26
17
Broach Extension

02
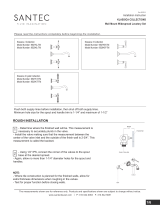
INSTALLATION INSTRUCTIONS
TH-8010/TH-8210/TH-8310/TH-8313
FINISHED
WALL
MIN MAX
#2
− Rough in the valve, lining the surface
of the wall to the Mudguard Min/Max
line.
1

INSTALLATION INSTRUCTIONS
− From surface of plate cut #8 so it is
protruding at least 1-1/4" from plate.
− From surface of plate cut #5 between 3/8"
- 1/2" so its protruding from the wall.
#4
plate surface
TOOL NEEDED FOR NEXT STEP
2
FINISHED
WALL
03
− Place #4
Plate up against wall over valve.
− Screw
#6 Nut,
the
#8
all thread
and
broach
extension #5 onto the volume
control / diverter valve until it
stops.
− Install
#27
SA250 and #22 PM-5-4x
3

#7
1¼" - 1½"
INSTALLATION INSTRUCTIONS
04
− Re-install part #7 Barosa Diverter
− Screw and tighten #11 Set screw
and screw in #20 Button
− Once #8 & #5 is cut to the surface,.
insert #15 washer and screw in #16
Nut.
FINISHED
WALL
#4
#15
#16
#7
#11
#20
4
5

INSTALLATION INSTRUCTIONS
#3
− Place #3 Thermostatic Handle
− Make sure the OFF position faces the 12
o'clock position).
− insert #14 set screw and tighten with L-
wrench prvided.
− Insert #1 Barosa Cap until it locks in
place.
Note: Make sure button is pointing to
12o'clock position.
FINISHED
WALL
0 5

0 6
1/2” THERMOSTATIC EXTENSION KIT (P00200) (NOT PRVIDED)
If the valve is roughed too far into the wall, please use the extension kit (call Santec
Customer Ser. if needed To install this kit, first thread part
P00055-1 onto the
valve. The remaining parts in the kit can be cut to fit based on the depth the valve is
in the wall. This extension kit can cover up to 0.845” into the wall.
ITEM NO.
PART NUMBER
DESCRIPTION
QTY.
1
P00055-1
Threaded Sleeve Extension
1
2
SA255-1
Broach for TH-7000 Extension
1
3
PM-1215
Kit
O-Ring for SA255-1
1
4
TH-7000-2
Plastic Temperature
Restrictor for TH-7000
Extension Kit
1
5
PM-1216
O-ring for TH-7000-2
1
6
PM-344
O-ring
1
7
PM-5-4X
Kit
Screw for TH-7000 Extension
1
SA255 FOR SA255-1
TH-7000-3 FOR
TH-7000-2 PM-5-4X
FOR PM-5-4X-1
-REPLACES-
1 2 3 4 7
5 6
P00055-1

General characteristic
- Santec thermostatic valve is suitable for most water heater
systems provided it is installed correctly
- Low pressure storage heaters are not recommended for
this application
Cartridggee CClleeaanininngg
After years of use, impurities and lime
scale can restrict the water flow. To clean
the cartridge, please follow these
instructions:
1- Remove the handle screw, handle trim,
trim plate screws, and
trim
plate.
2- Shut off the water line by turning the
check valve shut off mechanism clockwise.
Make sure that the both hot and cold sides
are closed.
3- Remove the cartridge using a 30mm wrench.
4- Wash the filter under running water or soak it with vinegar or a descaling agent.
5- Reassemble the cartridge making sure that the red lines on the
cartridge are aligned.
6- Open the check valve shut-off mechanism, turn on the water, and check water flow.
7- If the water flow is normal, reassemble the trims..
Note: Cartridge and #17 Temperature
Restrictor have RED markings indicating
the 100° mark should be aligned at the 12
o'clock position.
INSTALLATION INSTRUCTIONS
0 7

WARNING
: Do not clean your SANTEC product with ammonia (window cleaner), bleach, soaps, acids,
abrasives, harsh polishes, harsh cleaners, a coarse surfaced cloth, coarse sponge, or any type of scouring pad.
Doing so may ruin your faucet nish and/or void the warranty.
Thank you for making SANTEC a part of your lifestyle and luxury spa experience. Our products have been created as
works of enduring quality and sophisticated design. Luxurious nishes need proper care and attention, so in order to understand
how to properly clean your distinctive luxury nish, please refer to the nish care information below:
Your SANTEC product can be identied in one of two categories: clear coated nishes or non-clear coated nishes. Clear coated
nishes are more scratch-sensitive and are more reactant to harsh cleaning chemicals than non-clear coated nishes. Once you
have identied the specic luxury nish of your SANTEC product, please follow the important corresponding care instructions.
CLE AR C O ATED F I N ISHES
N O N-CLE AR COA TED FINISHE S
F INISH C ARE I NFORMATIO N
Please read ‘WHAT IS COVERED BY OUR WARRANTY’ and ‘EXCLUSIONS AND LIMITATIONS OF WARRANTY’ sections to
understand what is and what is not covered. Please have ready the proof of purchase (original sales receipt),
description
of the
problem, and carefully package the product or defective part with postage prepaid. Then, please contact your local
SANTEC
Showroom or write to
S
ANTEC
Technical Services.
T O OB TAIN WARRAN TY SER VICE
Effective: 05/01/2015
We recommend that all faucets, drains, etc., be gently wiped dry with a soft cloth after use to avoid water spotting
and water deposit build-up. A mild liquid hand soap may be used occasionally if desired. Use of a non-abrasive
carnauba wax will add protection to the nish and should be used if the faucets will not be dried after use. Santec
Orobrass kitchen products are clear coated. For clear coated nishes, it is recommened to clean your product weekly
with a soft moist cloth.
We recommend that all faucets, drains, etc., be gently wiped dry with a soft cloth after use to avoid water spotting
and water deposit build-up. A mild liquid hand soap may be used occasionally if desired. Use of a non-abrasive
carnauba wax is occasionally required and will add protection to the nish if the faucets will not be dried after use.
Clear Coated Finishes are as Follows:
Living finishes are unique, are intended to change over time and are exluded from the finish warranty. Any product
outdoors or in a marine environment are excluded from the finish warranty.

This warranty does not cover:
Crystals and/or glass
Drains
Damage due to negligence, accident, abuse, improper installation, or improper maintenance such as, but not limited to: heat
from soldering during installation, the use of plumber’s putty, damage from tools used during installation, the use or exposure
to chemicals or cleaning products either abrasive or non-abrasive, or the use of any cleaning tool or product other than a
soft, clean cloth. Reverse osmosis may also shorten the life of the nish.
which have been altered or used in a manner not typical for the product.
Loss, damages, or expense, incidental or consequential whatsoever, originating from the purchase, installation, use, re
pair,
failure, or replacement of any
SANTEC pro
duct or part, allowed by law.
Commercial and/or Industrial installations and use of the product.
This warranty does not include labor, travel charges, or any costs incurred for repair, removal, installation, servicing,
diagnosing, or handling of either defective or replacement parts.
1.
2.
3.
4
Changes in the nish or in the product due to normal wear or aging does not cover any products or parts
5.
6.
7.
SANTEC is committed to enhancing your bathroom experience by creating luxury products that will provide
enduring satisfaction. Every effort has been made to satisfy the highest standards of design and production to create
lasting peace of mind for our customers. Proof of purchase must be provided for all warranty claims, SANTEC provides the
following limited warrant
ies on our product.
This warranty only extends to the original consumer purchaser.
L IFET I ME L IMITE D WARRANTY
L ENGTH O F WA RRAN TY & WHO IS C OVE RED BY O U R WARRANTY
WHAT IS C OVERED BY OUR WA RRANTY
E X C LUSIO NS AND L I MITATIONS OF WARRANTY
1.
2.
3.
Limited warranty against manufacturing defects and tarnish to the original purchaser. Custom nishes carry
a ten (10) years limited warranty against manufacturing defects and tarnish to the original purchaser only.
Kitchen products carry a three (3) year limited warranty.
Parts: Santec parts carry a ten (10) year limited warranty against manufacturing defects, to the
original purchaser. Kitchen products carry a ve (5) year limited warranty.
Cartridges: Santec cartridges carry a lifetime limited warranty, with the exception of thermostatic and
pressure balanced cartridges, which carry a three (3) year limited warranty against manufacturing defects to
the original purchaser.
Finishes: SANTEC Polished Chrome, Polished Nickel and Satin Nickel nishes carry a Lifetime
Effective: 05/01/2015
This warranty does not cover: damage due to negligence, accident, abuse, improper installation, or improper
maintenence such as, (but not limited to): heat from soldering during installation, the use of plumbers putty, damage
from tools used during installation, the use or exposure to chemical or cleaning products, abrasive or non-abrasive, or
the use of any cleaning tool or product other than a soft, clean cloth.
This warranty does not cover: changes in the
finish or in the product due to normal wear or again and does not cover any product or parts which have been
altered or used in a manner not typical for the product.
Santec will not be held liable for damage to products caused by
the freight carrier, any such claims should be made immediately with the freight carrier. This warranty does not cover any
cost involved in the installation, repair, or replacement of any SANTEC product or parts. This warranty does not cover
and SANTEC will not be held liable for any loss, damages, or expenses, incidental or consequential whatsoever,
originating from the purchase, installation, use, repair, failure, or replacement of any SANTEC product or part, as
allowed by law. The product of components of the covered product will either be repaired, renished or replaced at the
sole discretion of SANTEC. SANTEC reserves the right to examine any product claimed defective prior to any warranty
claim being accepted or processed, at its sole discretion. This warranty gives you specic legal rights and you may
have other rights which may vary from state to state.
9.
8.
Access should be provided to the roman tub valves for future service or repair to valves and piping. Under no circumstances will Santec
Faucet, Inc. be liable for any costs associated with the removal of materials for future
access to the tub valves or piping for service or repair.
/