Page is loading ...


ILMAS10
3
ILMAS10
2
CONTENTS
1. Features ___________________________________________________________ 3
2. Names of Components ______________________________________________ 6
3. Switching the Mode (Display Function) ______________________________ 10
4. Hand 0-Position Check and Correction _______________________________ 11
• 0-Position Check
• 0-Position Correction
5. Setting the Time and Date __________________________________________ 15
• Setting the Time
• Setting the Date
• When the Date is not in the Center of the Calendar Window
6. Using the Chronograph _____________________________________________ 22
7. Setting Local Time ________________________________________________ 25
8. Using the Alarm __________________________________________________ 27
9. All-Reset _________________________________________________________ 29
10. Precautionary Items and Usage Limitation _________________________ 31
11. Warranty and After-Sales Service __________________________________ 41
12. Specifications ____________________________________________________ 43
13. Please Direct Inquiries To __________________________________________ 45
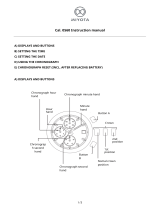
This watch is an analog quartz watch equipped with multiple functions including an
auto calendar function that changes the date automatically, a daily alarm function
that can be set based on a 24-hour clock, and a chronograph function that allows
measurement of time in 1/20 second units up to 59 minutes, 59.95 seconds.
1. FEATURES

ILMAS10 ILMAS10
4
5
Warning (caution) symbol followed by instructions that should be followed or
precautions that should be observed
Important instructions that should be followed are classified with the following symbol.
Can or will cause minor or moderate injury or damage
Can cause serious injury or death
Injuries and damage that might be caused by using the watch improperly or neglecting
any of the instructions or precautions contained in this manual are classified
with the following symbols.
Thank you for your purchase of this Lotus watch. Before using this watch, read this
instruction manual carefully to ensure correct use. After reading this manual, store it in
a safe place for future reference.
This manual contains the following the instructions that should be strictly followed at all
times to prevent injury to yourself and other persons as well as damage to property.
Safety precautions (Instructions to be followed at all times)
WARNING
CAUTION

Name/Mode Time/Calendar Chronograph
1. Mode hand TME CHR
2. Function hand Stops at 0-position
Chronograph minutes
1/20th seconds
3. Date Displays date
Date display
(TME or L-T)
4. Hour hand Displays hours
Displays hours
(TME, L-T or ALM)
5. Minute hand Displays minutes
Displays minutes
(TME, L-T or ALM)
6. Second hand Displays seconds Chronograph seconds
7. 24·hour hand
24·hour time display in
coordination with hour hand
24-hour time display in
coordination with hour hand
Local Time Alarm
L-T ALM
Stops at 0-position Stops at 0-position
Displays date of local time Date display (TME or L-T)
Displays hours of local time Displays alarm hours
Displays minutes of local time Displays alarm minutes
Displays seconds Displays ON/OFF
24-hour local time display
incoordination with hour hand
24-hour alarm time display in
coordination with hour hand
ILMAS10 ILMAS10
6
7
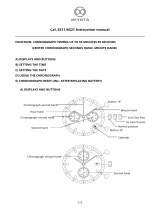
2. NAMES OF COMPONENTS

Name
Crown Alarm
position
¡Time/Calendar Chronograph
8 Crown
Normal position Mode switching Mode switching
Position 1 Calendar correction
0-position check/correction
(function hand, date wheel)
Position 2 Time correction
0-position check/correction
(second hand, 24 hour hand, hour hand, minute hand)
Button (A)
Normal position Not used
Start/stop, reset
(pressing continuously for at least 2 seconds)
Position 1 Not used
Function hand and date weel
0-position correction
Position 2 Not used
Second hand 0-position
correction
Button (B)
Normal position Not used Recalls 1/20 seconds when stopped
Position 1 Month correction Not used
Position 2 Not used Not used
Local Time Alarm
Mode switching Mode switching
Local time display Alarm ON/OFF setting
Local time correction Alarm time correction
(including ON/OFF switching)
Not used
Alarm tone monitor
(pressing continuously for at least 2 seconds)
Not used
ON/OFF switching
Not used
ON/OFF switching
Not used
Not used
Not used
Not used
Not used
Not used
ILMAS10 ILMAS10
8
9

ILMAS10 ILMAS10
10
11
4. HAND 0-POSITION CHECK AND CORRECTION3. SWITCHING THE MODE (DISPLAY FUNCTION)
This watch is equipped with four modes consisting of time/calendar,
chronograph, local time and alarm. Since the mode changes when the
crown is turned, the current mode can be confirmed with the mode hand.
Before using this watch, check that the functions of the watch operate
properly by performing the following procedure.
0-Position: This refers to the base position of each hand that enables
the watch to function properly.
[0-Position Check]
1. Turn the crown to switch the watch to the chronograph [CHR] mode.
2. Pull the crown out to Position 1 to check the 0-position (function hand
and date wheel correction mode). Confirm that the 24 hour hand, hour
hand, minute hand, second hand and function hand rapidly advance to
the 0 position, and the date wheel displays “1”.

ILMAS10 ILMAS10
12
13
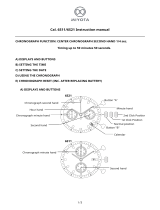
0 Positions of each Hand (Base Positions)
24 hour hand: 24:00
Hour hand, minute hand: 00:00
Second hand: 00 seconds
Function hand: 0 position (12:00 position)
Date wheel: 1st
Perform the “0-Position Correction” when
the hands and date wheel are not at the
positions indicated above.
1. Pull the crown out to Position 1 in the chronograph [CHR] mode to correct
the function hand and date wheel.
2. Click (turn) the crown to the left to align the date wheel.
The 12:00 position immediately after the date changes to the “1st” is the 0
position of the function hand. After correcting the date wheel to the “31st” by
turning the crown, press button (A) to finely correct the function hand so that the
function hand is aligned at the 0 position after the date wheel changes to the “1st”.
(1) Clicking the crown once causes the function hand to make four
revolutions and the date to be corrected by one day.
(2) Turning the crown rapidly (clicking continuously two or more times)
causes the function hand to advance continuously.
When stopping the function hand, click the crown once to the right or left. When
the function hand is not stopped manually, it stops automatically after advancing
31 days
0-Position Correction of Function Hand and Date Wheel
[0. Position Correction]

ILMAS10 ILMAS10
14
15
0-Position Correction of 24 Hour Hand, Hour Hand, Minute Hand and Second Hand
1. Pull the crown out to Position 2 in the chronograph [CHR] mode to correct each
hand.
2. Pressing button (A) causes the second hand to be corrected by one second at a
time each time it is pressed. Continuously pressing button (A) causes the second
hand to advanced rapidly.
3. Clicking the crown allows correction of the 24 hour hand, hour hand and minute
hand.
(1) Clicking the crown once to the right causes the hour and minute hands to
move clockwise.
(2) Clicking the crown once to the left causes the hour and minute hands to
move counter-clockwise.
• Turning the crown rapidly (clicking continuously two or more times) causes the
hands to advanced rapidly. When stopping the hands, click the crown once to the
right or left. When the hands are not stopped manually, they stop automatically
after being corrected by 12 hours.
5. SETTING THE TIME AND DATE
[Setting the Time]
1. Turn the crown and align the mode hand at the time/calendar [TME] mode.

ILMAS10 ILMAS10
16
17
2. When the crown is pulled out to Position 2 (time setting position), the second
hand rapidly advances to the 0 seconds position and stops.
Note: When the second hand does not stop at the 0 seconds position, reset the
base position in the “0-Position Correction Mode”.
3. Click (turn) the crown to set the time.
(1) Clicking the crown once to the right causes the 24 hour hand, hour hand and
minute hand to move in the clockwise direction.
(2) Clicking the crown once to the left causes the 24 hour hand, hour hand and
minute hand to move in the counter-clockwise direction.
• Turning the crown rapidly (continuously clicking two or more times) causes the
hands to advance rapidly. When stopping the hands, click the crown once to the
right or left. When the hands are not stopped manually, they stop automatically
after being corrected by 12 hours.
4. Return the crown to the normal position in synchronization with a telephone time
signal or other time service.
1. [Setting the Date]
As a result of being equipped with an auto calendar function, it is not
necessary to correct the date at the end of each month. However, since the
watch uses 28 days for the month of February, it is necessary to correct the
date at the end of February, but only in leap years.

ILMAS10 ILMAS10
18
19
1. Turn the crown to switch the watch to the time/calendar [TME] mode.
2. When the crown is pulled out to Position 1 (date correction position), the second hand
rapidly advances to the month display position stored in memory and stops.
3. Click (turn) the crown to the left to set the date.
• Clicking the crown once to the left causes the function hand to make four revolutions
and the date to be corrected by one day.
• Turning the crown rapidly (continuously clicking two or more times) causes the hand to
advance continuously. When stopping the hand, click the crown once to the right or left.
When the hand is not stopped manually, it stops automatically after being advanced 31
days.
4. Pressing button (B) allows correction of the month. Press button (B) and align the
second hand at the position corresponding to the month *
*Interpretation of Month/
Position of Second Hand*
January: 1:00 position
February: 2:00 position
March: 3:00 position
:
December: 12:00 position
5. Return the crown to the normal position
after setting the date. The watch will
resume keeping time once the second
hand catches up to the current seconds.
<When the Calendar has been Set to a Non-existent Date> When the watch is set to a
date that does not exist (February 30, for example), the watch automatically switches to
the 1st day of the following month when the crown is returned to the normal position.

ILMAS10 ILMAS10
20
21
[When the Date is not in the Center of the Calendar Window]
If the date has shifted from the calendar window as a result of the watch having
been subjected to a strong impact and so forth, realign the function hand and date
to their proper reference positions in the chronograph mode.
1. Turn the crown to set the watch to the chronograph mode.
2. Pull the crown out to the first click.
3. Pressing button (A) causes the function hand and date to move a little at a time.
* Press button (A) several times until the “1” of the date reaches the center of the
calendar window.
* After aligning the date to “1”, press button (A) several times until the function
hand reaches the “0” position.
4. Return the crown to the normal position.

ILMAS10 ILMAS10
22
23
The chronograph is able to measure time up to a maximum of 59 minutes 59.95 seconds in
1/20th second units, after which it resets to 0 seconds.
[Explanation of Hands During Chronograph Measurement]
When the crown is turned and the mode hand is set to the chronograph [CHR] mode, the
second hand and function hand are rapidly advanced to the 0 position and the watch
enters the chronograph mode.
• Second hand: Switches to the chronograph second hand. The second hand
advances rapidly and makes one revolution only when starting at 0 seconds, after
which it moves in 1 second increments to measure chronograph seconds.
• Function hand: Switches to either chronograph minutes or chronograph 1/20th se-
conds. The function hand moves in one minute increments to measure chronograph
minutes. When button (B) is pressed when the chronograph is stopped, the function
hand switches to 1/20th seconds display during time button (B) is pressed.
Note: 24 hour hand, hour hand, minute hand, date wheel:
• Continue to display the current time when the watch has been switched from
the time/calendar mode.
• Continues to display local time when the watch has been switched from the
local time mode.
• Continues to display the alarm set time when the watch has been switched
from the alarm mode.
6. USING THE CHRONOGRAPH

ILMAS10 ILMAS10
24
25
[Chronograph Measurement]
1. Turn the crown to set the mode hand to the chronograph [CHR] mode.
2. Press button (A) to start and stop the chronograph. A confirmation tone is heard whenever
button (A) is pressed.
3. Continuously pressing button (A) when the chronograph is stopped causes the chronograph
second hand and chronograph minute hand to be reset to the 0 position.
The local time function allows the time in a different time zone to be set separately
from the current time. Local time is set by performing a time difference correction
in 1 hour units based on the current time (time of the time mode/TME). The
minute and second hands move in coordination with the current time.
[Time Difference Correction Procedure]
1. Turn the crown to set the mode hand to the local
time [L-T] mode.
2. Pull out the crown to Position 2 (local time setting
position).
3. Click the crown to the right or left to correct the
time difference.
• When the crown is clicked to the right, the hour
hand moves by 1 hour in the clockwise direction.
• When the crown is clicked to the left, the hour hand
moves by 1 hour in the counter-clockwise direction.
* Turn the crown until the hour hand is precisely
advanced by 1 hour.
7. SETTING LOCAL TIME

ILMAS10 ILMAS10
26
27
Note: The hour hand is not advanced rapidly even if the crown is continuously clicked
two or more times. Perform correction accurately 1 hour at a time. Furthermore, the
range of time difference correction is ±23 hours based on the current time.
4. Always make sure to return the crown to the normal position after correcting the
time difference.
The alarm function uses a 24-hour clock. Once the alarm has been set, the alarm
sounds for 15 seconds when the set time is reached once a day. The time at
which the alarm sounds applies to the time (TME) mode, and cannot be set based
on the local time (L-T).
Note: If the hour hand passes 12:00 AM (midnight) during correction, the date is
advanced by 1 day following completion of hand movement. If the time difference is
corrected in the counter-clockwise direction and the hour hand passes back over 12:00
AM, although the date is corrected following completion of hand movement, since the
date is corrected by 30 days in the clockwise direction, it takes about 2-3 minutes fo
the date to be corrected. Pay attention to AM and PM when correcting time difference.
Note: When returning the time difference to the original setting, return the hourhand
in the direction opposite that when the time difference was corrected.
8. USING THE ALARM
[Setting the Alarm Time]
1. Turn the crown and set the mode hand to
the alarm [ALM] mode.
• Second hand: Moves rapidly to the ON
or OFF position.
• 24 hour hand, hour hand, minute hand:
Move the previously set alarm time.
• Function hand: Stops at the 0 position.
2. Pull out the crown to Position 2 (alarm
setting position).
• The alarm setting is turned ON
automatically.

ILMAS10 ILMAS10
28
29
9. ALL-RESET
3. Click (turn) the crown to set the alarm time.
(1) Clicking once to the right causes the hour and minute hands to move clockwise.
(2) Clicking once to the left causes the hour and minute hands to move counterclockwise.
• Turning the crown rapidly (continuously clicking two or more times) causes the
hands to advance rapidly. When stopping the hands, click the crown once to the
right or left. When the hands are not stopped manually, they stop automatically
after being corrected by 12 hours.
• Set the alarm while making sure to not to mistake AM and PM by referring to the 24
hour hand.
4. Return the crown to the normal position after setting the alarm time.
[Switching Alarm ON and OFF]
The alarm is switched ON and OFF each time button (A) is pressed when the crown
is pulled out to Position 1 or Position 2 in the alarm mode.
[Alarm Tone Monitor]
When button (A) is pressed with the crown in the normal position in the alarm mode, the
alarm tone sounds for as long as button (A) is pressed.
[Stopping the Alarm Tone]
Press either button (A) or (B) to stop the alarm tone while it is sounding.
This watch may not function properly as a result of being subjected to the effects of
static electricity or strong impact and so forth. When this happens, set the hands of
the watch to their respective base positions according to the following procedure after
performing the all-reset procedure

ILMAS10 ILMAS10
30
31
10. PRECAUTIONARY ITEMS AND USAGE LIMITATION
1. Turn the crown to set the mode hand to the chronograph [CHR] mode.
2. Pull out the crown to Position 2 (0-position correction mode).
• Each of the hands and date wheel move to their respective 0 positions stored
in memory and then stop.
3. Press buttons (A) and (B) simultaneously and then release.
• Following a confirmation tone, each of the hands perform a demonstration movement in
the order of the function hand, 24 hour hand, hour hand, minute hand and second hand
to indicate that the all-reset procedure is finished.
Note: Following the all-reset procedure, make sure to properly reset each mode after
performing 0-position correction for each hand before using the watch.
WARNING Water Resistance
• Water-resistance for daily use (to 3 atmospheres) means that the watch may be worn while
washing your face or in the rain, but is not to be immersed in water.
• Upgraded water-resistance for daily use (to 5 atmospheres) means that the watch may be
worn while swimming, but is not to worn while skin diving.
• Upgraded water-resistance for daily use (to 10/20 atmospheres) means that the watch may
be worn while skin diving, but not while scuba or saturated diving using helium gas.

ILMAS10 ILMAS10
32
33
Water Resistance:
Refer to the watch dial and the case back for the indication
of the water resistance of your watch. The following chart
provides examples of use for reference to ensure
that your watch is used properly.
* WATER RESIST (ANT) xx bar may also be indicated
as W.R. xx bar.
(The unit “bar” is roughly equal to 1 atmosphere.)

ILMAS10 ILMAS10
34
35
* Do not operate the crown or button when the watch is wet. Water may penetrate into the
watch, causing deterioration of water resistance.
* The durability of a leather band may be affected when wet, owing to the properties of the
material. In the case of a watch of upgraded water resistance for daily use that is frequently
used in water, fading, peeling of adhesive or other problems may occur. It is therefore
recommended to use another type of band (metal or rubber watchband).
* If a watch of upgraded water resistance for daily use is immersed in sea water or subjected
to excessive perspiration, thoroughly rinse with fresh water and wipe completely dry with a
soft cloth.
* If water enters the watch or the watch fogs up and does not clear up even after a long
time, consult your dealer or Citizen Consumer Help Desk, your nearest Customer Support
Center for inspection and/or repair.
* If seawater enters the watch, place the watch in a box or plastic bag and immediately take
it in for repair. Otherwise, pressure inside the watch will increase, and parts (crystal, buttons,
etc.) may come off.
* Be particularly careful when wearing your watch while holding a small child, to avoid
injury.
* Be particularly careful when engaged in strenuous exercise or work, to avoid injury
to yourself and others.
* Do NOT wear your watch while in a sauna or other location where your watch may
become excessively hot, since there is the risk of burns
* The rubber (urethane) band may be stained by dyes or soil present in or on clothing
or other accessories. Since these stains may not be able to be removed, caution is
required when wearing your watch with articles that tend to easily transfer color
(articles of clothing, purses, etc.).
* Be careful when putting on and taking off your watch, since there is a risk of
damaging your fingernails, depending on the manner in which the band is fastened.
* Keep the battery out of the reach of small children.
* In the event a battery is swallowed, immediately consult a physician.
CAUTION When Wearing your
CAUTION
CAUTION Handling the Band (Putting on and Taking off Band)
WARNING Handling of the Battery

ILMAS10 ILMAS10
36
37
* If a depleted battery is left in your watch, damage may be caused by leakage of battery
fluid. Be sure to replace the battery promptly.
* Always be sure to select a battery of the correct specifications when replacing the battery.
CAUTION Always Keep your Watch Clean
* The case and band of the watch come into direct contact with the skin in the same manner
as undergarments. Corrosion of the metal or unnoticed soiling such as that caused by
perspiration and dirt can soil sleeves and other portions of clothing. Keep your watch clean
at all times.
* Wearing this watch may cause itching or rash if you have sensitive skin or certain
physical conditions. If you think there is something wrong, discontinue wearing the watch
immediately and consult your physician.
Possible causes of rashes include:
1. Allergy to certain metal or leather
2. Rust, dirt or perspiration present on the watch’s body or band
* Leather bands may become discolored by perspiration or dirt. Always keep your leather
band clean by wiping with a dry cloth
* Do NOT wear the band too tightly. Try to leave enough space between the band and
yourskin to allow adequate ventilation.
<Caring for your Watch>
* Wipe any dirt or moisture such as perspiration from the case and crystal with a soft cloth.
* Remove any dirt from a leather band with a dry cloth.
* For a metallic, plastic or rubber watchband, wash any dirt off with water. Remove the small
amounts of dirt trapped between the crevices of the metallic band with a soft brush.
* Do NOT use solvents (such as paint thinner or benzene) for cleaning, since they may mar the
surface of the band.
<When equipped with Natural Light>
* “Natural Light” uses luminous paint that emits no hazardous radiation at all, and is not
harmful to human beings or to the environment. It emits light stored during exposure to
daylight or artificial light.
However, the brightness of the light will diminish as the watch remains in darkness. In
addition, depending on the brightness of the daytime light source and the distance between
the watch and the light source, the length of time the watch emits light will vary. Note that
if the light stored in the watch is insufficient, the watch may not emit much light or will lose
brightness quickly.
CAUTION Battery Replacement

ILMAS10 ILMAS10
38
39
<Temperature>
* The function of the watch may be impaired or the watch may even stop if the ambient
temperature is outside the range of -10°C to +60°C.
* If the watch is left for an extended period under temperatures outside the normal range
(+5°C to +35°C), fluid may leak from the battery, resulting in considerable shortening of
battery life.
<Static Electricity>
* The integrated circuits used in the watch are sensitive to static electricity. If exposed to
intense static electricity, the watch’s display may become incorrect.
<Magnetism>
* Do NOT allow the watch to come into close proximity to magnets. If the watch is used near
a magnetic health devices (magnetic necklaces, magnetic elastic band, etc.) or the magnets
used in the latches of refrigerator doors, earphone of a mobile phone, and so forth, it will not
keep time accurately. If this should happen, move the watch away from the magnet and reset
it to the correct time.
<Strong Shocks>
* Avoid dropping the watch or subjecting it to other strong impact.
<Chemicals, Corrosive Gasses and Mercury>
* If paint thinner, benzene or other solvents or products containing these solvents (including
gasoline, nail-polish remover, cresol, bathroom cleaners and adhesives) are allowed to come
into contact with the watch, they may discolor, dissolve or crack the materials. Be careful
when handling these chemicals. Contact with mercury such as that used in thermometers
may also cause discoloration of the band and case.
<Storage>
* If you will not be using your watch for an extended period of time, carefully wipe off any
perspiration, dirt or moisture and store in a proper location, avoiding locations subject to
excessively high or low temperatures and high humidity. Do NOT leave a depleted battery in
the watch for a long time. Be sure to replace it with new one. If battery fluid leaks out, it is
likely to damage the watch.
/