Page is loading ...

A
L
M
L
-
T
M
L
-
T
M
C
H
R
T
M
E
T
M
E
C
H
R
A
L
M
24
18
12
6
.0
.8 .2
.4.6
7

2
CONTENTS
1. Features ..........................................................................................................4
2. Before Using.................................................................................................. 5
3. Names of Components ............................................................................... 6
4. Functions Unique to Solar-Powered Watches ................................... 10
• Insufficient Charging Warning Feature • Time Setting Warning Feature
• Overcharging Prevention Feature • Power Save Feature
5. General Reference for Charging Times ............................................... 18
6. Notes Regarding Handling of this Watch ............................................ 19
• Charging Precautions
7. Replacing the Secondary Battery.......................................................... 20
8. Switching the Mode (Display Function) ............................................... 21
9. Hand 0-Position Check and Correction ............................................... 22
• 0-Position Check
• 0-Position Correction
3
10. Setting the Time and Date ..................................................................... 26
• Setting the Time
• Setting the Date
• When the Date is not in the Center of the Calendar Window
11. Using the Chronograph.......................................................................... 34
12. Setting Local Time................................................................................... 37
13. Using the Alarm........................................................................................ 39
14. All-Reset..................................................................................................... 42
15. Precautions ............................................................................................... 44
16. Specifications ........................................................................................... 50
English

2. Before Using
A secondary battery is used in this watch to store electrical energy. This sec-
ondary battery is a clean energy battery that does not contain mercury or other
toxic substances. Once fully charged, the watch will continue to run for about 9
months without additional charging (when the power save feature is operating).
V
Power Save Feature
When power generation stops as a result of light not shining on the solar cell dur-
ing the time display or local time display, the second hand stops at the 12:00 posi-
tion and only the hour and minute hands move to save power. When light once
again begins to shine on the solar cell, the second hand advances rapidly to the
current seconds and returns to moving at one second intervals.
<Proper Use of this Watch>
To use this watch comfortably, make sure to recharge it before it stops running
completely. Since there is no risk of overcharging (Overcharging Prevention Fea-
ture), it is recommended that the watch be recharged everyday.
1. Features
This watch is a solar-powered watch that contains a solar cell in its face that dri-
ves the watch by converting light energy into electrical energy. It is equipped
with numerous functions including a full-auto calendar that changes the date auto-
matically (day, month and year change automatically through February 28, 2100
including leap years), a daily alarm function that can be set based on a 24-hour
clock, and a chronograph function that allows measurement of time in 1/20 sec-
ond units up to 59 minutes, 59.95 seconds.
4 5

6 7
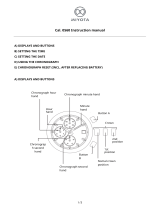
3. Names of Components
ChronographName/Mode Time/Calendar Local Time Alarm
CHR
A Mode hand
TME L-TM ALM
Chronograph minutes,
1/20th seconds
B Function hand
Stops at 0-position Stops at 0-position Stops at 0-position
Date display
(TME or L-TM)
C Date
Displays date Displays date of local time
Date display
(TME or L-TM)
Displays hours
(TME, L-TM or ALM)
D Hour hand
Displays hours
Displays hours of local
time
Displays alarm hours
Displays minutes
(TME, L-TM or ALM)
E Minute hand
Displays minutes
Displays minutes of local
time
Displays alarm minutes
Chronograph seconds
F Second hand
Displays seconds Displays seconds Displays ON/OFF
24-hour time display in
coordination with hour hand
G 24 hour hand
24-hour time display in
coordination with hour hand
24-hour local time display in
coordination with hour hand
24-hour alarm time display in
coordination with hour hand

8 9
Name Local Time
Mode switching
H Crown
Mode switching Mode switching Mode switching
0-position check/correction
(function hand, date wheel)
Calendar correction Local time display Alarm ON/OFF setting
0-position check/correction (second hand,
24 hour hand, hour hand, minute hand)
Time correction Local time correction
Alarm time correction (includ-
ing ON/OFF switching)
Start/stop, reset (pressing contin-
uously for at least 2 seconds)
Button (A)
Not used Not used
Alarm tone monitor (pressing con-
tinuously for at least 2 seconds)
Function hand and date
wheel 0-position correction
Year correction Not used ON/OFF switching
Second hand 0-position
correction
Not used Not used ON/OFF switching
Recalls 1/20 seconds when
stopped
Not used Not used Not used
Not usedMonth correction Not used Not used
Not used
Button (B)
Position 2
Position 1
Normal position
Position 2
Position 1
Normal position
Position 1
Normal position
Position 2
Not used Not used Not used
Alarm
Crown
position
Time/Calendar
Chronograph

1110
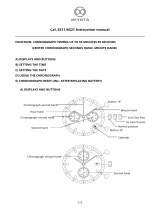
[Case of Having Become Insufficiently Charged from the Normal
Time Display]
* In the case the watch has become insufficiently charged, promptly recharge the watch so
that it returns to normal hand movement (normal time display).
Note: Recharge the watch by
exposing to light for at least 30
minutes. (Expose the watch to
light until the second hand
moves to the "SET" position.)
When the watch is
recharged by exposing
to light, the second hand
moves from "STOP" posi-
tion to the "SET" position.
A
L
M
L
-
T
M
L
-
T
M
C
H
R
T
M
E
T
M
E
C
H
R
A
L
M
24
18
12
6
.0
.8 .2
.4.6
A
L
A
R
M
O
N
O
F
F
W
A
R
N
I
N
G
S
E
T
S
T
O
P
C
H
A
R
G
E
7
A
L
M
L
-
T
M
L
-
T
M
C
H
R
T
M
E
T
M
E
C
H
R
A
L
M
24
18
12
6
.0
.8 .2
.4.6
A
L
A
R
M
O
N
O
F
F
W
A
R
N
I
N
G
S
E
T
S
T
O
P
C
H
A
R
G
E
7
A
L
M
L
-
T
M
L
-
T
M
C
H
R
T
M
E
T
M
E
C
H
R
A
L
M
24
18
12
6
.0
.8 .2
.4.6
A
L
A
R
M
O
N
O
F
F
W
A
R
N
I
N
G
S
E
T
S
T
O
P
C
H
A
R
G
E
7
A
L
M
L
-
T
M
L
-
T
M
C
H
R
T
M
E
T
M
E
C
H
R
A
L
M
24
18
12
6
.0
.8 .2
.4.6
A
L
A
R
M
O
N
O
F
F
W
A
R
N
I
N
G
S
E
T
S
T
O
P
C
H
A
R
G
E
7
[Normal Time Display]
[Time Setting Warning
Display]
The second hand rapidly moves
to the "SET" position and stops.
[Insufficient Charge
Warning Display]
The second hand rapidly moves
to "CHARGE" position and stops.
[Stopped]
The second hand rapidly
moves to "STOP" position
and stops.
If the watch
is left with-
out
recharging
When recharged
When insufficiently charged
When the second hand is pointing to the word "SET", it means that the time
should be reset. Always make sure to reset the watch to the current time.
Note: The watch will not return to the normal time display unless the time is reset.
When this watch becomes insufficiently charged, the second hand automatically
moves to one of the words indicating a warning display to inform the wearer of
"insufficient charge warning" or "time setting warning".
Try to keep the watch charged at all times to prevent it from becoming insuffi-
ciently charged.
4.
Functions Unique to Solar-Powered Watches

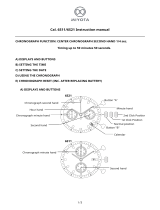
1312
[Case of Forgetting to Reset
the Time after Charging due to
the Watch Being Insufficiently
Charged and then Resetting
the Time after Recharging]
* If the watch stops as a result of
being insufficiently charged, the
watch will not return to normal
hand movement (normal time dis-
play) unless the watch is sufficient-
ly recharged and the time is reset.
[Insufficient Charge
Warning Display]
[Stopped]
A
L
M
L
-
T
M
L
-
T
M
C
H
R
T
M
E
T
M
E
C
H
R
A
L
M
24
18
12
6
.0
.8 .2
.4.6
A
L
A
R
M
O
N
O
F
F
W
A
R
N
I
N
G
S
E
T
S
T
O
P
C
H
A
R
G
E
7
A
L
M
L
-
T
M
L
-
T
M
C
H
R
T
M
E
T
M
E
C
H
R
A
L
M
24
18
12
6
.0
.8 .2
.4.6
A
L
A
R
M
O
N
O
F
F
W
A
R
N
I
N
G
S
E
T
S
T
O
P
C
H
A
R
G
E
7
[Time Setting Warning Display]
Note: Always make sure to
reset the watch to the
current time.
A
L
M
L
-
T
M
L
-
T
M
C
H
R
T
M
E
T
M
E
C
H
R
A
L
M
24
18
12
6
.0
.8 .2
.4.6
A
L
A
R
M
O
N
O
F
F
W
A
R
N
I
N
G
S
E
T
S
T
O
P
C
H
A
R
G
E
7
Always make
sure to
expose the
watch to light
and recharge.

<Insufficient Charging Warning Feature>
Regardless of the display of the watch at the time, when the watch becomes insufficiently
charged, the watch changes to the time display and the second hand moves to the CHARGE
position to inform the wearer that it is insufficiently charged. After the second hand moves
to the CHARGE position, the watch changes to the time display in the order of the 24 hour
hand, hour hand, minute hand and date wheel (function hand). Although the watch contin-
ues to keep time accurately at this time, the watch stops after about 5 days have elapsed
(roughly 2 days in the case the hands have been moved to switch the time when the insuffi-
cient charging warning feature is activated). When this happens, charge the watch by
exposing to light so that it returns to one-second interval movement. However, since the
time is incorrect when the watch is exposed to light and
changes to the insufficient charging warning display after it
has stopped due to insufficient charging, set the time after
sufficiently charging the watch.
Notes:
• Chronograph measurement stops and the chronograph is
reset even when measurement is in progress.
• The set time (time difference) is retained for the local time.
• The alarm will not sound even if it is set.
• Crown (mode switching) and button operations will not
function.
<Time Setting Warning Feature>
When the watch is recharged by exposing to light after it has stopped, the second hand
moves to the SET position to inform the wearer that the time is incorrect. Although the 24
hour hand, hour hand and minute hand will begin to move after the second hand moves to
the SET position, since the time is incorrect, reset the time and date after sufficiently charg-
ing the watch.
Notes:
• Crown and button operations will not function except for time and calendar setting opera-
tions.
• When the crown is pulled out to position 2 (time correction position) in the time or date
setting mode, the time setting warning feature is canceled.
The second hand will remain stopped at the SET position
unless the crown is pulled out to position 2 and the time is
set.
• In the case the watch has stopped due to insufficient charg-
ing, a minimum of 30 minutes are required until the watch
changes to the time setting warning display even if suffi-
ciently exposed to light.
<Overcharging Prevention Feature>
The overcharging prevention feature is activated when the
secondary battery is fully charged so that it is not charged fur-
ther.
14 15
C
H
A
R
G
E
7
7
S
E
T

Note:
• During the time the secondary battery is fully charged and the overcharging pre-
vention feature is operating, the power save feature does not operate even when
power generation is interrupted as a result of not exposing the solar cell to light.
Similarly, the power save feature will also not operate when the secondary bat-
tery has temporarily become fully charged as a result of exposure to intense
light.
17
<Power Save Feature>
When power is no longer generated as a result of light not shining on the solar cell
when the watch is in the time/calendar mode or local time mode, the second hand
moves to the 0 seconds position and stops to save power by reducing current con-
sumption.
The 24 hour hand, hour hand and minute hand continue to keep the correct time
even though the second hand is stopped. Furthermore, the calendar is corrected in
coordination with the 24 hour hand, hour hand and minute hand.
• During normal hand movement, when power generation is resumed after the
second hand stops at the 0 seconds position, the
second hand is rapidly advanced to the current
seconds and begins one-second interval move-
ment. However, when the insufficient charging
warning feature has been activated, the second
hand moves to the CHARGE position and stops,
and when the time setting warning feature has
been activated, it moves to the SET position and
stops. When the watch has stopped, the second
hand moves to the STOP position and remains
stopped.
A
L
M
L
-
T
M
L
-
T
M
C
H
R
T
M
E
T
M
E
C
H
R
A
L
M
24
18
12
6
.0
.8 .2
.4.6
A
L
A
R
M
O
N
O
F
F
W
A
R
N
I
N
G
S
E
T
S
T
O
P
C
H
A
R
G
E
7
16

Environment
Charging time
Illuminance
(lx)
18 19
5. General Reference for Charging Times
The time required for recharging varies according to the model of the watch (color of
the dial, etc.). The following times are shown below to serve only as a reference.
* Recharging time refers to the amount of time the watch is continuously exposed
to light.
Full recharging time : Time required for recharging the watch from the stopped state to fully charged.
Charging time for 1 day of operation : Time required for recharging the watch to run for 1 day at 1-second
interval movement.
Charging time
for 1 day of
operation
Charging time from the
stopped state to 1-sec-
ond interval movement
Full
recharging
time
500 Inside an ordinary office 2.5 hours 48 hours 337.5 hours
1,000
60-70 cm (24-28in.) under fluorescent light
(30W)
40 minutes 20 hours 134.5 hours
3,000 20 cm (8in.) under fluorescent light (30W) 10.5 minutes 7 hours 42.5 hours
10,000 Outdoors, cloudy weather 5 minutes 2.5 hours 12 hours
100,000 Outdoors, summer, under direct sunlight 1.5 minutes 1 hour 4 hours
6.
Notes Regarding Handling of this Watch
<Try to keep the watch charged at all times.>
Please note that if you wear long sleeves, the watch can easily become insuffi-
ciently charged as a result of it being concealed and unable to be exposed to light.
• When you take the watch off, try to place it in as bright a location as possible to
ensure that it always keeps the correct time.
CAUTION
Charging Precautions
• Avoid recharging at high temperatures (over about 60°C/140°F) since this may
result in damage to the watch during recharging.
Examples: Charging the watch in close proximity to an incandescent lamp,
halogen lamp or other light source that can easily reach high temper-
atures, charging the watch in a location that reaches high tempera-
tures such as on a car dashboard.
• When charging the watch with an incandescent lamp, always make sure the
watch is at least 50cm (20in.) away from the lamp so that it does not reach
excessively high temperatures during charging.

7. Replacing the Secondary Battery
Unlike ordinary batteries, the secondary battery used in this watch does not have
to be periodically replaced since it is able to be charged and discharged repeated-
ly.
20 21
8. Switching the Mode (Display Function)
This watch is equipped with four modes consisting of time/calendar, chronograph,
local time and alarm. Since the mode changes when the crown is turned, the cur-
rent mode can be confirmed with the mode hand.
[Modes/Display Functions]
ALM
Alarm Mode
TME
Time/Calendar Mode
L-TM
Local Time Mode
CHR
Chronograph/
0-Position Check Mode
A
L
M
L
-
T
M
L
-
T
M
C
H
R
T
M
E
T
M
E
C
H
R
A
L
M
A
L
A
R
M
O
N
O
F
F
W
A
R
N
I
N
G
S
E
T
S
T
O
P
C
H
A
R
G
E
7
Mode hand

0 Positions of each Hand (Base Positions):
24 hour hand: 24:00
Hour hand, minute hand: 00:00
Second hand: 00 seconds
Function hand: 0 position (12:00 position)
Date wheel: 1st
Perform the “0-Position Correction” when
the hands and date wheel are not at the
positions indicated above.
9. Hand 0-Position Check and Correction
Before using this watch, check that the functions of the watch operate properly by
performing the following procedure.
0-Position: This refers to the base position of each hand that enables the
watch to function properly.
[0-Position Check]
1. Turn the crown to switch the watch to the chronograph [CHR] mode.
2. Pull the crown out to Position 1 to check the 0-position (function hand and date
wheel correction mode). Confirm that the 24 hour hand, hour hand, minute
hand, second hand and function hand rapidly advance to the 0 position, and the
date wheel displays “1”.
22 23
A
L
M
L
-
T
M
L
-
T
M
C
H
R
T
M
E
T
M
E
C
H
R
A
L
M
24
18
12
6
.0
.8 .2
.4.6
A
L
A
R
M
O
N
O
F
F
W
A
R
N
I
N
G
S
E
T
S
T
O
P
C
H
A
R
G
E
1
0-Position Correction
(A)
(1)

[0-Position Correction]
0-Position Correction of Function Hand and Date Wheel:
1. Pull the crown out to Position 1 in the chronograph [CHR] mode to correct the
function hand and date wheel.
2. Click (turn) the crown to the left to align the date wheel.
(1) Clicking the crown once causes the function hand to make four revolutions
and the date to be corrected by one day.
(2) Turning the crown rapidly (clicking continuously two or more times) causes
the function hand to advance continuously. When stopping the function
hand, click the crown once to the right or left. When the function hand is
not stopped manually, it stops automatically after advancing 31 days.
The 12:00 position immediately after the date changes to the “1st” is the 0 posi-
tion of the function hand. After correcting the date wheel to the “31st” by turn-
ing the crown, press button (A) to finely correct the function hand so that the
function hand is aligned at the 0 position after the date wheel changes to the
“1st”.
0-Position Correction of 24 Hour Hand, Hour Hand, Minute Hand and Sec-
ond Hand:
1. Pull the crown out to Position 2 in the chronograph [CHR] mode to correct
each hand.
2. Pressing button (A) causes the second hand to be corrected by one second at a
time each time it is pressed. Continuously pressing button (A) causes the sec-
ond hand to advanced rapidly.
3. Clicking the crown allows correction of the 24 hour hand, hour hand and
minute hand.
(1) Clicking the crown once to the right causes the hour and minute hands to
move clockwise.
(2) Clicking the crown once to the left causes the hour and minute hands to
move counter-clockwise.
• Turning the crown rapidly (clicking continuously two or more times) causes
the hands to advanced rapidly. When stopping the hands, click the crown
once to the right or left. When the hands are not stopped manually, they stop
automatically after being corrected by 12 hours.
24 25

A
L
M
L
-
T
M
L
-
T
M
C
H
R
T
M
E
T
M
E
C
H
R
A
L
M
24
18
12
6
.0
.8 .2
.4.6
A
L
A
R
M
O
N
O
F
F
W
A
R
N
I
N
G
S
E
T
S
T
O
P
C
H
A
R
G
E
7
10. Setting the Time and Date
[Setting the Time]
1. Turn the crown and align the mode hand at the time/calendar [TME] mode.
2. When the crown is pulled out to Position 2 (time setting position), the second
hand rapidly advances to the 0 seconds position and stops.
Note: When the second hand does not stop at the 0 seconds position, reset the
base position in the “0-Position Correction Mode”.
Note: If the crown is pulled out to Position 2 when the date is changing, the
date wheel and function hand stop at that time, and are then advanced by
the remaining amount after the second hand is rapidly advanced to the 0
seconds position.
3. Click (turn) the crown to set the time.
(1) Clicking the crown once to the right causes the 24 hour hand, hour hand and
minute hand to move in the clockwise direction.
(2) Clicking the crown once to the left causes the 24 hour hand, hour hand and
minute hand to move in the counter-clockwise direction.
• Turning the crown rapidly (continuously clicking two or more times) causes
the hands to advance rapidly. When stopping the hands, click the crown
once to the right or left. When the hands are not stopped manually, they
stop automatically after being corrected by 12 hours.
4. Return the crown to the normal position in synchronization with a telephone
time signal or other time service.
26 27
(1) Date correction position
(2) Time setting position
Normal position
Date
Hour hand
24 hour hand
Second hand
Mode hand
Minute hand

[Setting the Date]
The calendar function of this watch is a full-auto calendar that changes the year,
month and date automatically, including leap years.
1. Turn the crown to switch the watch to the time/calendar [TME] mode.
2. When the crown is pulled out to Position 1 (date correction position), the sec-
ond hand rapidly advances to the month display position stored in memory,
while the function hand moves to the year display position (number of years
elapsed since the most recent leap year), after which both stop.
Note: If the crown is pulled out to Position 1 when the date is changing, the
second hand advances rapidly after the date changes.
3. Click (turn) the crown to the left to set the date.
• Clicking the crown once to the left causes the function hand to make four
revolutions and the date to be corrected by one day.
• Turning the crown rapidly (continuously clicking two or more times) causes
the hand to advance continuously. When stopping the hand, click the crown
once to the right or left. When the hand is not stopped manually, it stops
automatically after being advanced 31 days.
28 29
A
L
M
L
-
T
M
L
-
T
M
C
H
R
T
M
E
T
M
E
C
H
R
A
L
M
24
18
12
6
.0
.8 .2
.4.6
A
L
A
R
M
O
N
O
F
F
W
A
R
N
I
N
G
S
E
T
S
T
O
P
C
H
A
R
G
E
7
(1) Date correction position
Normal position
Date
Month
No. of years since most recent
(A)
(B)

6. Return the crown to the normal position
after setting the date. The watch will
resume keeping time once the second hand catches up to the current seconds.
<When the Calendar has been Set to a Non-existent Date>
When the crown is returned to the normal position from the date correction
mode, the watch switches to the 1st day of the following month.
Example: February 29, 30 or 31 in an ordinary year c March 1
February 30 or 31 in a leap year c March 1
* Interpretation of Month/
Position of Second Hand*
January: 1:00 position
February: 2:00 position
March: 3:00 position
:
December: 12:00 position
4. Pressing button (A) allows correction of the year (number of years elapsed
since the most recent leap year).
Press button (A) and align the function hand at the position corresponding to
the year (number of years elapsed since the most recent leap year).
5. Pressing button (B) allows correction of the month. Press button (B) and align
the second hand at the position corresponding to the month.
30 31
* Interpretation of Year/Position of Function Hand *
Leap year : 0 minutes position
1 year after most recent leap year : 6 minutes position
2 years after most recent leap year : 12 minutes position
3 years after most recent leap year : 18 minutes position
Year Years elapsed Year Elapsed years
2000 Leap year 2004 Leap yea
2001 1st year 2005 1st year
2002 2nd year 2006 2nd year
2003 3rd year 2007 3rd year
Quick Reference Table for No. of Years Since
Most Recent Leap Year:
7
December
January
February
March
April
May
June
July
August
September
October
November
.0
.8 .2
.4.6
Leap year
1st year
2nd year
3rd year

3332
[When the Date is not in the Center of the Calendar Window]
If the date has shifted from the calendar window as a result of the watch having
been subjected to a strong impact and so forth, realign the function hand and date
to their proper reference positions in the chronograph mode.
1. Turn the crown to set the watch to the chronograph mode.
2. Pull the crown out to the first click.
3. Pressing button (A) causes the function hand and date to move a little at a time.
* Press button (A) several times until the “1” of the date reaches the center of
the calendar window.
* After aligning the date to “1”, press button (A) several times until the function
hand reaches the “0” position.
4. Return the crown to the normal position.
A
L
M
L
-
T
M
L
-
T
M
C
H
R
T
M
E
T
M
E
C
H
R
A
L
M
24
18
12
6
.0
.8 .2
.4.6
A
L
A
R
M
O
N
O
F
F
W
A
R
N
I
N
G
S
E
T
S
T
O
P
C
H
A
R
G
E

[Explanation of Hands During Chronograph Measurement]
When the crown is turned and the mode hand is set to the chronograph [CHR]
mode, the second hand and function hand are rapidly advanced to the 0 position
and the watch enters the chronograph mode.
• Second hand:
Switches to the chronograph second hand. The second hand advances rapidly
and makes one revolution only when starting at 0 seconds, after which it moves
in 1 second increments to measure chronograph seconds.
• Function hand:
Switches to either chronograph minutes or chronograph 1/20th seconds. The
function hand moves in one minute increments to measure chronograph min-
utes. When button (B) is pressed when the chronograph is stopped, the func-
tion hand switches to 1/20th seconds display during time button (B) is pressed.
Note: 24 hour hand, hour hand, minute hand, date wheel:
• Continue to display the current time when the watch has been switched from
the time/calendar mode.
• Continues to display local time when the watch has been switched from the
local time mode.
• Continues to display the alarm set time when the watch has been switched
from the alarm mode.
11. Using the Chronograph
The chronograph is able to measure time up to a maximum of 59 minutes 59.95
seconds in 1/20th second units, after which it resets to 0 seconds.
34 35
A
L
M
L
-
T
M
L
-
T
M
C
H
R
T
M
E
T
M
E
C
H
R
A
L
M
24
18
12
6
.0
.8 .2
.4.6
A
L
A
R
M
O
N
O
F
F
W
A
R
N
I
N
G
S
E
T
S
T
O
P
C
H
A
R
G
E
7
Second hand (chronograph seconds)
Function hand (chronograph minutes
or chronograph 1/20th seconds
(A)
(B)

36 37
[Chronograph Measurement]
1. Turn the crown to set the mode hand to the chronograph [CHR] mode.
2. Press button (A) to start and stop the chronograph. A confirmation tone is
heard whenever button (A) is pressed.
3. Continuously pressing button (A) when the chronograph is stopped causes the
chronograph second hand and chronograph minute hand to be reset to the 0
position.
Reset Measurement Stop
(A) Pressed continuously
(A)
(A)
(A)
12. Setting Local Time
The local time function allows the time in a different time zone to be set separate-
ly from the current time. Local time is set by performing a time difference correc-
tion in 1 hour units based on the current time (time of the time mode/TME). The
minute and second hands move in coordination with the current time.
[Time Difference Correction Procedure]
1. Turn the crown to set the mode hand to the
local time [L-TM] mode.
2. Pull out the crown to Position 2 (local time
setting position).
3. Click the crown to the right or left to cor-
rect the time difference.
• When the crown is clicked to the right, the
hour hand moves by 1 hour in the clock-
wise direction.
• When the crown is clicked to the left, the
hour hand moves by 1 hour in the counter-
clockwise direction.
A
L
M
L
-
T
M
L
-
T
M
C
H
R
T
M
E
T
M
E
C
H
R
A
L
M
24
18
12
6
.0
.8 .2
.4.6
A
L
A
R
M
O
N
O
F
F
W
A
R
N
I
N
G
S
E
T
S
T
O
P
C
H
A
R
G
E
7
(2)
Local time setting position

38 39
Note: The hour hand is not advanced rapidly even if the crown is continuously
clicked two or more times. Perform correction accurately 1 hour at a
time. Furthermore, the range of time difference correction is ±23 hours
based on the current time.
4. Always make sure to return the crown to the normal position after correcting
the time difference.
Note: If the hour hand passes 12:00 AM (midnight) during correction, the date
is advanced by 1 day following completion of hand movement. If the
time difference is corrected in the counter-clockwise direction and the
hour hand passes back over 12:00 AM, although the date is corrected fol-
lowing completion of hand movement, since the date is corrected by 30
days in the clockwise direction, it takes about 2-3 minutes for the date to
be corrected. Pay attention to AM and PM when correcting time differ-
ence.
Note: When returning the time difference to the original setting, return the hour
hand in the direction opposite that when the time difference was correct-
ed.
13. Using the Alarm
The alarm function uses a 24-hour clock. Once the alarm has been set, the alarm
sounds for 15 seconds when the set time is reached once a day. The time at which
the alarm sounds applies to the time (TME) mode, and cannot be set based on the
local time (L-TM).
[Setting the Alarm Time]
1. Turn the crown and set the mode hand to
the alarm [ALM] mode.
• Second hand: Moves rapidly to the ON or
OFF position.
• 24 hour hand, hour hand, minute hand:
Move the previously set alarm time.
• Function hand: Stops at the 0 position.
2. Pull out the crown to Position 2 (alarm set-
ting position).
• The alarm setting is turned ON automati-
cally.
A
L
M
L
-
T
M
L
-
T
M
C
H
R
T
M
E
T
M
E
C
H
R
A
L
M
24
18
12
6
.0
.8 .2
.4.6
A
L
A
R
M
O
N
O
F
F
W
A
R
N
I
N
G
S
E
T
S
T
O
P
C
H
A
R
G
E
7
(2)
Alarm setting position
(A)
(B)
/