Page is loading ...

INSTRUCTION
MANUAL
FOR
RUGER
®
MODEL 77/50
TM
INLINE MUZZLELOADING BLACK POWDER
PERCUSSION RIFLE
For Product Service on This Model Please Call:
(603) 863-3300 (See p. 38)
STURM, RUGER & Company, Inc.
Southport, Connecticut 06490 U.S.A.
THIS INSTRUCTION MANUAL SHOULD ALWAYS ACCOMPANY THIS FIREARM AND BE
TRANSFERRED WITH IT UPON CHANGE OF OWNERSHIP, OR WHEN THE FIREARM IS LOANED OR
PRESENTED TO ANOTHER PERSON.
77/50 - 3/98
R1
READ THE INSTRUCTIONS AND
WARNINGS IN THIS MANUAL CAREFULLY
BEFORE USING THIS FIREARM
!
BLUED &
STAINLESS
STEEL
CALIBER
.50 Round or
Conical Ball
BLACK POWDER OR
PYRODEX ONLY

FIREARMS SAFETY-YOUR RESPONSIBILITY
SAFETY MUST BE THE FIRST AND CONSTANT
CONSIDERATION OF EVERY PERSON WHO
HANDLES FIREARMS AND AMMUNITION.
This Instruction Manual is designed to assist you in learning how to use and
care for your RUGER
®
MODEL 77/50
TM
muzzleloading rifle properly.
Only when you are certain you fully understand the Manual and can properly
carry out its instructions should you practice loading, etc. with live
ammunition.
If you have any doubts about your ability to handle or use a particular type
of gun safely, then you should seek supervised instruction.
Such personalized instruction is often available from gun dealers, gun clubs
or police departments. If none of these sources can help you, write to the
National Rifle Association, 11250 Waples Mill Road, Fairfax, VA 22030-7400.
They will assist you.
The person with a gun in their possession has a full-time job. You cannot
guess; you cannot forget. You must know how to use your firearm safely. Do
not use any firearm without having a complete understanding of its
particular characteristics and safe use.
Remember: There is no such thing as a foolproof gun.
TABLE OF CONTENTS
Page
General Information . . . . . . . . . . . . . . . . . . . . . . . . . . . . . . . . . . . . . . . . . . 3
Operation of Safety . . . . . . . . . . . . . . . . . . . . . . . . . . . . . . . . . . . . . . . . . . . .6
Ammunition . . . . . . . . . . . . . . . . . . . . . . . . . . . . . . . . . . . . . . . . . . . . . . . . 7
Eye and Ear Protection . . . . . . . . . . . . . . . . . . . . . . . . . . . . . . . . . . . . . . . .11
To Load and Fire . . . . . . . . . . . . . . . . . . . . . . . . . . . . . . . . . . . . . . . . . . . . 11
To Unload . . . . . . . . . . . . . . . . . . . . . . . . . . . . . . . . . . . . . . . . . . . . . . . . . 20
Basic Disassembly and Reassembly . . . . . . . . . . . . . . . . . . . . . . . . . . . . . . 22
Care and Cleaning . . . . . . . . . . . . . . . . . . . . . . . . . . . . . . . . . . . . . . . . . . . 27
Regarding Accuracy . . . . . . . . . . . . . . . . . . . . . . . . . . . . . . . . . . . . . . . . . .34
To Clear a Malfunction (“Jam”) . . . . . . . . . . . . . . . . . . . . . . . . . . . . . . . . . 35
Maintenance of Stainless Steel Components . . . . . . . . . . . . . . . . . . . . . . . 36
Attaching Scope Rings . . . . . . . . . . . . . . . . . . . . . . . . . . . . . . . . . . . . . . . . 36
Sight Adjustment . . . . . . . . . . . . . . . . . . . . . . . . . . . . . . . . . . . . . . . . . . . . 37
Service and Parts Policy . . . . . . . . . . . . . . . . . . . . . . . . . . . . . . . . . . . . . . 38
Parts Drawing . . . . . . . . . . . . . . . . . . . . . . . . . . . . . . . . . . . . . . . . . . . . . . 42
The Basic Rules of Safe Firearms Handling . . . . . . . . . . . . . . . . . . . . . . . 43
Warranty Information . . . . . . . . . . . . . . . . . . . . . . . . . . . . . . . . . . . . . . . . 48
“Ruger
®
” is a registered U.S. trademark.
“77/50
TM
” is a trademark of Sturm, Ruger & Co., Inc.
2

WARNING–ALTERATIONS
This product was designed to
function properly in its original
condition. Alterations can make it
unsafe. Do not alter any part or add
or substitute parts or accessories
not made by Sturm, Ruger & Co. Inc.
DO NOT ALTER ANY GUN
!
3
!
FIREARMS ARE DANGEROUS WEAPONS –
MUZZLELOADING BLACK POWDER FIREARMS
REQUIRE SPECIAL PRECAUTIONS.
READ THE INSTRUCTIONS AND WARNINGS IN THIS
MANUAL THOROUGHLY AND CAREFULLY BEFORE USING.
GENERAL INFORMATION
AND MECHANICAL CHARACTERISTICS
The rifle you have chosen, the RUGER
®
MODEL 77/50 muzzleloading
rifle, is an original Ruger design. It is manufactured to our regular standards of
strength and reliability entirely in modern Ruger factories in the U.S.A. High
quality steels and coil springs are used throughout, the same as in our centerfire
rifles. It is a bolt-action, single shot, muzzleloading black powder rifle of modern
design. It gives the black powder shooter many of the convenience and safety
features of modern Ruger centerfire rifles, combined with traditional
muzzleloading rifle characteristics. It is particularly useful for black powder
hunting and target shooting.
WARNINGS OF GREAT IMPORTANCE ARE
FOUND ON THE FOLLOWING PAGES:
Alterations 3 Firing 17
Manual Safety 7 Reloading 18
Lead Exposure 7 Mishandling 19
Ammunition 8 Disassembly 22
Black Powder 9 Lubrication 29
Percussion Caps 11 Storage 30
Loading 13 Malfunctions 35
Handling 17 Parts Purchasers 39
OTHER CAUTIONS AND WARNINGS APPEAR
THROUGHOUT THE MANUAL.

The RUGER
®
MODEL 77/50 is a muzzleloading, percussion rifle intended
for use with black powder, percussion caps, soft lead and jacketed “saboted”
projectiles. It has a precision rifled barrel with a 1-in-28” rifling twist. It does not
fire conventional cartridges, but is instead loaded from the muzzle of the barrel.
It is of bolt-action operation, and must be cocked and capped by opening the
bolt, placing a cap on the nipple, and then closing the bolt before normally firing
the rifle by pulling the trigger.
Like any such rifle, it is to be USED WITH BLACK POWDER OR PYRODEX
ONL
Y, and its safe use requires that the shooter be thoroughly familiar with the
special characteristics of these firearms.
Other notable features of the RUGER
®
MODEL 77/50 rifle include: A
three-position safety; in-line bolt action ignition; a fast lock-time trigger
mechanism (non-adjustable); a flush positioned bolt stop (bolt release); a
hardwood stock with a rubber recoil pad; and studs to which sling swivels can be
attached.
The receiver of the RUGER
®
MODEL 77/50 rifle incorporates integral
scope mount bases (see illustration next page). It also comes with open sights – a
gold bead front sight and a folding leaf rear sight which is adjustable for
elevation and windage.
Disassembly of the rifle to its major components is readily accomplished by
removal of two screws and the barrel band. The bolt assembly can be quickly
disassembled for cleaning.
All mechanical components are made of heat-treated chrome-molybdenum or
stainless steel, with music wire coil springs throughout the mechanism.
The mechanism of the RUGER
®
MODEL 77/50 provides for security
against accidental discharge when properly handled. As with any other firearm,
however, it must be used with strict attention to correct safety practices, some of
which are unique to muzzleloading firearms. In addition, the rifle should be
inspected frequently to assure that it is working properly.
The RUGER
®
MODEL 77/50 Officer’s Model has the same
mechanism and operation as the standard Model 77/50, but is furnished with a
special straight-gripped walnut stock with cut-checkered grip and forend and a
curved butt plate reminiscent of the “Officer’s Model” Springfield rifles privately
purchased by Calvary officers over a century ago.
The RUGER
®
MODEL 77/50 is also available in stainless steel construction
with a laminated stock, for increased corrosion resistance and protection from
the elements.
4

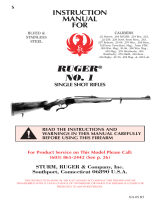
Figure 1. Components frequently referred to are identified. In these photographs the cocking piece is
shown cocked (protruding from the rear of the bolt sleeve) revealing the disassembly hole in the lower
portion of the cocked piece. The bolt stop (on the left side of the receiver) permits the bolt to be
withdrawn simply by pressing down lightly with the thumbnail. The safety selector (show in the “Safe”
position) should be in the “Load-Unload” position when the bolt is being removed or being installed.
NOMENCLATURE
5
Ramrod
Front Sight
Rear Sling
Swivel
Rear Sight
Bolt Handle
Bolt Stop
Trigger
Trigger Guard
Striker/Cocking Piece
Disassembly Hole
Receiver
Bolt Sleeve
Safety
(Shown “ON”)
Bolt
Scope Mount Bases
Nipple
Front Sling
Swivel
Ramrod
Thimble
Stock
Ramrod Tip
Barrel Band
Recoil Pad
Muzzle
Barrel

6
OPERATION OF SAFETY
The RUGER
®
MODEL 77/50 rifle has a three position safety. The safety
selector is located at the right of the bolt sleeve.
The safety selector can be moved from the “Fire” position to its two other
positions (“Load-Unload” and “Safe”) only when the striker is cocked. Fully
raising the bolt handle cocks the striker.
The bolt handle can be raised and lowered only when the safety selector is in
either the full forward “Fire” or the middle “Load-Unload” position. When the
safety selector is in the full rearward “Safe” position, the bolt handle is locked in
the closed (fully down) position in order to prevent inadvertent lifting of the bolt
handle and to ensure that the rifle will be ready to fire when the safety is taken
“off”.
Practice (with an unloaded rifle) moving the safety selector to the three positions
until you know the position of the safety selector for the three modes– “Fire,”
“Load-Unload,” and “Safe.” WARNING: When manipulating the safety selector,
DO NOT HAVE ANY FINGER INSIDE THE TRIGGER GUARD! When the safety
selector is in the “Fire” position and the trigger is pulled, the rifle will fire.
The safety selector should always be in the “Safe” position except when the gun
user is actually firing or unloading the rifle. The safety selector should
unfailingly be moved to the “Safe” position whenever the gun user ceases firing.
Figure 2. Safety selector in
“FIRE” (full forward) position.
The safety selector should be
moved to this position only when
the gun user is actually firing
the rifle. When the safety is in
the fire position, it is referred to
as being “off.” (When the safety
is in the “SAFE” position, shown
in Figure 4, it is referred to as
being “on.”)
Figure 3. Safety selector in
“LOAD-UNLOAD” (middle)
position. The safety selector should
be in this position when the bolt is
being cycled, to place a percussion
cap on the nipple, to remove a
percussion cap from the nipple, or
when unloading the rifle. As soon
as the bolt is closed, the safety
selector should be moved fully
rearward to the “SAFE” position
shown in Figure 4, unless the rifle
is to be fired immediately.
Figure 4. Safety selector in
“SAFE” (full rearward) position.
The safety selector is fully nested
in the groove in the cocking piece.
When the safety selector is in this
position, the bolt handle cannot
be raised. The curved arrow on the
bolt sleeve indicates the direction
and motion of the safety selector
to bring it to the “SAFE” position.
Keep the safety in this position
except when actually loading,
capping, unloading, or firing.
SAFETY POSITIONS

Keep the safety on unless actually firing. Always
move the safety fully to its intended position and
check it. The safety has three positions –“SAFE,”
“LOAD-UNLOAD,” and “FIRE.” Never depend on a
safety mechanism or any other mechanical device
to justify careless handling or permitting the rifle
to point in an unsafe direction. The only “safe”
rifle is one in which the bolt is open, the barrel is
empty of both powder and projectile, and the
nipple is uncapped.
KNOW HOW TO USE THE SAFETY
The safety selector is held in each of its positions by a plunger that is under
spring tension. Therefore, the gun user should frequently check the position of
the safety selector to be certain it has not been inadvertently moved. If the safety
does not function properly, or if the selector seems to move too easily, or if the
safety selector does not seem firmly positioned in any of its three positions, the
rifle should be discontinued from use and returned to the Newport Product
Service Department for repair (See p. 38).
!
WARNING –MANUAL SAFETY
3
2
1
SAFE
LOAD-
UNLOAD
FIRE
7
!
WARNING – LEAD EXPOSURE
Discharging firearms in poorly ventilated
areas, cleaning firearms, or handling
ammunition may result in exposure to
lead and other substances known to the
state of California to cause birth defects,
reproductive harm, and other serious
physical injury. Have adequate ventilation
at all times. Wash hands thoroughly after
exposure.
SHOOTING OR CLEANING GUNS
MAY EXPOSE YOU TO LEAD
AMMUNITION
BLACK POWDER OR PYRODEX ONLY
The RUGER
®
MODEL 77/50 is a single shot muzzleloading percussion
rifle intended solely for use with Black Powder or Pyrodex. It should never, under
any circumstances, be loaded with any type of smokeless powder as the result
could be damage to the rifle and injury to the shooter or bystanders. Be aware
that certain smokeless powders may appear black in color even though they are
not
Black Powder! Never use any powder that you are not certain is actually
Black Powder. The best way to do this is to only use powder from clearly marked
original cans of Black Powder or Pyrodex.

Death, serious injury, and damage
can result from the use of wrong
ammunition, bore obstructions,
powder overloads, or incorrect
components. Always wear
shooting glasses and hearing
protectors.
Never use smokeless powder in
any muzzleloader! Never fire an
unknown powder charge. If you
are uncertain as to which
components your rifle is loaded
with, do not fire it -- you must
unload your rifle and remove the
unknown components.
IMPROPER AMMUNITION
DESTROYS GUNS
8
Black Powder is usually classified by powder grain size, with “Fg” being the
largest granulation and “FFFFg” being the smallest granulation normally
available. Use only “FFg” (sometimes called “2F”) grain size black powder in the
RUGER
®
MODEL 77/50 rifle. Replica Black Powder such as Pyrodex RS
may be used, so long as suggested loading data is strictly adhered to. Note that
Pyrodex RS is less dense than FFg black powder and must only be used as a
measur
e-for-measure substitute for FFg black powder. If you substitute Pyrodex
RS for FFg black powder on a weight-for-weight basis, you will overcharge your
rifle and risk serious injury.
POWDER CHARGE
Since Black Powder is sold in bulk, you are in complete control over how you
load your rifle. Be sure to weigh each charge, or use a dipper which holds the
exact weight of powder you wish to load. Check to be sure the dipper holds the
correct amount of powder by weighing a dipper-full of powder befor
e you begin
loading your rifle from the dipper. Never load powder into the barrel directly
from a flask or other powder container -- you run the serious risk of explosion
and severe personal injury.
A good starting accuracy load, using a pure lead .50” diameter ball or conical
projectile, is 40 grains of FFg black powder. You may find that adjustment of this
charge upward or downward is more accurate in your rifle. A good starting
hunting load for deer-sized game with the same projectile is 70 grains of FFg
black powder. Consulting a black powder loading manual for recommended
target or hunting loads is essential. Never exceed the maximum powder charge
listed for the specific
projectile you are using! Never exceed a powder charge of
120 grains of FFg black powder, r
egardless of the projectile you are using!
?
POWDER?
Never Use Unknown
or Smokless Powder
WARNING –AMMUNITION
!

Black Powder is an extremely sensitive
propellant and is readily ignited by heat,
spark, static electricity, friction, pressure,
impact, etc. Unlike smokeless powder,
Black Powder will ignite with great
violence and rapidity even when
unconfined.
Black Powder should be handled only in
very small quantities. Never pour powder
directly from a flask or powder hor
n into
any muzzleloading firearm! Never smoke
while handling Black Powder!
Many shooters pre-weigh single charges
into small containers for use on the
range or in the field. Never fire the rifle
near an open powder container, or an
explosion may result.
If you are not familiar with safe handling
procedures for Black Powder and for
muzzleloading firearms in general, you
should obtain one of the authoritative
muzzle loaders’ Manuals and study it
carefully before beginning to shoot.
BLACK POWDER IS
EXPLOSIVE
9
!
WARNING–BLACK POWDER
Never Pour
Powder Directly
From Flask!
PROJECTILES
The RUGER
®
MODEL 77/50 is designed to use a .500” diameter pure lead
round ball or lubricated conical bullet of pure lead, a .490” round ball with a
lubricated .010 - .015” thick cloth patch, or a smaller diameter projectile encased
in a .500” diameter sabot. Bullets of either type can be purchased from your
dealer, ready to use, or can easily be cast at home with a small investment in
equipment. Information on bullet casting is available from the manufacturers of
moulds and casting equipment and from various authoritative handbooks. Your
dealer should be able to provide you with any equipment which you may require.
(See “Lead Exposure” Warning, p. 7)
The Ruger Model 77/50’s rifling twist (1 turn in 28”) is designed for best results
with pre-lubricated soft lead conical projectiles, or jacketed or soft lead bullets
encased in “sabots” (See p. 10). Patched round balls generally do not deliver as
high a level of accuracy with this rifling twist, but may be safely used if correctly
loaded (See p. 14).
The use of non-saboted jacketed or alloy bullets is not recommended as accuracy
is generally not as satisfactory as with the pure lead bullets. They may be difficult
to load and may raise pressures to dangerous levels.
Whatever projectile you select, you must remember that if it is not a tight fit in
the barrel when loaded, it could shift forward off the powder charge and act as a
bore obstruction, causing the barrel to bulge or burst when fired! It is your

10
responsibility to select the proper lead ball/patch combination of a lubricated
conical lead bullet that fits securely in the bore, yet is not excessively difficult to
load, particularly after a shot or two of black powder fouling has built up in the
bore.
Never load multiple projectiles into the barrel. The rearmost projectile slamming
into the other projectiles when fired could cause a burst barrel and severe
personal injury. Use only one bullet at a time.
SABOTS
Some projectiles designed for muzzleloading rifles are considerably undersized
from the bore diameter and are encircled by a resilient synthetic or fibre “sabot”
or “shoe”. An undersize sabot can easily release its projectile to become a bore
obstruction, or the sabot itself can act as a bore obstruction. Never lubricate a
sabot -- this can cause the saboted bullet to slip forward up the bore and act as
an obstruction when fired, possibly resulting in destruction of the rifle and
severe injury to the shooter or bystanders! If sabots are used, their
manufacturer’s directions must be scrupulously followed.
PATCHING
.490” diameter round ball projectiles of soft lead must be fired with a lubricated
round linen cloth patch of .010 - .015” thickness (about that of a gun cleaning
patch) and about 1.5” diameter. However, many shooters prefer to use lubricated
soft lead conical projectiles, and these often work best without a patch,
particularly if they are hollow-based. Always follow the instructions regarding
patches that are furnished by the manufacturer of the projectile (or bullet mold
if you cast your own bullets) that you chose. The best lubricants for patches are
vegetable-based greases, synthetic lubricants specifically designed for this use.
Petroleum-based lubricants often char the patches when fired and may leave
excess residue in the bore -- don’t use them to lubricate patches for bullets.
PERCUSSION CAPS
A percussion cap is a small metal cup, the interior top of which is coated with a
priming mixture. This priming mixture is usually covered with a foil or paper
liner. It fires when struck a blow.
The cap is placed on the nipple and when struck by the striker, the priming
compound explodes, igniting the powder charge.
The cap should fit the nipple only tightly enough so that it does not fall off when
the barrel is elevated with the bolt open. Do not attempt to use caps which ar
e
too tight or try to force or pound caps onto the nipples, as a premature
discharge could result. Suggested cap size for the RUGER
®
MODEL 77/50
rifle is No. 11 (U.S.) or equivalent.
Since percussion caps have an open end (which is placed on the cylinder nipple
when you are ready to fire), they are susceptible to contamination. Be careful
when handling percussion caps, especially with oily fingers, and try to keep
water, grease, dirt and other contaminants out of the open end of the caps.
Failure to do so is the main cause of misfires in percussion muzzleloading
firearms.

Percussion caps are designed
to fire as the result of a blow
(“percussion”).
A capped rifle loaded with
powder and ball is fully
loaded and will fire if the cap
is struck.
Never clean, lubricate,
disassemble, or work on a
rifle while it is capped or
loaded. Never install, remove,
or carry a capped nipple or
breech plug.
Always remove the
percussion cap before
unloading the barrel or
disassembling the rifle.
NEVER STRIKE A
PERCUSSION CAP
11
!
WARNING–PERCUSSION CAPS
DON'T
STRIKE
CAP!
EYE AND EAR PROTECTION
Safety glasses must be used when loading and firing the RUGER
®
MODEL
77/50, or any percussion firearm. In percussion muzzleloaders, unlike cartridge
firearms, the thin percussion cap is the only seal against the hot gasses of main
powder charge, which can escape out of the nipple with great force when the
rifle is fired. Small pieces of the percussion cap are frequently blown away to the
side or rear when a percussion arm fires. Always wear hearing protection when
firing any firearm, in order to avoid permanent hearing damage.
TO LOAD AND FIRE
Practice this important aspect of gun handling (with an unloaded rifle) until you
can perform each of the steps – described below – with skill and confidence. But
before loading the rifle, please read completely through this manual, and be
certain the muzzle is pointing in a safe direction. Do not load the rifle until you
are ready to use it!
(The following procedure assumes a new rifle with the bolt out.)

12
INSERTING THE BOLT
1. Be certain the barrel is empty by pointing the muzzle upward towards a
light source and glancing through the rear of the action at the rear end of
the nipple. You should see light through the hole in the nipple, indicating
that the barrel is empty. Keep the muzzle pointed in a safe direction, and
keep your fingers off the trigger throughout the assembly and loading
process until you are actually ready to fire. (See Rule 2, p. 43).
2. Position the safety selector in the “Load-Unload” position (see Figure 3,
p. 6).
3. Make certain the bolt is correctly assembled and ready to be inserted in the
receiver. If there is any doubt, see numbered paragraph 6, p. 33 (To
Assemble the Bolt) in the “Reassembly” section of this manual.
4. Note that if the breech plug is not screwed all the way into the receiver, the
bolt cannot be fully closed. Whenever you install the breech plug, be sure
that you coat its threads with grease in order to be able to remove it for
cleaning. (See p. 31).
5. Depress the bolt-stop and insert the bolt into the receiver.
LOADING
WARNING: Please re-read carefully the paragraph entitled
“Warning - Black Powder”, p. 9.
!
In the interests of both performance and safety, it is important that steps which
follow be performed in sequence and with attention to detail:
1. BEFORE LOADING:
Lift the bolt handle and place the safety in the “load-unload” position. Remove
the bolt by pressing down on the bolt stop and withdrawing the bolt to the rear.
Look through the hole in the nipple with the barrel pointed toward a light
source to make sure the barrel is empty of powder or ball. Reinsert the bolt.
Check rifle to ensure that:
A. Nipple is uncapped.
B. Barrel is empty.
C. Bore and nipples are free of grease, oil or other obstruction.
2. CLEARING THE NIPPLES:
Without loading the barrel, place a percussion cap on the nipple. Point the
rifle in a safe direction, a few inches from some grass, leaves, or snow. Move
the safety to the full forward “fire” position, and pull the trigger to fire the
cap. You should see the grass, leaves, or snow move from the force of the
percussion cap. Repeat this process with a second cap. This is done to ensure
that the nipple passage is clear and dry.
Open the bolt, place the safety in the “load-unload” position and remove the
percussion cap and cap fragments.

Know the bore diameter of your rifle you are loading and
load projectiles of only correct diameter into it! Either a
too tight or too loose projectile can cause a burst barrel,
resulting in serious injury to the shooter or bystanders.
This rifle is designed to use a .500” projectile (or a .490”
projectile with a .010 - .015” thick patch), a #11
percussion cap, and up to a maximum of 120 grains of
FFg black powder (or equivalent volume of Pyrodex RS)
only. Never use smokeless powder of any kind.
Before firing, be certain the percussion cap is seated
completely on the nipple. A rifle discharged by the
closing of the bolt on an incorrectly seated cap can
result in possible serious injury to the shooter and those
nearby.
If a projectile does not fully seat readily, do not force it.
Check to be certain that each projectile is the proper
caliber and of correct dimensions. If you cannot
determine why the projectile will not fit, carefully
remove the projectile, empty the rifle of all powder (see
pp. 20 - 22) and write or call the factory.
The wrong components or an excessive powder charge
can destroy your gun and result in serious injury to you
or bystanders.
BE SURE WHAT YOU LOAD
IS CORRECT
13
!
WARNING –LOADING
?
?
3. CHARGING THE BARREL:
A. Starting with the bolt open in its
full rearward position, place safety
in the “load-unload” position. (See
Fig. 5) Do not touch the trigger
while loading! Be sure that no cap
is on the nipple!
B. With one hand, hold the rifle
securely with the barrel pointing
straight upwards and the recoil
pad or butt plate on the ground.
Keep your face and other body
parts away from the muzzle!
S
a
f
e
t
y
MUZZLE UP
ACTION OPEN
SAFETY IN
"LOAD/UNLOAD"
POSITION
NIPPLE UNCAPPED
5
LOADING POSITION

14
C. Using a dipper or other single-charge
measure, pour the desired amount of
powder into the front opening (muzzle) of
the barrel. (See Fig. 6) Never exceed the
powder charge recommended for the
projectile you have selected from a
reputable black powder loading manual. Do
not pour powder directly from the flask or
other powder container (See “Black
Powder Warning”, p. 9)
D. Place the bullet in the muzzle of the charged barrel, with the flat spot
(“sprue”) of the round ball or the point of a lubricated conical projectile
facing upward, out of the muzzle. (See Fig. 7) If you lubricate your
projectile, be sure to use a lubricant designed specifically for black
powder. Ordinary petroleum-based lubricants can cause fouling to build
up and make it difficult to fully seat the projectile on the powder charge,
with the resulting danger of a burst barrel and injury to the shooter and
bystanders.
E. If you wish to use a patch on your round ball for tighter fit or improved
sealing of the ball in the barrel, place a 1 1/2” diameter patch lubricated
with a commercial black powder gun grease centered over the muzzle
befor
e you place a ball into the muzzle. (See Fig. 8) Again, align the sprue
of the bullet in the center of the bore facing upward, out of the muzzle.
(See Fig. 9, p.15) Some shooters now push the ball slightly into the
muzzle with a “short starter” rod of about 1” in length and then trim
away any excess patch material protruding from the muzzle, but this is
optional.
CENTER BALL
ON PATCH
7
8
BLACK POWDER
OR PYRODEX
ONLY!
6
LOADING POWDER
INSERTING CONICAL
PROJECTILE
INSERTING
PATCHED BALL
OR

F. Remove the ramrod from under the barrel by pulling it downward out of
its recess in the barrel and then forward (upward) out of the stock and
ramrod thimble. Grasp the ramrod around its side and, with a firm even
stroke, seat the bullet firmly on the powder charge. Do not
push down on
the ramrod tip with the palm of your hand, in the event that the powder
charge ignites while you are loading! (See Fig. 10) For maximum
accuracy, the powder charge should be very lightly compressed by the
bullet. Be sure that the bullet is seated deeply enough so that it rests
firmly against the powder charge. Do not leave an air space between the
powder and the bullet. This can cause the barrel to burst when firing!
G. You should not “pound” on the ramrod to fully seat the projectile, since
this can deform the bullet, cause accuracy problems, or even set off the
powder charge and fire the rifle! Once you determine that you have fully
seated the projectile of your choice onto the correct powder charge, note
and mark how much of the ramrod protrudes from the muzzle. You
should always be sure that no more of the ramrod protrudes after loading
the rifle -- otherwise, you may have loaded too much powder, multiple
projectiles, or failed to have fully seated the ball onto the powder charge.
Firing a rifle with any of these conditions can result in a wrecked rifle
and injury to the shooter and bystanders. Be safe -- unload your rifle and
start over again if your ramrod protrudes excessively from the muzzle
after loading (See “To Unload”, p. 20)
H. REMOVE THE RAMROD FROM THE BARREL. If you replace it in the
thimble under the barrel, you will not leave it behind.
IF YOU FORGET TO LOAD POWDER
If you have inadvertently loaded a ball without first loading a powder
charge, you must remove the breech plug with the breech plug wrench
and push the ball from the barrel (See “To Unload”, p. 20) before starting
all over again.
15
9
KEEP HAND OFF END
NOTE RAMROD
PROTRUSION WHEN
PROJECTILE IS FULLY
SEATED ON POWDER
10
STARTING PROJECTILE
FULLY SEAT PROJECTILE

4. CAPPING THE
NIPPLE:
Remember that the
safest way to carry
any loaded
muzzleloading rifle
is uncapped. Cap it
only just before you
are immediately
ready to fire. See
“Handling Warning”,
p. 17.
Be sure you use only #11 percussion caps of good quality and correct size.
With the bolt open, carefully place a #11 cap on to the nipple. An inline
capper, sold commercially, is preferred by some shooters. It is not required,
but is especially helpful if a scope is mounted on the rifle. Do not put oil,
grease, or dirt into the open end of the cap while loading -- misfires could
result. The caps should be completely seated on the nipple without undue
pressure. Caps should only be tight enough so that they do not fall off the
nipple when the barrel is elevated with the bolt open. (See Fig. 11)
S
a
f
e
t
y
CAP
NIPPLE
SAFETY IN
"LOAD/UNLOAD"
POSITION
11
WARNING:
It is dangerous to attempt to use caps which are
too small. Never force a cap on to the nipple. Since caps fire by
percussion, excess force or a blow in seating them can cause the caps to
discharge, firing the gun and forcing hot gas out of the nipple, which can
cause injury.
!
16
5. PREPARING TO FIRE:
To normally fire the rifle, the bolt must first be closed after the nipple is
capped. This is done by pushing the bolt handle fully forward, and lowering it.
DO NOT TOUCH THE TRIGGER WHILE OPERATING THE BOLT. KEEP THE
SAFETY IN THE “LOAD-UNLOAD” POSITION WHILE OPERATING THE
BOLT, AND MOVE IT FULLY REARWARD TO THE “SAFE” POSITION AS
SOON AS THE BOLT IS CLOSED. TOUCH THE TRIGGER ONLY WHEN YOU
ARE READY TO FIRE AND HAVE DISENGAGED THE SAFETY WHILE
AIMING AT A TARGET.
6. FIRING:
Once the safety is pushed fully forward to the “fire” position, the RUGER
MODEL 77/50 is now ready to fire. Light pressure on the trigger will cause
the striker to fall forward, striking the percussion cap, and the rifle will fire.
Always be certain that you know where the bullet will strike when you fire the
rifle.
WARNING: DO NOT TOUCH THE TRIGGER UNTIL YOU ARE
ACTUALLY READY TO FIRE THE RIFLE.
!
Never allow the thumb to touch the cocking piece as it can be pinched when
the striker moves forward during firing.
CAPPING THE NIPPLE

If this rifle is to be carried loaded, certain
precautions must be observed in the interest of
safety. It is safest to carry any muzzleloader
with no percussion cap on the nipple. The gun
should never be carried with the striker resting
on a percussion cap. Under such
circumstances, a light accidental blow to the
striker can readily cause the gun to discharge.
Never cap the nipple until you are ready to
shoot the rifle. When capping, be sure that the
safety is in the “load-unload” position. After
capping, immediately place the safety in the
full-rearward “safe” position and keep it there
until you are actually aiming at a target or
game. Only when you are immediately going to
shoot should you move the safety fully forward
to the “fire” position.
However, the safety is a mechanical device and
any mechanical device can fail. Never depend
upon this or any other mechanical device to
justify careless handling of any firearm. Keep
the firearm pointed in a safe direction at all
times.
NEVER PUT THE STRIKER
DOWN ON A CAPPED
NIPPLE
When firing any rifle, be sure all persons are a
safe distance to the rear of the shooter. When
fired, all muzzle loaders discharge gas and
particles through the clearance gap between
the striker and the rear of the nipple. These
particles of powder grains and percussion cap
fragments are projected broadly sideways at
high speed and can injure a person who is
standing too close to the rifle. When firing any
muzzle loader, always be certain that nothing
– including either of your hands – is in the
path of the hot gas and particles which are
discharged from the top, front and sides of the
rifle. Small pieces of the percussion cap are
frequently blown away when a percussion arm
fires. Safety glasses must be used by shooters
and bystanders when loading and firing any
percussion firearm. Always wear hearing
protection when firing any firearm, in order to
avoid permanent hearing damage.
HOT GASES EXIT
NIPPLE AREA
17
!
WARNING –FIRING
!
WARNING –HANDLING
SAFETY "OFF"
CAP NOT
VISIBLE
STRIKER
UNCOCKED
CAP IS VISIBLE
SAFETY
"ON"
STRIKER
COCKED

Black powder is extremely sensitive and a
powder charge poured down the barrel after
firing a shot can readily be ignited by an
ember of partially burned powder or glowing
patch fragment in the bore. Pushing a
projectile down onto a powder charge can
“fan” an ember into igniting the powder
charge and firing the rifle.
Always wait one minute before reloading. You
should wipe the bore with a cleaning patch
soaked in solvent between shots.
If a cap fires but the powder charge does not,
the powder may be smoldering and could
ignite at any time. Wait at least one minute
before attempting to recap. Remember that
hot gasses can escape from the nipple if the
powder charge ignites when the bolt is open,
and these gasses can burn you. Keep the rifle
pointed in a safe direction at all times.
Keep your head, face, eyes and hands away
from the muzzle while reloading and always
wear eye and hearing protection. Hold the
ramrod around its sides -- never place your
hand over the end of the ramrod so that it
would injure your hand if the powder charge
goes off (propelling the ramrod out) while
reloading.
DON’T LOAD IN A HURRY
18
!
WARNING –RELOADING
WARNING: REMEMBER THAT EACH TIME A SHOT IS FIRED,
THE SAFETY SELECTOR IS IN THE “FIRE” POSITION.
WHEN YOU OPEN THE BOLT, MOVE THE SAFETY SELECTOR
TO THE “LOAD-UNLOAD” POSITION BEFORE CLOSING THE ACTION.
ONCE THE ACTION IS CLOSED, MOVE THE SAFETY FULLY BACK TO
THE “SAFE” POSITION.
!
Remember - Never lower the striker fully down onto a percussion cap or loaded
rifle! See “Handling Warning”, p 17.
7. RELOADING:
After firing, the striker will remain down. Raise the bolt handle, put the safety
in “load/unload”, and draw the bolt to the rear in a firm, smooth stroke. This
will expose the nipple so you can remove the fired cap fragments. Fragments
clinging to the nipple may be removed with the fingers, and fragments
clinging to the bolt can be dislodged by fully pulling the bolt back smartly
against the bolt stop. To fire subsequent shots, repeat all preceding steps 3 -
6, above. It is not necessary to fire a cap in between shots to clear the nipple,
but you should be sure that the nipple is clear before reloading. A thin wire or
similar tool works well for this.

Never carry the rifle loaded with the
safety selector in the “FIRE” position. If
dropped or struck with the safety off, the
rifle may fire. Such a discharge can occur
with or without the trigger being directly
struck or touched. Never rest a loaded
rifle against any object (wall, fence,
vehicle, tree, etc.) because there is always
the possibility that the rifle will be jarred
or slide from its position and fall with
sufficient force to discharge. Keep safety
“on” unless actually firing.
Never lower (uncock) the striker onto a
percussion cap of a loaded rifle. Under
such circumstances the striker will be in
direct contact with the percussion cap
and a light accidental blow to the striker
can readily cause the gun to discharge.
If the rifle is dropped, the bullet should
be fully reseated against the powder
charge, or it might act as an obstruction
and cause the barrel to burst upon firing.
When afield, periodically check to see if
your bullet has remained fully seated on
the powder charge by inserting the
ramrod and pushing the projectile fully
downward onto the powder.
ANY GUN MAY FIRE IF
DROPPED
19
DRY-FIRING: Going through the actions of cocking, aiming, and pulling the
trigger of an unloaded
gun is known as “Dry Firing.” The Ruger Model 77/50
should not be dry-fired, as damage to the nipple may occur, which can prevent
the flame from the cap from fitting on the nipple correctly, or can prevent the
cap flame from igniting the powder charge.
!
3
2
1
SAFE
LOAD-
UNLOAD
FIRE
WARNING –MISHANDLING
Best results are obtained by cleaning the bore after each shot, before
reloading. Soak a patch in black powder solvent or bore lubricant, place it
over the front end of the ramrod, push it completely into the bore, and pull it
completely out of the muzzle. If it is difficult to remove, push the patch back
down and then up until it can be removed. This “swabbing” after each shot
makes reloading much easier. Never try to reload another projectile if it is
excessively difficult to push down the barrel -- you may not fully seat it on the
powder charge and it may act as a bore obstruction, resulting in a burst
barrel and possible serious injury to the shooter or bystanders. Instead, open
the bolt, pull the projectile out of the muzzle, empty out all powder, and
clean the barrel thoroughly before reloading.

20
TO UNLOAD
(Keep rifle pointed in a safe direction)
Completely unload the rifle immediately when you are finished shooting (by
removing cap, powder and ball), or fire it into a safe backstop.
It is much easier and safer to fir
e any muzzleloading firearm rather than attempt
to unload it. However, if this is impossible, or if you are uncertain that correct
components have been safely loaded, the rifle should be unloaded in accordance
with the following steps.
1. Be sure the rifle is
pointing in a safe
direction.
2. Carefully place the
safety in the “load-
unload” position. (See
Fig. 12) Keep fingers
away from trigger at all
times during
unloading!
3. Open action
and carefully
remove the
percussion cap
and any cap
fragments or
priming
compound
from the
nipple. (See
Fig. 13)
4. Depress bolt stop and
completely remove the
bolt rearward from the
receiver. (See Fig. 14)
PUT SAFETY IN
"LOAD/UNLOAD"
POSITION
12
S
a
f
e
t
y
A
B
OPEN ACTION
REMOVE CAP
SAFETY IN
"LOAD/UNLOAD"
POSITION
A
B
PRESS
BOLT STOP
DOWN
PULL BOLT BACK
OUT OF RECEIVER
13
14
SAFETY IN “LOAD/UNLOAD”
OPEN ACTION - REMOVE CAP
REMOVE BOLT
/