Page is loading ...

For Product Service on This Model Please Call:
(603) 865-2442 (See p. 28)
STURM, RUGER & Company, Inc.
Southport, Connecticut 06890 U.S.A.
THIS INSTRUCTION MANUAL SHOULD ALWAYS ACCOMPANY THIS FIREARM AND BE
TRANSFERRED WITH IT UPON CHANGE OF OWNERSHIP, OR WHEN THE FIREARM IS LOANED OR
PRESENTED TO ANOTHER PERSON.
DH 12/06
READ THE INSTRUCTIONS AND
WARNINGS IN THIS MANUAL CAREFULLY
BEFORE USING THIS FIREARM
BLUED &
STAINLESS
STEEL
CALIBERS
.204 Ruger, .223, .22-250, .243, .257 Roberts,
.25-06, .270 Win., .280 Rem., 7mm-08,
7mm Rem. Mag., .308, .30-06, .300 Win. Mag.,
.338 Federal, .338 Win. Mag., .358 Winchester,
.375 Ruger
S
M77 Hawkeye
INSTRUCTION
MANUAL
FOR
RUGER
®
M77
®
HAWKEYE
®
BOLT ACTION RIFLES

3
WARNING
“Children are attracted to and
can operate firearms that can
cause severe injuries or death.
Prevent child access by always
keeping guns locked away and
unloaded when not in use. If you
keep a loaded firearm where a
child obtains and improperly uses
it, you may be fined or sent to
prison.”
ADVERTENCIA
State-By-State Warnings
Certain states require by law that their own specified warning
notices in larger-than-normal type be conspicuously included by
the manufacturer, distributor, or retail dealer with firearms sold
in that state. Sturm, Ruger sells its products in compliance with
applicable laws and regulations. Because our products may be
sold in these states, we include the following:
California:
“A los niños los atraen las armas
de fuego y las pueden hacer
funcionar. Ellos pueden causarses
lesions graves y la muerte. Evite
que los niños tengan accesso a las
armas de fuego guardándolas
siempre con llave y descargadas
cuando no las esté utilizando. Si
usted tiene un arma de fuego
cargada en un lugar en que un
niño tiene acceso a ella y la usa
indebidamente, le pueden dar una
multa o enviarlo a la carcel.”
Connecticut:
“UNLAWFUL STORAGE OF A LOADED FIREARM MAY
RESULT IN IMPRISONMENT OR FINE.”
Florida:
“IT IS UNLAWFUL, AND PUNISHABLE BY
IMPRISONMENT AND FINE, FOR ANY ADULT TO
STORE OR LEAVE A FIREARM IN ANY PLACE WITHIN
THE REACH OR EASY ACCESS OF A MINOR UNDER 18
YEARS OF AGE OR TO KNOWINGLY SELL OR
OTHERWISE TRANSFER OWNERSHIP OR POSSESSION
OF A FIREARM TO A MINOR OR A PERSON OF
UNSOUND MIND.”

4
Maine:
“ENDANGERING THE WELFARE OF A CHILD IS A
CRIME. IF YOU LEAVE A FIREARM AND AMMUNITION
WITHIN EASY ACCESS OF A CHILD, YOU MAY BE
SUBJECT TO FINE, IMPRISONMENT OR BOTH. KEEP
FIREARMS AND AMMUNITION SEPARATE. KEEP
FIREARMS AND AMMUNITION LOCKED UP. USE
TRIGGER LOCKS.”
Maryland:
“WARNING: Children can operate firearms which may cause
death or serious injury. It is a cr
ime to store or leave a loaded
firearm in any location where an individual knew or should
have known that an unsupervised minor would gain access to
the firearm. Store your firearm responsibly!”
Massac
husetts:
“WARNING FROM THE MASSACHUSETTS ATTORNEY
GENERAL: This handgun is not equipped with a device that
fully blocks use by unauthorized users. More than 200,000
firearms like this one are stolen from their owners every year
in the United States. In addition, there are more than a
thousand suicides each year by younger children and
teenagers who get access to firearms. Hundreds more die from
accidental discharge. It is likely that many more children
sustain serious wounds, or inflict such wounds accidentally on
others. In order to limit the chance of such misuse, it is
imperative that you keep this weapon locked in a secure place
and take other steps necessary to limit the possibility of theft
or accident. Failure to take reasonable preventive steps may
result in innocent lives being lost, and in some circumstances
may result in your liability for these deaths.”
“IT IS UNLAWFUL TO STORE OR KEEP A FIREARM,
RIFLE, SHOTGUN OR MACHINE GUN IN ANY PLACE
UNLESS THAT WEAPON IS EQUIPPED WITH A
TAMPER-RESISTANT SAFETY DEVICE OR IS STORED
OR KEPT IN A SECURELY LOCKED CONTAINER.”

5
New Jersey:
“IT IS A CRIMINAL OFFENSE TO LEAVE A LOADED
FIREARM WITHIN EASY ACCESS OF A MINOR.”
New
York City:
“THE USE OF A LOCKING DEVICE OR SAFETY LOCK IS
ONLY ONE ASPECT OF RESPONSIBLE FIREARMS
STORAGE. FOR INCREASED SAFETY, FIREARMS
SHOULD BE STORED UNLOADED AND LOCKED IN A
LOCATION THAT IS BOTH SEPARATE FROM THEIR
AMMUNITION AND INACCESSIBLE TO CHILDREN AND
OTHER UNAUTHORIZED PERSONS.”
North Carolina:
“IT IS UNLAWFUL TO STORE OR LEAVE A FIREARM
THAT CAN BE DISCHARGED IN A MANNER THAT A
REASONABLE PERSON SHOULD KNOW IS ACCESSIBLE
TO A MINOR.”
Texas:
“IT IS UNLAWFUL TO STORE, TRANSPORT, OR
ABANDON AN UNSECURED FIREARM IN A PLACE
WHERE CHILDREN ARE LIKELY TO BE AND CAN
OBTAIN ACCESS TO THE FIREARM.”
Wisconsin:
“IF YOU LEAVE A LOADED FIREARM WITHIN THE
REACH OR EASY ACCESS OF A CHILD YOU MAY BE
FINED OR IMPRISONED OR BOTH IF THE CHILD
IMPROPERLY DISCHARGES, POSSESSES, OR EXHIBITS
THE FIREARM.”
***************** *****
Please check with your licensed retailer or state police for
additional warnings which may be required by local law or
regulation. Such regulations change constantly, and local
authorities are in the best position to advise you on such legal
matters.

6
• Always keep your firearm pointed in a safe direction,
including when you are installing or removing your
locking device.
• Always verify that your firearm is completely unloaded
before installing your locking device.
• Do not
install locking devices in the trigger guard;
always keep your fingers, clamp and locking device
outside the trigger guard during device installation and
removal.
• Store firearms, ammunition and keys separately and
securely, away from children and careless adults; do not
store your firearm with the keys in the locking device.
• Do not attempt to work the action of your firearm with
the locking device in place; this may damage your
firearm.
• While locking devices are an important aid to security
measures, they are not a substitute for safe firearm
handling and proper storage. Remember that any
mechanical device can be bypassed with enough time,
knowledge, determination and equipment.
LOCKING DEVICES MUST BE USED
SAFELY AND RESPONSIBLY
LOCKING DEVICE
INSTALLATION INSTRUCTIONS
WARNING — USE OF LOCKING DEVICES
Use the Cor
rect Lock:
While the basic locking device is substantially similar
for all Ruger
®
firearms, due to the different shapes of the many Ruger
®
firearms, some firearms utilize different locking devices. The 2 1/2” lock is
for use with the RUGER
®
M77
®
Hawkeye
®
rifles. It is important to use
the correct locking device!
To Install the Factory-Supplied Locking Device:
1. Keep the muzzle pointed in a safe direction and your fingers outside the
trigger guard at all times!
2. Be sure the firearm and its magazine are completely unloaded and contain
no cartridges or cartridge cases!
3. Open the action completely by drawing the bolt fully to the rear.

4. Release the floorplate latch and allow the floorplate to hang open.
5. Apply the lock directly to your M77 Hawkeye rifle as shown below.
6. Close the lock by pressing the shackle into the body of the lock (the part
that receives the key) as tightly together as possible. The lock has
bumpers and the shackle is coated with a non-marring material that will
not harm the metal finish of your firearm; be careful not to dent or
scratch the wooden stock.
7. Once the lock is securely closed, remove the key. Pull firmly on the lock
to test the connection and be sure it is locked. Do not leave or store your
firearm with the key in the lock! Store your locked unloaded firearm
and the key in secure, separate locations, away from ammunition,
children, or unauthorized adults.
Correct Installation of Lock
For Ruger M77 Hawkeye Rifles Only
7

FIREARMS SAFETY-YOUR RESPONSIBILITY
SAFETY MUST BE THE FIRST AND CONSTANT
CONSIDERATION OF EVERY PERSON WHO HANDLES
FIREARMS AND AMMUNITION.
This Instruction Manual is designed to assist you in learning how to use and care
for your RUGER
®
M77
®
Hawkeye
®
rifle properly.
Only when you are certain you fully understand the Manual and can properly
carry out its instructions should you practice loading, etc. with live ammunition.
If you have any doubts about your ability to handle or use a particular type of gun
safely, then you should seek supervised instruction. Such personalized instruction
is often available from gun dealers, gun clubs or police departments. If none of
these sources can help you, write to the National Rifle Association, 11250 Waples
Mill Road, Fairfax, VA 22030-7400. They will assist you.
The person with a gun in their possession has a full-time job. You cannot guess;
you cannot forget. You must know how to use your firearm safely. Do not use any
firearm without having a complete understanding of its particular characteristics
and safe use. Remember: There is no such thing as a foolproof gun.
TABLE OF CONTENTS
Page
State-By-State Warnings . . . . . . . . . . . . . . . . . . . . . . . . . . . . . . . . . . . . . . . . . . . . .3
Locking Device Installation Instructions . . . . . . . . . . . . . . . . . . . . . . . . . . . . . . . .6
General Information and Mechanical Characteristics . . . . . . . . . . . . . . . . . . . . . . 9
Operation of Safety . . . . . . . . . . . . . . . . . . . . . . . . . . . . . . . . . . . . . . . . . . . . . . . . .10
Ammunition . . . . . . . . . . . . . . . . . . . . . . . . . . . . . . . . . . . . . . . . . . . . . . . . . . . . . 12
To Load and Fire . . . . . . . . . . . . . . . . . . . . . . . . . . . . . . . . . . . . . . . . . . . . . . . . . . 13
To Unload Rifle and Magazine . . . . . . . . . . . . . . . . . . . . . . . . . . . . . . . . . . . . . . . 15
To Clear a Malfunction (“Jam”) . . . . . . . . . . . . . . . . . . . . . . . . . . . . . . . . . . . . . . 16
To Minimize Malfunctions (“Jams”) . . . . . . . . . . . . . . . . . . . . . . . . . . . . . . . . . . 18
Basic Disassembly and Reassembly . . . . . . . . . . . . . . . . . . . . . . . . . . . . . . . . . . . 18
Care and Cleaning . . . . . . . . . . . . . . . . . . . . . . . . . . . . . . . . . . . . . . . . . . . . . . . . . 22
Storage . . . . . . . . . . . . . . . . . . . . . . . . . . . . . . . . . . . . . . . . . . . . . . . . . . . . . . . . . .23
Maintenance of Stainless Steel Rifles . . . . . . . . . . . . . . . . . . . . . . . . . . . . . . . . . . 25
Attaching Ruger Scope Rings . . . . . . . . . . . . . . . . . . . . . . . . . . . . . . . . . . . . . . . 25
Sight Picture and Adjustment for “Alaskan” and “African” Models Only . . . . . .26
Special Instructions and Warning For Frontier Rifle . . . . . . . . . . . . . . . . . . . . .27
Service and Parts Policy . . . . . . . . . . . . . . . . . . . . . . . . . . . . . . . . . . . . . . . . . . . . 28
Shipping Firearms for Repair . . . . . . . . . . . . . . . . . . . . . . . . . . . . . . . . . . . . . . . .28
Ordering Parts . . . . . . . . . . . . . . . . . . . . . . . . . . . . . . . . . . . . . . . . . . . . . . . . . . . .29
Parts List . . . . . . . . . . . . . . . . . . . . . . . . . . . . . . . . . . . . . . . . . . . . . . . . . . . . .30 - 35
Parts Drawings . . . . . . . . . . . . . . . . . . . . . . . . . . . . . . . . . . . . . . . . . . . . . . . . 36 - 37
The Basic Rules of Safe Firearms Handling . . . . . . . . . . . . . . . . . . . . . . . . 38 - 41
Warranty Information . . . . . . . . . . . . . . . . . . . . . . . . . . . . . . . . . . . . . . . . . . . . . . 44
“Ruger,” “M77” & “Hawkeye” are registered U.S. trademarks.
8

WARNING—ALTERATIONS
This product was designed to
function properly in its original
condition. Alterations can make it
unsafe. Do not alter any part or add
or substitute parts or accessories
not made by Sturm, Ruger & Co. Inc.
DO NOT ALTER ANY GUN
9
FIREARMS ARE DANGEROUS WEAPONS —
READ THE INSTRUCTIONS AND WARNINGS
IN THIS MANUAL THOROUGHLY AND
CAREFULLY BEFORE USING.
GENERAL INFORMATION
AND MECHANICAL CHARACTERISTICS
The RUGER
®
M77
®
Hawkeye
®
is a bolt action, magazine fed, repeating
rifle. The receiver on all versions of the RUGER
®
M77
®
Hawkeye
®
rifle
incorporates integral scope mount bases (see the illustration on p. 10). A set of
two steel one-inch scope rings is included. For M77
®
Hawkeye
®
Frontier
rifles, see page 27.
Other notable features of RUGER
®
M77
®
Hawkeye
®
rifles include: A new
LC6
TM
trigger, three-position safety, a fast lock-time steel trigger mechanism, a
patented bedding system, quick release hinged floorplate with a newly designed
floorplate latch, a newly contoured cut-checkered walnut stock with red rubber
recoil pad, and studs to which sling swivels can be attached. An “All-Weather
®
”
version featuring stainless steel construction and a warp-proof synthetic stock is
also available.
WARNINGS OF GREAT IMPORTANCE ARE
FOUND ON THE FOLLOWING PAGES:
Locking Devices 6 Unloading 16
Alterations 9 Malfunctions 17
Manual Safety 12 Disassembly 18
Lead Exposure 12 Lubrication 23
Ammunition 13 Storage 24
Loading 13 Scope Mounting 27
Handling 14 Shipping 28
Firing 15 Parts Purchasers 29
OTHER CAUTIONS AND WARNINGS APPEAR
THROUGHOUT THE MANUAL.

10
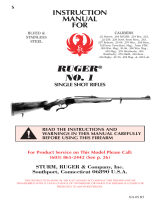
Figure 1. Right-handed version shown. In this illustration the cocking piece is shown
cocked (protruding from the rear of the bolt sleeve). The bolt stop (on the left side of the
receiver) permits the bolt to be withdrawn simply by pulling it out to the left. The safety
selector should be in the “Load-Unload” position when the bolt is being removed or installed.
All mechanical components are made of heat-treated chrome-molybdenum or
stainless steel with music wire coil springs throughout the mechanism (except the
magazine spring). The rifle is available in short and standard action.
The RUGER
®
M77
®
Hawkeye
®
“African” Model is chambered in the new .375
Ruger cartridge and features a blue matte finish, American black walnut stock, and
red recoil pad.
The RUGER
®
M77
®
Hawkeye
®
“Alaskan” Model is designed to handle the
harshest conditions. Chambered for the new .375 Ruger cartridge, the “Alaskan” has a
medium-weight 20” hammer forged barrel, Diamondblack
TM
finish, and Hogue
®
OverMolded
TM
synthetic stock.
The RUGER
®
M77
®
Hawkeye
®
Compact Model has a specially designed stock
with a 12 3/4” length of pull, shorter forend, and a 16 1/2” lightweight barrel for ease
of carry in dense cover.
The RUGER
®
M77
®
Hawkeye
®
Frontier Rifle features a shorter stock and 16
1/2” barrel like the Compact Model and includes front scope mounting barrel ribs.
The Frontier Rifle allows for fast “eyes-open” target acquisition in a short, easy to
carry package. Patented Ruger scope rings and a Weaver-style scope base adapter are
included.
OPERATION OF SAFETY
The RUGER
®
M77
®
Hawkeye
®
rifle has a three-position safety. The safety
selector is located at the right of the bolt sleeve (on the left of the bolt sleeve on
left-handed versions).
NOMENCLATURE
TRIGGER
BOLT HANDLE
SAFETY SELECTOR (shown on “SAFE”)
TRIGGER GUARD
FLOORPLATE LATCH
FLOORPLATE
EXTRACTOR
COCKING PIECE
BOLT SLEEVE
SCOPE MOUNT BASES (integral)
RECEIVER
STOCK
BARREL
(Standard Model Hawkeye Shown)

11
Figure 2. Safety selector in
“FIRE” (full forward) position.
The safety selector should be
moved to this position only when
the gun user is actually firing the
rifle. When the safety selector is
in the fire position, it is referred
to as being “off.” (When the safety
is in the “SAFE” position, it is
referred to as being “on.”)
Figure 3. Safety selector in
“LOAD-UNLOAD” (middle)
position. The safety selector should
be in this position when the bolt is
being cycled to load a cartridge, or
to unload a live round. As soon as
a cartridge is chambered, the
safety selector should be moved to
the “SAFE” position unless the
rifle is to be fired immediately.
Figure 4. Safety selector in
“SAFE” (full rearward) position.
The safety selector is fully nested
in the groove in the cocking piece.
When the safety selector is in this
position, the bolt handle cannot
be raised. The curved arrow on the
bolt sleeve indicates the direction
and motion of the safety selector
to bring it to the “SAFE” position.
Keep the safety selector in this
position except when actually
loading, unloading, or firing.
The safety selector can be moved from the “Fire” position to its two other
positions (“Load-Unload” and “Safe”) only when the firing pin is cocked. Fully
raising the bolt handle cocks the firing pin.
The bolt handle can be raised and lowered only when the safety selector is in
either the “Fire” or the “Load-Unload” position. When the safety selector is in the
“Safe” position, the bolt handle is locked in the closed (full down) position, in
order to prevent inadvertent lifting of the bolt handle and to ensure that the rifle
will be ready to fire when the safety is moved to the “fire” position.
Practice (with an unloaded rifle) moving the safety selector to the three positions
until you know the position of the safety selector for the three modes– “Fire,”
“Load-Unload,” and “Safe.” WARNING: When manipulating the safety selector,
DO NOT HAVE ANY FINGER INSIDE THE TRIGGER GUARD! When the safety
selector is in the “Fire” position and the trigger is pulled, the rifle will fire.
The safety selector should always be in the “Safe” position except when the gun
user is actually firing or unloading the rifle. The safety selector should
unfailingly be moved to the “Safe” position when the gun user ceases firing.
SAFETY POSITIONS
The safety selector is held in each of its three positions by a plunger that is under
spring tension. Therefore, the gun user should frequently check the position of
the safety selector to be certain it has not been inadvertently moved. If the safety
does not function properly, or if the selector seems to move too easily, or if the
safety selector does not seem firmly positioned in any of its three positions, the
rifle should be discontinued from use and returned to the Newport Product
Service Department for repair (see p. 28).

12
AMMUNITION
RUGER
®
M77
®
Hawkeye
®
rifles are chambered for many of the most
popular factory-loaded cartridges manufactured in accordance with U.S. industry
practice. The particular caliber for each rifle is rollmarked on the barrel. Use
cartridges only of the designated caliber that is marked on the barrel. Please see
“Warning - Ammunition” and “Warning - Loading” on page 13.
RUGER
®
M77
®
Hawkeye
®
“Alaskan” and “African” rifles are chambered for
the .375 Ruger cartridge. The magazine capacity of these rifles is three cartridges.
WARNING — LEAD EXPOSURE
AMMUNITION (CARTRIDGES) NOTICE
WE SPECIFICALLY DISCLAIM RESPONSIBILITY FOR ANY DAMAGE
OR INJURY WHATSOEVER OCCURRING IN CONNECTION WITH, OR
AS A RESULT OF, THE USE IN ANY RUGER FIREARMS OF FAULTY,
OR NON-STANDARD, OR “REMANUFACTURED” OR HAND-LOADED
(RELOADED) AMMUNITION, OR OF CARTRIDGES OTHER THAN
THOSE FOR WHICH THE FIREARM WAS ORIGINALLY CHAMBERED.
Discharging firearms in poorly ventilated
areas, cleaning firearms, or handling
ammunition may result in exposure to
lead and other substances known to the
state of California to cause birth defects,
reproductive harm, and other serious
physical injury. Have adequate ventilation
at all times. Wash hands thoroughly after
exposure.
SHOOTING OR CLEANING GUNS
MAY EXPOSE YOU TO LEAD
WARNING —MANUAL SAFETY
3
2
1
SAFE
LOAD-
UNLOAD
FIRE
Keep the safety on unless actually firing. Always
move the safety fully to its intended position and
check it. The safety has three positions –“SAFE,”
“LOAD-UNLOAD,” and “FIRE.” Never depend on a
safety mechanism or any other mechanical device to
justify careless handling or permitting the rifle to
point in an unsafe direction. The only “safe” rifle is
one in which the bolt is open and the chamber and
magazine are empty.
KNOW HOW TO USE THE SAFETY

Know the caliber of your rifle you are loading and load
cartridges of only that caliber into it!
Before loading, be certain the primer of each cartridge is seated
flush with, or below, the surface of the cartridge case base. A
cartridge discharged by the closing of the bolt can result in
possible serious injury to the shooter and those nearby.
If a cartridge does not chamber readily, do not force it. Check
the bore and chamber to be certain that each cartridge is the
proper caliber and of correct dimensions. If you cannot
determine why the cartridge will not fit, clear the rifle of all
cartridges and write or call the factory.
The wrong ammunition can destroy your gun and result in
serious injury.
BE SURE WHAT YOU LOAD
IS CORRECT
13
TO LOAD AND FIRE
Practice the important aspects of gun handling described below (with an
unloaded rifle) until you can perform each of the steps with skill and confidence.
But before loading the rifle, please read completely through this manual, and be
certain the muzzle is pointing in a safe direction. Do not load the rifle until you
are ready to use it!
(The following procedure assumes a new rifle with the bolt out).
1. Keep the muzzle pointed in a safe direction (See Rule 2, p. 38).
2. Position the safety selector in the “Load-Unload” position (see Figure 3, p. 11).
3. Insert the bolt in the receiver in accordance with “To replace bolt” instructions
on Page 21.
4. Draw the bolt fully to the rear.
WARNING —AMMUNITION
Death, serious injury, and damage
can result from the use of wrong
ammunition, bore obstructions,
powder overloads, or incorrect
cartridge components. Even the
strongest gun can be blown up by
excess pressure. Only use correct
ammunition loaded to U.S. Industry
Standards. Always wear shooting
glasses and hearing protectors.
IMPROPER AMMUNITION
DESTROYS GUNS
WARNING —LOADING

14
To single-load: (Safety should be in “Load-Unload” position.) Place a cartridge
directly into the chamber and close the bolt. If there are cartridges in the
magazine and it is desired to single-load a cartridge directly into the chamber,
depress the top cartridge and push the bolt forward until the bolt face is well
ahead of the rim of the top cartridge in the magazine. Then, close the bolt.
WARNING —HANDLING
WARNING: DO NOT TOUCH THE TRIGGER
UNTIL YOU ARE ACTUALLY READY
TO FIRE THE RIFLE.
Never carry the rifle loaded with the
safety selector in the “FIRE” position. If
dropped or struck with the safety off, the
rifle may fire. Such a discharge can occur
with or without the trigger being directly
struck or touched. Never rest a loaded
rifle against any object (wall, fence,
vehicle, tree, etc.) because there is always
the possibility that the rifle will be jarred
or slide from its position and fall with
sufficient force to discharge. Keep safety
on unless actually firing.
Never lower (uncock) the firing pin with
a loaded cartridge in the chamber. Under
such circumstances the firing pin will be
in direct contact with the primer of the
loaded cartridge and a light accidental
blow to the firing pin can readily cause
the gun to discharge.
ANY GUN MAY FIRE IF
DROPPED
Loading the magazine: (Safety should be in “Load-Unload” position.) With the bolt
open, and the floorplate in its closed and latched position, load cartridges of the
correct caliber directly into the magazine from the top by pressing one cartridge at
a time into the magazine.
Loading the chamber: (Safety should be in “Load-Unload” position.) Do not
chamber a cartridge until you are ready to shoot immediately. After loading the
magazine, push the bolt handle forward. This will strip a cartridge from the
magazine and push the cartridge ahead of the bolt into the chamber. Close the bolt
handle fully downward and put the safety fully rearward to the “Safe” position.

When firing the M77
®
Hawkeye rifle, be sure
that bystanders are well clear of the shooter and
standing a safe distance to the rear. Empty
cartridge cases are hot and are normally ejected
from the rifle to the right. They could cause
injury to any person who is standing too closely
alongside the shooter. Shooters who fire right-
handed rifles from their left shoulder should be
particularly cautious concerning ejected
cartridge cases and the back of the bolt as it is
drawn rearward.
EJECTED BRASS IS HOT
15
TO UNLOAD RIFLE AND MAGAZINE
(Keep the Rifle Pointed in a Safe Direction)
UNLOAD THE RIFLE IMMEDIATELY WHEN YOU ARE FINISHED SHOOTING.
1. Move the safety selector to the “Load-Unload” position if the firing pin is
cocked.
2. Lift the bolt handle fully and then pull it completely to the rear to eject
chambered cartridge.
3. Inspect the chamber to be certain the cartridge has been extracted. Leave bolt
open. Do not unload magazine by feeding cartridges into chamber.
4. Push rearward the small latch in the front of the trigger guard to open the
hinged floorplate and empty the cartridges from the magazine. Hold the other
hand under the floorplate so as to retard the opening of the spring loaded
floorplate and catch the cartridges in the palm of the hand.
5. Close the bolt fully.
6. Move the safety selector in the “Fire” position and with the rifle pointed in a
safe direction, pull the trigger.
To fire the rifle: When a cartridge is chambered and the rifle is pointed in a safe
direction, put the safety in the “Fire” position. Pulling (squeezing) the trigger
will discharge the cartridge. Always be certain that you know where the bullet
will strike when you fire the rifle. Never allow the thumb to touch the cocking
piece when firing as it can be pinched when the cocking piece moves forward to
fire the rifle.
WARNING —FIRING

WARNING — UNLOADING
16
Removing cartridges from the magazine
does not prevent the rifle from being fired!
When there is a cartridge in the chamber
and the safety selector is in the “Fire”
position, the cartridge will discharge if the
trigger is pulled. It is absolutely essential
for the user to know how to completely
unload it.
“Completely” means emptying the
magazine and removing a chambered
cartridge.
The safety selector should
always be in the “Load-Unload” position
when the rifle is being unloaded.
See the
“Operation of Safety” section of this
manual.
GUN WILL FIRE WITH
EMPTY MAGAZINE
2
1
3
4
SAFETY IN
"LOAD-UNLOAD"
POSITION
CORRECT UNLOADING SEQUENCE
TO CLEAR A MALFUNCTION ( JAM )
If a jam occurs, immediately put the safety selector in the “Load-Unload’
position and be certain the muzzle of the rifle is at all times pointing in a
safe direction.
Then study the situation to determine the nature of the jam and how best to
clear it.
–If a cartridge or fired case is caught between the bolt and the barrel, or
against a cartridge that is in the chamber, open the hinged floor plate and
empty the cartridges from the magazine. Then retract the bolt fully and
remove the jammed cartridge or case.

17
WARNING — MALFUNCTIONS
➞
If a cartridge hangs up, jams, or binds when
being chambered or when being fed from the
magazine into the chamber, do not attempt to
force it into the chamber by pushing or striking
the bolt handle.
Most failures of a cartridge to feed or to
chamber are caused by improper loading of the
magazine or ammunition that is incorrect or
defective.
Whatever the cause, the gun user must, above
all, recognize that jams can result in the very
potentially dangerous situation of a cartridge
discharging before it is chambered. If this
occurs, the cartridge case will rupture and its
fragments will fly out of the gun with sufficient
force to cause injury. Always wear shooting
glasses and hearing protectors!
STRIKING PRIMER CAN
BURST CARTRIDGE
–When attempting to extract a cartridge that is “stuck” in the chamber do
not use any type of tool that is likely to act as a “firing pin” and discharge
the cartridge should the tool impact on the primer.
–After clearing a jam, inspect the gun mechanism to determine if dirt might
be the cause of the problem. Excess lubricant or grease can cause
cartridges to feed sluggishly or fail to extract. An accumulation of grease or
dirt on the face of the bolt, under the extractor, in the chamber, or in the
magazine can contribute to cartridge feeding problems. (See section on
“Care and Cleaning” page 22.)
–After clearing a jam, inspect all cartridges that have been removed from
the gun. Safely dispose of any cartridges which are in any way damaged.
–If it appears that the rifle is not at fault and that the jam was caused by the
type of cartridge being used, then try another type.
–Examine your fired cartridge cases. If they have split, blown or bulged
heads, stop using that ammunition and promptly return the rifle to the
factory for examination.
–If the above procedures do not result in a smooth and reliable feeding
firearm, don’t use the rifle. The RUGER
®
M77
®
Hawkeye
®
can be
returned directly to our Newport Product Service Department for
inspection and repair, if required. See the “Service and Parts Policy”
section of the manual for packing and shipping information.

18
TO MINIMIZE MALFUNCTIONS ( JAMS )
Firearms of all makes and types are susceptible to occasional malfunctioning due
to a cartridge not feeding from the magazine to the chamber, or due to a
cartridge or fired case not being extracted and ejected.
To minimize the possibility of such occurrences the gun user should:
–Use ammunition of the correct caliber and type which is loaded to U.S.
Industry Specifications. Do not use cartridges that are deformed or
cartridges that have been reloaded.
–Clean and lubricate the gun in accordance with the instructions in this
manual.
–Learn to correctly operate the bolt and how to properly load and empty the
chamber and magazine.
–If the mechanism shows signs of not functioning correctly, or if a part is
damaged or broken – don’t use the rifle. Have it inspected and repaired.
For most repairs we recommend that Ruger guns be returned to the factory.
However, if a gun has a cartridge in it which cannot be removed, then it is a
violation of Federal Regulations to ship that loaded gun whether it be by U.S.
Mail or by common carrier. Contact our Newport Product Service Department at
(603) 865-2442.
BASIC DISASSEMBLY AND REASSEMBLY
WARNING —DISASSEMBLY
Always unload a firearm
before cleaning, lubrication,
disassembly or assembly.
UNLOAD BEFORE
CLEANING
2
1
3
4
SAFETY IN
"LOAD-UNLOAD"
POSITION
It is preferable to carry out these procedures on a workbench or table which has
a covered top. A piece of shallow nap rug or an old, coarse blanket is an ideal
covering. Such a covering not only reduces the chances of the rifle slipping and
being scratched, but it serves also to trap pins, plungers and springs that may
otherwise get lost. It is advisable to have a container – such as a shoebox – in
which each part can be placed as it is removed from the gun.

19
Before attempting to disassemble the rifle for the first time, study the parts
drawing and parts list so as to be familiar with the relative position, appearance
and name of each part. Carry out the disassembly slowly and carefully note the
position of the part in the gun before starting to remove it. If a part is under
spring tension (such as, the Safety Selector, Bolt Stop, Trigger) remove it
cautiously and anticipate the direction the spring and plunger are most likely to
“jump.”
WARNING: If a spring or plunger become lost do not use a substitute. Springs of
correct tension are vital to the safe and reliable performance of firearms. Before
starting disassembly, remove the sling, scope and rings and place the rear sight
blade in its down flat position.
DISASSEMBLY
(Rifle Must Be Unloaded Prior To Disassembly)
1. Keep the rifle pointed in a safe direction! Put the safety in the “Load-Unload”
position.
2. CHECK TO BE CERTAIN THAT THE CHAMBER AND MAGAZINE ARE EMPTY.
3. To remove the bolt: Open bolt and pull to the rear while at the same time
pivoting open the bolt stop which is located on the left side of the receiver on
the right-handed version and the right side of the receiver on the left-handed
version. This is as far as you need to dismantle the rifle for a routine cleaning.
It is rarely necessary to proceed further.
4. To remove firing pin assembly from bolt: With bolt out of the rifle and firing
pin cocked, insert a pin or nail into the “disassembly hole” in the cocking
piece.
NOTE: The pin or nail should be as close as possible in size to the hole
diameter, and at least 2 inches long so that it can be used to ‘lever’ the firing
pin to the rear when reassembling the firing pin assembly into the bolt.
Unscrew firing pin assembly and remove from bolt. (Caution: Do not remove
the restraining pin until firing pin assembly is reassembled into bolt).
CAUTION: The firing pin assembly is intended to be a permanent
assembly and should not be disassembled. The parts are under great
spring pressure and if disassembled could fly apart with sufficient force to
cause serious injury. Also, special tools are required to correctly
reassemble this part.
5. To remove stock: Open floorplate and while holding it up out of the way,
loosen and remove the screw that holds the floorplate hinge assembly. Next,
loosen and remove the screw that is just forward of the trigger guard. Remove
trigger guard. Remove magazine box. (If magazine box does not come out
readily, do not force it. It can be lifted out with the barrel-receiver assembly,
but it must be done with great care.) Lift barrel from the stock very carefully.
Lift the receiver at the same time as the barrel is lifted so that the barrel-
receiver comes out of the stock level and not at an angle.
6. To remove the trigger: (Safety Selector should be in the “Fire” position.)
While holding the trigger in place, press out the trigger pivot pin.
(Caution: Trigger is spring loaded.)

20
7. To remove the sear:
a. Press out the sear pivot pin.
b. Turn receiver upside down and slide sear forward. Sear will drop out of the
top slot in the receiver.
8. To remove safety assembly:
a. Rotate the safety selector so that the upper section is positioned fully over
the center of the receiver tang.
b. While holding the safety selector in place with thumb and forefinger, slide
the retainer up out of receiver. (Caution: Safety Selector is under spring
tension from a spring and plunger acting against the lower section of the
safety selector. The spring and plunger will jump out if not contained.)
c. Lift out the safety selector.
d. Remove the safety selector detent and safety selector detent spring.
REASSEMBLY
(Again, Be Sure Rifle Is Unloaded)
1. To replace the safety assembly:
a. Place the safety selector detent and safety selector detent spring into the
hole in the receiver.
b. Set the safety selector in place with its upper section positioned over the
center of the receiver tang.
c. While holding the safety selector in place with thumb and forefinger while
applying downward pressure, slide the safety selector retainer into dovetail
from the top. Align the notch in the safety selector retainer with the sear pivot
pin hole.
2. To replace the sear:
a. Place the rear end (the end with the hole in it) of the sear into the slot from
the top of the receiver. Swing the rear end of the sear up and slide the sear
into position until the hole in the sear is aligned with the mating holes in the
receiver.
b. Insert the sear pivot pin.
3. To replace the trigger:
a. Place the trigger/sear spring over the dimple in the trigger.
b. Assemble the trigger while aligning the spring with the dimple on the sear.
c. While holding the trigger in position, replace the trigger pivot pin.
4. To replace the stock:
a. Install magazine box on receiver.
b. Place barrel-action assembly – with magazine box in place – into stock.
c. Replace trigger guard and loosely install screws.
d. Install floorplate hinge assembly and firmly tighten screw. (This screw is
angled and draws the barrel-action assembly into the bedding surface of the
stock.)
e. Tighten the two trigger guard screws as follows: Do not tighten one screw
all the way and then tighten the other. Instead, alternately tighten each one –
a partial turn at a time – so that the screws will be tightened equally until both
are snugly tightened.

21
5. To reassemble firing pin assembly into bolt:
Screw the assembly fully into the bolt. The assembly is properly positioned in
the bolt when the flat on the bottom right side of the bolt sleeve (front of bolt
facing you) is aligned with the flat on the bottom end of the bolt handle. Note:
There is a shallow notch on the rear end of the bolt body – at the end of the
cam cut – into which the nose of the cocking piece ‘fits.’ When the firing pin
assembly is being turned into the bolt body, it may be necessary to use the
restraining pin as a lever to slightly retract the cocking piece nose so it can be
moved into the notch. When the firing pin assembly is correctly positioned in
the bolt body, the restraining pin can be removed, but not before!
6. To replace bolt:
a. With bolt handle in an upward position and bolt head away from you, align
the extractor with the right hand locking lug in the right-handed version or
the left locking lug in the left-handed version. Align the locking lugs with the
channels in each side of the rear of the receiver and partially insert the bolt.
b. Push the bolt fully forward.
REGARDING ACCURACY: The accuracy of any rifle can vary depending upon the
make and type of cartridges used in it. Such being the case, if your RUGER
®
M77
®
Hawkeye
®
rifle does not perform to expectations, it is advisable to try
several brands and types of cartridges to determine which one delivers the best
accuracy, before proceeding further. If your rifle is not as “accurate” as you
believe it should be, before concluding that some serious fault exists, run the
following checks:
1. Be certain the two trigger guard screws and the floorplate hinge screw are
snugly tightened as described in Step 4, p. 20, of the “Reassembly” section of
this manual.
2. Be certain the bore is clean and free from accumulated metal fouling
(deposited by metal jacketed and lead bullets). See the “Care and Cleaning”
section of this manual.
3. Check the sights for tightness, setting and alignment.
If everything is tight, the bore is clean, the sights are properly aligned and secure
but the accuracy problem persists, DO NOT alter the stock bedding in any way.
Do not scrape away wood and do not bed with “glass,” plastic, epoxy, etc. Once a
rifle stock has been altered, it cannot be reworked by our Product Service
Department.
If you still have an accuracy problem, write a brief letter to our Product Service
Department in Newport, New Hampshire 03773 and describe the nature of the
problem based on the use of factory-loaded cartridges – not reloads. You will
receive a prompt response from us and if indicated, detailed instructions with
regard to the return of the rifle.
/