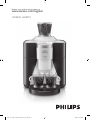
Philips HD 8010 Senseo Sarista User manual
- Category
- Coffee makers
- Type
- User manual
This manual is also suitable for

Register your product and get support at
www.senseo.com/register
HD8030, HD8010
4203_000_7242_1_DFU Booklet_Lux_A5_v2.indd 1 5/29/12 5:49 PM
Page is loading ...
Page is loading ...

4
Table of contents
Introduction 4
General description 5
Important 5
Danger 5
Warning 5
Caution 6
Compliance with standards 7
Installing the coffeemaker 7
Placing and removing the bean-funnels 7
Preparing for use 8
Filling the water tank 8
Automatic rinsing cycle 9
Using the coffeemaker 10
Brewing 1 or 2 cups of coffee 10
Brewing a jug of coffee 11
Selecting the coffee strength (HD8030 only) 13
Manual rinsing cycle 13
Adjusting the grinding degree 14
Cleaning and maintenance 16
Cleaning the water tank, the coffee grounds container
and the drip tray 16
Cleaning the detachable coffee spout 18
Cleaning the jug 18
Cleaning the brewing unit 19
Lubrication 22
Descaling the coffeemaker 23
Descaling procedure 23
Ordering accessories 27
Environment 27
Guarantee and service 27
Meaning of light signals 28
Troubleshooting 29
Introduction
Congratulations on your purchase of a Philips SENSEO
®
SARISTA bean-
support that Philips offers, register your product at
www.senseo.com/register.
The Philips SENSEO
®
SARISTA bean-funnel coffeemaker uses a Douwe
Egberts SENSEO
®
SARISTA bean-funnel to brew coffee from freshly
ground beans, which ensures
optimal aroma and taste. Douwe Egberts
SENSEO
SARISTA bean-funnels are available in different varieties to suit
different tastes.
This user manual applies to HD8030 and HD8010.
HD8030 comes standard with an insulated jug. For HD8010, you can buy
an insulated jug as an accessory in the online shop at
For more information on the Philips SENSEO
®
SARISTA bean-funnel
coffeemaker and for instruction movies on how to use the coffeemaker
and the bean-funnels, go to www.philips.com/senseo-sarista.
ENGLISH
4203_000_7242_1_DFU Booklet_Lux_A5_v2.indd 4 5/29/12 5:49 PM
funnel coffeemaker and welcome to Philips! To fully benefit from the
®
www.shop.philips.com/service

For support and movies on how to clean, maintain and descale the
coffeemaker and how to adjust the grinder, go to
www.senseo.com/sarista/support.
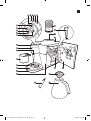
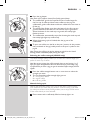
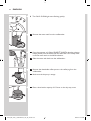
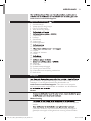
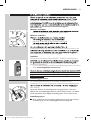
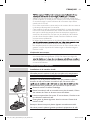
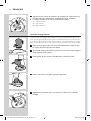
General description (Fig. 1)
1 Activity light
2 ’Water tank empty’ light
3 CALC CLEAN light
4 ’Bean-funnel empty’ light
5 ’Coffee grounds container full’ light
6 Coffee strength button (HD8030 only)
7 1-cup button
8 Jug button
9 On/off button
10 2-cup button
11 Control panel
12 Coffee dispensing head
13 Water tank
14 Detachable coffee spout for 1 or 2 cups
15 Drip tray cover
16 ’Drip tray full’ indicator
17 Drip tray
18 Coffee grounds container
19 Lubricant
20 Coffee jug (HD8030 only)
21 Lid of coffee jug (HD8030 only)
22 Brewing unit
23 Service door
24 Grinding degree adjustment hole
25 Opening for bean-funnel
26 Grinding degree adjustment tool
27 Bean-funnel
Important
Read this user manual carefully before you use this coffeemaker and
instructions on how to clean, maintain and descale the coffeemaker and
adjust the grinder at www.senseo.com/sarista/support.
Danger
- Never immerse the coffeemaker in water or any other liquid, nor rinse
it under the tap.
Warning
- Check if the voltage indicated on the coffeemaker corresponds to the
local mains voltage before you connect the coffeemaker.
- This coffeemaker is not intended for use by persons (including
children) with reduced physical, sensory or mental capabilities, or lack
of experience and knowledge, unless they have been given supervision
or instruction concerning use of the coffeemaker by a person
responsible for their safety.
ENGLISH 5
4203_000_7242_1_DFU Booklet_Lux_A5_v2.indd 5 5/29/12 5:49 PM

- Children should be supervised to ensure that they do not play with the
coffeemaker.
- Keep the packaging materials (plastic bags, cardboard buffers, etc.) out
of the reach of children, as they are not a toy.
- This coffeemaker is designed to grind beans and brew coffee. Use it
correctly and with care to avoid scalding by hot water and steam.
- Do not use the coffeemaker if the plug, the mains cord or the
coffeemaker itself is damaged.
- If the mains cord is damaged, you must have it replaced by Philips, a
order to avoid a hazard.
Caution
- Always place and use the coffeemaker on a stable, level and horizontal
surface.
- Unplug the coffeemaker if problems occur during grinding or brewing
and before you clean it.
- Do not move the coffeemaker while it is operating.
- Do not use the appliance in combination with a transformer, as this
could cause hazardous situations.
- If a problem occurs that you cannot solve by means of this user
manual, contact the Consumer Care Centre in your country. If the
problem cannot be solved, take the coffeemaker to a service centre
authorised by Philips for examination or repair. Do not attempt to
repair the coffeemaker yourself, otherwise your guarantee becomes
invalid.
- None of the detachable parts, nor the jug is dishwasherproof.
- Never use the jug in a microwave oven.
- Never immerse the jug in water or any other liquid, as this could cause
water to enter between the walls of the jug.
- Keep the jug away from heat sources to prevent damage.
- The inside of the jug is breakable. Do not put ice cubes or other solid
objects in the jug.
- Only use the jug to keep coffee hot. Do not use it to keep milk, baby
food or other food hot or cold.
- Do not use aggressive cleaning agents, solvents or chemicals to clean
the jug.
-
- Always check the inside of the jug before use. If you detect any cracks
or damage, do not use the jug.
- Be careful not to drop the jug. If the jug has fallen while full, do not
pour out the contents to prevent injury. The inner wall of the jug may
be broken due to the fall.
- To prevent scalding, always pour contents into a cup and do not drink
directly from the jug.
- This coffeemaker is intended for normal household use only. It is not
farms or other work environments. Nor is it intended to be used
by clients in hotels, motels, bed and breakfasts and other residential
environments.
ENGLISH6
4203_000_7242_1_DFU Booklet_Lux_A5_v2.indd 6 5/29/12 5:49 PM
- Do not use or store the appliance at a temperature outside the
operating temperature range of +15°C to +45°C, otherwise your
guarantee becomes invalid.

-
cause damage to the water tank and the coffeemaker.
Compliance with standards
- This Philips coffeemaker complies with all standards regarding
according to
evidence available today.
Installing the coffeemaker
Never install the coffeemaker in environments where the temperature
may drop to 0° or below. If the water inside the coffeemaker freezes, the
coffeemaker will be damaged.
Note: It is normal that there are some traces of coffee and water in the
has been tested in the factory to make sure that it is in perfect working order.
We guarantee that your coffeemaker is brand-new.
1 Remove all packaging material from the coffeemaker.
2 Place the coffeemaker on a table or worktop away from the tap, the
sink and heat sources.
3 Leave a free space of at least 15cm above, behind and on both sides
of the coffeemaker.
4 Slide the drip tray into the guiding grooves in the front of the
coffeemaker.
Note: Make sure the drip tray is fully inserted.
Never remove the drip tray when the coffeemaker is brewing coffee.
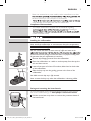
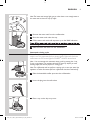
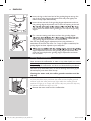
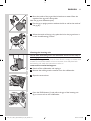
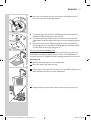
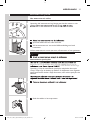
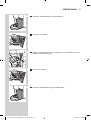
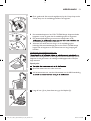
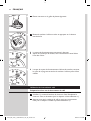
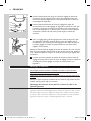
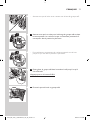
Placing and removing the bean-funnels
For more information on the bean-funnels and movies on how to place
them on the coffeemaker, go to www.philips.com/senseo-sarista.
1 Pull the vertical tear strip down to remove the protective sleeve of
the bean-funnel.
ENGLISH 7
4203_000_7242_1_DFU Booklet_Lux_A5_v2.indd 7 5/29/12 5:49 PM
- Never use accessories or parts made by other manufacturers or that
become invalid if you use such parts or accessories.

2 Pull the round AROMA LOCK
®
seal off the bean-funnel.
3 Insert the screw thread of the bean-funnel properly into the opening
in the top of the coffeemaker (1). Then turn the bean-funnel clockwise
to fasten it (2).
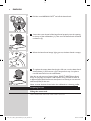
4 When the ‘bean-funnel empty’ light goes on, the bean-funnel is empty.
5 To replace the empty bean-funnel with a full one, turn the bean-funnel
anticlockwise (1) and remove it (2). Then perform step 1 to place a
new full bean-funnel on the coffeemaker.
Note: You can also remove a Douwe Egberts SENSEO
®
SARISTA bean-funnel
that is not yet empty and replace it with another one if you want to switch to
a different coffee blend. Because the bean-funnel is re-closed, you can store the
used bean-funnel for later use.
Never remove the bean-funnel when the coffeemaker is brewing coffee.
Preparing for use
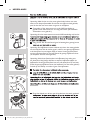
Filling the water tank
Fill the water tank with fresh water before each use.
ENGLISH8
4203_000_7242_1_DFU Booklet_Lux_A5_v2.indd 8 5/29/12 5:49 PM

Note: The ‘water tank empty’ light goes on when there is not enough water in
the water tank to brew one cup of coffee.
1 Remove the water tank from the coffeemaker.
2 Rinse the water tank under the tap.
3 Fill the water tank with cold tap water up to the MAX indication.
cause damage to the water tank and the coffeemaker.
4 Slide the water tank back into the coffeemaker.
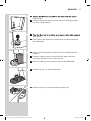
Automatic rinsing cycle
The coffeemaker automatically performs a rinsing cycle every time you
switch it on. This guarantees that you always get the full aroma from the
coffee beans in the Douwe Egberts SENSEO
®
SARISTA bean-funnel..
Note : You can interrupt the automatic rinsing cycle by pressing the 1-cup,
2-cup, or jug button. The machine still needs to warm up before you start
brewing coffee, but will not perform a rinsing cycle.
Note: The coffeemaker will not perform a rinsing cycle in case you switch the
appliance on within 8 minutes after the coffeemaker has been switched off.
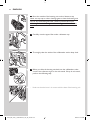
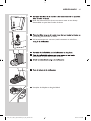
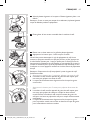
1 Slide the detachable coffee spout into the coffeemaker.
2 Insert the plug into the wall socket.
3 Place a cup on the drip tray cover.
ENGLISH 9
4203_000_7242_1_DFU Booklet_Lux_A5_v2.indd 9 5/29/12 5:49 PM

4 Press the on/off button to switch on the coffeemaker.
,
, out of the spout into the
cup. Empty the cup into the sink.
, When the activity light lights up continuously, the rinsing cycle is
Using the coffeemaker
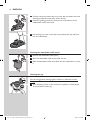
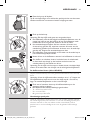
Brewing 1 or 2 cups of coffee
1 Check if there is enough water in the water tank. Fill the water tank
with water, if necessary (see chapter ‘Preparing for use’).
2 Make sure the bean-funnel is attached properly (see chapter ‘Before
3 Empty the drip tray if the ‘drip tray full’ indicator is visible.
during brewing.
4 Slide the detachable coffee spout into the coffeemaker.
ENGLISH10
4203_000_7242_1_DFU Booklet_Lux_A5_v2.indd 10 5/29/12 5:49 PM

5 Place 1 or 2 cups on the drip tray cover.
6 Press the 1-cup or 2-cup button.
Tip: You can interrupt the brewing cycle at any time, which can give you a
stronger coffee. To do this, press the same cup button (1-cup button or 2-cup
button) that you pressed to start brewing coffee. However, if you do this, the
machine does not complete the interrupted brewing cycle if you switch it on
again or press the same cup button again.
Note: Each cup of coffee is brewed from freshly ground beans.
- Press the 1-cup button to brew 1 cup of coffee.
, The coffeemaker grinds the required amount of coffee beans for one
cup and then brews one cup of coffee.
,
- Press the 2-cup button to brew 2 cups of coffee.
, The coffeemaker grinds the required amount of coffee beans for
coffeemaker again grinds the coffee beans for one cup and brews the
,
ground and twice when the beans for the second half are ground.
Note: If the coffeemaker stops during brewing, the water tank or bean-funnel
may be empty or the coffee grounds container may be full. Fill the water tank,
replace the bean-funnel or empty the coffee grounds container and press the
1-cup or 2-cup button again to complete the brewing cycle.
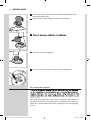
Brewing a jug of coffee
When you press the jug button, the coffeemaker brews six cups of coffee
into the jug.
Note: Always clean the jug with warm water and some washing-up liquid before
remove any odour.
1
tank with water, if necessary (see chapter ‘Preparing for use’).
empty’ light may go on and the coffeemaker may stop during brewing. Fill the
water tank and press the jug button to continue brewing coffee.
2 Make sure the bean-funnel is attached properly and contains enough
beans to brew a jug of coffee.
ENGLISH 11
4203_000_7242_1_DFU Booklet_Lux_A5_v2.indd 11 5/29/12 5:49 PM

Note: The coffee beans have to be visible above the matt section of the bean-
funnel. If this is not the case, there are not enough coffee beans in the bean-
funnel to brew six cups of coffee. Replace the bean-pack with a full one or one
Note: If the bean-funnel becomes empty during brewing, the ‘bean-pack empty’
light goes on and the coffeemaker stops during brewing. Replace the bean-
funnel with a full one or one that contains enough coffee beans (see chapter
3 Remove the detachable coffee spout, if present.
4 Always empty the coffee grounds container and the drip tray before
you start brewing a jug of coffee.
Note: If you do not empty the coffee grounds container, the ‘coffee grounds
container full’ light may go on and the coffeemaker may stop during brewing.
Empty the coffee grounds container and press the jug button to continue
brewing coffee.
brewing.
5 Turn the lid of the jug by its lever to ‘closed/brewing’ position. In this
position, the arrowhead on the jug handle points to the ‘closed/
brewing’ symbol on the jug lid.
6 Place the jug on the drip tray cover.
Tip: To keep the coffee hot longer, rinse the jug with hot water to preheat it
before you start brewing coffee.
ENGLISH12
4203_000_7242_1_DFU Booklet_Lux_A5_v2.indd 12 5/29/12 5:49 PM

7 Press the jug button.
Note: Each cup of coffee is brewed from freshly ground beans.
, The coffeemaker grinds the required amount of coffee beans for
the rst cup of coffee and then brews coffee into the jug. The
coffeemaker grinds coffee beans and brews coffee ve more times to
ll the jug.
, The activity light ashes once when the beans for the rst cup are
ground, twice when the beans for the second cup are ground etc.
When the beans for the sixth cup are ground, the activity light
ashes six times.
, The coffeemaker automatically stops after brewing the sixth cup and
the activity light lights up continuously.
8 When the brewing cycle is nished, take the jug out of the
coffeemaker.
9 To pour out coffee, turn the lid to the ‘pour’ position. In this position,
the arrowhead on the jug handle points to the ‘pour’ symbol on the
jug lid.
Note: To keep the coffee in the jug hot, always turn the lid to the ‘closed/
brewing’ position immediately after pouring out coffee.
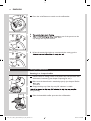
Selecting the coffee strength (HD8030 only)
The coffee strength button enables you to select the coffee strength you
prefer for each cup of coffee.
Note: You can only change the coffee strength when you are brewing 1 or 2
cups. The coffee strength button does not work when you are brewing a jug
of coffee. When you brew a jug, you get the standard coffee strength, which is
regular.
1 Press the coffee strength button one or more times to select the
strength you want.
, The corresponding coffee strength light goes on.
- e = strong short coffee
- d = regular coffee
- c= mild long coffee
Manual rinsing cycle
Next to the automatic rinsing cycle, you can also start a manual rinsing
cycle whenever you want. You may perform a manual rinsing cycle when
you switch to another variety. Rinsing enables you to enjoy the full aroma
of the coffee blend you have selected.
1 Ensure water tank is sufciently lled and activity light is on.
ENGLISH 13
4203_000_7242_1_DFU Booklet_Lux_A5_v2.indd 13 5/29/12 5:49 PM

2 Turn the bean-funnel anticlockwise to remove it.
3 Slide the detachable coffee spout into the coffeemaker.
4 Place a cup on the drip tray cover.
5 Press the 1-cup button to start the rinsing cycle.
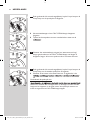
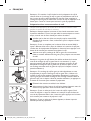
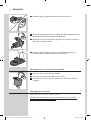
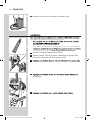
Adjusting the grinding degree
You can adjust the coffee grinder with the grinding degree adjustment tool
to set the coffee strength to your personal taste. When you adjust the
taste, adjust the grinder to a coarser setting.
Note: Over time the grinder may change to a coarser setting. It is
recommended to adjust the grinding degree to your personal taste from time
to time. These adjustments are not required regularly.
ENGLISH14
4203_000_7242_1_DFU Booklet_Lux_A5_v2.indd 14 5/29/12 5:49 PM

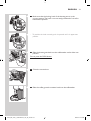
1 Remove the coffee grounds container from the coffeemaker.
2 Open the service door.
3 Take the grinding degree adjustment tool out of the recess next to
the brewing unit.
4 Close the service door.
5 Slide the coffee grounds container back into the coffeemaker.
ENGLISH 15
4203_000_7242_1_DFU Booklet_Lux_A5_v2.indd 15 5/29/12 5:50 PM

6 Insert the lug on the broad end of the grinding degree next to the
cap of the grinding degree adjustment hole and press lightly. This
makes the cap open automatically.
7 Insert the narrow end of the grinding degree adjustment tool into
the grinding degree adjustment hole so that the opening in the tool
button, when the device starts grinding you can adjust the grinding
degree.
8 For a coarser setting, push down and turn the grinding degree
the grinding degree adjustment tool anticlockwise.
Note: Turn the grinding degree adjustment tool one step clockwise or
anticlockwise at the time. Then brew 2 or 3 cups of coffee to establish if the
grinding degree has been adjusted to your satisfaction.
9
degree adjustment tool from the grinding degree adjustment hole,
close the cap and place the grinding degree adjustment tool back
into its recess.
Cleaning and maintenance
Never immerse the coffeemaker in water or any other liquid, nor rinse it
under the tap.
Always unplug the coffeemaker and let it cool down before you clean it.
Note: None of the detachable parts, nor the the brewing unit and the jug are
dishwasherproof, rinse them under the tap.
Cleaning the water tank, the coffee grounds container and the
drip tray
Empty and clean the water tank, the coffee grounds container and the drip
tray every day. Also empty and clean the water tank and coffee grounds
container when the ‘water tank empty’ light and/or the ‘coffee grounds
container full’ light go on. Empty and rinse the drip tray when the ‘drip tray
full’ indicator indicates the drip tray is full.
1 Remove the water tank from the coffeemaker.
ENGLISH16
4203_000_7242_1_DFU Booklet_Lux_A5_v2.indd 16 5/29/12 5:50 PM

2
under the tap.
3 Clean the water tank with hot water and some washing-up liquid
and rinse it under the tap.
4
down gently.
5 Fill the water tank with fresh, cold tap water and slide it back into
the coffeemaker.
6 Remove the coffee grounds container from the coffeemaker and
empty it.
7 Clean the coffee grounds container with hot water and some
washing-up liquid and rinse it under the tap.
8 Slide the coffee grounds container back into the coffeemaker.
9 Pull the drip tray out of the coffeemaker.
10 Remove the drip tray cover and empty the drip tray.
ENGLISH 17
4203_000_7242_1_DFU Booklet_Lux_A5_v2.indd 17 5/29/12 5:50 PM

11 Clean the drip tray and the drip tray cover with hot water and some
washing-up liquid and rinse them under the tap.
12 Clean the guiding grooves for the drip tray in the bottom of the
coffeemaker with a moist cloth.
13 Put the drip tray cover on the drip tray and slide the drip tray back
into the coffeemaker.
Cleaning the detachable coffee spout
1 Remove the detachable coffee spout.
2 Rinse the detachable coffee spout under the tap.
3 Slide the detachable coffee spout back into the coffeemaker or store
it.
Cleaning the jug
Clean the jug after every use.
Do not use aggressive cleaning agents, solvents or chemicals to clean
the jug.
1 Turn the lid by its lever to the ‘remove lid’ symbol to unlock the lid.
Then pull the lid off the jug.
ENGLISH18
4203_000_7242_1_DFU Booklet_Lux_A5_v2.indd 18 5/29/12 5:50 PM

2 Rinse the inside of the jug and the lid with warm water. Clean the
outside of the jug with a damp cloth.
Note: The jug is not dishwasher-proof.
3 Put the jug in upright position without the lid on and let the inside of
the jug dry.
4 When the inside of the jug is dry, place the lid on the jug and turn it
to the ‘closed/brewing’ position
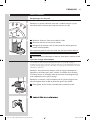
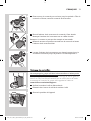
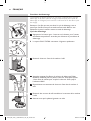
Cleaning the brewing unit
Do not clean the brewing unit in the dishwasher and do not use soap or
a cleaning agent to clean it.
Clean the brewing unit every time the bean-funnel is empty or at least once
a week. For more information on how to remove, clean and place back
the brewing unit, watch the instruction movies on
www.senseo.com/sarista/support..
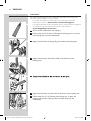
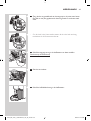
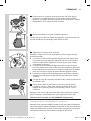
1 Switch off the coffeemaker and unplug it.
2 Remove the coffee grounds container from the coffeemaker.
3 Open the service door.
4 Press the PUSH button (1) and pull at the grip of the brewing unit
(2) to remove it from the coffeemaker.
ENGLISH 19
4203_000_7242_1_DFU Booklet_Lux_A5_v2.indd 19 5/29/12 5:50 PM

5 Rinse the outside of the brewing unit under a lukewarm tap.
Never use any soap or other cleaning agent to clean the brewing unit.
Do not dry the brewing unit with a cloth to prevent bres from
collecting inside the brewing unit. After rinsing, just shake off excess
water.
6 Carefully rinse the upper lter under a lukewarm tap.
7 Thoroughly clean the inside of the coffeemaker with a damp cloth.
8 Before you slide the brewing unit back into the coffeemaker, make
sure the two reference signs on the side match. If they do not match,
perform the following step:
- Make sure that the lever is in contact with the base of the brewing unit.
ENGLISH20
4203_000_7242_1_DFU Booklet_Lux_A5_v2.indd 20 5/29/12 5:50 PM

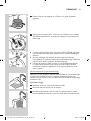
9 Make sure that the locking hook of the brewing unit is in the
correct position. The hook is not correctly positioned if it is still in
bottommost position.
- To position the hook correctly, push it upwards until it is uppermost
position.
10 Slide the brewing unit back into the coffeemaker until it clicks into
position.
Do not press the PUSH button.
11 Close the service door.
12 Slide the coffee grounds container back into the coffeemaker.
ENGLISH 21
4203_000_7242_1_DFU Booklet_Lux_A5_v2.indd 21 5/29/12 5:50 PM

Lubrication
For optimal performance of the coffeemaker, lubricate the brewing unit
after 400 cups of coffee or once a month.
- For more information on what and how to lubricate, watch the
instruction movies on www.senseo.com/sarista/support.
- For optimal brewing results, we advise you to use the lubricant supplied
by Philips. You can buy this lubricant in the online shop at
www.shop.philips.com/service.
1 Switch off the coffeemaker and unplug it.
2 Follow steps 2 to 4 of section ‘Cleaning the brewing unit’ to remove
the brewing unit from the coffeemaker.
3 Apply some lubricant to the guiding rails inside the brewing unit.
4 Apply some lubricant around the shaft in the bottom of the
brewing unit.
5
6 Apply some lubricant on both sides of the lever in the brewing unit.
7 Follow steps 9 to 11 of ‘Cleaning the brewing unit’ to place the
brewing unit and the coffee grounds container back into the
coffeemaker.
ENGLISH22
4203_000_7242_1_DFU Booklet_Lux_A5_v2.indd 22 5/29/12 5:50 PM
Page is loading ...
Page is loading ...
Page is loading ...
Page is loading ...
Page is loading ...
Page is loading ...
Page is loading ...
Page is loading ...
Page is loading ...
Page is loading ...
Page is loading ...
Page is loading ...
Page is loading ...
Page is loading ...
Page is loading ...
Page is loading ...
Page is loading ...
Page is loading ...
Page is loading ...
Page is loading ...
Page is loading ...
Page is loading ...
Page is loading ...
Page is loading ...
Page is loading ...
Page is loading ...
Page is loading ...
Page is loading ...
Page is loading ...
Page is loading ...
Page is loading ...
Page is loading ...
Page is loading ...
Page is loading ...
Page is loading ...
Page is loading ...
Page is loading ...
Page is loading ...
Page is loading ...
Page is loading ...
Page is loading ...
Page is loading ...
Page is loading ...
Page is loading ...
Page is loading ...
Page is loading ...
Page is loading ...
Page is loading ...
Page is loading ...
Page is loading ...
Page is loading ...
Page is loading ...
Page is loading ...
Page is loading ...
Page is loading ...
Page is loading ...
Page is loading ...
Page is loading ...
Page is loading ...
Page is loading ...
Page is loading ...
Page is loading ...
Page is loading ...
Page is loading ...
Page is loading ...
Page is loading ...
Page is loading ...
Page is loading ...
Page is loading ...
Page is loading ...
-
 1
1
-
 2
2
-
 3
3
-
 4
4
-
 5
5
-
 6
6
-
 7
7
-
 8
8
-
 9
9
-
 10
10
-
 11
11
-
 12
12
-
 13
13
-
 14
14
-
 15
15
-
 16
16
-
 17
17
-
 18
18
-
 19
19
-
 20
20
-
 21
21
-
 22
22
-
 23
23
-
 24
24
-
 25
25
-
 26
26
-
 27
27
-
 28
28
-
 29
29
-
 30
30
-
 31
31
-
 32
32
-
 33
33
-
 34
34
-
 35
35
-
 36
36
-
 37
37
-
 38
38
-
 39
39
-
 40
40
-
 41
41
-
 42
42
-
 43
43
-
 44
44
-
 45
45
-
 46
46
-
 47
47
-
 48
48
-
 49
49
-
 50
50
-
 51
51
-
 52
52
-
 53
53
-
 54
54
-
 55
55
-
 56
56
-
 57
57
-
 58
58
-
 59
59
-
 60
60
-
 61
61
-
 62
62
-
 63
63
-
 64
64
-
 65
65
-
 66
66
-
 67
67
-
 68
68
-
 69
69
-
 70
70
-
 71
71
-
 72
72
-
 73
73
-
 74
74
-
 75
75
-
 76
76
-
 77
77
-
 78
78
-
 79
79
-
 80
80
-
 81
81
-
 82
82
-
 83
83
-
 84
84
-
 85
85
-
 86
86
-
 87
87
-
 88
88
-
 89
89
-
 90
90
-
 91
91
-
 92
92


Philips HD 8010 Senseo Sarista User manual
- Category
- Coffee makers
- Type
- User manual
- This manual is also suitable for
Ask a question and I''ll find the answer in the document
Finding information in a document is now easier with AI
in other languages
- français: Philips HD 8010 Senseo Sarista Manuel utilisateur
- Nederlands: Philips HD 8010 Senseo Sarista Handleiding
Related papers
Other documents
-
SENSEO® HD8010/10 Quick start guide
-
SEVERIN KM3869 Datasheet
-
Senseo Viva Café Premium Platinum User manual
-
Smeg DCF02BLAU User manual
-
-
Sytech SYDC108T Owner's manual
-
Cuisinart DCC1200WE User manual
-
SENSEO® HD7810/70 User manual
-
-