Honeywell RTH221B Operating instructions

Category
Thermostats
Type
Operating instructions

This manual is also suitable for

Quick Installation Guide
RTH2300/RTH221 Series
Programmable Thermostat
69-2728ES-02
69-2728ES_A.indd 1 5/6/2012 12:05:30 PM
69-2728ES02 ii
Identify System Type
This thermostat is compatible with the following systems:
Gas, oil or electric furnace
Central air conditioner
Hot water system with or without pump
Millivolt system
Central heating and cooling system
Heat pump without auxiliary/backup heat
Do you need assistance?
We are here to help.
Call 1-800-468-1502 for wiring
assistance before returning
the thermostat to the store.
This thermostat cannot be used on heat pumps or on
multistage systems.
69-2728ES_A.indd 2 5/6/2012 12:05:33 PM
1 69-2728ES—02
1
Turn Off Power to Heating/
Cooling System
or
OFF
69-2728ES_A.indd 1 5/6/2012 12:05:34 PM
69-2728ES02 2
Is there a sealed tube containing
mercury? If so, see back cover for
proper disposal instructions.
50 60 70 80 F
OFF
AUTO EM. HEAT
EM. HEATAUX. HEAT
50 60 70 80
M33835
Old thermostat
Cover
Remove old thermostat but leave wallplate with
wires attached.
Remove Old Thermostat
Do not remove
wallplate yet
2
69-2728ES_A.indd 2 5/6/2012 12:05:38 PM
3 69-2728ES—02
Label Wires with Tags
3
Label the wires using the supplied wire labels as you
disconnect them.
Wire Labels
M28100
M33763
69-2728ES_A.indd 3 5/6/2012 12:05:41 PM
69-2728ES02 4
M32731
TO REMOVE WALLPLATE
PULL HERE
Separate Wallplate from
New Thermostat
4
Remove wallplate from the new thermostat and mount onto
wall.
Wallplate
69-2728ES_A.indd 4 5/6/2012 12:05:43 PM
5 69-2728ES—02
Mount the new wallplate using the included screws
and anchors.
5
Mount Wallplate
Drill 3/16-in. holes for drywall
Drill 3/32-in. holes for plaster
W/
Aux
Not
Used
M32714
69-2728ES_A.indd 5 5/6/2012 12:05:46 PM
69-2728ES02 6
Connect Wires
6
M32732
SCREW
INSERT WIRES
AND TIGHTEN
SCREWS
WIRE
HOLE
LABELED
WIRES
W
G
R
Not
Used
W
Y
Simply match wire labels.
Remove metal jumper if you have both R and Rc wires.
Labels don’t match? See page 20.
We are here to help.
Call 1-800-468-1502 for wiring assistance.
69-2728ES_A.indd 6 5/6/2012 12:05:48 PM
7 69-2728ES—02
RTHXXXX
M32707
Install two AAA alkaline batteries.
Back of thermostat
7
Install Batteries
69-2728ES_A.indd 7 5/6/2012 12:05:51 PM
69-2728ES02 8
Move the switch to the proper setting:
Gas or Oil: For gas or oil heating systems, leave the fan
operation switch in this factory-set position (for systems that
control the fan in a call for heat).
Electric or Heat Pump: Change the switch to this setting
for heat pump or electric heat systems. (This setting is for
systems that allow the thermostat to control the fan in a call
for heat, if a fan wire is connected to the G terminal.)
8
Set fan operation switch
RTHXXXX
M32716
GAS OR OIL
ELECTRIC OR HEAT PUMP
GAS OR OIL
ELECTRIC OR HEAT PUMP
69-2728ES_A.indd 8 5/6/2012 12:05:55 PM
9 69-2728ES—02
W/
Aux
Not
Used
Heat Off Cool Auto On
Fan
M33784
Heat Off Cool Auto On
Fan
Heat Off Cool
Auto On
Fan
Set
Hold
Run
Install thermostat onto the wallplate on the wall.
9
Install Thermostat onto Wallplate
69-2728ES_A.indd 9 5/6/2012 12:05:58 PM
69-2728ES02 10
Turn the power back on to the heating/cooling system.
10
Turn Power Back On
or
ON
69-2728ES_A.indd 10 5/6/2012 12:05:59 PM
11 69-2728ES—02
If your system type is:
q Single Stage Heat and Cool
q Heat Only or Cool Only
Congratulations, youre done!
If your system type is:
q Heat Pump* with Backup Heat
Continue with advanced installation
on next page to match your thermostat to your system
type.
*Heat Pump—an air conditioner that provides cooling in the
summer, and also runs in reverse in the winter to provide
heating.
If you are not sure of your system type or if you have
other questions, call us toll-free at 1-800-468-1502.
This thermostat works on 24 volt or 750 mV systems. It will
NOT work on multi-stage conventional systems or 120/240
Volt systems.
11
If your system type is...
69-2728ES_A.indd 11 5/6/2012 12:06:00 PM
Advanced Installation
Enter system setup .............................................................. 13
Changing settings ................................................................ 14
Heating cycle rate ................................................................15
Temperature display ............................................................16
Compressor protection ........................................................17
Clock display .......................................................................18
Restore program schedule default ......................................20
Alternate wiring....................................................................21
Troubleshooting ...................................................................22
Customer assistance ...........................................................23
Limited warranty ..................................................................24
69-2728ES_A.indd 12 5/6/2012 12:06:00 PM
RTH2300/RTH221
13 69-2728ES—02
SETUP WIRING ASSISTANCE TROUBLESHOOTING
Enter System Setup
System setup
To enter system setup, press and hold both the s and
t buttons until the display changes (approximately 5
seconds).
M33785
Heat Off Cool Auto On
Fan
Heat Off Cool
Auto On
Fan
Set
Hold
Run
69-2728ES_A.indd 13 5/6/2012 12:06:01 PM
Advanced Installation Guide
69-2728ES02 14
SETUPWIRINGASSISTANCETROUBLESHOOTING
5
5
M33786
Set
Hold
Run
System setup
Change Function Change Setting
See pages 15–19 to change Function Settings.
Changing Settings
Function Setting
1. Press the s or t button to change the setting.
2. Press the s and t buttons simultaneously for one
second to advance to the next function.
3. Press the Run button to exit and save settings.
NOTE: If you do not press any button for 60 seconds while
you are in the setup menu, the thermostat automatically
saves any changes made and exits the menu.
69-2728ES_A.indd 14 5/6/2012 12:06:02 PM
RTH2300/RTH221
15 69-2728ES—02
About your new thermostat
SETUP WIRING ASSISTANCE TROUBLESHOOTING
5
5
M32720
System setup
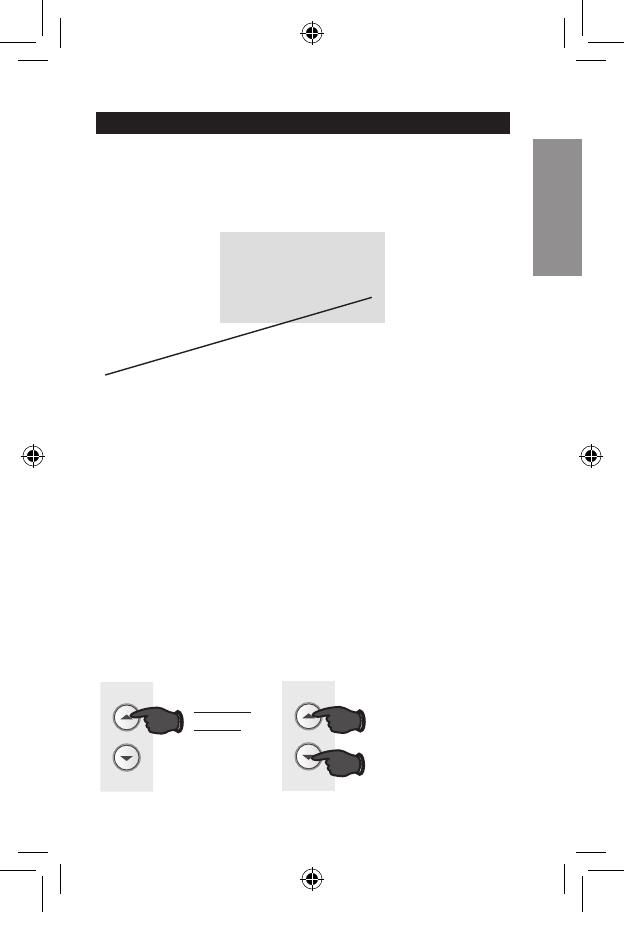
Press the s or t button to select your heating system
and optimize its operation.
Function 5: Heating cycle rate
5 Gas or oil furnace: Use this setting if you have a
standard gas or oil furnace that is less than 90%
efficient.
6 Electric furnace: Use this setting if you have any type
of electric heating system.
3 Hot water or high-efficiency furnace: Use this
setting if you have a hot water system or a gas furnace
of greater than 90% efficiency.
2 Gas/oil steam or gravity system: Use this setting if
you have a steam or gravity heat system.
Press to
change
setting.
When finished,
press s and t
to advance to the
next function.
M33591
AND
OR
69-2728ES_A.indd 15 5/6/2012 12:06:11 PM
Advanced Installation Guide
69-2728ES02 16
SETUPWIRINGASSISTANCETROUBLESHOOTING
System setup
Function 14: Temperature display
0 Fahrenheit temperature display (°F)
1 Celsius temperature display (°C)
Press the s or t button to select Fahrenheit or Celsius
temperature display.
14
0
M32722
Press to
change
setting.
When finished,
press s and t
to advance to the
next function.
M33591
AND
OR
69-2728ES_A.indd 16 5/6/2012 12:06:14 PM
RTH2300/RTH221
17 69-2728ES—02
SETUP WIRING ASSISTANCE TROUBLESHOOTING
System setup
Function 15: Compressor Protection
1 On
0 Off
Press the s or t button to select Compressor Protection
settings.
Compressor Protection: This feature forces the com-
pressor to wait approximately 5 minutes before restarting,
to prevent equipment damage. During the wait time, the
message “Cool On” or “Heat On” is displayed on screen.
15
1
M32723
Press to
change
setting.
When finished,
press s and t
to advance to the
next function.
M33591
AND
OR
69-2728ES_A.indd 17 5/6/2012 12:06:19 PM
Advanced Installation Guide
69-2728ES02 18
SETUPWIRINGASSISTANCETROUBLESHOOTING
System setup
Function 20: Clock Display
0 12-hour display
1 24-hour display
Press the s or t button to select clock display.
Press to
change
setting.
When finished,
press s and t
to advance to the
next function.
M33591
AND
OR
20
0
M32724
69-2728ES_A.indd 18 5/6/2012 12:06:23 PM
  • Page 1 1
  • Page 2 2
  • Page 3 3
  • Page 4 4
  • Page 5 5
  • Page 6 6
  • Page 7 7
  • Page 8 8
  • Page 9 9
  • Page 10 10
  • Page 11 11
  • Page 12 12
  • Page 13 13
  • Page 14 14
  • Page 15 15
  • Page 16 16
  • Page 17 17
  • Page 18 18
  • Page 19 19
  • Page 20 20
  • Page 21 21
  • Page 22 22
  • Page 23 23
  • Page 24 24
  • Page 25 25
  • Page 26 26
  • Page 27 27
  • Page 28 28
  • Page 29 29
  • Page 30 30
  • Page 31 31
  • Page 32 32
  • Page 33 33
  • Page 34 34
  • Page 35 35
  • Page 36 36
  • Page 37 37
  • Page 38 38
  • Page 39 39
  • Page 40 40
  • Page 41 41
  • Page 42 42
  • Page 43 43
  • Page 44 44
  • Page 45 45
  • Page 46 46
  • Page 47 47
  • Page 48 48
  • Page 49 49
  • Page 50 50
  • Page 51 51
  • Page 52 52
  • Page 53 53
  • Page 54 54
  • Page 55 55
  • Page 56 56

Honeywell RTH221B Operating instructions

Category
Thermostats
Type
Operating instructions
This manual is also suitable for

Ask a question and I''ll find the answer in the document

Finding information in a document is now easier with AI

in other languages