Page is loading ...

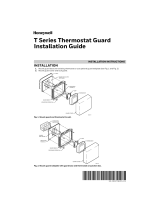
If the Thermostat Guard is being used for an
existing thermostat, the Thermostat Guard can
be installed without removing the existing
thermostat from the wall. In this application the
Thermostat Guard will be installed without the
Wallplate. (see FIG. A)
If the Thermostat Guard is being used for a
new thermostat, the Thermostat Guard can
be installed with or without the Wallplate. The
Wallplate would be used to cover up mounting
marks from a previous thermostat. (see FIG. B)
The Thermostat Guard can also be mounted on
an exposed junction box using the Wallplate.
Holes may need to be drilled into the Wallplate
to mount the Wallplate to the junction box.
(see FIG. C)
The Thermostat Guard can be mounted vertically
or horizontally. If the Thermostat Guard is
mounted horizontally, the Guard Cover will swing
open sideways, if mounted vertically the Guard
Cover will open swinging down or up.
Using the Thermostat Guard
WITHOUT the Wallplate (see FIG. A)
1. The Cover CAN BE removed from the Base
Ring for easier installation. Pull the hinge tabs
to remove the Cover from the Base Ring.
2. Place the Base Ring over the thermostat.
Align the Base Ring with the thermostat and
use a Bubble Level to level the Base Ring.
Mark the four mounting holes on the wall.
3. Drill four pilot holes for the Anchors.
4. Use the four 1¼” length Mounting Screws
(included, see FIG. 6), and the four Anchors
(included, see FIG. 5) to mount the Base Ring
to the wall.
5. If the Cover was removed before installation,
snap the Cover back onto the Base Ring
and lock the Thermostat Guard with the key
(included, see FIG. 4).
6. The hinge on the Thermostat Guard
allows the Cover to swing open when the
thermostat needs to be adjusted. There is no
need to remove the Cover.
THERMOSTAT GUARD INSTALLATION INSTRUCTIONS
FIGURE A
FIGURE C
PART LIST
FEATURES:
• Low Prole
• Lockable
• Patented Rotating Removable Hinge:
No Need to Remove Cover when
Adjusting the Thermostat.
• Mounts Horizontally and Vertically
• Heavy Duty Polycarbonate Construction
• Level for Easy and Perfect Mounting
INSTALLATION GUIDE
THERMOSTAT GUARD
INSTALLATION
INSTRUCTIONS
FIGURE 1:
1 clear plastic Cover with Tumbler Lock
Using the Thermostat Guard with
the Wallplate (see FIG. B and C)
1. The Cover can be removed from the
Base Ring for easier installation. Pull the
hinge tabs to remove the Cover from the
Base Ring.
2. Place the Base Ring on the Wallplate and
mark the four mounting holes in the wall.
Use a Bubble Level to level the Wallplate.
3. Drill four pilot holes for the Anchors.
4. Pull the thermostat wire through the
Wallplate.
5. Use the four 1¼” length Mounting Screws
(included, see FIG. 6, and the four Anchors
(included, see FIG. 5) to mount the Base
Ring to the wall.
6. Screw the Base Ring to the Wallplate
(¾” Self Tapping Screws included, see FIG. 7).
7. Mount the thermostat on the Wallplate
following the installation instructions
provided with the thermostat. Use the
screws provided with the thermostat.
8. If the Cover was removed before
installation, snap the Cover back on the
Base Ring and lock the Thermostat Guard
with the Key (included, see FIG. 4.
9. The hinge on the Thermostat Guard
allows the Cover to swing open when the
thermostat needs to be adjusted. There is
no need to remove the Cover.
FIGURE 2:
1 clear plastic Base Ring
FIGURE 3:
1 plastic Wallplate
FIGURE 4:
2 Keys for Tumbler Lock
FIGURE 6:
4 Mounting Screws,
1 -1/4” length
FIGURE 5:
4 Anchors
FIGURE 7:
4 Self Tapping Screws,
3/4” length
FIGURE B
ZTC_NS_REV-E
www.hubbell.com/taymac

GUARDIA DE TERMOSTATO: INSTRUCCIONES DE INSTALACIÓN
PARTES
GUÍA DE INSTALACIÓN
GUARDIA DE
TERMOSTATO
INSTRUCCIONES DE
INSTALACIÓN
FIGURA 1:
1 Cubierta de Plástico Transparente con Traba
FIGURA 2:
1 Base Transparente
FIGURA 3:
1 Placa de Pared de Plástico
FIGURA 4:
2 Llaves para la Traba
FIGURA 6:
4 Tornillos de Plancha de
1-1/4”
FIGURA 5:
4 Anclajes de Plastico
FIGURA 7:
4 Tornillos Rosca
de Plancha de 3/4”
Si se piensa utilizar para cubrir un termostato
ya empotrado, Guardia de Termostato se puede
instalar sin necesidad de quitarlo de la pared.
En este caso, Guardia de Termostato se deberá
instalar sin la placa de pared. FIG. A
Por el contrario, si se piensa utilizar para cubrir
un termostato nuevo, Guardia de Termostato se
puede colocar con la placa de pared o sin ella.
En caso de usarse, la placa de pared serviría para
tapar las marcas de instalacíon de un termostato
anterior. FIG. B
Por otro lado, Guardia de Termostato también
se puede instalar usando la placa de pared para
cubrir una caja de conexiones expuesta. Pueda
que sea necesario perforar agujeros en la placa
de pared para la caja de conexiones. FIG.C
Guardia de Termostato se puede colocar
en sentido horizontal o vertical. Si se coloca
horizontal, la cubierta se abrirá hacia un lado,
si se coloca vertical, la cubierta se abrirá hacia
arriba o abajo.
Uso de Guardia de Termostato
sin la placa de pared (FIG. A)
1. La cubierta se puede separar de la base para
facilitar la instalación. Jale la bisagras para
remover la cubierta de la base.
2. Localize la base sobre el termostato. Use
un nivel de aire para alinear la base con el
termostato hasta que estén nivelados.
Marque los cuatro agujeros para la
colocación en la pared.
3. Perfore los cuatro agujeros para los anclajes
de plastico.
4. Atornille la base a la pared usando los cuatro
tornillos de plancha de 1¼” (incluido, FIG. 6)
y los cuatro anclajes (incluido, FIG. 5).
5. Si separó la cubierta antes de comenzar
la instalación, vuelva a ponerla en la base
y trabe Guardia de Termostato con llave
(incluido, FIG. 4).
6. Las bisagras de Guardia de Termostato
permite abrir la cubierta siempre que se
necesite ajustar el termostato. En efecto, no
es necesario quitar la cubierta.
Uso de Guardia de Termostato
con la placa de pared (FIG. B y FIG. C)
1. La cubierta se puede separar de la base
para facilitar la instalación. Jale las bisagras
para remover la cubierta de la base.
2. Coloque la base sobre la placa de pared
y marque los cuatro agujeros para la
colocación en la pared. Use un nivel de aire
para nivelar la placa de pared.
3. Perfore los cuatro agujeros para los anclajes
de plastico.
4. Estire el alambre del thermostato a traves
de la placa de pared.
5. Atornille el Aro de Base a la pared usando
los cuatro tornillos de plancha de 1¼”
(incluido, FIG. 6) y los cuatro anclajes
(incluido, FIG. 5).
6. Tornille la base a la placa de pared (tornillos
rosca de plancha de ¾” incluido, FIG. 7)
7. Coloque el termostato sobre la placa de
pared de acuerdo con las instrucciones de
instalación del thermostato. Use los tornillos
que vienen con el termostato.
8. Si separó la cubierta antes de
comenzar la instalación, vuelva a ponerla en
la base y trabe Guardia de Termostato con
llave (incluido, FIG. 4).
9. La bisagra de Guardia de Termostato
permite abrir la cubierta siempre que se
necesite ajustar el termostato. En efecto, no
es necesario quitar la cubierta.
CARACTERÍSTICAS
• Bajo Perl
• Traba
• Bisagra Patentada, No es Necesario Retirar la
Cubierta para Ajustar el Termostato
• Para Instalación Horizontal o Vertical
• Construccíon Resistentes de Polycarbonate
• Nivel de Aire para una Colocación
Sencilla y Correcta
ZTC_NS_REV-E
www.hubbell.com/taymac
FIGURA A
FIGURA C
FIGURA B
/