Page is loading ...

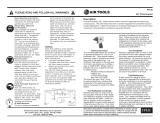
USE AND CARE GUIDE
1/2 INCH IMPACT WRENCH
Questions, problems, missing parts?
Before returning to the store, call
Husky Customer Service
8 a.m. - 6 p.m., EST, Monday-Friday
1-888-43-HUSKY
HUSKYTOOLS.COM
Item #676 532
Model #H4430
THANK YOU
We appreciate the trust and condence you have placed in Husky through the purchase of this impact wrench. We strive to continually create
quality products designed to enhance your home. Visit us online to see our full line of products available for your home improvement needs.
Thank you for choosing Husky!

2
Table of Contents
Table of Contents ...................................2
Safety Information ..................................2
Work Area Safety ..................................2
Personal Safety ...................................2
Air Compressor and Air Tool Safety ....................3
Warranty ..........................................3
Husky Air Tools Limited Two Year Warranty ..............3
Additional Limitations ..............................3
Pre-Installation .....................................4
Specications ....................................4
Package Contents .................................4
Installation ........................................5
Operation. . . . . . . . . . . . . . . . . . . . . . . . . . . . . . . . . . . . . . . . . . 6
Maintenance .......................................7
Lubrication .......................................7
Troubleshooting ....................................8
Service Parts .......................................9
Safety Information
WORK AREA SAFETY
1. Keep your work area clean and well lit. Ensure oors are not
slippery from wax or dust.
2. Do not operate power tools in explosive atmospheres, such as
in the presence of ammable liquids, gases, or dust. Power
tools create sparks which may ignite the dust or fumes. Keep
bystanders, children, and visitors away while operating tools.
Distractions can cause you to lose control.
3. Always disconnect the air supply and power supply before
making adjustments, servicing a tool, changing an accessory or
when a tool is not in use.
4. For further information on the safe use of air tools, we advise
you to obtain a copy of CAGI B186.1-2009 from
Husky Air Tools
851 Jupiter Park Lane
Jupiter, Florida 33458
(877) 260-1630.
PERSONAL SAFETY
1. Use safety equipment. Always wear eye protection with side
shields when operating power tools. Dust mask, nonskid
safety shoes, hard hat, or hearing protection must be used for
appropriate conditions.
2. Stay alert when operating a power tool. Do not use the tool while
tired or under the inuence of drugs, alcohol, or medication.
3. Do not wear loose clothing or jewelry. Contain long hair. Keep
your hair, clothing, and gloves away from moving parts. Loose
clothes, jewelry, or long hair can be caught in moving parts.
4. Keep proper footing and balance at all times. Proper footing
and balance enables better control of the tool in unexpected
situations.
5. Do not use on a ladder or unstable support.
WARNING: Risk of injury to persons. Read and
understand operation instructions. Always become familiar
with all the instructions and warnings before operating any
pneumatic tool.
WARNING: Some dust created by power sanding, sawing,
grinding, drilling and other construction activities contains
chemicals known to cause cancer, birth defects or other
reproductive harm. Some examples of these chemicals are:
Lead from lead based paint, crystalline silica from bricks
and cement and other masonry products, arsenic and
chromium from chemically-treated lumber.
Your risk from those exposures varies, depending on how
often you do this type of work. To reduce your exposure to
these chemicals: work in a well-ventilated area, and work
with approved safety equipment, such as dust masks that
are specically designed to lter out microscopic particles.
CAUTION: This product contains chemicals known to
the State of California to cause cancer and birth defects or
other reproductive harm. Wash hands after handling.

3 HUSKYTOOLS.COM
Please contact 1-888-43-HUSKY for further assistance.
Safety Information (continued)
AIR COMPRESSOR AND AIR TOOL SAFETY
1. Risk of Bursting. Do not adjust the regulator to result in output
pressure greater than the marked maximum pressure of this air
tool.
2. Ensure the hose is free of obstructions or snags. Entangled or
snarled hoses can cause loss of balance or footing and may
become damaged.
3. Never leave a tool unattended with the air hose attached.
4. Do not operate this tool if it does not contain a legible warning
label.
5. Do not continue to use a tool or hose that leaks air or does not
function properly.
6. Never direct a jet of compressed air toward people or animals.
7. Protect your lungs. Wear a face or dust mask if the operation is
dusty.
WARNING: Do not use at a pressure greater than the
rated maximum pressure of this air tool.
WARNING: Do not attempt to modify this tool or create
accessories not recommended for use with this tool. Any
such alteration or modication is misuse and could result in
a hazardous condition leading to possible serious personal
injury.
WARNING: Operating any power tool can result in foreign
objects being thrown into your eyes, which can result in
severe eye damage. Before beginning operation, always
wear safety goggles, safety glasses with side shields, or
a full face shield when needed. Always use eye protection
marked to comply with ANSI Z87.1.
WARNING: Avoid Prolonged Exposure to Vibration
Pneumatic tools can vibrate during use. Prolonged exposure
to vibration or very repetitive hand and arm movements,
can cause injury. Stop using any tool if discomfort, tingling
feeling or pain occurs. You should consult your physician
before resuming use of the tool.
Warranty
HUSKY AIR TOOLS LIMITED TWO YEAR WARRANTY
If within two years from the date of purchase, this Husky air tool product fails due to a defect in materials or workmanship, please
immediately contact the Customer Service Team at 1-888-43-HUSKY 8 a.m. - 6 p.m., EST, Monday-Friday, except normal holidays. Do not
return the air tool to the store. Please be prepared to send the product, postage prepaid, to the address provided by the Customer Service
Team. The package must also include a copy of the dated rst owner purchase receipt with the air tool model included and circled. The
serial number and month/year of manufacture of the air tool must also be included to determine warranty. A defective product will be
promptly replaced with a new one of equal or greater value. This warranty excludes incidental/consequential damages and failures due to
misuse, abuse or normal wear and tear. This warranty gives you specic rights, and you may also have other rights, which vary, from state
to state.
Please contact the Customer Service Team at 1-888-43-HUSKY or visit www.HUSKYTOOLS.com.
ADDITIONAL LIMITATIONS
To the extent permitted by applicable law, all implied warranties, including warranties of merchantability or tness for a particular
purpose, are disclaimed. Any implied warranties, including warranties of merchantability or tness for a particular purpose, that cannot
be disclaimed under state law are limited to two years from the date of purchase. Husky is not responsible for direct, indirect, incidental,
special or consequential damages. If this air compressor is used for commercial purposes, the warranty will apply for ninety (90) days
from the date of purchase. Some states do not allow limitations on how long an implied warranty lasts and/or do not allow the exclusion
or limitation of incidental or consequential damages, so the above limitations may not apply to you. This warranty gives you specic legal
rights, and you may also have other rights, which vary from state to state.
WARNING: Hearing Protection is Recommended
Hearing protection should be used when the noise level
exposure equals or exceeds an 8 hour time-weighted
average sound level of 85dBA.

4
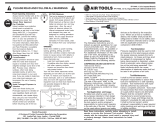
Pre-Installation
SPECIFICATIONS
Free Speed
(RPM)
Weight
(lbs)
Length
(in)
Air Cons.
(SCFM)
Maximum
Operating
Pressure (PSI)
7500 4.77 7.25 4
90
PACKAGE CONTENTS
A
Part Description Quantity
A 1/2” Impact Wrench 1

5 HUSKYTOOLS.COM
Please contact 1-888-43-HUSKY for further assistance.
Installation
1
Cleaning the air hose
□ A 3/8" air hose is required, with a maximum length of 25 ft.
□ Clean the air hose of accumulated dust and moisture
before connecting it to the air supply.
NOTE: If a longer air hose is required, connect a 1/2" air
hose to the 3/8" air hose to ensure the impact wrench has
the necessary air supply.
2
Connecting to the air supply
□ Always use clean dry air. Excessive moisture and dirt will
greatly reduce the life of any air motor. We recommend the
installation of an in-line lter-regulator-lubricator as close
to the tool as possible.
□ Ensure all hoses and ttings are the correct size and
secured tightly.
Recommended Air Line Set-Up
Part Description
A 1/2" Impact Wrench
B Quick Plug
C Quick Coupler
D Air Hose
E In-line Regulator
F In-line Lubricator
G In-line Filter
H Air Compressor

6
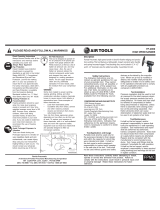
Operation
1
Operating the impact wrench
□ This 1/2" Impact Wrench is designed to operate on 90 PSIG.
Lower pressure (below 90 PSIG) will reduce performance
of the tool. Higher air pressure (over 90 PSIG) raises the
performance of the tool beyond its rated capacity and
could cause serious damage to the tool and the user.
2
Changing the output torque direction
□ This tool features the reverse switch to change the
output torque direction to tighten (assemble) or loosen
(disassemble) the bolt or fastener.
□ Control the output torque direction by pushing the reverse
switch button to the F (Forward) or R (Reverse) position to
change the direction.
3
Changing the output torque level
□ This tool features the air regulator to manage the output
power.
□ Press the air regulator in, then adjust to your desired
torque level.
□ 1 means minimum torque and 4 means the full power.
4
Installing and removing the impact
sockets
WARNING: Disconnect the tool from the air supply before
servicing or changing accessories. Always use sockets rated
for impact wrenches.
To install the impact socket:
□ Disconnect the tool from the air source.
□ Select the suitable and desirable socket size.
□ Press t the anvil into the socket.
□ To remove the impact socket:
□ Disconnect the tool from the air source.
□ Use your hand or a suitable tool to remove the socket.
P
U
S
H
1
2
3
4

7 HUSKYTOOLS.COM
Please contact 1-888-43-HUSKY for further assistance.
Operation (continued)
5
Tightening or loosening the bolt or fastener
WARNING: Once a bolt or fastener is seated, impacting for
longer than ve (5) seconds will cause excessive wear and
possible damage to the impact mechanism. If it takes longer
to tighten or loosen your bolt or fastener, we recommend the
use of a larger sized impact wrench.
□ Fit the impact socket.
□ Hold the impact wrench with one hand.
□ Ensure that the operator is aware of the torque direction to tighten
(Forward) or loosen (Reverse) and has selected the suitable torque level.
□ Use the tool to tighten or loosen the bolt or fastener.
Maintenance
Ensure the air line is shut-off and drained of air before removing this tool for service or changing sockets.
This will prevent the tool from operating if the throttle is accidentally engaged.
LUBRICATION
□ An in-line lter-regulator-lubricator is recommended as it increases tool life and keeps the tool in
sustained operation.
□ Regularly check and ll the in-line lubricator with air tool oil. Avoid using excessive amounts of oil.
□ Adjust the in-line lubricator by placing a sheet of paper next to the tool’s exhaust ports and holding the
throttle open approximately 30 seconds. The lubricator is properly set when a light stain of oil collects on
the paper.
□ If it is necessary to store the tool for an extended period of time (overnight, weekend, etc.), generously
lubricate the tool through the air inlet. Run the tool for approximately 30 seconds to ensure the oil is
evenly distributed throughout the tool. Store the tool in a clean and dry environment.
□ Recommended lubricants: Air tool oil or any other high grade turbine oil containing moisture absorbent,
rust inhibitors, metal wetting agents, and an EP (extreme pressure) additive.

8
Troubleshooting
Problem Possible Cause Solution
The tool runs slowly or will not
operate.
There is grit or gum in the tool. Flush the tool with air tool oil or gum solvent.
The tool is out of oil. Lubricate the tool according to the lubrication
instructions in this manual.
The air pressure is low. □ Adjust the regulator on the tool to the
maximum setting.
□ Adjust the compressor regulator to the tool’s
maximum setting of 90 psi.
The air hose leaks. Tighten and seal the hose ttings with pipe thread
tape if leaks are found.
The air pressure drops. □ Ensure the hose is the proper size. Long
hoses or tools using large volumes of air may
require a hose with an I.D. of ½" or larger
depending on the total length of the hose.
□ Do not use a multiple number of hoses
connected together with a quick connect
tting. This causes additional pressure drops
and reduces the tool power. Directly connect
the hoses together.
There is a worn rotor blade in the motor. Replace the rotor blade.
There is a worn ball bearing in the motor. Remove and inspect the bearing for rust, dirt, and
grit. Replace or clean and grease the bearing with
bearing grease.
There is moisture blowing out
of the tool’s exhaust.
There is water in the tank. Drain the tank. (See the air compressor manual
for instructions.) Lubricate the tool and run it until
water is not evident. Lubricate the tool again and
run for 1-2 seconds.
The tool impacts slowly or not
at all.
The tool needs lubricating. Lubricate the air motor and the impact mechanism
according to the lubrication instructions in this
manual.
The tool regulator setting is in the wrong position. Adjust the regulator on the tool to the maximum
setting.
The tool impacts rapidly, but
will not remove bolts.
The tool has a worn impact mechanism. Replace the worn impact mechanism components.
The tool does not impact. The impact mechanism is broken. Replace the broken impact mechanism
components.

9 HUSKYTOOLS.COM
Please contact 1-888-43-HUSKY for further assistance.
Service Parts

10
Service Parts (continued)
Reference
Number
Part Number Description Reference
Number
Part Number Description
1 931224801 Housing Assembly 25 9287246G O Ring
2 9160A15G Anvil Bushing 26 916038G Mufer Cover
3 931224819A Washer 27 916039G Screw (2)
4 9287159G Anvil 28 931224804 Trigger
5 9287161G Hammer Pin 29 916005G Trigger Pin
6 9287160G Hammer Case 30 916014G Spring
7 9287162G Hammer Dog 31 9106365G O Ring
8 9287163G Cam 32 916011G Air Regulator
9 9287228G Ball Bearing 33 916013G Screw
10 9287166G Front End Place 34 916007G Bushing
11 9287168G Rotor 35 916006G Valve Stem
12 9287169G Rotor Blade (6) 36 916008G Steei Ball
13 931224830 Pin 37 916009G Spring
14 910624G Cylinder 38 916010G Air Inlet
15 931224823 Pin 39 931224811 Plastic Plug
16 9287172G Rear End Plate 40 910637G Screw
17 9287228G Ball Bearing 41 910635G Pin
19 931224803 Reverse Valve 42 916036G Spring
20 9312248331 Gasket 43 9126004G Oil Plug
21 916033G End Cap 44 9481586 Rubberized HUSKY logo (2)
22 931224835 Washer (4) 45 931224801A Handle Grip
23 9287232G Cap Screw (4) 46 916043G O Ring
24 9284247G Retainer Ring

Questions, problems, missing parts? Before returning to the store,
call Husky Customer Service
8 a.m.-6 p.m., EST, Monday-Friday
1-888-43-HUSKY
HUSKYTOOLS.COM
Retain this manual for future use.
/