Page is loading ...

USE AND CARE GUIDE
1/2 in. IMPACT WRENCH
Questions, problems, missing parts?
Before returning to the store, call
Husky Customer Service
8 a.m. - 6 p.m., EST, Monday-Friday
1-888-43-HUSKY
HUSKYTOOLS.COM
Item #1003-097-323
Model H4455
THANK YOU
quality products designed to enhance your home. Visit us online to see our full line of products available for your home improvement needs.
Thank you for choosing Husky!

2
Table of Contents
Table of Contents ................................. . . 2
Safety Information ................................ . . 2
Work Area Safety ................................ . . 2
Personal Safety ................................. . . 2
Air Compressor and Air Tool Safety .................. . . 3
Warranty ........................................ . . 3
Husky Air Tools Limited Year Warranty
Three
............ . . 3
Additional Limitations ............................ . . 3
Pre-Installation ................................... . . 4
.................................. . . 4
Package Contents ............................... . . 4
Installation ...................................... . . 5
Operation. . . . . . . . . . . . . . . . . . . . . . . . . . . . . . . . . . . . . . . .
Maintenance ..................................... . . 8
6-7
Lubrication ..................................... . . 8
Troubleshooting .................................. . . 9
Service Parts ..................................... . 10
Safety Information
WORK AREA SAFETY
1. Keep your work area clean and well lit.
slippery from wax or dust.
2. Do not operate power tools in explosive atmospheres, such as
. Power
tools create sparks which may ignite the dust or fumes. Keep
bystanders, children, and visitors away while operating tools.
Distractions can cause you to lose control.
3. Always disconnect the air supply and power supply before
making adjustments, servicing a tool, changing an accessory or
when a tool is not in use.
4. For further information on the safe use of air tools, we advise
you to obtain a copy of CAGI B186.1-2009 from
Husky Air Tools
851 Jupiter Park Lane
Jupiter, Florida 33458
(877) 260-1630.
PERSONAL SAFETY
1. Use safety equipment. Always wear eye protection with side
shields when operating power tools. Dust mask, nonskid
safety shoes, hard hat, or hearing protection must be used for
appropriate conditions.
2. Stay alert when operating a power tool. Do not use the tool while
.
3. Do not wear loose clothing or jewelry. Contain long hair. Keep
your hair, clothing, and gloves away from moving parts. Loose
clothes, jewelry, or long hair can be caught in moving parts.
4. Keep proper footing and balance at all times. Proper footing
and balance enables better control of the tool in unexpected
situations.
5. Do not use on a ladder or unstable support.
WARNING: Risk of injury to persons. Read and
understand operation instructions. Always become familiar
with all the instructions and warnings before operating any
pneumatic tool.
WARNING: Some dust created by power sanding, sawing,
grinding, drilling and other construction activities contains
chemicals known to cause cancer, birth defects or other
reproductive harm. Some examples of these chemicals are:
Lead from lead based paint, crystalline silica from bricks
and cement and other masonry products, arsenic and
chromium from chemically-treated lumber.
Your risk from those exposures varies, depending on how
often you do this type of work. To reduce your exposure to
these chemicals: work in a well-ventilated area, and work
with approved safety equipment, such as dust masks that
.
WARNING:
This product can expose you to chemicals
including lead, which are known to the State of California
to cause cancer and birth defects or
other reproductive harm.
.
For more information go to www.P65Warnings.ca.gov

3 HUSKYTOOLS.COM
Please contact 1-888-43-HUSKY for further assistance.
Safety Information (continued)
AIR COMPRESSOR AND AIR TOOL SAFETY
1. Risk of Bursting. Do not adjust the regulator to result in output
pressure greater than the marked maximum pressure of this air
tool.
2. Ensure the hose is free of obstructions or snags. Entangled or
snarled hoses can cause loss of balance or footing and may
become damaged.
3. Never leave a tool unattended with the air hose attached.
4. Do not operate this tool if it does not contain a legible warning
label.
5. Do not continue to use a tool or hose that leaks air or does not
function properly.
6. Never direct a jet of compressed air toward people or animals.
7. Protect your lungs. Wear a face or dust mask if the operation is
dusty.
WARNING: Do not use at a pressure greater than the
rated maximum pressure of this air tool.
WARNING: Do not attempt to modify this tool or create
accessories not recommended for use with this tool. Any
a hazardous condition leading to possible serious personal
injury.
WARNING: Operating any power tool can result in foreign
objects being thrown into your eyes, which can result in
severe eye damage. Before beginning operation, always
wear safety goggles, safety glasses with side shields, or
a full face shield when needed. Always use eye protection
marked to comply with ANSI Z87.1.
WARNING: Avoid Prolonged Exposure to Vibration
Pneumatic tools can vibrate during use. Prolonged exposure
to vibration or very repetitive hand and arm movements,
can cause injury. Stop using any tool if discomfort, tingling
feeling or pain occurs. You should consult your physician
before resuming use of the tool.
Warranty
HUSKY AIR TOOLS LIMITED THREE YEAR WARRANTY
If within three years from the date of purchase, this Husky air tool product fails due to a defect in materials or workmanship, please
immediately contact the Customer Service Team at 1-888-43-HUSKY 8 a.m. - 6 p.m., EST, Monday-Friday, except normal holidays. Do not
return the air tool to the store. Please be prepared to send the product, postage prepaid, to the address provided by the Customer Service
Team. . The
serial number and month/year of manufacture of the air tool must also be included to determine warranty. A defective product will be
promptly replaced with a new one of equal or greater value. This warranty excludes incidental/consequential damages and failures due to
misuse, abuse or normal wear and tear.
to state.
Please contact the Customer Service Team at 1-888-43-HUSKY or visit www.HUSKYTOOLS.com.
ADDITIONAL LIMITATIONS
purpose, are disclaimed.
be disclaimed under state law are limited to two years from the date of purchase. Husky is not responsible for direct, indirect, incidental,
special or consequential damages. If this air compressor is used for commercial purposes, the warranty will apply for ninety (90) days
from the date of purchase. Some states do not allow limitations on how long an implied warranty lasts and/or do not allow the exclusion
or limitation of incidental or consequential damages, so the above limitations may not apply to you.
rights, and you may also have other rights, which vary from state to state.
WARNING: Hearing Protection is Recommended
Hearing protection should be used when the noise level
exposure equals or exceeds an 8 hour time-weighted
average sound level of 85dBA.

4
Pre-Operation
SPECIFICATIONS
Free Speed
(RPM)
Square
Drive (in.)
Impacts Per
Minute
Max. Torque
(ft-lb) @ 90
PSI
Weight
(lbs)
Length
(in)
Air Cons.
(SCFM)
Maximum
Operating
Pressure (PSI)
7,500 1/2 1,050 650
4.80 7.66 5.0
90
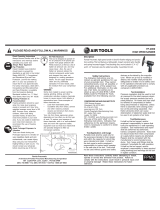
PACKAGE CONTENTS
A
Part Description Quantity
A
1/2-in. Impact Wrench 1

5 HUSKYTOOLS.COM
Please contact 1-888-43-HUSKY for further assistance.
Installation
1
Cleaning the air hose
□ A 3/8 in. air hose is required, with a maximum length of 25
ft.
□ Clean the air hose of accumulated dust and moisture
before connecting it to the air supply.
NOTE: If a longer air hose is required, connect a 1/2 in. air
hose to the 3/8 in. air hose to ensure the impact wrench has
the necessary air supply.
2
Connecting to the air supply
□ Always use clean dry air. Excessive moisture and dirt will
greatly reduce the life of any air motor. We recommend the
installation of an in-line lter-regulator-lubricator as close
to the tool as possible.
□ Ensure all hoses and ttings are the correct size and
secured tightly.

6
Operation
1
Operating the impact wrench
□ This 1/2 in. Impact Wrench is designed to operate on
90 PSIG. Lower pressure (below 90 PSIG) will reduce
performance of the tool. Higher air pressure (over 90
PSIG) raises the performance of the tool beyond its rated
capacity and could cause serious damage to the tool and
the user.
2
Changing the output torque direction
□ This tool features the reverse switch to change the
output torque direction to tighten (assemble) or loosen
(disassemble) the bolt or fastener.
□ Control the output torque direction by turning the reverse
switch button to the Forward arrow or Reverse arrow
position to change the direction.
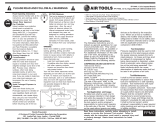
3
Changing the output torque level
□ This tool features the air regulator to manage the output
power located on the back of the housing.
□ Turn the knob to adjust to your desired torque level.
□ The left setting is the lowest power level, the center setting
is a medium power level, adn the right setting is the
highest power level.
4
Installing and removing the impact
sockets
WARNING: Disconnect the tool from the air supply before
servicing or changing accessories. Always use sockets rated
for impact wrenches.
To install the impact socket:
□ Disconnect the tool from the air source.
□ Select the suitable and desirable socket size.
□ Press t the anvil into the socket.
□ To remove the impact socket:
□ Disconnect the tool from the air source.
□ Use your hand or a suitable tool to remove the socket.
Forward

7 HUSKYTOOLS.COM
Please contact 1-888-43-HUSKY for further assistance.
Operation (continued)
5
Tightening or loosening the bolt or fastener
WARNING: Once a bolt or fastener is seated, impacting for
possible damage to the impact mechanism. If it takes longer
to tighten or loosen your bolt or fastener, we recommend the
use of a larger sized impact wrench.
□ Fit the impact socket.
□ Hold the impact wrench with one hand.
□ Ensure that the operator is aware of the torque direction to tighten
(Forward) or loosen (Reverse) and has selected the suitable torque level.
□ Use the tool to tighten or loosen the bolt or fastener.
Maintenance
Ensure the air line is shut-off and drained of air before removing this tool for service or changing sockets.
This will prevent the tool from operating if the throttle is accidentally engaged.
LUBRICATION
□
sustained operation.
□ . Avoid using excessive amounts of oil.
□ Adjust the in-line lubricator by placing a sheet of paper next to the tool’s exhaust ports and holding the
throttle open approximately 30 seconds. The lubricator is properly set when a light stain of oil collects
on the paper.
□ If it is necessary to store the tool for an extended period of time (overnight, weekend, etc.), generously
lubricate the tool through the air inlet. Run the tool for approximately 30 seconds to ensure the oil is
evenly distributed throughout the tool. Store the tool in a clean and dry environment.
□ Recommended lubricants: Air tool oil or any other high grade turbine oil containing moisture absorbent, rust inhibitors, metal wetting
agents, and an EP (extreme pressure) additive.

8
Troubleshooting
Problem Possible Cause Solution
The tool runs slowly or will not
operate.
There is grit or gum in the tool. Flush the tool with air tool oil or gum solvent.
The tool is out of oil. Lubricate the tool according to the lubrication
instructions in this manual.
The air pressure is low. □ Adjust the regulator on the tool to the
maximum setting.
□ Adjust the compressor regulator to the tool’s
maximum setting of 90 psi.
The air hose leaks. Tighten and seal the hose ttings with pipe thread
tape if leaks are found.
The air pressure drops. □ Ensure the hose is the proper size. Long
hoses or tools using large volumes of air may
require a hose with an I.D. of 1/2 in. or larger
depending on the total length of the hose.
□ Do not use a multiple number of hoses
connected together with a quick connect
tting. This causes additional pressure drops
and reduces the tool power. Directly connect
the hoses together.
There is a worn rotor blade in the motor. Replace the rotor blade.
There is a worn ball bearing in the motor. Remove and inspect the bearing for rust, dirt, and
grit. Replace or clean and grease the bearing with
bearing grease.
There is moisture blowing out
of the tool’s exhaust.
There is water in the tank. Drain the tank. (See the air compressor manual
for instructions.) Lubricate the tool and run it until
water is not evident. Lubricate the tool again and
run for 1-2 seconds.
The tool impacts slowly or not
at all.
The tool needs lubricating. Lubricate the air motor and the impact mechanism
according to the lubrication instructions in this
manual.
The tool regulator setting is in the wrong position. Adjust the regulator on the tool to the maximum
setting.
The tool impacts rapidly, but
will not remove bolts.
The tool has a worn impact mechanism. Replace the worn impact mechanism components.
The tool does not impact. The impact mechanism is broken. Replace the broken impact mechanism
components.

9 HUSKYTOOLS.COM
Please contact 1-888-43-HUSKY for further assistance.
Service Parts
03
04
05
06
07
08
09
10
11
12
13
15
16
18
19
21
22
23
24
25
27
29
30
31
32
33
34
35
36
37
40
41
17
14
32
20
26
01
02
28
38
39

10
Service Parts (continued)
Reference
Number
Part Number Description Qty. Reference
Number
Part Number Description Qty.
1 9445501 Housing Assembly 1 23 9445523 O-Ring 1
2 9445502 Trigger Assembly 1 24 9445524 Switch Assembly 1
3 9445503 O-Ring 1 25 9445525 Steel Ball 1
4 9445504 Trigger Pin 1 26 9445526 Spring 1
5 9445505 Oil Seal 1 27 9445527 O-Ring 1
6 9445506 Valve Stem 1 28 9445528 End Cap 1
7 9445507 Throttle Valve 1 29 9445529 Spring Washer 4
8 9445508 Valve Spring 1 30 9445530 Screw 4
9 9445509
1
10 9445510 Air Inlet NPT 1
11 9445511 Washer 1
12 9445512 Ball Bearing 1
13 9445513 Front End Plate 1
14 9445514 Steel Washer 1
15 9445515 Rotor Blade 7
16 9445516 Rotor 1
17 9445517 E Clip 1
18 9445518 Cylinder 1
19 9445519 Dowel Pin 1
20 9445520 Rear End Plate 1
21 9445521 Ball Bearing 1
22 9445522 Gasket 1
40

Questions, problems, missing parts? Before returning to the store,
call Husky Customer Service
8 a.m.-6 p.m., EST, Monday-Friday
1-888-43-HUSKY
HUSKYTOOLS.COM
Retain this manual for future use.

GUÍA DE USO Y CUIDADO
LLAVE DE IMPACTO DE 1/2 pulg.
¿Tiene preguntas, problemas o faltan piezas?
Antes de regresar a la tienda, llame a Servicio
al Cliente de Husky de lunes a viernes
de 8 a.m. a 6 p.m., hora local del Este
1-888-43-HUSKY
HUSKYTOOLS.COM
Núm. de artículo 1003-097-323
Núm. de modelo H4455
GRACIAS
de calidad diseñados para mejorar su hogar. Visítenos en internet para ver nuestra línea completa de productos disponibles para sus
necesidades de mejorar su hogar. ¡Gracias por preferir a Husky!

2
Tabla de contenido
Tabla de contenido ..................................... . . .2
Información de seguridad ............................... . . .2
Seguridad del área de trabajo ........................... . . .2
Seguridad personal ................................... . . .2
Compresor de aire y seguridad de la herramienta neumática . . . . .3
Garantía. . . . . . . . . . . . . . . . . . . . . . . . . . . . . . . . . . . . . . . . . . . . . . . . .3
Garantía limitada de tres años de herramientas neumáticas Husky . .3
Limitaciones adicionales ............................... . . .3
Pre-instalación ........................................ . . .4
...................................... . . .4
Contenido del paquete. . . . . . . . . . . . . . . . . . . . . . . . . . . . . . . . . . . .4
Instalación ........................................... . . .5
Operación ............................................ . . .6
Mantenimiento ........................................ . . .7
Lubricación ......................................... . . .7
Resolución de fallas .................................... . . .7
Piezas de repuesto ..................................... . . .8
Información de seguridad
SEGURIDAD DEL ÁREA DE TRABAJO
1. Mantenga su área de trabajo limpia y bien iluminada. Asegúrese de que
los pisos no estén resbaladizos por cera o polvo.
2. No opere herramientas eléctricas en atmósferas explosivas, como en
. Las herramientas
eléctricas generan chispas que pueden encender el polvo o los humos.
Mantenga lejos a los transeúntes, niños y visitantes mientras opera las
herramientas. Las distracciones pueden hacer que pierda el control.
3. Desconecte siempre el suministro de aire y la fuente de energía antes
de hacer ajustes, darle servicio a la herramienta, cambiar un accesorio
o cuado una herramienta no está en uso.
4. Para información adicional sobre el uso seguro de herramientas
neumáticas, le aconsejamos obtener una copia de CAGI B186.1-2009 de
Husky Air Tools
851 Jupiter Park Lane
Jupiter, Florida 33458
(877) 260-1630.
SEGURIDAD PERSONAL
1. Use equipo de seguridad. Use siempre protección para los ojos con
pantallas protectoras cuando opere herramientas neumáticas. Deben
usarse para condiciones apropiadas máscara antipolvo, zapatos de
seguridad antideslizantes, casco o protección auditiva.
2. Manténgase alerta cuando opere una herramienta neumática. No use
alcohol o medicamentos.
3.
. Contenga el pelo largo. Mantenga su pelo,
ropa y guantes lejos de las partes móviles.
pelo largo pueden ser atrapados por las partes móviles.
4. Conserve la posición apropiada y el equilibrio en todo momento. La
posición apropiada y el equilibrio permiten un mejor control de la
herramienta en situaciones inesperadas.
5. No use la herramienta en una escalera o en un soporte inestable.
ADVERTENCIA: Riesgo de lesiones a las personas. Lea y
comprenda las instrucciones de operación. Familiarícese siempre
con todas las instrucciones y advertencias antes de operar
cualquier herramienta neumática.
ADVERTENCIA: Ciertos polvos generados al lijar, aserrar,
esmerilar, taladrar y por otras actividades de construcción
contienen sustancias químicas que se sabe producen cáncer,
defectos de nacimiento u otros daños reproductivos. Algunos
ejemplos de estas sustancias químicas son:
Plomo de pinturas en base a plomo, sílice cristalino de ladrillos
y cemento y otros productos de albañilería, arsénico y cromo de
madera tratada químicamente.
El riesgo que corre de estas exposiciones varía, dependiendo de
la frecuencia con la que hace este tipo de trabajo. Para reducir la
exposición a estas sustancias químicas: trabaje en un área bien
ventilada, y hágalo con equipo de seguridad apropiado, como
.
ADVERTENCIA: Este producto puede exponerlo a sustancias
químicas, incluyendo plomo, los cuales son conocidos por el Estado
de California como causantes de cáncer y defectos de nacimiento u
otros daños reproductivos. Para obtener más información vaya a
www.P65Warnings.ca.gov

3 HUSKYTOOLS.COM
Póngase en contacto con el 1-888-43-HUSKY para asistencia adicional.
Información de seguridad (continuación)
COMPRESOR DE AIRE Y SEGURIDAD DE LA HERRAMIENTA NEUMÁTICA
1. Riesgo de explosión. No ajuste el regulador de modo que la presión de
salida sea mayor que la presión máxima marcada de esta herramienta
neumática.
2. Asegúrese de que la manguera esté libre de obstrucciones u
obstáculos. Las mangueras enrededadas o enmarañadas pueden
causar pérdida del equilibrio o posición y puede resultar con daños
personales.
3. Nunca deje una herramienta desatendida con la manguera de aire
enganchada.
4. No opere esta herramienta si no contiene una etiqueta de advertencia
legible.
5. No continúe usando una herramienta o manguera que tenga fuga de
aire o que no funcione apropiadamente.
6. Nunca dirija un chorro de aire comprimido hacia personas o animales.
7. Proteja sus pulmones. Wear a face or dust mask if the operation is
dusty.
ADVERTENCIA: No la use a una presión mayor que la presión
máxima nominal de esta herramienta neumática.
ADVERTENCIA:
accesorios no recomendados para ser usados con la misma.
resultar en una condición peligrosa que conduzca a posibles
lesiones personales serias.
ADVERTENCIA: La operación de cualquier herramienta eléctrica
puede resultar en que objetos extraños sean lanzados a sus ojor, lo
que puede resultar en daños graves al ojo. Antes de comenzar la
operación, use siempre gafas de protección , lentes de seguridad
con protección lateral, o una máscara facial protectora completa.
Use siempre protección para los ojos marcada para cumplir con
ANSI Z87.1.
ADVERTENCIA: Evite la exposición prolongada a herramientas
neumáticas de vibración que pueden vibrar durante su uso. La
exposición prolongada a la vibración o movimientos de manos
y brazos muy repetitivos pueden causar lesiones. Pare de usar
cualquier herramienta si ocurre incomodidad, sensación de
hormigueo o dolor. Debe consultar a su médico antes de reanudar
el uso de la herramienta.
Garantía
GARANTÍA LIMITADA DE AÑOS DE HERRAMIENTAS NEUMÁTICAS HUSKY
Si en el plazo de tres años a partir de la compra, este herramienta neumática Husky falla debido a un defecto en materiales o mano de obra, llame de
inmediato al Equipo de Servicio al Cliente al 1-888-43-HUSKY de 8 a.m. a 6 p.m., EST, de lunes a viernes, excepto los feriados normales. No devuelva
la herramienta neumática a la tienda. Por favor, prepárese para enviar el producto, con franqueo prepagado, a la dirección proporcionada por el Equipo
de Servicio al Cliente. El paquete debe incluir también una copia fechada del recibo de compra del primer comprador con el modelo de la herramienta
neumática incluido y encerrado en un círculo. El número de serie y el mes/año de fabricación de la herramienta neumática también deben estar incluidos
para determinar la garantía. Un producto defectuoso será reemplazado con prontitud por uno nuevo de igual o mayor valor. Esta garantía excluye daños y
fallos incidentales/consecuenciales debido al mal uso, abuso o desgaste normal por el uso.
tener otros derechos que varían de un estado a otro.
Póngase en contacto con el Equipo de Servicio al Cliente llamando al 1-888-43-HUSKY o visite www.HUSKYTOOLS.com.
LIMITACIONES ADICIONALES
En la medida permitida por la ley aplicable, todas las garantías implícitas, incluyendo garantías de comercialización o idoneidad para un propósito
particular, son denegadas. Cualquier garantía implicita, incluyendo garantías de comercialización o idoneidad para un propósito particular, que no pueden
ser denegadas conforme a la ley estatal están limitadas a los dos años a partir de la fecha de compra. Husky no se hace responsable de daños directos,
indirectos, incidentales, especiales o consecuenciales.
días a partir de la fecha de compra. Algunos estados no permiten limitaciones sobre cuánto debe durar una garantía implícita y/o no permiten la exclusión
o limitación de daños incidentales o consecuenciales, de modo que las limitaciones anteriores podrían no aplicar a usted. Esta garantía le otorga derechos
.
ADVERTENCIA: Se recomienda protección auditiva
La protección auditiva debe ser usada cuando la exposición al nivel
de ruido es igual o superior a un nivel de sonido promedio ajustado
por el tiempo de 8 horas de 85 dBA.
TRES

4
Pre-Operación
ESPECIFICACIONES
Velocidad libre
(RPM)
Llave cuadrada
(pulg.)
Impactos por
minuto
Par de torsión
máximo (pie-lb)
a 90 PSI
Peso
(lbs)
Longitud
(pulg.)
Consumo
de aire
(SCFM)
Presión máxima
de operación (PSI)
7,500 1/2 1,050 650
4.80 7.66 5.0 90
CONTENIDO DEL PAQUETE
A
Pieza Descripción Cantidad
A
Llave de impacto de 1/2 pulg. 1

5 HUSKYTOOLS.COM
Póngase en contacto con el 1-888-43-HUSKY para asistencia adicional.
Instalación
1
Limpieza de la manguera de aire
□ Se requiere una manguera de aire de 3/8 pulg. con una
longitud máxima de 25 pies.
□ Limpie el polvo acumulado y la humedad de la manguera
de aire antes de conectarla al suministro de aire.
NOTA: Si se requiere una manguera más larga, conecte una
manguera de aire de 1/2 pulg. a la manguera de aire de 3/8
pulg. para asegurarse de que la llave de impacto tenga el
suministro de aire necesario.
2
Cómo conectar al suministro de aire
□ Use siempre aire seco y limpio. La humedad excesiva y el
polvo reducirán grandemente la vida de cualquier motor de
aire. Recomendamos la instalación de un ltro-regulador-
lubricador en linea tan cerca a la herramienta como sea
posible.
□ Asegúrese de que las mangueras y accesorios sean del
tamaño correcto y asegúrelos con rmeza.
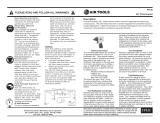
Configuracíón recomendada de la línea de aire
Pieza Descripción
1
Llave de impacto de 1/2 pulg.
2
Enchufe rápido
3
Acoplador rápido
4
Manguera de aire
5
Regulador en línea
6
Lubricador en línea
7
Filtro en línea
8
Compresador de aire

6
Operación
1
Cómo operar la llave de impacto
□ Esta llave de impacto de 1/8 pulg está diseñada para funcionar
a 90 PSIG. La presión baja (abajo de 90 PSIG) reducirá el
desempeño de la herramienta. La presión alta (arriba de
90 PSIG) eleva el desempeño de la herramienta más
allá de su capacidad nominal y podría causar serios
daños a la herramienta y al usuario.
2
Cómo cambiar la dirección del par
de torsión de salida
□ Esta herramienta ofrece un interruptor de reversa para cambiar
la dirección del par de torsión de salida par apretar (ensamblar)
o aojar (desmontar) el perno o el sujetador.
□ Controle la dirección del par de torsión de salida girando el
botón del interruptor de reversa a la posición de la echa
hacia adelante o echa hacia atrás para cambiar la dirección.
3
Cómo cambiar el nivel del par
de torsión de salida
□ Esta herramienta ofrece el regulador de aire para manejar la
potencia de salida localizada en la parte posterior de la carcasa.
□ Gire la perilla para ajustar al nivel del par de torsión deseado.
□ El ajuste izquierdo es el nivel de potencia más baja, el ajuste
central es un nivel de potencia media y el ajuste derecho es
el nivel de potencia más alta.
4
Instalación y extracción de los cubos
de impacto
ADVERTENCIA: Desconecte la herramienta del suministro
de aire antes de darle servicio o cambiar los accesorios. Use
siempre cubos calibrados para llaves de impacto.
Para instalar el cubo de impacto:
□ Desconecte la herramienta de la fuente de aire.
□ Seleccione el tamaño de cubo apropiado y deseable.
□ Ajuste a presión el yunque en el cubo.
□ Para retirar el cubo de impacto:
□ Desconecte la herramienta de la fuente de aire.
□ Use su mano o una herramienta adecuada para extraer el cubo.
Ajustes del par de
torsión hacia adelante
Bajo
Medio
Alto
Alto
Ajustes del par de torsión
hacia atrás

7 HUSKYTOOLS.COM
Póngase en contacto con el 1-888-43-HUSKY para asistencia adicional.
Operación (continuación)
5
ADVERTENCIA: Una vez un perno o sujetador está asentado,
impactar por más de cinco (5) segundos causará desgaste excesivo
y posibles daños al mecanismo de impacto. Si toma más tiempo
llave de impacto de mayor tamaño.
□ Coloque el cubo de impacto.
□ Sostenga la llave de impacto con una mano.
□
y haya seleccionado el nivel de par de torsión adecuado.
□ .
Mantenimiento
Asegúrese de que la línea de aire esté apagada y drenada de aire antes de retirar esta herramienta para servicio
o para cambio de cubos. Esto evitará que la herramienta opere si el estrangulador se engancha accidentalmente.
LUBRICACIÓN
□
y mantiene la herramienta en operación sostenida.
□ Revise regularmente y llene el lubricador en línea con aceite de herramienta neumática. Evite usar
cantidades excesivas de aceite.
□ Ajuste el lubricador en línea colocando una hoja de papel a la par de los puertos de escape de la
herramienta y manteniendo el estrangulador abierto aproximadamente durante 30 segundos. El
lubricador está ajustado apropiadamente cuando una mancha clara de aceite cae sobre el papel.
□ Si es necesario almacenar la herramienta durante un periodo de tiempo prolongado (durante la noche,
.), lubrice generosamente la herramienta a través de la entrada de aire. Haga funcionar
la herramienta durante aproximadamente 30 segundos para asegurarse de que el aceite esté distribuido
uniformemente en toda la herramienta. Almacene la herramienta en un ambiente limpio y seco.
□ Lubricantes recomendados: Aceite de herramienta neumática y cualquier otro aceite de turbina de alto grado que contenga absorbente
de humedad, inhibidores de óxido, agentes humectantes de metal y un aditivo PE (presión extrema).

8
Resolución de fallas
Problema Posible causa Solución
La herramienta funciona
lentamente o no funcionará.
Hay arena o goma de mascar en la herramienta. Enjuague la herramienta con aceite de herramienta
neumática o solvente de goma de mascar.
La herramienta no tiene aceite. Lubrique la herramienta de acuerdo a las instrucciones
de lubricación en este manual.
La presión del aire está baja. □ Ajuste el regulador en la herramienta a la
posición máxima.
□ Ajuste el regulador del compresor a la posición
máxima de la herramienta de 90 psi.
La manguera de aire tiene fugas. Apriete y selle los accesorios de la manguera con
cinta de rosca de tubería si se encuentran fugas.
La presión del aire disminuye. □ Asegúrese de que la manguera sea del tamaño
apropiado. Las mangueras largas o herramientas
que usan grandes volúmenes de aire pueden
requerir una manguera con un diámetro
interno de 1/2 pulg o mayor dependiendo
de la longitud total de la manguera.
□ No use un múltiple número de mangueras
conectadas entre sí con un accesorio de
conexión rápida. Esto hace que las caídas de
presion adicionales reduzcan la potencia de
la herramienta. Conecte directamente
las mangueras.
Hay un aspa del rotor desgastada en el motor. Reemplace el aspa del rotor.
Hay un cojinete desgastado en el motor. Retire e inspeccione el cojinete en busca de óxido,
suciedad y polvo. Reemplace o limpie y engrase
el cojinete con grasa de cojinete.
Hay humedad saliendo del
escape de la herramienta.
Hay agua en el tanque. Drene el tanque. (Consulte el manual del compresor
de aire para instrucciones.) Lubrique la herramienta
y hágala funcionar hasta que no sea evidente la
presencia de agua. Lubrique de nuevo la
herramienta y hágala funcionar durante
1 a 2 segundos.
La herramienta impacta
lentamente o para nada.
La herramienta necesita lubricación. Lubrique el motor de aire y el mecanismo de impacto
de acuerdo a las instrucciones de lubricación en
este manual.
El ajuste del regulador de la herramienta está en la
posición incorrecta.
Ajuste el regulador en la herramienta a la
posición máxima.
La herramienta impacta
rápidamente, pero no
extrae los pernos.
La herramienta tiene un mecanismo de
impacto desgastado.
Reemplace los componentes desgastados del
mecanismo de impacto.
La herramienta no impacta. El mecanismo de impacto está roto. Reemplace los componentes rotos del mecanismo
de impacto.

9 HUSKYTOOLS.COM
Póngase en contacto con el 1-888-43-HUSKY para asistencia adicional.
Piezas de servicio
03
04
05
06
07
08
09
10
11
12
13
15
16
18
19
21
22
23
24
25
27
29
30
31
32
33
34
35
36
37
40
41
17
14
32
20
26
01
02
28
38
39
/