Page is loading ...

1
Part no. 209-1360
rev. 08/10/20
Framed Lighted Mirror
Miroir encadré éclairé
Espejo con marco iluminado
www.savant.com
savantsupport@savant.com
1-877-SAVANT5
(1-877-728-2685)
©2020, Robern, Inc.
All rights reserved
All designs protected by copyright
Covered by US Patents. Patents pending
FRAMED LIGHTED MIRROR
Electrical connection - 4
Prep the wall - 5
Prep the mirror - 8
Mirror installation - 10
Français / Español - 12
Important safety instructions - Save these instructions
CONTENTS
GENERAL INFORMATION
This instruction sheet contains information on how to install the Framed Lighted Mirror. This series comes in many sizes. Please refer
to the box or product label for the specic model number.
Save these instructions for future use and reference. An improper installation voids the warranty. Carefully inspect the mirror for
damage. Installed products cannot be returned.
If you experience any problems with your wall mirror, contact Savant or Robern directly.
Limited Warranty — One Year Term
Chamfer Slim

2
Part no. 209-1360
rev. 08/10/20
Framed Lighted Mirror
Miroir encadré éclairé
Espejo con marco iluminado
www.savant.com
savantsupport@savant.com
1-877-SAVANT5
(1-877-728-2685)
©2020, Robern, Inc.
All rights reserved
All designs protected by copyright
Covered by US Patents. Patents pending
It's recommended that the dimmer be within reach of your mirror so you can adjust the brightness.
For on/off (no dimmer) operation a standard wall switch may be substituted in place of the dimmer.
[216-1166]*
Mounting Hardware Bag
FrameMirror
Reector
†
(5) Screw (2) Cleat (1) Wall Bracket
(2) Screw(5) Wall Anchor
1/4" 3/32"
DIMMER RECOMMENDATIONS
TOOLS NEEDED
PARTS
* Some hardware may not be used in all installations.
For framed mirror sizes over 45" in width, two hardware bags are included.
†
Title 24 models only
(2) 1" Loop
Adhesive Strip
(2) 5" Loop
Adhesive Strip
(2) 3" Locking
Adhesive Strip

3
Part no. 209-1360
rev. 08/10/20
Framed Lighted Mirror
Miroir encadré éclairé
Espejo con marco iluminado
www.savant.com
savantsupport@savant.com
1-877-SAVANT5
(1-877-728-2685)
©2020, Robern, Inc.
All rights reserved
All designs protected by copyright
Covered by US Patents. Patents pending
Unpack the mirror. Check the box thoroughly for all hardware and loose parts. Carefully inspect the mirror for damage.
DANGER: Risk of personal injury. To avoid possible electrical shock, the electricity must be turned off at the circuit
breaker or fuse box before attempting any installation procedure.
DANGER: Risk of personal injury. To avoid possible electrical shock, the mirror must be properly grounded.
CAUTION: Grounding instructions for connected products: Both power leads of this product must be connected to a
grounded AC power outlet and a grounded AC electrical circuit. All wiring should be done by a qualied licensed electrician.
CAUTION: This mirror may be equipped with two power leads. Be certain that ALL power leads are disconnected/
unplugged from the power outlet before servicing.
IMPORTANT: Power for the defogger should be provided separately from the electricity to the lights so that the defogger can be
controlled independently of the lights and should be wired to a separate switch.
NOTE: Requires 120 VAC 20 amp GFCI circuit.
NOTE: Requires an approved compatible dimmer for installation (not included).
Observe all local electrical codes and building codes. Wire the mirror in accordance with the electrical codes.
This mirror is for indoor use only.
This mirror is UL listed for damp locations and conforms to UL 962; certied to CAN/CSA C22.2 Canadian Electrical Code, Part I.
This installation may require more than one person.
DANGER - RISK OF SHOCK -
DISCONNECT POWER BEFORE INSTALLATION
A B C
Grounded outlet
Grounded pin
Grounded
outlet box
Grounded
outlet box
Metal screw
Adapter
Adapter
Tab for
grounding screw
Grounding instructions:
For a grounded, cord-connected product rated max 15 amperes and intended for use on a nominal 120-volt supply circuit:
This product is for use on a nominal 120-volt circuit and has a grounding plug that looks like the plug illustrated in sketch A (below).
Make sure that the product is connected to an outlet having the same conguration as the plug.
No adapter should be used with this product as illustrated in sketch B and C.
NOTES

4
Part no. 209-1360
rev. 08/10/20
Framed Lighted Mirror
Miroir encadré éclairé
Espejo con marco iluminado
www.savant.com
savantsupport@savant.com
1-877-SAVANT5
(1-877-728-2685)
©2020, Robern, Inc.
All rights reserved
All designs protected by copyright
Covered by US Patents. Patents pending
1. The required outlet should be located as shown. (see gure 1)
2. Make electrical connections as shown. (see gure 2)
1
C C
L L
Slim Museum
18-1/8" (460 mm)
Chamfer Museum
19" (483 mm)
Slim Museum
20-5/8" (524 mm)
Chamfer Museum
21-1/2" (546 mm)
Up to 40"
(1016 mm)
Over 40"
(1016 mm)
Outlet
Location
Outlet
Location
2
*Make proper connections according to the Dimmer Manufacturer's Instructions. For on/off
(no dimmer) operation a standard wall switch may be substituted in place of the dimmer.
20A GFI Circuit
Black (L)
Black (L1)
Red (L2)
White (N)
White (N)
Ground (G)
Ground (G)
Light Switch
and/or
Dimmer*
Light circuit
connection
Defogger
circuit
connection
Defogger
if equipped
Note: Outlet "line" connection for
top and bottom receptacles must
be electrically isolated from each
other. Receptacles will be controlled
independently.
STEP 1 - ELECTRICAL CONNECTION
Note: Measurements shown are based on an assembled mirror and frame.

5
Part no. 209-1360
rev. 08/10/20
Framed Lighted Mirror
Miroir encadré éclairé
Espejo con marco iluminado
www.savant.com
savantsupport@savant.com
1-877-SAVANT5
(1-877-728-2685)
©2020, Robern, Inc.
All rights reserved
All designs protected by copyright
Covered by US Patents. Patents pending
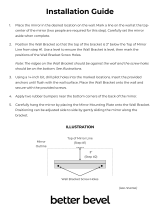
1. The mounting location for the cleats are determined by the light pattern and width of the mirror. Use the diagrams on pages 5, 6, and
7 for the mounting location and number of cleats needed. Whether you are using two, three, or four brackets, you must mount the two
outer brackets to a structural frame member.
2. Level and mark the holes that determine the location of the cleats.
3A. Locate the studs and drill two holes for each cleat using a 3/32" drill bit.
3B. For the mounting brackets that do not require structural mounting (see views above), drill a 1/4" hole for each wall anchor and use
the supplied wall anchors.*
4. Use screws provided to attach cleats to the wall.
5. Tighten screws until tight. When anchors are used, keep turning screw at least 4 more times as shown to properly set anchor.
4X
*Actual wall anchor many differ from type shown.
STEP 2 - PREP THE WALL
Up to 45"
(Two Brackets)
45" up to 62"
(Three Brackets)
62" up to 72"
(Four Brackets)
Must be mounted in
structural frame member
Must be mounted in
structural frame member
Must be mounted in
structural frame member
6. Peel and stick the 3" adhesive locking strips to the wall in the locations indicated on pages 6 and 7.

6
Part no. 209-1360
rev. 08/10/20
Framed Lighted Mirror
Miroir encadré éclairé
Espejo con marco iluminado
www.savant.com
savantsupport@savant.com
1-877-SAVANT5
(1-877-728-2685)
©2020, Robern, Inc.
All rights reserved
All designs protected by copyright
Covered by US Patents. Patents pending
1-1/2"
(38 mm)
1-1/2"
(38 mm)
1-1/2"
(38 mm)
1-1/2"
(38 mm)
STEP 2 FOR CHAMFER MUSEUM FRAME - PREP THE WALL
62" up to 72"
(Four Brackets)
36" up to 45"
(Two Brackets)
Up to 36"
(Two Brackets)
45" up to 62"
(Three Brackets)
8"
(203 mm)
8"
(203 mm)
8"
(203 mm)
8"
(203 mm)
8-3/8"
(213 mm)
16"
(406 mm)
16"
(406 mm)
16"
(406 mm)
16"
(406 mm)
5-3/16"
(132 mm)
5-3/16"
(132 mm)
5-3/16"
(132 mm)
5-3/16"
(132 mm)
C
C
C
L
L
L
C
L
Note: Dimensions are based on the mirror and framed assembly
Adhesive
Locking
Strip
Locations
2-1/2"
(64 mm)
2-1/2"
(64 mm)
5-1/2"
(140 mm)
5-1/2"
(140 mm)

7
Part no. 209-1360
rev. 08/10/20
Framed Lighted Mirror
Miroir encadré éclairé
Espejo con marco iluminado
www.savant.com
savantsupport@savant.com
1-877-SAVANT5
(1-877-728-2685)
©2020, Robern, Inc.
All rights reserved
All designs protected by copyright
Covered by US Patents. Patents pending
STEP 2 FOR SLIM MUSEUM FRAME - PREP THE WALL
1-1/2"
(38 mm)
1-1/2"
(38 mm)
1-1/2"
(38 mm)
1-1/2"
(38 mm)
62" up to 72"
(Four Brackets)
36" up to 45"
(Two Brackets)
Up to 36"
(Two Brackets)
45" up to 62"
(Three Brackets)
8"
(203 mm)
8"
(203 mm)
8"
(203 mm)
8"
(203 mm)
8-3/8"
(213 mm)
16"
(406 mm)
16"
(406 mm)
16"
(406 mm)
16"
(406 mm)
4-5/16"
(110 mm)
4-5/16"
(110 mm)
4-5/16"
(110 mm)
4-5/16"
(110 mm)
C
C
C
L
L
L
C
L
Note: Dimensions are based on the mirror and framed assembly
Adhesive
Locking
Strip
Locations
1-5/8"
(41 mm)
1-5/8"
(41 mm)
4-5/8"
(117 mm)
4-5/8"
(117 mm)

8
Part no. 209-1360
rev. 08/10/20
Framed Lighted Mirror
Miroir encadré éclairé
Espejo con marco iluminado
www.savant.com
savantsupport@savant.com
1-877-SAVANT5
(1-877-728-2685)
©2020, Robern, Inc.
All rights reserved
All designs protected by copyright
Covered by US Patents. Patents pending
1. Find and place the thicker foam rectangle from the packaging on a at surface. Place the mirror, face down, on the foam. Clean the
bottom section of the mirror tubing with isopropyl alcohol. Peel and stick the hook and loop adhesive strip to the mirror tubing.
1. Add the included reector* to the back of the mirror as shown.
1
Thicker rectangular foam
from packaging
STEP 3 - PREP THE MIRROR
Mirror tubing
Top of Mirror
Mounting slots
(2) 1" Loop
Adhesive Strip
(2) 5" Loop
Adhesive Strip
TITLE 24 - ADDING THE REFLECTOR
THICKER RECTANGULAR
FOAM FROM PACKAGING
* Title 24 models only

9
Part no. 209-1360
rev. 08/10/20
Framed Lighted Mirror
Miroir encadré éclairé
Espejo con marco iluminado
www.savant.com
savantsupport@savant.com
1-877-SAVANT5
(1-877-728-2685)
©2020, Robern, Inc.
All rights reserved
All designs protected by copyright
Covered by US Patents. Patents pending
THICKER RECTANGULAR
FOAM FROM PACKAGING
THICKER RECTANGULAR
FOAM FROM PACKAGING
2 3
Adjusting the brackets: If the frame is not tight with the mirror, adjust the brackets toward each other evenly. Distances marked as "X"
should measure the same.
Press down
Bracket
"X" "X"
Adjust the Brackets evenly
Bracket
Screws
2. Remove the frame from it’s packaging and align it over the back of the mirror. The four frame brackets should meet the outside face
of the tubing on the rear of the mirror. There should be some resistance as the brackets increase their contact with the tubing.
3. Press the brackets down onto the mirror tubing until the frame has come into complete contact with the back of the mirror tubing.
The brackets will NOT contact the back of the mirror.
Note: Do NOT pick up the mirror in this orientation by the frame.
STEP 3 - PREP THE MIRROR

10
Part no. 209-1360
rev. 08/10/20
Framed Lighted Mirror
Miroir encadré éclairé
Espejo con marco iluminado
www.savant.com
savantsupport@savant.com
1-877-SAVANT5
(1-877-728-2685)
©2020, Robern, Inc.
All rights reserved
All designs protected by copyright
Covered by US Patents. Patents pending
1. Plug the mirror into the electrical outlet installed in STEP 1 - Electrical connection
Note: Make sure to dress wires so they are not pinched or damaged.
2. Lift the mirror and carefully lower onto cleats, and adjust horizontally.
3. Press on the lower surface of mirror to secure the adhesive strips together.
1
2a 2b
3
STEP 4 - MIRROR INSTALLATION

11
Part no. 209-1360
rev. 08/10/20
Framed Lighted Mirror
Miroir encadré éclairé
Espejo con marco iluminado
www.savant.com
savantsupport@savant.com
1-877-SAVANT5
(1-877-728-2685)
©2020, Robern, Inc.
All rights reserved
All designs protected by copyright
Covered by US Patents. Patents pending
Use only a damp cloth to clean. Ammonia or vinegar-based cleaners can damage mirrors.
A 50/50 solution of water and isopropyl alcohol is recommended for cleaning the mirrors.
When cleaning, spray the cloth, not the mirror or surround surfaces. Do not use abrasive cleansers on any part of the light xture.
No Ammonia
Sans Ammoniac
Sin Amoniaco
No Vinegar
Sans Vinaigre
Sin Vinagre
USE AND MAINTENANCE
W
ARRANTY
Limited Warranty One Year Term
Robern warrants to the original purchaser that, it will, at its election repair, replace, or make appropriate adjustment to products made
by this company shown to have signicant defects in material or workmanship which are reported to Robern in writing within one (1)
year from the date of delivery. Robern is not responsible for installation costs. The warranty is void in the event the product is damaged
in transit, or if damage or failure is caused by abuse, misuse, abnormal usage, faulty installation, damage in an accident, improper
maintenance, or any repairs other than those authorized by Robern. At the expiration of the one year warranty period, Robern shall be
under no further obligation under any warranty, expressed or implied, including the implied warranty of merchantability. Robern shall
not be liable for any consequential damages arising out of or in connection with the use or performance of its products. Some states
do not allow limitations on how long an implied warranty lasts or do not allow the exclusion or limitation of incidental or consequential
damages, so the above limitation or exclusion may not apply to you. Any liability against Robern under any implied warranty, including
the warranty of merchantability, is expressly limited to the terms of this warranty. Permission to return any merchandise under this
warranty must be authorized by Robern and returned prepaid by the purchaser. Claims under this warranty should be sent directly to
Savant.

18
Part no. 209-1360
rev. 08/10/20
Framed Lighted Mirror
Miroir encadré éclairé
Espejo con marco iluminado
www.savant.com
savantsupport@savant.com
1-877-SAVANT5
(1-877-728-2685)
©2020, Robern, Inc.
All rights reserved
All designs protected by copyright
Covered by US Patents. Patents pending
1-1/2"
(38 mm)
1-1/2"
(38 mm)
1-1/2"
(38 mm)
8"
(203 mm)
8"
(203 mm)
8"
(203 mm)
8"
(203 mm)
16"
(406 mm)
16"
(406 mm)
16"
(406 mm)
16"
(406 mm)
5-3/16"
(132 mm)
5-3/16"
(132 mm)
5-3/16"
(132 mm)
C
C
L
L
C
L
ÉTAPE 2 POUR CADRE CHAMFER
MUSEUM
PRÉPARER LE MUR
Remarque : Les dimensions sont basées
sur le miroir et le cadre assemblés.
PASO 2 PARA MARCOS CHAMFER
MUSEUM
PREPARACIÓN DE LA PARED
Nota: Las dimensiones se basan en el
ensamblaje del espejo enmarcado.
36 po à 45 po /
De 36 a 45 pulg.( Deux
supports / 2 soportes )
45 po à 62 po / De 45 a 62 pulg.
( Trois supports / 3 soportes )
62 po à 72 po / De 62 a 72 pulg.
( Quatre supports / 4 soportes )
1-1/2"
(38 mm)
Jusqu'à 36 po /
Hasta 36 pulg
( Deux supports / 2 soportes )
8-3/8"
(213 mm)
5-3/16"
(132 mm)
C
L
Emplacements des bandes de
verrouillage adhésives /
Ubicación de las tiras
adhesivas de jación
2-1/2"
(64 mm)
2-1/2"
(64 mm)
5-1/2"
(140 mm)
5-1/2"
(140 mm)

19
Part no. 209-1360
rev. 08/10/20
Framed Lighted Mirror
Miroir encadré éclairé
Espejo con marco iluminado
www.savant.com
savantsupport@savant.com
1-877-SAVANT5
(1-877-728-2685)
©2020, Robern, Inc.
All rights reserved
All designs protected by copyright
Covered by US Patents. Patents pending
1-1/2"
(38 mm)
1-1/2"
(38 mm)
1-1/2"
(38 mm)
8"
(203 mm)
8"
(203 mm)
8"
(203 mm)
8"
(203 mm)
16"
(406 mm)
16"
(406 mm)
16"
(406 mm)
16"
(406 mm)
4-5/16"
(110 mm)
4-5/16"
(110 mm)
4-5/16"
(110 mm)
C
C
L
L
C
L
36 po à 45 po /
De 36 a 45 pulg.( Deux
supports / 2 soportes )
45 po à 62 po / De 45 a 62 pulg.
( Trois supports / 3 soportes )
62 po à 72 po / De 62 a 72 pulg.
( Quatre supports / 4 soportes )
ÉTAPE 2 POUR CADRE SLIM MUSEUM
PRÉPARER LE MUR
Remarque : Les dimensions sont basées sur
le miroir et le cadre assemblés.
PASO 2 PARA MARCOS SLIM
MUSEUM
PREPARACIÓN DE LA PARED
Nota: Las dimensiones se basan en el
ensamblaje del espejo enmarcado.
1-1/2"
(38 mm)
8-3/8"
(213 mm)
4-5/16"
(110 mm)
C
L
1-5/8"
(41 mm)
1-5/8"
(41 mm)
4-5/8"
(117 mm)
4-5/8"
(117 mm)
Jusqu'à 36 po /
Hasta 36 pulg
( Deux supports / 2 soportes )
Emplacements des bandes de
verrouillage adhésives /
Ubicación de las tiras
adhesivas de jación

23
Part no. 209-1360
rev. 08/10/20
Framed Lighted Mirror
Miroir encadré éclairé
Espejo con marco iluminado
www.savant.com
savantsupport@savant.com
1-877-SAVANT5
(1-877-728-2685)
©2020, Robern, Inc.
All rights reserved
All designs protected by copyright
Covered by US Patents. Patents pending
Utiliser seulement un chiffon humide pour nettoyer. Des
nettoyants à base d'ammoniaque ou de vinaigre peuvent
endommager les miroirs.
Une solution de 50/50 d'eau et d'alcool isopropylique est
recommandée pour nettoyer les miroirs.
Lors du nettoyage, vaporiser le chiffon, et non pas le miroir
ou les surfaces avoisinantes. Ne pas utiliser de nettoyants
abrasifs sur une partie quelconque de l'appareil d'éclairage.
Para limpiar solo use un paño húmedo. Los limpiadores que
contienen amoniaco o vinagre pueden dañar los espejos.
Se recomienda usar una solución 50/50 de agua y alcohol
isopropílico para limpiar los espejos.
Al limpiar, rocíe el paño, no el espejo ni las supercies
circundantes. No use limpiadores abrasivos en ninguna parte
de la unidad de iluminación.
No Ammonia
Sans Ammoniac
Sin Amoniaco
No Vinegar
Sans Vinaigre
Sin Vinagre
Utiliser seulement un chiffon humide pour nettoyer. Des
nettoyants à base d'ammoniaque ou de vinaigre peuvent
endommager les miroirs.
Une solution de 50/50 d'eau et d'alcool isopropylique est
recommandée pour nettoyer les miroirs.
Lors du nettoyage, vaporiser le chiffon, et non pas le miroir
ou les surfaces avoisinantes. Ne pas utiliser de nettoyants
abrasifs sur une partie quelconque de l'appareil d'éclairage.
Para limpiar solo use un paño húmedo. Los limpiadores que
contienen amoniaco o vinagre pueden dañar los espejos.
Se recomienda usar una solución 50/50 de agua y alcohol
isopropílico para limpiar los espejos.
Al limpiar, rocíe el paño, no el espejo ni las supercies
circundantes. No use limpiadores abrasivos en ninguna parte
de la unidad de iluminación.
UTILISATION ET ENTRETIEN USO Y MANTENIMIENTO
/