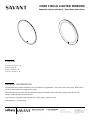
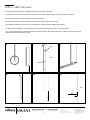
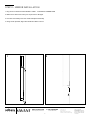
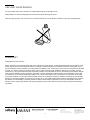
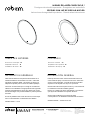
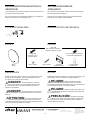
Savant SVTCM00030N03I00 is a Core Circle Lighted Mirror that comes with a one-year limited warranty and is intended for indoor use only. The mirror is UL listed for damp locations and conforms to UL 962; certified to CAN/CSA C22.2 Canadian Electrical Code, Part I. It requires a 120 VAC 20 amp GFCI circuit and an approved compatible dimmer for installation (not included). The mirror is equipped with both light and defogger circuits that should be wired to separate switches for independent control.
Savant SVTCM00030N03I00 is a Core Circle Lighted Mirror that comes with a one-year limited warranty and is intended for indoor use only. The mirror is UL listed for damp locations and conforms to UL 962; certified to CAN/CSA C22.2 Canadian Electrical Code, Part I. It requires a 120 VAC 20 amp GFCI circuit and an approved compatible dimmer for installation (not included). The mirror is equipped with both light and defogger circuits that should be wired to separate switches for independent control.


-
 1
1
-
 2
2
-
 3
3
-
 4
4
-
 5
5
-
 6
6
-
 7
7
-
 8
8
-
 9
9
-
 10
10
-
 11
11
-
 12
12
-
 13
13
-
 14
14
-
 15
15
-
 16
16


Savant SVTCM00030N03I00 Deployment Guide
- Type
- Deployment Guide
- This manual is also suitable for
Savant SVTCM00030N03I00 is a Core Circle Lighted Mirror that comes with a one-year limited warranty and is intended for indoor use only. The mirror is UL listed for damp locations and conforms to UL 962; certified to CAN/CSA C22.2 Canadian Electrical Code, Part I. It requires a 120 VAC 20 amp GFCI circuit and an approved compatible dimmer for installation (not included). The mirror is equipped with both light and defogger circuits that should be wired to separate switches for independent control.
Ask a question and I''ll find the answer in the document
Finding information in a document is now easier with AI
in other languages
- français: Savant SVTCM00030N03I00
- español: Savant SVTCM00030N03I00
Related papers
Other documents
-
 Better Bevel 17106 Installation guide
-
The Better Bevel 20023 Installation guide
-
WILLIAMS SONOMA WILLIAMS-SONOMA 6853739 Point Reyes Mirror Rectangular User manual
-
Robern VT-SPOMM User manual
-
Robern EDGEPULL-84 User manual
-
Aquadom S-4830 Installation guide
-
Robern PLGKIT Installation guide
-
ANZZI BA-LMDFX015AL User manual
-
-
