Page is loading ...

9005 Display Cabinet
Assembly Instructions
Page 1 of 9
WI-0222
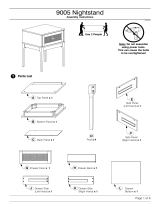
Parts List
1
Parts in Box A:
Note: Do not assemble
using power tools.
This can cause the bolts
to be overtightened
Use 2 People
ATo p Panel x 1
BBottom Panel x 1
Side Panel
(Left Hand) x 1
F G
Side Panel
(Right Hand) x 1
CMiddle Shelf x 1
DBottom Shelf x 1
ESupport Bar x 2
Door Panel
(Left Hand) x 1
H J
Door Panel
(Right Hand) x 1
K
Post x 4

M4 x 32mm
Wood Screw
x 12
M6 x 25mm
Wood Dowel
x 4
9005 Display Cabinet
Assembly Instructions
Page 2 of 9
Parts List
1
Hardware List
2
1M6 x
15mm JCB
x 20
9'L' Bracket
(5005-3)
x 10
Parts in Box B:
16 Allen Key
x 1
7
QDrawer Side
(Left Hand) x 1 RDrawer Side
(Right Hand) x 1
5M4 x 25mm
Wood Screw
x 10
2M6 x
60mm JCB
x 8
CSK Cap
Wood Screw
(M6 x 50mm) x 4
WI-0222
NDrawer Face x 1 ODrawer Back x 1 PDrawer Rail x 1
12 Flat
Washer x 8 13 M4 x 20mm
Bolt x 2
15 Handle
(1005) x 4
3M4 x 16mm
Wood Screw
x 28
11 Spring
Washer x 8
6
4M4 x 20mm
Wood Screw
x 6
810 Shelf Support
(S060)
x 4
14 M4 x 25mm
Bolt x 2
LBack Panel x 2 MDrawer Bottom Panel x 1
17 Hinge
x 4

9005 Display Cabinet
Assembly Instructions
Page 3 of 9
Assemble the Drawer Sides (Q & R) &
Drawer Rail (P) to the
Drawer Face (N).
3
Q
M
RN
5
5Q
O
RN
Assemble the Drawer Back (O) to
the Drawer Sides (Q & R).
5
Turn the Drawer over to fit angled
25mm Wood screws (5)
to the Drawer Rail (P).
6
O
5
P
N
WI-0222
Slide the Drawer Bottom (M)
into the groove on the
Drawer Sides (Q & R).
4
N
5
5
7
Q
P
7
R
Important: Assemble the
Drawer Runner facing
Drawer Face.

1
x 10
9
1
x 4
F
G
Bottom holes
to assemble
Bottom Panel
Bottom holes
to assemble
Bottom Panel
9005 Display Cabinet
Assembly Instructions
Page 4 of 9
Fit the 'L' Bracket to the Side Panel (F & G).
7
Assembled the Top Panel (A) &
Bottom Panel (B) to the
Side Panel (F & G).
8
8
B
F
G
8
Hole to
assemble
Bottom Panel
A
Back
Rail facing back
Rail facing back
Important: Drawer
Runner facing front.
WI-0222
x 4

E
A
B
G
F
9005 Display Cabinet
Assembly Instructions
Page 5 of 9
Fit the Support Bar (E) to the
Side Panel (F & G) as shown.
9
B
L
L
F
A
Attached the Back Panel (L)
to the back of the frame.
10
1
x 2
6
x 12
Back
Back
WI-0222

12
2
K
B
11
9005 Display Cabinet
Assembly Instructions
Page 6 of 9
Turn the chest over to fit the
Post (K) to the Bottom Panel (B).
11
B
K
K
A
G
D
F
Fit the Bottom Shelf (D) into the cabinet.
12
WI-0222
1
F/G
D
1

9005 Display Cabinet
Assembly Instructions
Page 7 of 9
Fit the Shelf Support to the Side Panel (F & G).
13
G
C
F
Fit the Middle Shelf (C) in place.
14
WI-0222
F/G
C
3
3
G
D
Fx 4
10

9005 Display Cabinet
Assembly Instructions
Page 8 of 9
Fit and adjust the Drawer Face (N).
15
After the Drawer Faces (N) are aligned,
secure with wood screws.
16
4
N
4
WI-0222
N
N
16
N
JCB
NOTE: Before fitting the Wood Screws.
Lossen the JCBs on the Drawer Face if
the face needs alignment.
*

9005 Display Cabinet
Assembly Instructions
Page 9 of 9
Fit the Door Panel (H & J).
17
WI-0222
13
15
N
14
H/J
1515
Finaly, fit the Handle to the Cabinet Door Panel (H & J)
and Drawer Face (N).
18
H
N
J
A
H
J
3
H/J
A
x 16
3
17
3
17
x 8
/


