Page is loading ...

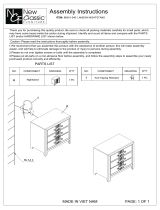
0038 Queen Bed
Assembly Instructions
Page 1 of 9
Assembled View
1
Note: Do not assemble
using power tools.
This can cause the bolts
to be overtightened
Use 2 People
Parts List
2
AHeadboard Panel x 1
BFootboard Panel x 1
H
Set of Bed Slats x 1
CHeadboard Support Rail x 1
Parts in Box A:
Parts in Box B:
FSide Rail x 2
GLong Support x 1 Support Leg
x 3 J
WII-0120
DHeadboard Post
(Left Hand)
x 1
EHeadboard Post
(Right Hand)
x 1

Page 2 of 9
Parts List
2
Wood Screw
(M4 x 16mm)
x 14
Hardware List
3
1M4 Allen Key
x 1
12 CSK Cap Wood Screw
(M6 x 50mm)
x 24
6
2Center Rail
Bracket x 2 3'L' Bracket
x 8 4Adjustable
Foot x 3 5Barrel
Nut x 13
Wood Screw
(M4 x 32mm)
x 18
7Wood Dowel
(M8 x 30mm)
x 8
8Wood Dowel
(M10 x 40mm)
x 6
9Spring
Washer
x 4
10
13 M6 x 15mm
JCB x 20 14 M6 x 30mm
JCB x 8
16 M6 x 60mm JCB
x 8 17 M6 x 90mm JCB
x 13
Parts in Box C:
Storage Side Panel
(Left Hand)
x 2
Storage Foot
x 4
N
Storage Divider
x 6
KStorage Back Panel x 2
LStorage Bottom Panel x 2
MStorage Support Rail x 4
Storage Side Panel
(Right Hand)
x 2
O
P Q
Flat
Washer
x 4
11 15 M6 x 40mm
JCB x 20
WII-0120
0038 Queen Bed
Assembly Instructions

Page 3 of 9
Fit the Lower Headboard Post (D & E) to the
Headboard Support Rail (C).
417
E
D
C
5
9
5
17
9
Short Tab of
Metal Bracket (2)
13
Fit the Headboard Panel (A) to the
Headboard Post (D & E).
5
A
C
D
E
WII-0120
15
10
11
0038 Queen Bed
Assembly Instructions

Page 4 of 9
Fit the Center Rail Bracket to the
Footboard Panel (B).
6
x 2
WII-0120
0038 Queen Bed
Assembly Instructions
13
3
Fit the 'L' Bracket (3) to the End of the
Storage Bottom Panel (L) with
M6 x 15mm JCB (13).
8
L
17
17
5
H
4
G
17
5
H
4
5
H
4
Note: Extra
holes on top
Assemble the Support Leg (H)
to the Long Support (G).
7
Short Tab of
Metal Bracket (2)
13
B

Assemble the Storage Side Panel (N & O) to the
Storage Bottom Panel & Support Rail (L & M).
Page 5 of 9
Tap the Wood Dowel to the end of the
Storage Support Rail (M).
9
x 2
11
16
N
16
L
O
M
3
13 Back
WII-0120
0038 Queen Bed
Assembly Instructions
P
P
P
12
12
12
12
12
12
M
L
8
M
M
Assemble the Storage Bottom Panel (L) & Support Rail (M) to the
Storage Divider (P).
10

Slide the Storage Back Panel (K) into the groove.
Page 6 of 9
Fit the Storage Foot (Q) to the Storage Bottom Panel (L).
x 2
Back
K
LN
O
Q
Q
12
13
WII-0120
0038 Queen Bed
Assembly Instructions
M
N
O
L
15
QBack

Fit the Storage Back Panel (K) in place.
Page 7 of 9
Assemble the Side Rail (F) to the
Headboard / Footboard (A & B).
15
14
12
WII-0120
0038 Queen Bed
Assembly Instructions
9
17
5
A
F
B
F
K
M
N
O
Back
6

Page 8 of 9
Bolt the Long Support (G) to the Center Rail Brackets on
the Headboard Panel / Footboard Panel (A & B).
16
Bolt & screw the Bed Slats (J) to the Side Rail (F).
17
WII-0120
0038 Queen Bed
Assembly Instructions
15
7
15
7
15
7
15
15
15
15
J
F
13
2
G
F
A
F
B
G
7
15

Page 9 of 9
Fit the Assembled
Storage under the
Bed Frame.
18
Assembled Storage
NOTE: Open shelves
facing outside!
Assembled Storage
NOTE: Open shelves
facing outside!
Assembled
Storage
Bolt the Assembled Storage to
the Bed Frame with
M6 x 30mm JCB (14).
19
14
WII-0120
0038 Queen Bed
Assembly Instructions

0038 Nightstand
Assembly Instructions
Page 1 of 6
WII-0120
Note: Do not assemble
using power tools.
This can cause the bolts
to be overtightened
Use 2 People
Parts List
1
Leg Frame
(Left hand) x 1
F
Leg Frame
(Right hand) x 1
G
Drawer Face x 1 Drawer Back x 1
Drawer Side
(Left hand) x 1
Drawer Side
(Right hand) x 1
Drawer
Bottom x 1
H J
K L M
ATo p Panel x 1
BShelf
(Smaller) x 1
CBack Panel
(Bigger) x 1
DLower Rear
Support Bar x 1
ELower Front
Support Bar x 1
Groove

0038 Nightstand
Assembly Instructions
Page 2 of 6
WII-0120
Hardware List
2
1M6 x
15mm JCB
x 16
2M4 x 25mm
Wood Screw
x 8
3M4 x 22mm
Wood Screw
x 1
6Allen Key
x 1
4'L' Bracket
(5005-3)
x 8
5Handle
(1005)
x 1
H
L
2
2
K
K
M
L
J
2
2K
L
Assemble the Drawer Sides (K & L)
to the Drawer Face (H).
3
Slide the Drawer Bottom (M) into the
groove on the Drawer Sides (K & L).
4
Assemble the Drawer Back (J) to
the Drawer Sides (K & L).
5
Important: Assemble the
Drawer Runner facing
Drawer Face.

0038 Nightstand
Assembly Instructions
Page 3 of 6
WII-0120
Fit the 'L' Bracket to the Left & Right hand
Leg Frame (F & G).
6
Fit the Back Panel (C) to the Top Panel (A).
7
F/G
1
1
4
4
1
4
1
4
C
A
Groove

1
x 3
0038 Nightstand
Assembly Instructions
Page 4 of 6
WII-0120
Assemble the Left hand Leg Frame (F).
8
Fit the Lower Rear Support Bar (D) to the Left hand
Leg Frame (F).
9
D
A
F
Front
C
A
F
Front

1
x 5
A
F
E
D
G
0038 Nightstand
Assembly Instructions
Page 5 of 6
WII-0120
Fit the Lower Front Support Bar (E) to the Left hand
Leg Frame (F). Assemble the Right hand
Leg Frame (G) to the frame.
Tighten all the bolts with using 15mm JCB.
11
Front
Front
10

0038 Nightstand
Assembly Instructions
Page 6 of 6
WII-0120
Fit the Shelf (B).
Fit the Handle to the Drawer face (H).
Finally, fit the assembled Dawer.
Front
Assembled
Drawer
12
13
B
F
A
G
H
3
5
H

0038 6 Drawer Dresser
Assembly Instructions
Page 1 of 8
WII-0120
Parts List
1
Drawer Face x 6
F
Drawer Back x 6
G
Drawer Bottom x 6
J
Drawer
Rail x 6
H
ATo p Panel x 1
BBack Panel x 2
DBottom Front
Support Bar x 1
Groove
CRear
Support Bar x 1
EBottom Rear
Support Bar x 1
Groove
Groove
Parts in Box A:
Note: Do not assemble
using power tools.
This can cause the bolts
to be overtightened
Use 2 People

0038 6 Drawer Dresser
Assembly Instructions
Page 2 of 8
WII-0120
Parts List
1
F
5
5
4N
H
4
O
Important: Assemble the
Drawer Runner facing
Drawer Face.
Hardware List
2
Parts in Box B:
K
Leg Frame
(Left Hand) x 1
Leg Frame
(Right Hand) x 1
N
Drawer Side
(Left Hand) x 6
O
Drawer Side
(Right Hand) x 6
ML
Center Frame
x 1
Assemble the Drawer Sides (N & O) & Drawer Rail (H)
to the Drawer Face (F).
3x 6
1M6 x
15mm JCB
x 20
2M6 x
30mm JCB
x 4
7'L' Bracket
(5005-3) x 10 8Handle
(1005) x 6 9Allen Key
x 1
3M6 x
40mm JCB
x 1
4M6 x 25mm
Wood Dowel
x 24
5M4 x 25mm
Wood Screw
x 60
6M4 x 22mm
Wood Screw
x 6

0038 6 Drawer Dresser
Assembly Instructions
Page 3 of 8
WII-0120
Slide the Drawer Bottom (J) into the
groove on the Drawer Sides (N & O).
4
N
J
O
F
5
5N
G
O
Assemble the Drawer Back (G) to
the Drawer Sides (N & O).
5
Turn the Drawer over to fit angled 25mm Wood
screws (5) to the Drawer Rail (H).
6
G
5
H
x 6

1
7
1
7
D
1
1
A
7
7
7
0038 6 Drawer Dresser
Assembly Instructions
Page 4 of 8
WII-0120
Fit the 'L' Bracket to the Top Panel (A).
7
Fit the 'L' Bracket to the Rear
Support Bar (C) as shown below.
8
Fit the 'L' Bracket to the Bottom Front & Rear
Support Bar (D & E) as shown below.
9
1
7
1
7
E
Groove
1
7
1
7
C
Groove
Groove

0038 6 Drawer Dresser
Assembly Instructions
Page 5 of 8
WII-0120
Slide the Back Panel (B) into the groove on
To p Panel (A) & Left hand Leg Frame (K).
Slide the Rear Support Bar (C) into the
groove on Back Panel (B).
B
A
K
C
A
K
B
Groove
Groove
10
1
7
x 2
11
1
7
Front
Front
/