Page is loading ...

Quick guide
Convert a Maglite Magcharger with original glow-bulb to a LEDMAG P7 V2 led upgrade in
10 steps.
If you run into any problems please check the extended video for help. Do not try to force anything, this may
permanently damage the Flashlight or led.
Taking the flashlight apart is also a good chance to clean the glass lens and lubricate all treads, rings, rubbers and
connections. Clean the Glass Lens in warm water with some washing up liquid.
Do not touch the inside of the reflector! Dust and fingerprints will be very hard to remove without damaging the
reflective surface.
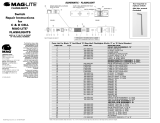
Parts of the Maglite Magcharger flashlight:
1. Tailcap
2. O-ring Tailcap
3. Spare bulb in foam
4. Spring
5. Barrel with Battery
6. Center Housing
7. O-ring Housing
8. Nylon Washer
9. Switch assembly with Switch.
10. Switch Seal
11. Charging Module
12. Head
13. O-ring Head
14. Reflector
15. Glass Lens
16. Glass Lens Seal
17. Face Cap
Parts of the LED upgrade:
18. Switch-barrel aluminum
19. LED module with reflector
18.
19.

Steps to disassemble the Flashlight.
1. Remove the Tailcap (part 1-4) and the Battery from the flashlight.
2. Disassemble the flashlight into 3 parts. Unscrew the head assembly (part 6 till 13) and the barrel (part 5)
from the charging module (part 11).
The charging module might be stuck either in the head assembly or the barrel. Please gently remove this
part. If it does not want to be removed please check the extended video.
3. Remove the Face Cap, the Glass Lens (part 15-17) and the Reflector (part 14).
4. Push the switch button and press the Switch Assembly with Switch (part 9) out of the Center Housing (part
6). Next push the switch button again and this time press the switch itself out of the assembly.
!NOTE! There are different switches each with their own difficulties.
- Some older models have a big spring fixed to the front of the switch, please cut it gently of with pliers.
- If the switch has a white button; prevent it from “exploding” after it is pushed out. Keep the two halves
pushed together and immediately go to the next step.
- The newest 3 mode switch has a small spring that will fall out once the switch is removed. Without the
spring the switch will not work.

Steps to assembling the switch
5. Put the Switch into the new switch-barrel (part 18).
6. Put the new Switch assembly back into the Center Housing (part 6)
7. Screw the Charging Module (part 11) back into the Center Housing (part 6) and tighten it.

Assembling LED module
8. Drop the Led Module (part 19) into the Head (part 12) with the led facing outwards. Put the Glass Lens (part
15) with Seal (part 16) and Face Cap (part 17) back on the flashlights head and tighten.
9. Reassemble the Barrel (part 5), place the Battery into the barrel and screw the Tail Cap (part 1-4) back on.
10. That is all, enjoy the new flashlight! For a full guide going in detail through every step of the process please
check the video or contact us at: info@ledmag.nl for any questions.
The following parts are left over after the conversion to led and can be saved as a back-up.
/