Black & Decker LCS120 Owner's manual
- Category
- Cordless chainsaws
- Type
- Owner's manual
This manual is also suitable for

20V MAX* LiTHiUM CORDLESS
CHAIN SAW iNSTRUCTiON MANUAL
Model # LCS120
IVlodel Number LCS120
PLEASE READ BEFORE RETURNING
THiS PRODUCT FOR ANY REASON:
If you have a question or experience a problem with your
Black & Decker purchase, go to
WWW.BLACKAND DECKER.COM/INSTANTANSWERS
for instant answers 24 hours a day.
If you can't find the answer or do not have access to the intemet,
call 1-800-544-6986 from 8 a.m. to 5 p.m. EST Mon.- Fri
to speak with an agent.
Please have the catalog number available when you call.
SAVE THiS MANUAL FOR FUTURE REFERENCE.
VEA EL ESPA_IOL EN LA CONTRAPORTADA.
POUR LE FRAN(_,AIS, VOIR LA COUVERTURE ARRII_RE.
INSTRUCTIVO DE OPERACION, CENTROS DE SERVICIO
Y POLIZA DE GARANTIA. ADVERTENClA: LEASE ESTE
INSTRUCTIVO ANTES DE USAR EL PRODUCTO.
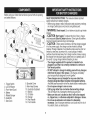
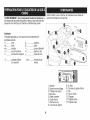
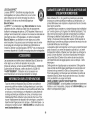
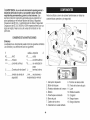
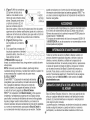
KEY iNFORMATION YOU SHOULD KNOW:
- DO NOT OVER-TENSION CHAIN. Refer to "ADJUSTING
CHAIN TENSION" for proper method of tensioning
chain.
- Retighten chain frequently during first two hours of use.
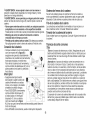
*Maximum initial battery pack voltage [
(measured without a workload) is 20
volts. Measured under a workload,
nom na votage s 18.

Safety Guidelines - Definitions ................................................. 2
Chain Saw Terms ..................................................................... 2
Important Safety Instructions ................................................... 3
Components ............................................................................. 6
Important Safety Instructions for Battery Chargers .................. 6
Important Safety Instructions for Battery Packs ....................... 7
Charging Procedure ................................................................. 8
Preparing Chain Saw for Use .................................................. 10
Assembly ................................................................................. 10
Operating the Chain Saw ......................................................... 12
Maintenance ............................................................................ 15
Service Information .................................................................. 16
Full Two-Year Home Use Warranty ......................................... 16
Troubleshooting ....................................................................... 17
SAFETY GUIDELINES =DEFINITIONS
It is important for you to read and understand this manual. The
information it contains relates to protecting YOUR SAFETY and
PREVENTING PROBLEMS. The symbols below are used to help
you recognize this information.
z_DANGER: Indicates an imminent!y hazardous situation which
if not avoided, will result in death or serious tnjury.
z_WARNING- Indicates a potentially hazardous situation which,
not avoided, could result in death or serious injury.
z_CAUTION: Indicates a potentially hazardous situation which,
if not avoided, may result in minor or moderate injury.
NOTICE: Used without the safety alert symbol indicates a
potentially hazardous situation which, if not avoided, may result in
property damage.
Your Black & Decker Cordless Chain Saw is ideal for pruning
applications and cutting small logs up to 8 inches (203 mm) in
diameter. This tool is intended for consumer use only.
Bucking - The process of cross cutting a felled tree or log into
lengths.
Motor Brake =A device used to stop the saw chain when the
trigger is released.
Chain Saw Powerhead - A chain saw without the saw chain and
guide bar.
Drive Sprocket or Sprocket - The toothed part that drives the
saw chain.
Felling =The process of cutting down a tree.
Felling Back Cut =The final cut in a tree felling operation made
on the opposite side of the tree from the notching cut.
Front Handle =The support handle located at or toward the front
of the chain saw.
Front Hand Guard - A structural barrier between the front handle
of a chain saw and the guide bar, typically located close to the
hand position on the front handle and sometimes employed as an
activating lever for a chain brake.
Guide Bar - A solid railed structure that supports and guides the
saw chain.
Guide Bar Scabbard =Enclosure fitted over guide bar to prevent
tooth contact when saw is not in use.
Kickback =The backward or upward motion, or both of the guide
bar occurring when the saw chain near the nose of the top area
of the guide bar contacts any object such as a log or branch, or
when the wood closes in and pinches the saw chain in the cut.
Kickback, Pinch - The rapid pushback of the saw which can
occur when the wood closes in and pinches the moving saw chain
in the cut along the top of the guide bar.

Kickback,Rotational-Therapidupwardandbackwardmotion
ofthesawwhichcanoccurwhenthemovingsawchainnearthe
upperportionofthetipoftheguidebarcontactsanobject,such
asalogorbranch.
Limbing-Removingthebranchesfromafallentree
Low-KickbackChain-Achainthatcomplieswiththekickback
performancerequirementsofANSIB175.1-1991(whentestedon
arepresentativesampleofchainsaws.)
NormalCuttingPosition - Those positions assumed in
performing the bucking and felling cuts.
Notching Undercut - A notch cut in atree that directs the tree's fall.
Rear Handle - The support handle located at or toward the rear
of the saw.
Reduced Kickback Guide Bar - A guide bar which has been
demonstrated to reduce kickback significantly.
Replacement Saw Chain - A chain that complies with kickback
performance requirements of ANSI B175.1-2000 when tested
with specific chain saws. It may not meet the ANSI performance
requirements when used with other saws.
Saw Chain - A loop of chain having cutting teeth, that cut the
wood,and that is driven by the motor and is supported by the
guide bar.
Ribbed Bumper - The ribs used when felling or bucking to pivot
the saw and maintain position while sawing.
Switch - A device that when operated will complete or interrupt
an electrical power circuit to the motor of the chain saw.
Switch Linkage - The mechanism that transmits motion from a
trigger to the switch.
Switch Lockout - A movable stop that prevents the unintentional
operation of the switch until manually actuated.
When usmc 3erated chain saw, basic
safety precau to reduce risk of fire,
electric shock, and personal injury, including the following:
READ ALL INSTRUCTIONS
• Keep all parts of the body away from the saw chain when the
chain saw is operating. Before you start the chain saw, make
sure the saw chain is not contacting anything. A moment of
inattention while operating chain saws may cause entanglement
of your clothing or body with the saw chain.
• Hold the power tool by insulated gripping surfaces only,
because the saw chain may contact hidden wiring or its own
cord. Saw chains contacting a "live" wire may make exposed
metal parts of the power tool "live" and could give the operator an
electric shock:
• Wear safety glasses and hearing protection. Further
protective equipment for head, hands, legs and feet is
recommended. Adequate protective clothing wifl reduce personal
injury by flying debris or accidental contact with the saw chain.
• Do not operate a chain saw in a tree. Operation of a chain saw
while up in a tree may result in personal injury.
• Always keep proper footing and operate the chain saw only
when standing on fixed, secure and level surface. Slippery or
unstable surfaces such as ladders may cause a loss of balance or
control of the chain saw.
• When cutting a limb that is under tension be alert for spring
back. When the tension in the wood fibres is released the spring
loaded limb may strike the operator and/or throw the chain saw
out of control.
• Use extreme caution when cutting brush and saplings. The
slender material may catch the saw chain and be whipped toward
you or pull you off balance.
• Carry the chain saw by the front handle with the chain saw
switched off and away from your body. When transporting or
storing the chain saw always fit the guide bar cover. Proper
handling of the chain saw will reduce the fikelihood of accidental
contact with the moving saw chain.
• Follow instructions for lubricating, chain tensioning and
changing accessories. Improperly tensioned or lubricated chain
may either break or increase the chance for kickback:

o
o
Keep handles dry, clean, and free from oil and grease.
Greasy, oily handles are slippery causing loss of control.
Cut wood only. Do not use chain saw for purposes not
intended. For example: do not use chain saw for cutting
plastic, masonry or non-wood building materials. Use of the
chain saw for operations different than intended could result in a
hazardous situation.
Causes and operator prevention of kickback:
Kickback may occur when the nose or tip of the guide bar touches
an object, or when the wood closes in and pinches the saw chain in
the cut.
Tip contact in some cases may cause a sudden reverse reaction,
kicking the guide bar up and back towards the operator.
Pinching the saw chain along the top of the guide bar may push the
guide bar rapidly back towards the operator.
Either of these reactions may cause you to lose control of the saw
which could result in serious personal injury. Do not rely exclusively
upon the safety devices built into your saw. As a chain saw user,
you should take several steps to keep your cutting jobs free from
accident or injury.
Kickback is the result of tool misuse and/or incorrect operating
procedures or conditions and can be avoided by taking proper
precautions as given below:
• Maintain a firm grip, with thumbs and fingers encircling the
chain saw handles, with both hands on the saw and position
your body and arm to allow you to resist kickback forces.
Kickback forces can be controlled by the operator, if proper
precautions are taken. Do not let go of the chain saw.
• Do not overreach and do not cut above shoulder height. This
helps prevent unintended tip contact and enables better control of
the chain saw in unexpected situations.
• Only use replacement bars and chains specified by the
manufacturer. Incorrect replacement bars and chains may cause
chain breakage and/or kickback:
• Follow the manufacturer's sharpening and maintenance
instructions for the saw chain. Decreasing the depth gauge
height can lead to increased kickback:
The following precautions should be followed to minimize
kickback:
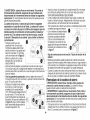
(1.) Grip Saw Firmly. Hold the chain saw firmly with both hands
when the motor is running. Use a firm grip with thumbs and fingers
encircling the chain saw handles. Chain saw will pull forward when
cutting on the bottom edge of the bar, and push backward when
cutting along the top edge of the bar.
(2.) Do not over reach.
(3.) Keep proper footing and balance at all times.
(4.) Don't let the nose of the guide bar contact a log, branch, ground
or other obstruction.
(5.) Don't cut above shoulder height.
(6.) Use devices such as low kickback chain and reduced kickback
uide bars that reduce the risks associated with kickback.
.) Only use replacement bars and chains specified by the
manufacturer or the equivalent.
(8.) Never let the moving chain contact any object at the tip of the
uide bar.
.) Keep the working area free from obstructions such as other
trees, branches, rocks, fences, stumps, etc. Eliminate or avoid
any obstruction that your saw chain could hit while you are cutting
through a particular log or branch.
(10.) Keep your saw chain sharp and properly tensioned. A loose
or dull chain can increase the chance of kickback. Check tension at
regular intervals with the motor stopped and battery removed, never
with the motor running.
(11.) Begin and continue cutting only with the chain moving at full
speed. If the chain is moving at a slower speed, there is a greater
chance for kickback to occur.
(12.) Cut one log at a time.
(13.) Use extreme caution when re-entering a previous cut. Engage
ribbed bumpers into wood and allow chain to reach full speed before
roceeding with cut.
14.) Do not attempt plunge cuts or bore cuts.
(15.) Watch for shifting logs or other forces that could close a cut
and pinch or fall into chain.
• Power Supply - Connect chain saw battery charger to correct
voltage, that is, be sure that the voltage supplied is the same as that
specified on the nameplate of the tool

ckbackSafety Features
WARNING: The following features are included on your saw
to help reduce the hazard of kickback; however such features
wilt not totally eliminate this dangerous reaction. As a chain saw user
do not rely only on safety devices. You must follow all safety
precautions, instructions, and maintenance in this manual to help
avoid kickback and other forces which can result in serious injury.
• Reduced-Kickback Guide Bar, designed with a small radius tip
which reduces the size of the kickback danger zone on bar tip. A
reduced - kickback guide bar is one which has been demonstrated to
significantly reduce the number and seriousness of kickbacks when
tested in accordance with safety requirements for electric chain saws.
• Low=Kickback Chain, designed with a contoured depth gauge and
guard link which deflect kickback force and allow wood to gradually
ride into the cutter. A low-kickback chain is a chain which has met
kickback performance requirements of ANSI B175.1-1991.
• Do not operate chain saw while in a tree, on a ladder, on a
scaffold, or from any unstable surface.
• Hold tool by insulated gripping surfaces when performing an
operation where the cutting tool may contact hidden wiring.
Contact with a "live" wire will make exposed metal parts of the tool
"live" and shock the operator.
• Do not attempt operations beyond your capacity or
experience. Read thoroughly and understandcompletely all
instructions in this manual.
• Before you start chain saw, make sure saw chain is not
contacting any object.
• Do not operate a chain saw with one hand! Serious injury
to the operator, helpers, or bystanders may result from one
handed operation. A chain saw is intended for two-handed use only.
• Keep the handles dry, clean, and free of oil or grease.
Do not allow dirt, debris, or sawdust to build up on the motor
or outside air vents.
• Stop the chain saw before setting it down.
• Do not cut vines and/or small under brush.
• Use extreme caution when cutting smatl size brush and
saplings because slender material may catch the saw chain and
!_be whipped toward you or pull you off balance.
WARNING: Some dust created by power sanding, sawing,
grinding, drilling, and other construction activities contains chemicals
known to the State of California to cause cancer, birth defects or
other reproductive harm. Some examples of these chemicals are:
• lead from lead-based paints,
crystalline silica from bricks and cement and other masonry
products, and
• arsenic and chromium from chemically-treated lumber.
Your risk from these exposures varies, depending on how often
you do this type of work. To reduce your exposure to these
chemicals: work in a well ventilated area, and work with approved
safety equipment, such as those dust masks that are specially
designed to filter out microscopic particles.
• Avoid prolonged contact with dust from power sanding,
sawing, grinding, drilling, and other construction activities.
Wear protective clothing and wash exposed areas with soap
and water. Allowing dust to get into your mouth, eyes, or lay on the
_Nkin maypromote absorption of harmful chemicals.
ARNING: Use of this tool can generate and/or disburse dust,
which may cause serious and permanent respiratory or other injury.
Always use NIOSH/OSHA approved respiratory protection appropriate for
the dust exposure. Direct particles away from face and body.
SAVE THESE INSTRUCTIONS
Symbols
The label on your tool may include the following symbols.
V. ................................volts
Hz..............................herlz
min.............................minutes
- - -. ........................directcurrent
@ ..............................ClassIConstructbn
(grounded)
[] ..............................ClassIIConstructbn
(doubleinsulated)
........................Readinstruction
manualbeforeuse
..............................Usepropereyeprotedion
A..............amperes
W.............watts
,_..........attemabhgcurrent
no............noloadspeed
8. ...........earthingterminal
z_..........safetyalertsymbd
.../minorrpm...revduiionsor
recfprocationperminute
............Useproper
respiratoryprotectlbn
0 ...........Useproper
heatingprotection

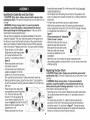
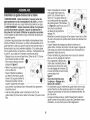
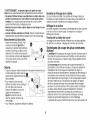
Before using your Chain Saw familiarize yourself with all operating
and safety features.
1. Trigger Switch
2. Lock Off Button
3. Front Hand Guard
4. Battery
5. Ribbed Bumper
6. Guide Bar
7. Saw Chain
8. Sprocket Cover
9. Allen Head Screws
10. Guide Bar Scabbard
11. Wrench
12. Oil Bottle
13. Charger
14. Rear Handle
15. Front Handle
SAVE THESE INSTRUCTIONS: This manual contains important
safety instructions for battery chargers.
• Before usingcharger, read all instructions and cautionary markings
on charger,battery pack, and product using battery pack.
Z_WARNING: Shock hazard. Do not allow any liquid to get inside
charqer.
z_CAUTION: Burn hazard. To reduce the risk of injury, charge
only designated Black & Decker batteries. Other types of batteries
may burst causing personal injury and damage.
_CAUTION: Under certain conditions, with the charger plugged
in to the power supply, the charger can be shorted by foreign
material. Foreign materials of a conductive nature such as, but not
limited to, stee/woot, aluminum foil, or any buildup of metallic
particles should be kept away from charger cavities. Always unplug
the charger from the power supply when there is no battery pack in
the cavity. Unplug charger before attempting to clean.
• The charger supplied with this product is intended to be
plugged in suchthat it is correctly orientated in a vertical or
floor mount position.
• DO NOT attempt to charge the battery pack with any chargers
other than the ones in this manual. The charger and battery
pack are specifically designed to work together.
• These chargers are not intended for any uses other than
charging designated Black & Decker rechargeable batteries.
Any other uses may result in risk of fire, electric shock or electrocution.
• Do not expose charger to rain or snow.
• Pull byplug rather than cord when disconnecting charger.
This will reduce risk of damage to electric plug and cord.
• Make sure that cord is located so that it will not be stepped
on, tripped over, or otherwise subjected to damage or stress.
• Do not use an extension cord unless it is absolutely
necessary. Use of improper extension cord could result in risk of
fire, electric shock; or electrocution.

• An extension cord must have adequate wire size (AWG or
American Wire Gauge) for safety. The smaller the gauge number
of the wire, the greater the capacity of the cable, that is 16 gauge
has more capacity than 18 gauge. When using more than one
extension to make up the total length, be sure each individual
extension contains at least the minimum wire size.
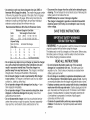
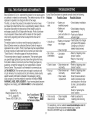
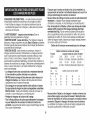
Recommended Minimum Wire Size for Extension Cords
MinimumGauge for Cord Sets
Volts Total Lengthof Cord in Feet
120V 0-25 26-50 51-100 101-150
240V 0-50 51-100 101-200 201-300
Ampere Rating
More Not more American Wire Gauge
Than Than
0 6 18 16 16 14
6 10 18 16 14 12
10 - 12 16 16 14 12
12 - 16 14 12 NotRecommended
• Do not place any object on top of charger or place the charger
on a soft surface that might block the ventilation slots and
result in excessive internal heat. Place the charger in a
position away from any heat source. The charger is ventilated
through slots in the top and the bottom of the housing.
• Do not mount charger on wall or permanently affix charger
to any surface. The charger is intended to use on a flat, stable
surface (i.e., table top, bench top).
• Do not operate charger with damaged cord or plug = have
them replaced immediately.
• Do not operate charger if it has received a sharp blow, been
dropped, or otherwise damaged in any way. Take it to an
authorized service center.
• Do not disassemble charger; take it to an authorized service
center when service or repair is required. Incorrect reassembly
may result in a risk of electric shock, electrocution or fire.
• Disconnect the charger from the outlet before attempting any
cleaning. This will reduce the risk of electric shock: Removing the
battery pack will not reduce this risk:
• NEVER attempt to connect 2 chargers together.
• The charger is designed to operate on standard household
electrical power (120 Volts). Do not attempt to use it on any
other voltage.
SAVE THESE INSTRUCTIONS
z_WARNING: For safe operation, read this manual and manuals
originally supplied with tool before using the charger.
The battery pack is not fully charged out of the carton. Before using
the battery pack and charger, read the safety instructions below.
Then follow charging procedures outlined.
READ ALL INSTRUCTIONS
• Do not incinerate the battery pack even if it is severely
damaged or is completely worn out. The battery pack can
explode in a fire. Toxic fumes and materials are created when
battery packs are burned.
• Do not charge or use battery in explosive atmospheres, such
as in the presence of flammable liquids, gases or dust. Inserting
or removing the battery from the charger may ignite the dust or fumes.
• If battery contents come into contact with the skin, immediately
wash area with mild soap and water, ff battery liquid gets into the
eye, rinse water over the open eye for 15 minutes or until irritation
ceases. Ifmedical attention is needed, the battery electrolyte for
Li-ion batteries is composed of a mixture of liquid organic
carbonates and fithium salts.
• Contents of opened battery cells may cause respiratory
irritation. Provide fresh air. If symptoms persist, seek medical
attention.

ZLWARNING:Burnhazard.Batteryliquidmaybeflammableif
exposedtosparkorflame.
• Charge the batterypacks only in Black & Decker chargers.
• DO NOT splash or immerse in water or other liquids. This may
cause premature ceil failure.
• Do not store or use the tool and battery pack in locations where
the temperature may reach or exceed 105°F (40°C) (such as
outside sheds or metal buildings in summer).
Z_WARNING: Never attempt to open the battery pack for any
reason. If battery pack case is cracked or damaged, do not insert into
charger. Do not crush, drop or damage battery pack. Do not use a
battery pack or charger that has received a sharp blow, been
dropped, run over or damaged in any way (i.e., pierced with anail, hit
with a hammer, stepped on). Damaged battery packs should be
returned to service center for recycling.
Z_WARNING: Fire hazard. Do not store or carry battery so that
metal objects can contact exposed battery terminals. For
example, do not place battery in aprons, pockets, tool boxes, product
kit boxes, drawers, etc., with loose nails, screws, keys, etc.
Transporting batteries can possibly cause fires ff the battery
terminals inadvertently come in contact with conductive materials
such as keys, coins, hand tools and the like. The US Department
of Transportation Hazardous Material Regulations (HMR) actually
prohibit transporting batteries in commerce or on airplanes (Le.,
packed in suitcases and carry-on luggage) UNLESSthey are properly
protected from short circuits. So when transporting individual batteries,
make sure that the battery terminals are protected and well insulated
from materials that could contact them and cause a short circuit.
NOTE: LI=ION batteries should not be put in checked baggage.
STORAGE RECOMMENDATIONS
1. The best storage place is one that is cool and dry away from
direct sunlight and excess heat or cold.
2. Long storage will not harm the battery pack or charger.
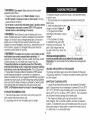
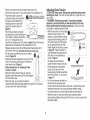
The standard charger provided will charge a fully depeleted battery
in about 4 hours.
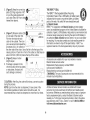
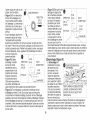
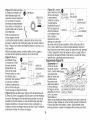
1. Plug the charger into an appropriate outlet before inserting the
battery pack.
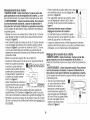
2. Insert the battery pack into the
charger as shown in figure A.
3. The green LED will flash
indicating that the battery is being
charged.
4. The completion of charge
is indicated by the green LED
remaining on continuously. The
pack is fully charged and may
be used at this time or left on the
charger.
Recharge discharged batteries
as soon as possible after use or battery life may be
diminished. Itis recommended that the batteries be recharged after
each use.
LEAVING THE BATTERY IN THE CHARGER
The charger and battery pack can be left connected with the green
LED glowing indefinitely. The charger will keep the battery pack fresh
and fully charged.
IMPORTANT CHARGING NOTES
1. Longest life and best performance can be obtained if the battery
pack is charged when the air temperature is between 60°F and 80°F
(16°- 27°C). DO NOT charge the battery pack in an air temperature
below +40°F (+4.5°C), or above +105°F (+40.5°C). This is important
and will prevent serious damage to the battery pack.
2. The charger and battery pack may become warm to touch
while charging. This is a normal condition, and does not indicate a
problem. To facilitate the cooling of the battery pack after use, avoid
placing the charger or battery pack in a warm environment such as
in a metal shed, or an uninsulated trailer.

3.Ifthebatterypackdoesnotchargeproperly:
a.Checkcurrentatreceptaclebyplugginginalamporother
appliance.
b.Checktoseeifreceptacleisconnectedtoalightswitch
whichturnspoweroffwhenyouturnoutthelights.
c.Movechargerandbatterypacktoalocationwherethe
surroundingairtemperatureisapproximately60°Fand80°F
(16°-27°C).
d.Ifchargingproblemspersist,takethetool,batterypackand
chargertoyourlocalservicecenter.
4.Thebatterypackshouldberechargedwhenitfailstoproduce
sufficientpoweronjobswhichwereeasilydonepreviously.DO
NOTCONTINUEtouseundertheseconditions.Followthecharging
procedure.Youmayalsochargeapartiallyusedpackwhenever
youdesirewithnoadverseaffectonthebatterypack.
5.Foreignmaterialsofaconductivenaturesuchas,butnotlimited
to,steelwool,aluminumfoil,oranybuildupofmetallicparticles
shouldbekeptawayfromchargercavities.Alwaysunplugthe
chargerfromthepowersupplywhenthereisnobatterypackinthe
cavity.Unplugchargerbeforeattemptingtoclean.
6.Donotfreezeorimmersechargerinwateroranyotherliquid.
ZhWARNING: Shock hazard. Do not allow any liquid to get inside
charger. Never attempt to open the battery pack for any reason. If the
plastic housing of the battery pack breaks or cracks, return to a service
center for recycling.
zLWARNING- Make certain the lock-off button is engaged to
prevent switch actuation before removing or installing battery.
TO INSTALL BATTERY PACK:
Insert battery pack into tool until
an audible click is heard
(figure B/C).
TO REMOVE BATTERY
PACK: Depress the battery
release button in the back of the
battery pack and pull battery pack
out of tool (figure B/C).
Read and understand atl instructions. Failure to
follow all instructions listed below may result in electric shock, fire
and/or serious personal injury.

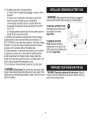
_stallingthe Guide Bar and Saw Chain
CAUTION: Sharp chain. Always wear protective gloves when
handling the chain. The chain is sharp and can cut you when it is not
running.
_WARNING: Sharp moving chain. To prevent accidental
operation, insure that battery is disconnected from the tool
before performing the following operations. Failure to do this
could result in serious personal injury.
The saw chain and guide bar are packed separately in the carton
inside the scabbard. The chain has been placed on the guide bar at
the factory to insure that the teeth are facing in the proper direction
when you first attach it. Should the chain come off of the guide bar,
refer to the section "Replacing the Chain" for proper tooth orientation.
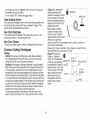
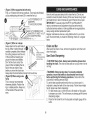
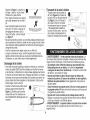
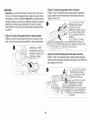
• Place the saw on a firm surface.
Rotate the two allen head screws
(9) counterclockwise with the
wrench (11) provided as shown in
figure O.
• Remove sprocket cover (8) and
allen head screws (9).
• Cut the plastic wire tie holding the
guide bar scabbard (10) to the
guide bar (6). Be sure to cut away
from yourself to prevent injury if cutting instrument should slip.
• Wearing protective gloves, grasp the saw chain (7) and guide bar
(6) with one hand and pull the guide bar scabbard (10) off with your
free hand.
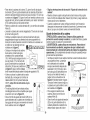
• Place the saw chain and guide
bar assembly around the sprocket
(16). Check to make sure that
the slot (17) in the guide bar (6)
is over the two location pins (18)
shown in figure E and that the hole
below the slot is located over the
adjustment pin (19).
• Replace sprocket cover (8) and
o
o
thread allen head screws (9) in with wrench until snug, then back
wrench off one full turn.
Cut the plastic wire tie holding the saw chain to the guide bar. Be
sure to cut away from yourself to prevent injury if cutting instrument
should slip.
Pull bar nose up and keep it up as you adjust tension.
With the flat screwdriver end of the wrench provided rotate the
tension adjustment screw (20) in the front of the housing clockwise
to increase the chain tension as in
figure F. O
Follow instructions in "Adjusting
Chain Tension" section.
While still holding the bar nose up,
tighten the rear allen screw first,
then tighten the front allen screw. _-_.......
Make sure both allen screws
are securely tightened. Do not
overtighten. _'_
When the chain is new check the tension frequently (after
disconnecting battery) during the first 2 hours of use as a new chain
stretches slightly.
lacing the Saw Chain
AUTION: Sharp chain. Always wear protective gloves when
handling the chain. The chain is sharp and can cut you when it is not
running.
_WARNING: Sharp moving chain. To prevent accidental
operation, insure that battery is disconnected from the tool
before performing the following operations. Failure to do this
could result in serious personal injury.
• Place the saw on a firm surface. Rotate the two allen head screws
(9) counterclockwise with the wrench (11) provided as shown in
figure D.
• To remove the saw chain (7), rotate the tension adjustment
screw (20) in the front of the housing using the flat screwdriver
end of the wrench (11) as shown in figure F. Turning the screw
counterclockwise allows the guide bar to recede and reduces the
tension on the chain so that it may be removed.
10

• Removesprocketcover(8)andallenheadscrews(9).
• Liftthewornsawchain(7)outofthegrooveintheguidebar(6).
o
o
o
o
o
o
Place new chain in groove of
guide bar making sure saw teeth
are facing correct direction by
matching arrow on chain with
graphic on housing shown in
figure G.
Place the saw chain and guide
bar assembly around the sprocket
(16). Check to make sure that the
slot (17) in the guide bar (6) is
over the two location pins (18) shown in figure Eand that the hole
below the slot is located over the adjustment pin (19).
Replace sprocket cover (8) and thread allen head screws (9) in
with wrench until snug, then back wrench off one full turn.
Pull bar nose up and keep it up as you adjust
tension Figure G1.
Rotate the tension adjustment screw (20) in the
front of the housing clockwise to increase the
chain tension as in Figure F.
Follow instructions in "Adjusting Chain
Tension" section.
While still holding the bar nose up, securely
tighten the rear allen screw (9) first, then tighten
the front allen screw.
When the chain is new check the tension
frequently (after disconnecting battery) during the first 2 hours of
use as a new chain stretches slightly.
_dcJUSting Chain Tension
AUTION: Sharp chain. Always wear protective gloves when
handling the chain. The chain is sharp and can cut you when it is
z_t running.
WARNING: Sharp moving chain. To prevent accidental
operation, insure that battery is disconnected from the tool
before performing the following operations. Failure to do this
could result in serious personal injury.
• With the saw still on a firm surface
check the chain tension. The
tension is correct when the chain
snaps back after being pulled 1/8
inch (3mm) away from the guide
bar (6) with light force from the
middle finger and thumb as shown
in figure H. There should be no
"sag" between the guide bar and
the chain on the underside as
shown in figure I. A
• To adjust saw chain tension,
loosen the allen head screws (9).
• Rotate the tension adjustment
screw (20) in the front of the
housing using the flat screwdriver
end of the wrench (11) as shown
in figure F.
• Do not over-tension the chain as
this will lead to excessive wear
v'
_o_
X
and will reduce the life of the bar and chain. Overtensioning also
reduces the amount of cuts you wilt get per battery charge.
Once chain tension is correct, tighten allen head screws (9).
When the chain is new check the tension frequently (after
disconnecting battery) during the first 2 hours of use as a new chain
stretches slightly.
ii

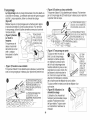
Chain Oiling
• A high quality bar and chain oil or
SAE30 weight motor oil should be
used for chain and bar lubrication.
The use of a vegetable based bar and
chain oil is recommended when pruning
trees. Mineral oil is not recommended
because it may harm trees. Never use
waste oil or very thick oil. These may
damage your chain saw.
• Lubricate the whole chain evenly before each use as shown
in figure J. Also lubricate the chain whenever replacing a fully
discharged battery with a fully charged one.
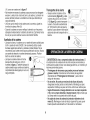
Transporting Saw
• Always remove the battery (4) from
the tool (figure K) and cover the
guide bar (6) with the scabbard
(10) (figure L) when transporting
the saw. See the warning under
"Battery Cap Information"
for additional information on
transporting the battery.
Read and understand all instructions. Failure to
follow all instructions listed below may result in electric shock, fire
and/or serious personal injury.
• Guard Against Kickback which can result in severe injury
or death. See important Safety instructions "Guard Against
Kickback", to avoid the risk of kickback.
12
• Do not overreach. Do not cut above chest height. Make sure
your footing is firm. Keep feet apart. Divide your weight evenly on
both feet.
• Use a firm grip with your left hand on the front handle (15) and
your right hand on the rear handle (14) so that your body is to the
left of the guide bar.
• Do not hold chain saw by front hand guard (3). Keep elbow of
left arm locked so that left arm is straight to withstand a kickback.
z_WARNING: Never use a cross-handed grip (left hand on the
rear handle and right hand on the front handle).
z_WARNING: Never allow any part of your body to be in line with
the guide bar (6) when operating the chain saw.
• Never operate while in a tree, in any awkward position or on
a ladder or other unstable surface. You may lose control of saw
causing severe injury.
• Keep the chain saw running at full speed the entire time you
are cutting.
• Allow the chain to cut for you. Exert only light pressure. Do not
put pressure on chain saw at end of cut.
Connecting the Battery
• Place the battery (4) into the tool as
shown in figure M and be certain that it
is inserted fully into the tool cavity until it
"clicks" into place. To remove the battery
from the tool, press down on the release
button (21) on the back of the battery and
slide out.
Switch
• Always be sure of your footing and
grip the chain saw firmly with both
hands with the thumb and fingers
encircling both handles.
• To turn the tool ON push the lock
off button (2) to either side and
squeeze the trigger switch (1) with

yourfingersasshownin figureN.(Oncethetoolisrunningyou
canreleasethelockoffbutton.)
• ToturnthetoolOFF,releasethetriggerswitch.
Chain Braking System
Your chain saw is equipped with a motor chain braking system which
wilt stop the chain quickly each time you release the trigger. This
system should be tested before every use.
Saw Chain Sharpness
The cutters wilt dull immediately if they touch the ground or a nail
while cutting. Refer to "Sharpening the Chain".
Saw Chain Tension
This should be done regularly. Refer to "Adjusting Chain Tension".
Common Cutting Techniques
Felling
Felling is the process of cutting down a tree. Be sure battery is
fully charged before felling a tree so you can finish on a single
charge. Do not fell trees in high wind conditions.
Bucking is the process of cutting a felled tree or log into lengths.
When bucking and felling operations are being performed by two
or more persons, at the same time, the felling operation should
be separated from the bucking operation by a distance of at least
twice the height of the tree being felled. Trees should not be felled
in a manner that would endanger any person, strike any utility line
or cause any property damage. If the tree does make contact with
any utility line, the utility company should be notified immediately.
Scrutinize the surrounding overhead for dead or broken limbs or
branches which may fall during the felling process.
The chain saw operator should keep on the uphill side of the
terrain as the tree is likely to roll or slide downhill after it is felled.
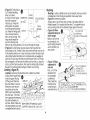
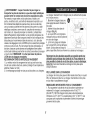
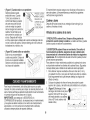
• (Figure O) A retreat path
should be planned and
cleared as necessary before
cuts are started. The retreat
path should extend back and
diagonally to the rear of the
expected line of fall.
• Before felling is started,
consider the natural lean
of the tree, the location of
larger branches and the wind
direction to judge which
_TREAT DIRECTION
OF
FALL
5° _" _q-REE
\
way the tree will fall. Have wedges (wood, plastic or aluminum)
and a heavy mallet handy.
Remove dirt, stones, loose bark, nails, staples, and wire from the
tree where the felling cuts are to be made.
(Figure P) Notching
Undercut - Make the
notch 1/3 of the diameter
of the tree, perpendicular
to the direction of the fall.
Make the lower horizonta
notching cut first. This will
help to avoid pinching of
either the saw chain or
the guide bar when the
second notch is being
made.
DI_DRECTION2 (5cm) /
/INCHES/ FELLINGBACK
OFFAL_- ..... / J L / ,CUT
L,y/ 2( cm)
_1 _ IINCHES
NOTCH .... XI I I- -- _ --
13

• (Figure Q) Felling Back
Cut - Make the felling
back cut at least
2 inches (51ram) higher
than the horizontal
notching cut. Keep the
felling back cut parallel
to the horizontal notching
cut. Make the felling back
cut so enough wood is
left to act as a hinge. The
hinge wood keeps the
tree from twisting and
OFFA ........
N
FELLING BACK
CUT
/ 2 (5cm)
_ IINCHES
-T-
__HINGE
falling in the wrong direction. Do not cut through the hinge.
• (Figure Q) As the felling cut gets close to the hinge the tree
should begin to fall. Ifthere is any chance that the tree may not fall
in the desired direction or it may rock back and bind the saw chain,
stop cutting before the felling cut is complete and use wedges to
open the cut and drop the tree along the desired line of fall. When
the tree begins to fall remove the chain saw from the cut, stop the
motor, put the chain saw down, then use the retreat path planned.
Be alert for overhead limbs falling and watch your footing.
Limbing (figure R)
Limbing is removing the branches from a fallen tree. When
limbing, leave larger lower
limbs to support the log
off the ground. Remove
the small limbs in one cut.
Branches under tension
should be cut from the
bottom up to avoid binding
the chain saw. Trim limbs
from opposite side keeping
tree stem between you
and saw. Never make cuts
with saw between your legs SUPPORT LIMBS UNTILLOG IS CUT
or straddlethe limb to be cut.
Bucking
Bucking is cutting a felled tree or log into lengths. How you should
cut depends on how the log is supported. Use a saw horse
(figure W) whenever possible.
Always start a cut with the chain running at full speed and the
ribbed bumper (5) in contact with the wood. To complete the cut
use a pivoting action of the ribbed bumper against the wood.
• (Figure S) When
supported along its
whole length
Make a cut from the
top (overbuck), but
avoid cutting the earth
as this will dull your
saw quickly.
(Figure T) When
supported at
one end
First, cut 1/3 the
diameter from
the underside
(underbuck).
Then make the
finished cut by
overbucking to
meet the first cut.
O j_,l_"2nd CUT OVERBUCK
A_I_-j_..1_d_'X (2/3DIAMETER)
_J .-_(_-Z_,_ TO MEET 1st CUT
TO AVOID PINCHING'
_, _)?''_:_t,_,_, I_,' _,,;_>"_'_/,_TO AVOID SPLINTERING
14

• (Figure U) When supported at both ends
First, cut 1/3 down from the top overbuck. Then make the finished
cut by underbucking the bower2/3 to meet the first cut.
CUTOVERBUCK (1/3
PINCHING)
• (Figure V) When on a slope
Always stand on the uphill side of
the log. When "cutting through", to
maintain complete control release
the cutting pressure near the end
of the cut without relaxing your
grip on the chain saw handles.
Don't let the chain contact the
ground. After completing the cut,
wait for the saw chain to stop
before you move the chain saw.
Always stop the motor before moving from tree to tree.
• (Figure W) When using a saw
horse
This is strongly recommended
whenever possible. Position the
log in a stable position. Always cut
on the outside of the saw horse
arms.
% _ STAND ON UPHILL
/ [/ _ _4._ SIDE WHEN
I I / CUTTING BECAUSI
__.] l LOG MAY ROLL
Use only mild soap and damp cloth to clean the tool. Do not use
solvents to clean the plastic housing of the saw. Never let any liquid
get inside the tool; never immerse any part of the tool into a liquid.
IMPORTANT: To assure product SAFETY and RELIABILITY,
repairs, maintenance and adjustment should be performed by
authorized service centers or other qualified service organizations,
always using identical replacement parts.
Regular maintenance ensures a long effective life for your chain
saw. We recommend you make the following checks on a regular
basis:
Chain and Bar
After every few hours of use, remove the guide bar and chain and
clean thoroughly.
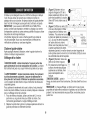
Saw Chain Sharpening
z_CAUTION: Sharp chain. Always wear protective gloves when
handling the chain. The chain is sharp and can cut you when it is not
running.
Z_WARNING: Sharp moving chain. To prevent accidental
operation, insure that battery is disconnected from the tool
before performing the following operations. Failure to do this
could result in serious personal injury.
To get the best possible performance from your chain saw it is
important to keep the teeth of the chain sharp. Follow these helpful
tips for proper saw chain sharpening:
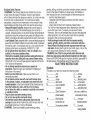
1. For best results use a 4.5mm file and a file holder or filing guide
to sharpen your chain. This will ensure you always get the correct
sharpening angles.
2. Place the file holder flat on the top plate and depth gauge of the
cutter.
15

3. (Figure X) Keep the correct top _j___:_:J_u _ I
plate (22) filing angle line of 30° _ .; ",_ S .... I
on your file guide parallel with _ _.'-, /\.'
your chain (file at 60° from chain_ ._ / _ s "-_
viewed from above). _' ' .........._: _ ...... 60Q
4. (Figure Y) Sharpen cutters (23) _[_ _-_'_i_--- ¢.025 in.
on one side of the chain first. ÷.635mm
File from the inside of each
cutter to the outside. Then turn \.
your saw around and repeat the _.
processes (2,3,4) for cutters on
the other side of the chain. Use a flat file to file the tops of the
rakers (portion of chain link in front of the cutter) so that they are
about .025 inch (.635 mm) below the tips of the cutters.
5. (Figure Z) Keep all cutter
lengths equal.
6. If damage is present on the
chrome surface of the top plates
or side plates, file back until
such damage is removed.
z_CAUTION: After filing, the cutter will be sharp, use extra caution
during this process.
NOTE: Each time the chain is sharpened, it loses some of the
low kickback qualities and extra caution should be used. It is
recommended that a chain be sharpened no more than four times.
THE RBRC TM SEAL
The RBRC TM (Rechargeable Battery Recycling
Corporation) Seal on the M-ION battery (or battery pack)
indicates that the costs to recycle the battery (or battery
pack) at the end of its useful life have already been paid
by Black & Decker.
RBRC TM in cooperation with Black & Decker and other battery
users, has established programs in the United States to facilitate the
collection of spent M-ION batteries. Help protect our environment and
conserve natural resources by returning the spent M-ION battery to
an authorized Black & Decker service center or to your local retailer
for recycling. You may also contact your local recycling center for
information on where to drop off the spent battery. RBROTM isa
registeredtrademark ofthe RechargeableBatteryRecyclingCorporation.
Accessories are available from your local retailer or nearest
Black & Decker service center.
Replacement chain accessory number RC800
(service part # 623382-00)
eplacement bar service part # 623381-00
WARNING: The use of accessories not recommended in this
manual may be hazardous.
All Black & Decker Service Centers are staffed with trained
personnel to provide customers with efficient and reliable power
tool service. Whether you need technical advice, repair, or genuine
factory replacement parts, contact the Black & Decker location
nearest you. To find your local service location, refer to the yellow
page directory under "Tools--Electric" or call: 1=800=544-6986 or
visit www.blackanddecker.com
16

Black & Decker (U.S.) Inc. warrants this product for two years against
any defects in material or workmanship. The defective product will be
replaced or repaired at no charge in either of two ways.
The first, is to return the product to the retailer from whom it was
purchased (provided that the store is a participating retailer). Returns
should be made within the time period of the retailer's policy for
exchanges (usually 30 to 90 days after the sale). Proof of purchase
may be required. Please check with the retailer for their specific
return policy regarding returns that are beyond the time set for
exchanges.
The second option is to take or send the product (prepaid) to a
Black & Decker owned or authorized Service Center for repair or
replacement at our option. Proof of purchase may be required.Black
& Decker owned and authorized Service Centers are listed under
"Tools-Electric" in the yellow pages of the phone directory.
This warranty does not apply to accessories. This warranty gives
you specific legal rights and you may have other rights which vary
from state to state or province to province. Should you have any
questions, contact the manager of your nearest Black & Decker
Service Center. This product is not intended for commercial use.
LATIN AMERICA: This warranty does not apply to products sold
in Latin America. For products sold in Latin America, check country
specific warranty information contained in the packaging, call the
local company or see the website for warranty information.FREE
WARNING LABEL REPLACEMENT: If your warning labels become
illegible or are missing, call 1=800=544-6986 for a free replacement.
Imported by
Black & Decker (U.S.) Inc.,
701 E. Joppa Rd.
Towson, MD 21286 U.S.A.
See 'Tools=Electric'
- Yellow Pages -
for Service & Sales
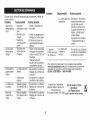
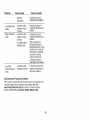
Ifyour Chain Saw does not operate correctly check the following:
Problem Possible Cause Possible Solution
• Toot will not • Battery not •
start, installed properly.
• Battery not •
charged.
• Lock-out button not •
actuated.
• Unit will not • Battery not inserted"
charge, into charger.
Check battery installation.
17
Check battery charging
requirements.
Push lock off button/
actuate triqger.
Insert battery into charger
until green LED appears.
Charge up to 8 hours if
• Chain too tight, battery totally drained.
• Bar / chain • Lubrication • Refer to "adjusting chain
overheated, needed, tension" section.
• Refer to "chain oiling"
section.
• Chain is loose. • Chain tension set • Refer to"adjusting chain
incorrectly, tension" section.
• Poor cut • Chain tension set • Refer to"adjusting chain
quality, incorrectly, tension" section.
• Chain needs Note: Excessive tension
replacement, leads to excessive wear
and reduction in life of bar
& chain. Lubricate before
each cut.
Refer to "replacing the
chain" section.
• Unit runs but • Chain installed • Refer to sections for
does not cut. backwards, installing and removing
chain.
For assistance, visit our website www.btackanddecker.corn for
the location of the service center nearestyou or call the
BLACK & DECKER help line at 1=800=544-6986.
Page is loading ...
Page is loading ...
Page is loading ...
Page is loading ...
Page is loading ...
Page is loading ...
Page is loading ...
Page is loading ...
Page is loading ...
Page is loading ...
Page is loading ...
Page is loading ...
Page is loading ...
Page is loading ...
Page is loading ...
Page is loading ...
Page is loading ...
Page is loading ...
Page is loading ...
Page is loading ...

MANUAL DE INSTRUCCIONES DE LA
SIERRA DE CADENA INALAMBRICA
CON BATERiA DE LITIO DE 20 V MAX.*
Modelo N° LCS120
Gracias pot elegir Black & Decker!
Visite www, Blackand Decker.com/NewOwner
para registrar su nuevo producto,
LEA EL MANUAL ANTES DE DEVOLVER
ESTE PRODUCTO POR CUALQUIER MOTIVO:
Sitieneunaconsultaoalg0ninconvenienteconsuproducto
Black& Decker,visite
HTTP://WWW.BLACKANDDECKER.CO_INSTANTANSWERS
paraobtenerrespuestasinstantb,neaslas24horasdeldia.
Sinoencuentralarespuestaonotieneaccesoa lnternet,Ilameal
1-800-544-6986delunesaviernesde8a.m.a5p.m.heradelEste
parahablarconunagente.
CuandoIlame,tengaamaneeln0merodecatalogo.
38
Modelo N° LOS120
INFORMAClON CLAVE QUE DEBE SABER:
- NO TENS!ONE EN EXCESO LA CADENA. Consulte
"Ajuste de tension de la cadena" a fin de conocer el
metodo adecuado para tensionar la cadena.
- Vuelva a ajustar la cadena con frecuencia durante las dos
primeras horas de uso.
*El ma.ximo vottaje inicial del paquete
de baterias (medido sin una carga
de trabajo) es 20 voltios. Si se mide
con una carga de trabajo, el voltaje
nom na es 18.
Page is loading ...
Page is loading ...
Page is loading ...
Page is loading ...
Page is loading ...
Page is loading ...
Page is loading ...
Page is loading ...
Page is loading ...
Page is loading ...
Page is loading ...
Page is loading ...
Page is loading ...
Page is loading ...
Page is loading ...
Page is loading ...
Page is loading ...
Page is loading ...
Page is loading ...
Page is loading ...

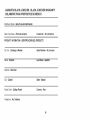
- GARANTiA BLACK & DECKER - BLACK & DECKER WARRANTY
. SOLAMENTE PARA PROPOSITOS DE MEXICO
Distributor Name • Sello firma del distribuidor
Date of purchase • Fecha de compra Invoice No. •No. de factura
PRODUCT INFOIVlATION - IDENTIFICACI6N DEL PRODUCTO
Cat. No. • Catalogo 6 Modelo Serial Number. No. de serie
_ombre
Last _o
Address • Direccion
City • Ciudad State •Estado
Postal Code • Codigo Postal Country. Pals
Telephone. No. Telefono
5g
Page is loading ...
-
 1
1
-
 2
2
-
 3
3
-
 4
4
-
 5
5
-
 6
6
-
 7
7
-
 8
8
-
 9
9
-
 10
10
-
 11
11
-
 12
12
-
 13
13
-
 14
14
-
 15
15
-
 16
16
-
 17
17
-
 18
18
-
 19
19
-
 20
20
-
 21
21
-
 22
22
-
 23
23
-
 24
24
-
 25
25
-
 26
26
-
 27
27
-
 28
28
-
 29
29
-
 30
30
-
 31
31
-
 32
32
-
 33
33
-
 34
34
-
 35
35
-
 36
36
-
 37
37
-
 38
38
-
 39
39
-
 40
40
-
 41
41
-
 42
42
-
 43
43
-
 44
44
-
 45
45
-
 46
46
-
 47
47
-
 48
48
-
 49
49
-
 50
50
-
 51
51
-
 52
52
-
 53
53
-
 54
54
-
 55
55
-
 56
56
-
 57
57
-
 58
58
-
 59
59
-
 60
60


Black & Decker LCS120 Owner's manual
- Category
- Cordless chainsaws
- Type
- Owner's manual
- This manual is also suitable for
Ask a question and I''ll find the answer in the document
Finding information in a document is now easier with AI
in other languages
Related papers
-
Black & Decker GPC1820L20 User manual
-
-
-
-
-
Black and Decker GKC1000L Astschere Owner's manual
-
-
-
Black & Decker NPP2018 User manual
-