REV. 12/18/2019 INST108-FD4CH
5
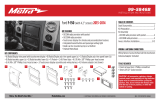
CONNECTIONS
From the 16-pin harness with stripped leads to the aftermarket radio:
• Connect the Red wire to the accessory wire.
• If the vehicle is equipped with a Shaker/Shaker-Pro sound system or NAV, connect the Blue/
White wire to the amp turn on wire. This wire must be connected to hear sound from the
factory amplifier.
• Connect the Orange/White wire to the illumination (lighting switch) wire.
• Connect the Gray wire to the right front positive speaker output.
• Connect the Gray/Black wire to the right front negative speaker output.
• Connect the White wire to the left front positive speaker output.
• Connect the White/Black wire to the left front negative speaker output.
• Connect the Green/Purple wire to the reverse wire.
• Connect the Light Green wire to the parking brake wire
• Tape off and disregard the following (6) wires, they will not be used in this application:
Blue/Pink, Brown, Green, Green/Black, Purple, Purple/Black
From the main harness to the aftermarket radio:
• Connect the Black wire to the ground wire.
• Connect the Yellow wire to the battery wire.
• Connect the Blue wire to the power antenna wire.
• If the vehicle is equipped with NAV, connect the Blue/White wire with a red connector to the
amp turn on wire. This wire must be connected to hear sound from the factory amplifier.
• Connect the Green wire to the left rear positive speaker output.
• Connect the Green/Black wire to the left rear negative speaker output.
• Connect the Purple wire to the right rear positive speaker output.
• Connect the Purple/Black wire to the right rear negative output.
• For models
with
SYNC: Connect the Red and White RCA jacks labeled “RSE/SYNC/SAT”, to the
audio input jacks. Disregard the Red and White RCA jacks labeled “FROM 3.5”, they will not
be used in this application.
• For models
without
SYNC: Connect the Red and White RCA jacks labeled “FROM 3.5”, to the
audio input jacks. Disregard the Red and White RCA jacks labeled “RSE/SYNC/SAT”, they will
not be used in this application.
• Disregard the DIN jack, it will not be used in this application.
Continued on the next page