Curtis TCC1 User guide

Category
Coffee makers
Type
User guide
Liquid Concentrate
Iced Tea/Coffee Dispensers
USER GUIDE
READ AND SAVE THESE INSTRUCTIONS
NOTICE TO INSTALLER: Please leave this booklet with the machine.
øøøøø /$
'$5$$<$>'30/5$07&3 'SFW/$
4UZMFWBSJFT.PEFMT5$$BOE5$$$TIPXO
CONTENTS CL60
.H\)HDWXUHV6SHFLÀFDWLRQV6\VWHP5HTXLUHPHQWV..............................................................................................FS60
,PSRUWDQW6DIHJXDUGV............................................................................................................................................... IS2
,QVWDOODWLRQ,QVWUXFWLRQV*HQHUDO.............................................................................................................................II28
,QVWDOODWLRQ,QVWUXFWLRQV/HYHOLQJ:DWHU6XSSO\.....................................................................................................II29
2SHUDWLQJ,QVWUXFWLRQV ...........................................................................................................................................OI43
&OHDQLQJ,QVWUXFWLRQV..............................................................................................................................................CI25
5RXJK,Q'UDZLQJ................................................................................................................................................. 5'
,OOXVWUDWHG3DUWV5HFRPPHQGHG3DUWV................................................................................................................. ,3
7URXEOHVKRRWLQJ*XLGH ..........................................................................................................................................7*
3URGXFW:DUUDQW\....................................................................................................................................................3:
Contact Information
Wilbur Curtis Co., Inc.
6913 Acco Street | Montebello, CA 90640 US
Phone: 323-837-2300 | Toll Free: 800-421-6150
Email: [email protected] | Web: www.wilburcurtis.com
'PSUIFMBUFTUTQFDJmDBUJPOTBOEJOGPSNBUJPOHPUPXXXXJMCVSDVSUJTDPN
5PMM'SFF].POEBZ'SJEBZ
A.M. - 4:00 P.M. PT
%VFUPDPOUJOVFEQSPEVDUJNQSPWFNFOUUIFQSPEVDUTJMMVTUSBUFEQIPUPHSBQIFEJOUIJTHVJEFNBZWBSZTMJHIUMZGSPNUIFBDUVBMQSPEVDU
5$$<$>$0/5&/54-*45øø /$
KEY FEATURES/SPECIFICATIONS/SYSTEM REQUIREMENTS FS60
Key Features
Mixing chambers have been designed and engineered for enhanced blending performance
Easily adjustable concentrate-to-water mixing ratio
Drip tray and quick disconnect included
• Braided hoses
Extra length hose for under-counter or remote bag-in-box applications
6SHFLÀFDWLRQV6HOHFWHG0RGHOV
3K\VLFDO
02'(/ '(6&5,37,21
&83
&/($5$1&(
&203$570(17
&$3$&,7<
5(*8/$725
6(77,1*
&21&(175$7(
5$7,2
&21&(175$7(
&211(&725
',63(16(5)/2:
5$7(*$/0,1
7&&
Single faucet, iced tea 8.50” 3.0 gal. max. 15.0 psi Adjustable QCD2 0.6
7&&& Single faucet, iced coffee 8.50” 3.0 gal. max. 15.0 psi Adjustable SCHOLLE “L” 0.6
7&& Dual faucet, iced tea 8.38” 2 x 1.5 gal. max. 15.0 psi Adjustable QCD2 0.6
7&& Triple faucet, iced tea 8.50” 3 x 1.0 gal. max. 15.0 psi Adjustable QCD2 0.6
'LPHQVLRQV :DWHU6XSSO\5HTXLUHPHQWV
02'(/ +(,*+7 :,'7+ '(37+
6+,3
:(,*+7
6+,3
&8%(
23(5$7,21$/
:(,*+7
:$7(5&211(&725 :$7(535(6685(
0,1)/2:
5$7(
7&& 24.63” 9.38” 17.88” 20.0 lbs 6.2 cu ft 45.0 lbs µÁDUH
20 - 90 psi 1.0 gpm
7&&& 24.63” 9.38” 17.88” 20.0 lbs 6.2 cu ft 45.0 lbs µÁDUH
20 - 90 psi 1.0 gpm
7&& 24.63” 9.38” 17.88” 21.0 lbs 6.2 cu ft 46.0 lbs µÁDUH
20 - 90 psi 1.0 gpm
7&& 28.13” 14.25” 13.88” 22.0 lbs 6.2 cu ft 47.0 lbs µÁDUH
20 - 90 psi 1.0 gpm
TCC1[C]/2/3, KEY FEATURES/SPECS/SYSTEM REQUIREMENTS 030218NC
IMPORTANT SAFEGUARDS IS2
Symbols
This is the safety alert symbol. It is used to alert you to potential physical injury hazards. Obey all safety
messages that follow this symbol to avoid possible injury or death.
DANGER - Indicates a hazardous situation which, if not avoided, will result in death or serious injury.
WARNING - Indicates a hazardous situation which, if not avoided, could result in death or serious injury.
CAUTION - Indicates a hazardous situation which, if not avoided, could result in minor or moderate injury.
NOTICE - Indicates a situation which, if not avoided, could result in property damage.
IMPORTANT - Provides information and tips for proper operation.
SANITATION REQUIREMENTS
Important Safeguards/Conventions
WARNING:
Make sure that this appliance is installed and grounded according to the INSTALLATION
*/4536$5*0/4CZRVBMJmFEQFSTPOOFMCFGPSFBUUFNQUJOHUPVTFJU'BJMVSFUPGPMMPXUIF*/45"--"5*0/
INSTRUCTIONS could result in personal injury or void the warranty.
This appliance is designed for commercial use. Any service other than cleaning and preventive
maintenance should be performed by an authorized Wilbur Curtis service technician.
5PSFEVDFUIFSJTLPGmSFPSFMFDUSJDTIPDL%0/05PQFOUIFTFSWJDFQBOFMT5IFSFBSFOPVTFS
serviceable parts inside.
Keep hands, arms and other items away from hot surfaces of the unit during operation.
Clean the appliance and any dispensers completelyCFGPSFVTJOHUIFNGPSUIFmSTUUJNFBDDPSEJOHUP
the CLEANING INSTRUCTIONS. Clean them regularly as instructed in the CLEANING INSTRUCTIONS.
Use this appliance only for its intended use, brewing/dispensing hot and/or cold beverages/water.
This appliance is not intended for use by persons (including children) with reduced physical, sensory
or mental capabilities or lack of experience and knowledge, unless they have been given supervision
or instruction concerning use of the appliance by a person responsible for their safety. Children should
be supervised to ensure that they do not play with the appliance.
Avoid spillage onto the power (mains) connector.
$0''&&5&"#3&8&34*.1035"/54"'&(6"3%44:.#0-4 )
WARNING - 5IJTQSPEVDUDBOFYQPTFZPVUPDIFNJDBMTJODMVEJOH"DSZMBNJEFBOE#JTQIFOPM"#1"
which are known to the State of California to cause cancer and birth defects or other reproductive harm.
'PSNPSFJOGPSNBUJPOWJTJUXXX18BSOJOHTDBHPW
IMPORTANT SAFEGUARDS IS2
$0''&&5&"#3&8&34*.1035"/54"'&(6"3%44:.#0-4 )
CE Requirements
This appliance must be installed in locations where it can be overseen by trained personnel.
'PSQSPQFSPQFSBUJPOUIJTBQQMJBODFNVTUCFJOTUBMMFEXIFSFUIFUFNQFSBUVSFJTCFUXFFO¡$UP¡$
This appliance is not suitable for outdoor use.
5IJTBQQMJBODFTIBMMOPUCFUJMUFENPSFUIBO¡GPSTBGFPQFSBUJPO
"OFMFDUSJDJBONVTUQSPWJEFFMFDUSJDBMTFSWJDFBTTQFDJmFEJODPOGPSNBODFXJUIBMMMPDBMBOEOBUJPOBMDPEFT
'PSTBGFVTFBOBMMQPMFEJTDPOOFDUJPONVTUCFJODPSQPSBUFEJOUPUIFmYFEXJSJOHJOBDDPSEBODFXJUIUIF
XJSJOHSVMFTPVUMJOFEJODMBVTFPG*&$GPSNFFUJOHUIFNJOJNVNFMFDUSJDBMTBGFUZPGUIJTTUBOEBSE
This appliance must not be cleaned by water jet.
5IJTBQQMJBODFDBOCFVTFECZQFSTPOTBHFEGSPNZFBSTBOEBCPWFJGUIFZIBWFCFFOHJWFOTVQFSWJTJPOPS
instruction concerning use of the appliance in a safe way and if they understand the hazards involved.
,FFQUIFBQQMJBODFBOEJUTDPSEPVUPGSFBDIPGDIJMESFOBHFEMFTTUIBOZFBST
"QQMJBODFTDBOCFVTFECZQFSTPOTZFBSTBOEBCPWFXJUISFEVDFEQIZTJDBMTFOTPSZPSNFOUBMDBQBCJMJUJFT
or lack of experience and knowledge if they have been given supervision or instruction concerning use of the
appliance in a safe way and understand the hazards involved.
$IJMESFOVOEFSUIFBHFPGZFBSTTIPVMECFTVQFSWJTFEUPFOTVSFUIFZEPOPUQMBZXJUIUIFBQQMJBODF
If the power cord is ever damaged, it must be replaced by the manufacturer or authorized service personnel
with a special cord available from the manufacturer or its authorized service personnel in order to avoid a
hazard.
Machine must not be immersed for cleaning.
$MFBOJOHBOEVTFSNBJOUFOBODFTIBMMOPUCFNBEFCZDIJMESFOVOMFTTUIFZBSFPMEFSUIBOZFBSTBOE
supervised.
This appliance is intended to be used in household and similar applications such as:
oTUBGGLJUDIFOBSFBTJOTIPQTPGmDFTBOEPUIFSXPSLJOHFOWJSPONFOUT
oCZDMJFOUTJOIPUFMTNPUFMTBOEPUIFSSFTJEFOUJBMUZQFFOWJSPONFOUT
– bed and breakfast type environments.
This appliance not intended to be used in applications such as:
– farm houses
Access to the service areas permitted by Authorized Service personnel only.
5IF"8FJHIUFETPVOEQSFTTVSFMFWFMJTCFMPXE#"
INSTALLATION INSTRUCTIONS II28
Installation Instructions
Installation Requirements
"XBUFSmMUSBUJPOTZTUFNJTSFRVJSFEUPNBJOUBJOUSPVCMFGSFFPQFSBUJPO8JMCVS$VSUJT$P*ODSFDPNNFOETB
8JMCVS$VSUJTBQQSPWFEXBUFSmMUFS4FFUIF$VSUJT&RVJQNFOU$BUBMPHGPSBGVMMMJOFPG8JMCVS$VSUJTBQQSPWFE
XBUFSmMUFST
1PUBCMFXBUFSTVQQMZMJOFDPOOFDUJPOGSPNUIFXBUFSmMUFSDBQBCMFPGTVQQMZJOHUIFNJOJNVNnPXSBUFSFRVJSFE
CZUIFTQFDJmDBUJPOT5IFXBUFSTVQQMZMJOFNVTUCFBCMFUPDPOOFDUUPUIFnBSFmUUJOHPOUIFCBDLPGUIF
VOJU4FFUIFSPECIFICATIONSTFDUJPOGPSUIFDPSSFDUTJ[F5IFXBUFSMJOFTIPVMEBMTPCFDBQBCMFPGCFJOH
DPOUSPMMFECZBTIVUPGGWBMWF%POPUDPOOFDUUIFXBUFSMJOFUPBTBEEMFWBMWFPSOFFEMFWBMWF
/4'*OUFSOBUJPOBMSFRVJSFTUIFGPMMPXJOHXBUFSDPOOFDUJPO
1 "RVJDLEJTDPOOFDUPSBEEJUJPOBMDPJMFEUVCJOHBUMFBTUUXPUJNFTUIFEFQUIPGUIFVOJUJTSFRVJSFE
TPUIBUJUDBOCFNPWFEGPSDMFBOJOHVOEFSOFBUI
2 5IJTFRVJQNFOUJTUPCFJOTUBMMFEXJUIBEFRVBUFCBDLnPXQSPUFDUJPOUPDPNQMZXJUIBQQMJDBCMF
GFEFSBMTUBUFBOEMPDBMDPEFT
 8BUFSQJQFDPOOFDUJPOTBOEmYUVSFTEJSFDUMZDPOOFDUFEUPBQPUBCMFXBUFSTVQQMZTIBMMCFTJ[FE
JOTUBMMFEBOENBJOUBJOFEJOBDDPSEBODFXJUIGFEFSBMTUBUFBOEMPDBMDPEFT
WARNING:*OTUBMMBUJPOJTUPCFQFSGPSNFEPOMZCZBRVBMJmFEJOTUBMMFS
NOTICE:%0/05DPOOFDUUIJTBQQMJBODFUPBIPUXBUFSTVQQMZ%POPUFYDFFEUIFNBYJNVNXBUFSQSFTTVSF
TUBUFEJOUIFSPECIFICATIONSTFDUJPO
IMPORTANT:0CTFSWFBMMHPWFSOJOHDPEFTBOEPSEJOBODFT
8"5&30/-:*/45"--"5*0/*/4536$5*0/4 "
5IF*OUFSOBUJPOBM1MVNCJOH$PEFPGUIF*OUFSOBUJPOBM$PEF$PVODJMBOEUIF'PPEBOE%SVH"ENJOJTUSBUJPO
'%"'PPE$PEFNBOVBMEJSFDUUIBUUIJTFRVJQNFOUNVTUCFJOTUBMMFEXJUIBEFRVBUFCBDLnPXQSFWFOUJPO
JODPNQMJBODFXJUIGFEFSBMTUBUFBOEMPDBMDPEFT'PSVOJUTJOTUBMMFEPVUTJEFPGUIF64"NBLFTVSFUIBU
UIFJOTUBMMBUJPOJTJODPNQMJBODFXJUIUIFBQQMJDBCMFQMVNCJOHTBOJUBUJPODPEFGPSZPVSBSFB
Leveling
1 Position the unit on a level counter top capable
of supporting its operating weight. See the
SPECIFICATIONS section.
INSTALLATION INSTRUCTIONS II29
Installation
5$$*/45"--"5*0/*/4536$5*0/4ø 030218NC
Connect the Water Supply
2 Make sure that the water supply valve on the back of
the unit is in the OFF position.
3 Flush the water supply line before connecting it to the
VOJUUPQVSHFBJSBOEEFCSJTGSPNUIFXBUFSmMUFSBOE
tubing.
4 $POOFDUUIFXBUFSTVQQMZMJOFUPUIFnBSFmUUJOHPOUIF
back of the unit.
5 Open the water supply valve running to the unit. Also,
turn the valve handle on the back of the unit itself to
the ON position.
6 Sanitize the dispensing system according to the
instructions in the CLEANING INSTRUCTIONS
TFDUJPOCFGPSFVTJOHUIFVOJUGPSUIFmSTUUJNF8IJMF
nVTIJOHPVUUIFTZTUFNDIFDLUIFDPOOFDUJPOTPOUIF
incoming water line for leaks.
Valve knob
in OFF
position
f
g
Style
varies
Back of unit
style varies
OPERATING INSTRUCTIONS OI43
TCC, OPERATING INSTRUCTIONS 030218NC
Use Instructions
Changing/Attaching the Liquid Concentrate Bag
Reload the concentrate bag and re-prime the unit immediately when the bag is empty.
2 The main water supply and
the water valve on the back
of the unit should both be in
the on position.
1 Remove the top cover from
the TCC dispenser and pull
the empty concentrate bag
and hose out.
3 Hold a cup under the faucet
and pull forward on the
handle to dispense.
2 On units with a Scholle type
connector, unscrew the
connector from the bag and
pull it up and off.
1 Make sure that the appropriate liquid concentrate bag(s) are connected to the unit. See the instructions below.
WARNING - DO NOT refrigerate unused tea overnight for later consumption. Never hold dispensed tea for
more than eight hours at room temperature. Discard any unused tea after eight hours.
NOTICE - Curtis strongly recommends that the water supply valve, behind the unit, be turned off during
non-business hours.
The liquid concentrate tea/coffee dispenser is factory preset for optimal performance.
3 On units with a QCD type
connector, release it by
pulling up on the hose
and cap assembly on the
opposite sides. The plunger
will pop up in the center of
the QCD. Slide sideways to
remove.
Back of unit
style varies
Style
varies
d
c
Cap
Hose
OPERATING INSTRUCTIONS OI43
TCC, OPERATING INSTRUCTIONS 030218NC
Changing/Attaching the Liquid Concentrate Bag (continued)
4 Place the new tea/coffee
concentrate bag on the
counter next to the TCC
dispenser. Remove the
shipping cap on the spout.
5 On units equipped with a
Scholle type connector,
place the connector over the
bag spout and thread the
connector all the way into the
spout. Skip to step 8.
6 On units with a QCD
connector, place the QCD
next to the spout, then
slide sideways until it
stops.
7 Push in on the QCD plunger
until it snaps into place.
8 Carefully lift the bag and set it inside the dispenser. Rest the
tubing on top of the bag. Route the tubing to the opposite
QSPEVDUJOUBLFIPMFPOUIFnPPSPGEJTQFOTFSBTTIPXO
9 Replace the top cover and
dispense beverage from
each faucet until darker
product starts to appear
(approximately 5 to 10
seconds).
Top view -
style varies
Bag #1
Bag #2
Place
connector
on side
Route hose for each
connector to opening
on opposite side
OPERATING INSTRUCTIONS OI43
TCC, OPERATING INSTRUCTIONS 030218NC
Mixing Valve Adjustment
1 6TVBMMZUIFGBDUPSZTFUUJOHTEPOPUSFRVJSFBEKVTUNFOU)PXFWFSGPSDVTUPNFSTXIPXJTIUPBEKVTUUIFnBWPS
of the drink, the mixing valve changes the water to concentrate ratio. This valve is very sensitive. Only slight
rotation of the mixing rod is needed to change the ratio (1/16th to 1/8th of a turn). The factory setting is
approximately 7:1 ratio, which will result in a 5 to 8 percent brix when sweet tea concentrate is used.
2 Tilt the dispenser on its side.
3 Before adjusting the mixing valve, check to make sure that the pressure regulator is set to 15 psi. If the
regulator is not properly set, the mixing valve will not work properly. See Setting the Pressure Regulator for
instructions.
4 Locate the adjusting rod (see diagram below). Turn it counter-clockwise (looking from the bottom) for a
stronger concentration – turn clockwise for a weaker concentration. Taste the tea/coffee with each adjustment
to determine the desired consistency.
NOTICE - Do not rotate the adjusting rod more than 2 full turns from the closed position. More turns will
cause the adjustment rod to disengage from the mixing valve, resulting in a leak.
Adjustment
rod
+
-
Setting the Pressure Regulator
The purpose of the regulator is to provide uniform water pressure, so that the mixing valve can produce a stable
and uniform blend of concentrate and water, and also to protect the hydraulics of the dispensing unit from
excessive line pressure.
1 Tilt the dispenser on its side.
2 Locate the regulator adjustment knob and turn it until the pressure level on the gauge reads 15 psi.
OPERATING INSTRUCTIONS OI43
TCC, OPERATING INSTRUCTIONS 030218NC
NOTICE - Do not exceed 25 psi (static). Equipment failure or leakage will result.
IMPORTANT - %POPUVTFUIFQSFTTVSFSFHVMBUPSBMPOFUPBEKVTUUIFUBTUFCSJYMFWFM$POmSNUIBUUIFSFHVMBUPS
is properly set, then adjust the taste/brix level using the Mixing Valve Adjustment instructions.
Daily Cleaning
1 Prepare a mild cleaning solution of dish washing detergent and warm water.
2 Wipe any spills, dust or debris from the exterior surfaces, with a damp cloth.
Apply a stainless steel polish to prevent scratches.
3 Turn off water supply at valve behind unit.
4 Open the dispensing faucet to relieve pressure in the dispensing lines.
5 Remove the top cover and clean with the cleaning solution.
6 Clean the faucet assembly:
Remove the handle/seat cup assembly from the faucet by holding the
bonnet and unscrewing.
Clean the bonnet and silicone seat cup assembly.
Use a spiral brush soaked in cleaning solution to clean inside the faucet
body.
Run the brush through the adapter on the body of the dispenser.
7 Rinse and dry parts that were removed. Assemble the dry parts onto the unit.
Weekly Cleaning and Sanitizing
Use a concentrated cleaning solution to simplify the cleaning procedure. This procedure requires a one gallon
container of a cleaning solution containing hot water and a granulated concentrated cleaner (a cleaner like Coffee
Dispenser Cleaner Corporation #12580, Urnex or equivalent) and a one gallon container of clean hot water.
1 Turn on water supply to the dispenser.
2 Remove the quick disconnect from the tea
concentrate bag.
3 Pull the cap off of the QCD (see detail drawing) and
place this end of the line into the container containing
the cleaning solution.
4 Place a large empty container under the dispenser
faucet.
5 Open the front faucet and dispense at least half of the
cleaning solution.
6 "MMPXUIFEJTQFOTFSUPTJUPWFSOJHIUCFGPSFnVTIJOH
cleaning solution.
continued...
NOTICE - Do not use cleaning liquids, compounds or powders containing chlorine (bleach) or corrosives.
5IFTFQSPEVDUTQSPNPUFDPSSPTJPOBOEXJMMEBNBHFUIFmOJTIFT USE OF THESE PRODUCTS WILL VOID
THE WARRANTY. Do not immerse the unit in water or any other liquid.
CLEANING INSTRUCTIONS CI25
TCC, CLEANING INSTRUCTIONS 052119A
Cap
QCD
To mixing
valve
Mix cleaner in
1 gallon hot
water
Bonnet
Seat cup
Weekly Cleaning and Sanitizing (cont.)
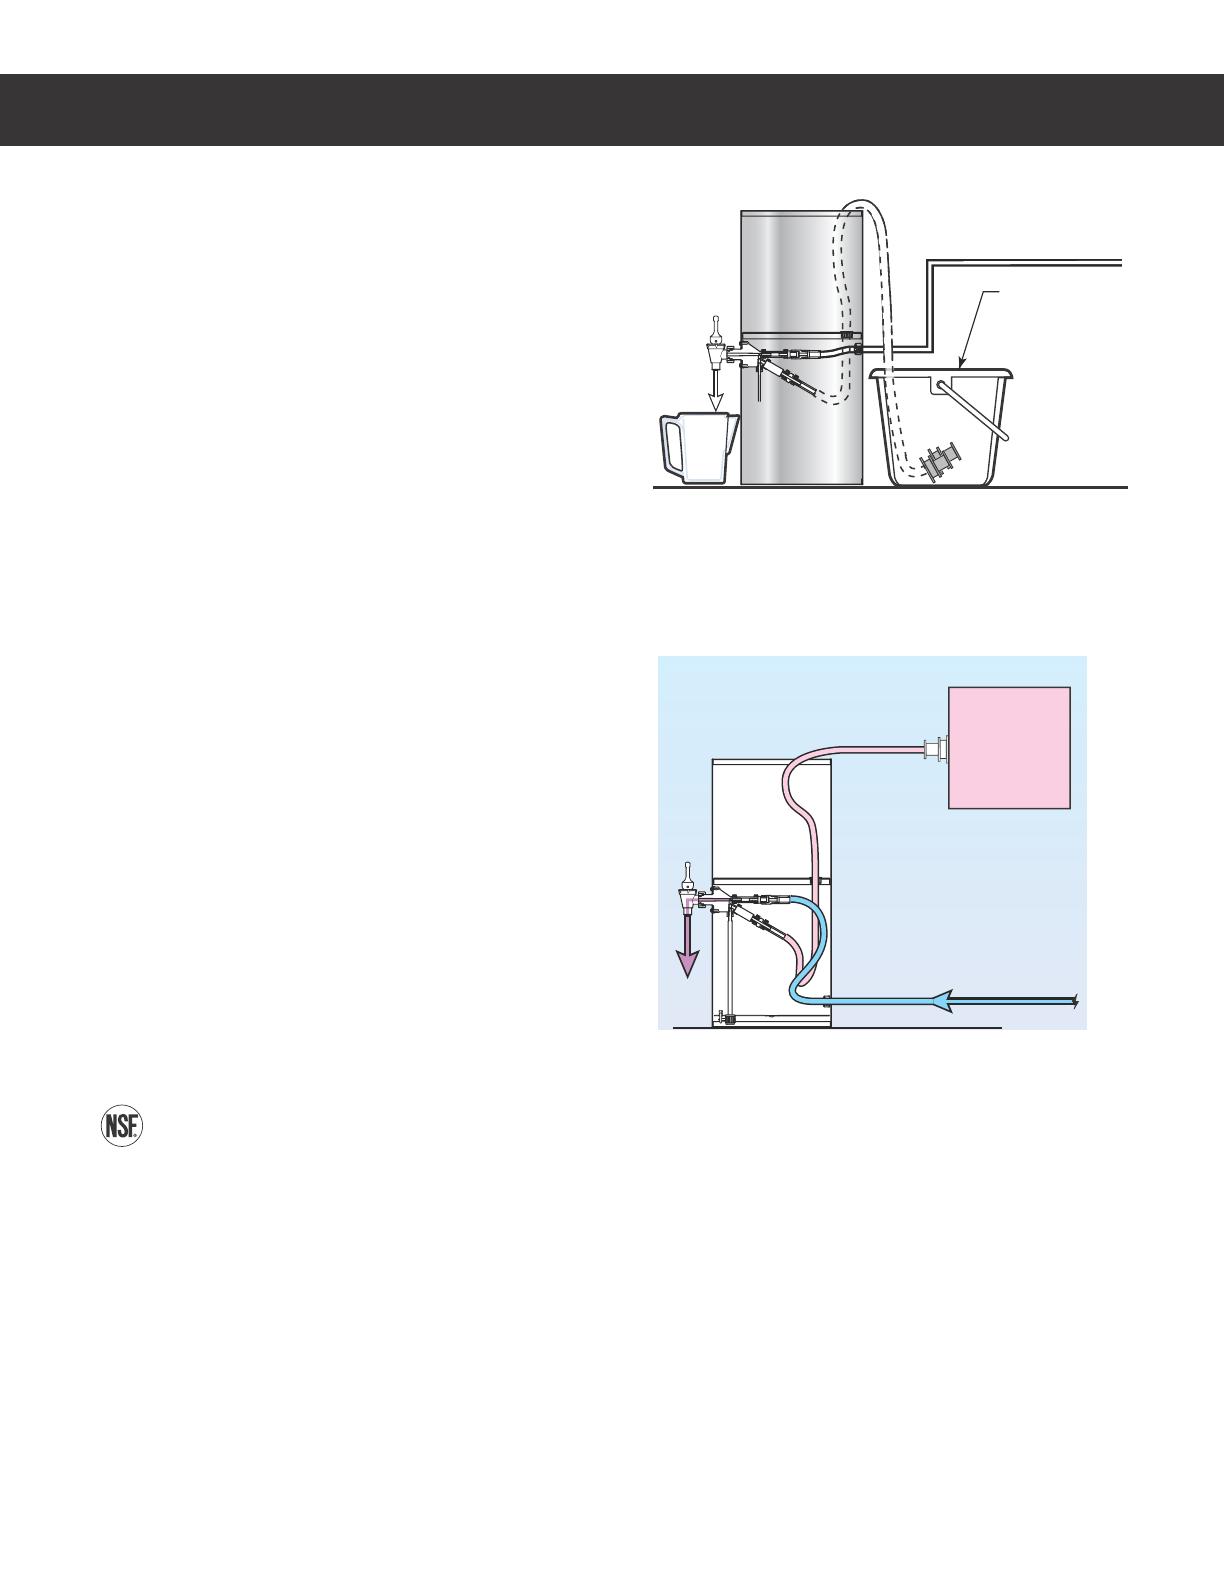
7 'MVTIUIFTZTUFNCZmMMJOHBPOFHBMMPODPOUBJOFS
with clean hot water (no cleaning solution) and open
the faucet and dispense at least one gallon of the
hot water or until all the cleaning solution has been
nVTIFEGSPNUIFTZTUFN
8 3FNPWFUIF2$%GSPNUIFnVTIJOHDPOUBJOFSBOE
replace the cap. Reconnect the QCD to the Bag in
the Box tea concentrate and dispense several cups
to prime the concentrate line or until consistency of
the product is correct.
Sanitizing
Use a Bag-in-Box style cleaning solution to simplify the sanitizing procedure. A product like BevClean (http://
bevclean.com) beverage line sanitizer comes in a 3 gallon bag-in-box that connects directly to your bag-in-box
system for line sanitizing.
1 Remove the quick disconnect from the tea concentrate
bag.
2 Place the BIB sanitizer container next to the TCC tea
dispenser. Pull the spout from the sanitizer box through
the marked area. Remove the clear travel cap from
spout. Don’t worry about spilling sanitizer when the cap is
removed. The cap has an internal seal.
3 Snap the QCD bag connector onto the bag spout.
4 Grasping the bag connector (as shown in Load Product,
step 6), push the sliding probe all the way into the bag
spout. A “click” will be heard when it is fully inserted.
5 Once the cleaning solution box is connected, open the
dispensing valve on the dispenser and run liquid through the valve until the sanitizer (clear liquid) is detected.
DO NOT FLUSH. Allow the sanitizing solution to sit in the tea lines overnight before proceeding with line
nVTIJOHTUFQTUISPVHICFMPX
6 Remove the QCD from the BIB cleaner. Unsnap the connector probe, pulling out and removing the connector
from the spout.
7 Reattach the tea concentrate BIB product.
8 0QFOUIFEJTQFOTJOHGBVDFUJOGSPOUPGUIFEJTQFOTFSBOEBMMPXXBUFSUPSVOPVUVOUJMUFBnPXTGSPNUIFGBVDFU
9 Repeat the process for any additional faucets on dispenser.
10 Note: Muliti-outlet manifolds are available for sanitizing up to eight beverage lines with one bag-in-box
sanitizer. This allows you to clean all systems at one time.
CLEANING INSTRUCTIONS CI25
TCC, CLEANING INSTRUCTIONS 052119A
Hot rinse
water
Water line
BIB
sanitizer
CLEANING INSTRUCTIONS CI25
TCC, CLEANING INSTRUCTIONS 051619A
Cleaning The Strainer - Monthly or As Needed
1 Turn off the water supply valve on the back of the unit.
Open one of the dispensing faucets to relieve pressure in
the tubing system.
2 Tilt the dispenser on its side.
3 Locate the strainer cap, located on the bottom of the
water supply valve. Use a pair of pliers to grab the
valve housing while removing the strainer cap with an
adjustable wrench.
4 Remove the wire strainer and clean any debris out of the
valve housing.
5 Use a spiral bristled brush to clean inside the strainer.
6 Rinse the strainer and reinsert it into the valve housing.
7 Replace the strainer cap.
8 Tilt the unit back into place and turn on the water supply
valve.
Turn off
valve
Strainer
Valve
housing
Cap
ROUGH-IN DRAWINGS RD62
TCC1[C]/2/3, ROUGH-IN DRAWING 022217NC
TCC1[C]
TCC2
17.88 in
[45.4 cm]
17.88 in
[45.4 cm]
12.88 in
[32.7 cm]
12.88 in
[32.7 cm]
9.38 in
[23.8 cm]
9.38 in
[23.8 cm]
8.88 in
[22.5 cm]
8.88 in
[22.5 cm]
8.50 in
[21.6 cm]
8.38 in
[21.0 cm]
24.63 in
[62.5 cm]
24.63 in
[62.5 cm]
0.75 in
[1.9 cm]
0.75 in
[1.9 cm]
ROUGH-IN DRAWINGS RD62
TCC1[C]/2/3, ROUGH-IN DRAWING 030218NC
TCC3
13.88 in
[35.2 cm]
8.88 in
[22.5 cm]
14.25 in
[36.6 cm]
9.38 in
[23.8 cm]
8.50 in
[21.6 cm]
28.13 in
[71.4 cm]
0.75 in
[1.9 cm]
ILLUSTRATED PARTS/RECOMMENDED PARTS IP108
TCC1[C]/2/3, ILLUSTRATED PARTS/RECOMMENDED PARTS 040317NC
TCC1[C]/2/3 - Outer Chassis - Exploded View
1A
1B
1A
1B
2A
2B
2A
3A
4
4
3B
TCC1[C] shown - Outer chassis replacement
parts for TCC2 are the same.
TCC3 shown
ITEM # PART # DESCRIPTION
1A WC-5683
LID, SOLID/BREW-THRU (OPTIONAL USES)
TCO’S
1B WC-5683-101
LID, SOLID/BREW-THRU BLUE TCC/TCO
(OPTIONAL)
2A WC-38471
1,3,4
LABEL, FRONT TCO ICED TEA GENERIC
2B WC-38472
2
LABEL, FRONT TCOC ICED COFFEE
GENERIC
ITEM # PART # DESCRIPTION
3A DTP-08
1,2,3
DRIP TRAY, ASSY PLASTIC 8”
3B DTP-13
4
DRIP TRAY, ASSY PLASTIC 13”
4 WC-3531 LEG, PLASTIC GLIDE TCN
TCC1[C]/2/3 - Outer Chassis - Parts List
ITEM # PART # DESCRIPTION
1A WC-5683
LID, SOLID/BREW-THRU (OPTIONAL USES)
TCO’S
3A DTP-08 DRIP TRAY, ASSY PLASTIC 8”
3B DTP-13 DRIP TRAY, ASSY PLASTIC 13”
Recommended Parts to Stock
1
TCC1,
2
TCC1C,
3
TCC2,
4
TCC3
ILLUSTRATED PARTS/RECOMMENDED PARTS IP108
TCC1[C] Mixing/Dispensing System - Exploded View
TCC1[C]/2/3, ILLUSTRATED PARTS/RECOMMENDED PARTS 030218NC
11A
11B
21
9
8
7
6
5
24
13
22
4A
4A
4B
2
2
17
26
16
15
14
18
19
1A
1B
2
2
3
23
10
ILLUSTRATED PARTS/RECOMMENDED PARTS IP108
TCC2 Mixing/Dispensing System - Exploded View
TCC1[C]/2/3, ILLUSTRATED PARTS/RECOMMENDED PARTS 030218NC
11A
9
8
7
6
5
24
13
22
12
4A 4A
4B
2
2
13
2
2
17
26
16
15
14
18
19
1A
22
3
23
10
21
ILLUSTRATED PARTS/RECOMMENDED PARTS IP108
TCC3 Mixing/Dispensing System - Exploded View
TCC1[C]/2/3, ILLUSTRATED PARTS/RECOMMENDED PARTS 030218NC
11A
9
8
7
6
5
24
13
22
12
4A
4A
4B
2
13
2
13
2
2
2
17
17
26
25
15
14
18
19
1A
2
2
2
3
23
10
21
  • Page 1 1
  • Page 2 2
  • Page 3 3
  • Page 4 4
  • Page 5 5
  • Page 6 6
  • Page 7 7
  • Page 8 8
  • Page 9 9
  • Page 10 10
  • Page 11 11
  • Page 12 12
  • Page 13 13
  • Page 14 14
  • Page 15 15
  • Page 16 16
  • Page 17 17
  • Page 18 18
  • Page 19 19
  • Page 20 20
  • Page 21 21
  • Page 22 22
  • Page 23 23

Curtis TCC1 User guide

Category
Coffee makers
Type
User guide

Ask a question and I''ll find the answer in the document

Finding information in a document is now easier with AI