Westinghouse WVEP6716 User guide

Type
User guide

Westinghouse WVEP6716, a durable and reliable oven, is ready to help you make the most of your time at home. Enjoy a wide range of cooking options with functions like Fan Forced, Fan Grill, Grill, Easy Bake + Steam, and AirFry. Achieve perfectly cooked dishes with the help of the Uptimer icon and pre-heat your oven efficiently to save time and energy. The Assisted Cooking icon provides guidance for selecting the right program for the best results. Discover healthier alternatives with the AirFry function, delivering delicious and crispy meals for the entire family.

Westinghouse WVEP6716, a durable and reliable oven, is ready to help you make the most of your time at home. Enjoy a wide range of cooking options with functions like Fan Forced, Fan Grill, Grill, Easy Bake + Steam, and AirFry. Achieve perfectly cooked dishes with the help of the Uptimer icon and pre-heat your oven efficiently to save time and energy. The Assisted Cooking icon provides guidance for selecting the right program for the best results. Discover healthier alternatives with the AirFry function, delivering delicious and crispy meals for the entire family.

Quick Start Guide
WVEP6716, WVEP6717 oven series
Ready
Set...
Before you start, please make sure:
Your oven has been correctly installed by a qualified person.
Your oven has power and is switched on.
You’ve removed all relevant packaging.
Get to know your oven control panel:
To access your detailed user manual online, simply scan the QR code on your smart phone.
For more detailed information and installation guide refer to user manuals
at westinghouse.com.au/manuals
Quick Start Guide
WVEP6716, WVEP6717 oven series
and WESTINGHOUSE are trademarks of Westinghouse Electric Corporation. Used under license by Electrolux Home Products Pty Ltd. All Rights Reserved.
© 2023 Electrolux Home Products Pty Ltd. ABN 51 004 762 341 W_QSG_WVEP6716_WVEP6717_A4_Feb23 ANC A26699401 RevA (Assy ANC A26721001 RevA)
This is a Quick Start Guide. Please refer to user manual
online for detailed information and installation
Most of the packaging
materials can be recycled.
Please dispose of them at
your local recycling centre
or in your own recycling bin.
Dear Customer,
Thank you for purchasing a Westinghouse oven. You have chosen a product that comes
from a history of durable and reliable products loved by many families. We look to help
you make the most of your time at home, so you can spend your time doing what you
really love, with the ones you love.
Welcome to Westinghouse.
1 Lock icon
2 Uptimer icon
3 Steam cooking indicator icon
4 Settings icon
5 Cleaning icon
6 Assisted cooking icon
7 Cooking time icon
8 Time delay icon
9 Minute minder icon
9 8 6 57
1 2
34
function selector temperature selector
Electrolux Home Products Australia
telephone: 13 13 49
email: customercare@electrolux.com.au
web: electrolux.com.au
Electrolux Home Products New Zealand
telephone: 0800 436 245
email: customercare@electrolux.co.nz
web: electrolux.co.nz
Contact us if you need more help
Customer Care Centre
Need more help?
To access your detailed user manual online, simply scan the
QR code on your smart phone. If you prefer a printed manual,
please contact our Customer Care Centre using details below.
Enjoy peace of mind.
Register your appliance today.
Stay updated on better living services, safety notices and shop for accessories.
1. Open the camera app on your smartphone and point at the QR code to scan
Product Registration QR code is located on the front of your appliance or
inside the door rim*.
2. Tap the notification or link to open the registration form
3. Complete your details and enjoy peace of mind
*Exact location of QR code may vary depending on oven model
Go!
You’re ready to use your new Westinghouse appliance. A few tips from us:
Remember to pre-heat each time.
For best cooking results pre-heat the oven. Pre-heating allows the oven to reach the required
temperature quickly and effi ciently as well as cook food at the correct temperature for the entire
cook time. Recommended pre-heat time is 30 mins for baking and 3 minutes for grilling.
Set your temperature
Turn the temperature selector (left or right ) as required to set the desired cooking temperature
in °C.
Note: the temperature can be adjusted at any time throughout the cooking time.
Condition the oven (to burn off any residue)
New appliances can have oil or residue left
from manufacturing. You will need to heat
your oven for 30 minutes before using it for
the fi rst time.
1. Turn the function selector dial to FAN
FORCED
2. Using the temperature selector, set the
oven at 180°C for approximately 30
minutes. Please ensure that the room is well
ventilated during this process.
Choose the right program for the best result:
Set the time
Before you can start using the oven, you
must set up the clock.
• After the oven has been electrically
connected, ‘12:00’ will be displayed and
the hour minute digits will fl ash.
• Turn the temperature selector (Left – or
Right +) to set the time of the day.
• Press OK to complete the clock setting.
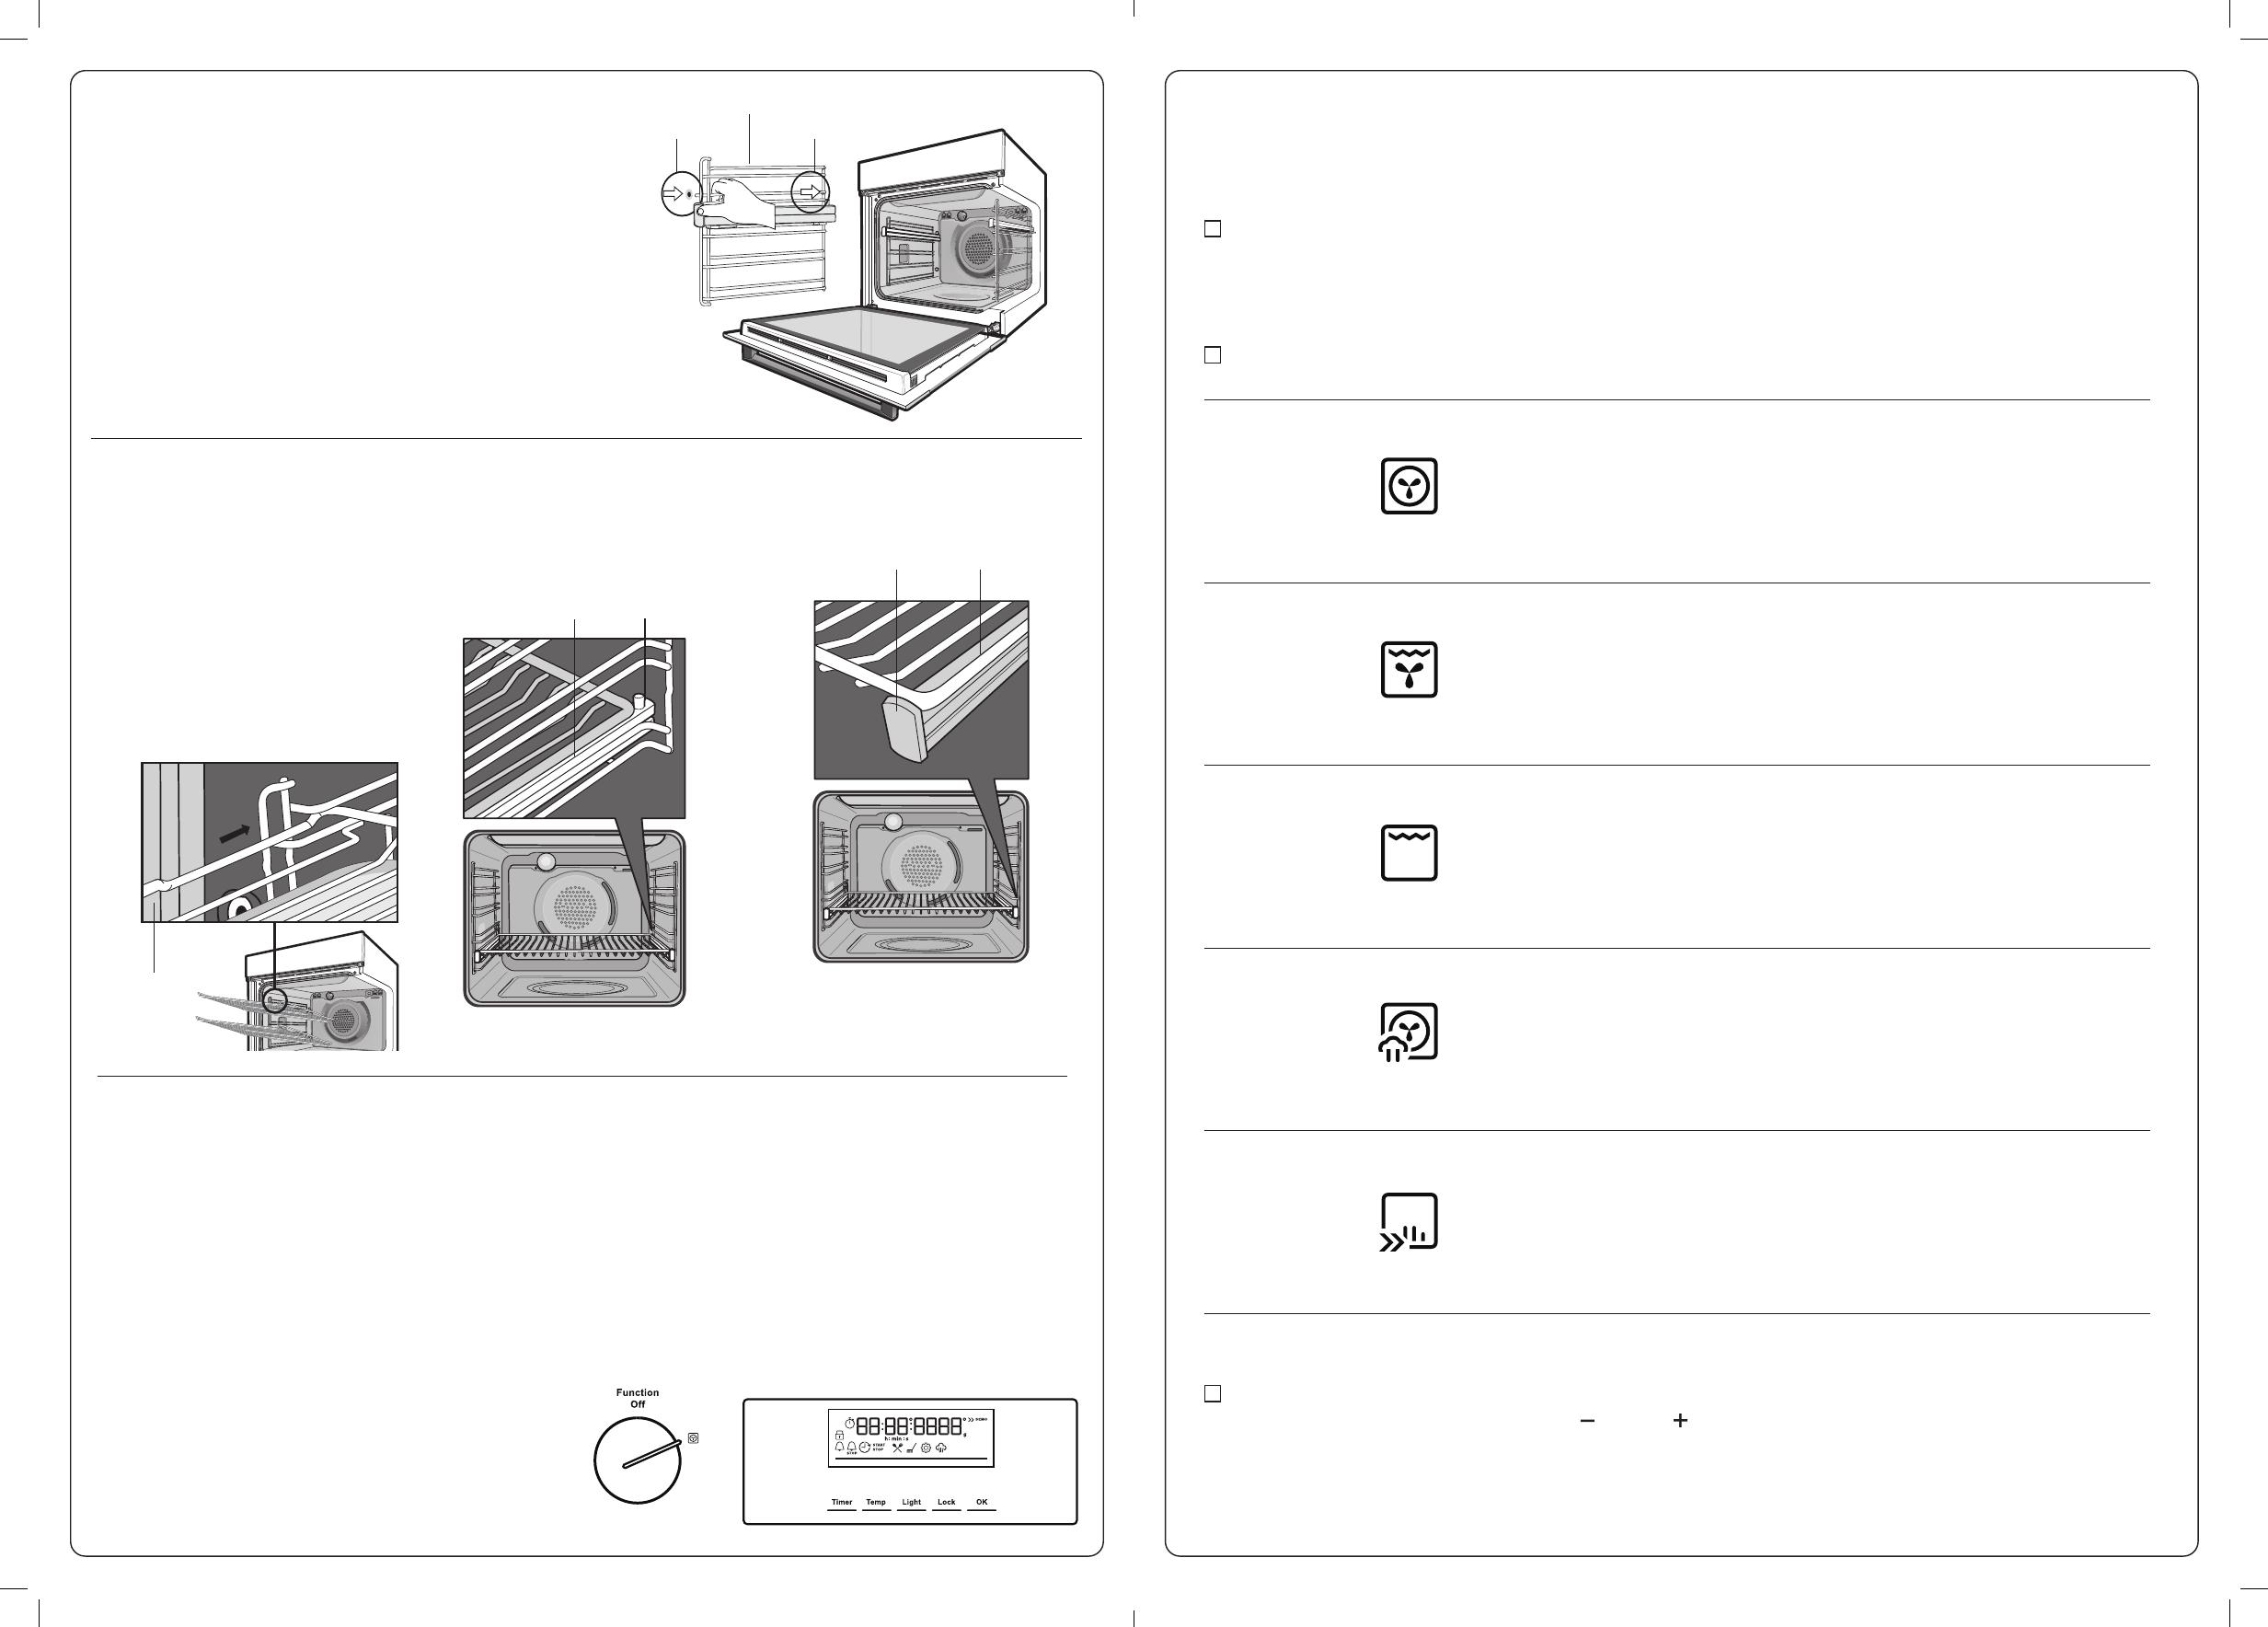
Installing the oven accessories
1. Install telescopic slides (where supplied) to the
side racks. Refer to installation guide supplied
with oven slides.
2. Insert side racks
There is a left hand and right hand version (see image).
1. Insert the rear peg into the rear access hole,
ensuring that the peg is fully inserted.
2. Then locate the front peg into the front access hole
and push in fi rmly.
Set...
4. Fit shelf/tray (where
supplied) to telescopic slides
1. Push the shelf or tray along
the top of the slide until it hits
the back post.
Shelf Back post
2. Drop the front of the shelf or
tray onto the slide ensuring it
sits behind the front post of the
slide.
Shelf
Front post
3. When fully inserted the shelf/
tray should not interfere with the
closed oven door.
3. To fi t a shelf or tray to side racks:
1. Locate the rear edge of the shelf
in between guide rails of the
side rack. Ensure the same rail
positions on both sides of the
oven are being engaged.
2. With the front edge raised, slide
the shelf into the oven.
3. Once the detents have passed the
front edge of the side rack, the
shelf can be pushed completely in.
Detent
Left hand side rack
front peg rear peg
FAN
FORCED
This setting is best used when cooking on multiple shelves at once or
reheating complete meals for your family.
FAN &
GRILL
When cooking large cuts of meat, this setting gives you result that
is similar to ‘rotisserie’ cooked meat. When using ‘Fan Grill’ it is not
necessary to turn food over during the cooking cycle. Set temperature
to 180°C and cook with the oven door closed.
GRILL
When it comes to cooking tender cuts of meat, steak, chops, sausages,
fish, cheese toasties and other quick cooking foods the grill setting will
get you the best results. By preheating your grill for 3 minutes this will
help in sealing in the natural juices for a better flavour. Grill with the
oven door closed.
EASY BAKE
+ STEAM
Steam helps you get a better rise, crispier crust, a fluffier centre and
tastier textures for all your bread, pastries, cakes, scones and puddings
at home. (WVEP6717 models only)
AIRFRY
AirFry for that perfect, healthy crunch. When a food craving hits,
make healthier and delicious food right in your oven. Deliver all the
flavour and none of the guilt. AirFry allows you to make healthier
tasty meals for the entire family – right in your oven.
Refer to your full user manual for more details on oven functions.
FAN
FORCED
  • Page 1 1
  • Page 2 2

Westinghouse WVEP6716 User guide

Type
User guide

Westinghouse WVEP6716, a durable and reliable oven, is ready to help you make the most of your time at home. Enjoy a wide range of cooking options with functions like Fan Forced, Fan Grill, Grill, Easy Bake + Steam, and AirFry. Achieve perfectly cooked dishes with the help of the Uptimer icon and pre-heat your oven efficiently to save time and energy. The Assisted Cooking icon provides guidance for selecting the right program for the best results. Discover healthier alternatives with the AirFry function, delivering delicious and crispy meals for the entire family.

Ask a question and I''ll find the answer in the document

Finding information in a document is now easier with AI