Pitsco Education W37521 User guide

Type
User guide

Pitsco Education W37521 is an educational tool that allows users to build and operate a functional torsion catapult. With this kit, users can learn about the principles of torsion and how it can be used to launch projectiles. The kit includes all the necessary materials to assemble the catapult, including basswood sheets with laser-cut parts, screws, a paper clip, string, and glue. Additionally, users will need a small screwdriver, scissors, and needle-nose pliers (optional).

Pitsco Education W37521 is an educational tool that allows users to build and operate a functional torsion catapult. With this kit, users can learn about the principles of torsion and how it can be used to launch projectiles. The kit includes all the necessary materials to assemble the catapult, including basswood sheets with laser-cut parts, screws, a paper clip, string, and glue. Additionally, users will need a small screwdriver, scissors, and needle-nose pliers (optional).

Torsion
Catapult Kit
60000 V1122
Cautionary and Warning Statements
This kit is designed and intended for educational purposes only.
Use only under the direct supervision of an adult who has read and
understood the instructions provided in this user guide.
Read warnings on packaging and in manual carefully.
Anyone operating the Torsion Catapult or nearby during its operation
should wear safety glasses.
Never use a sharp object as a projectile. Never fire at a living thing.
Use this device only in the manner discussed and illustrated within this
guide. Misuse of this product can cause serious injury.
Do not aim at people.
Always exercise caution when using sharp tools.
User Guide
2 Torsion Catapult User Guide 60000 V1122
How It Works
In the Middle Ages, people used torsion as the force needed to operate
a catapult. Torsion is the strain in a material that is twisted – when the
material is released, it resists this strain by unwinding itself. Operators
twisted ropes very tightly around the catapult arm and then released
them. When the twisted ropes were released, the catapult’s arm reacted by
springing up and releasing the ammunition. This same principle is used in
this kit designed for modern students.
Materials Included
2 basswood sheets with laser-cut parts
3 screws
Paper clip
String
Items Required (not included)
Small screwdriver
White glue (such as HD Bond II)
Scissors
Needle-nose pliers (optional)
Projectiles (such as clay, Styrofoam balls, mini marshmallows,
or Whopper candies)
Torsion Ballista User Guide 60000 V1122 3
Build the Catapult Frame
1. Pop out the parts from the
basswood sheets. Keep the
numbered pieces and dispose of
the rest.
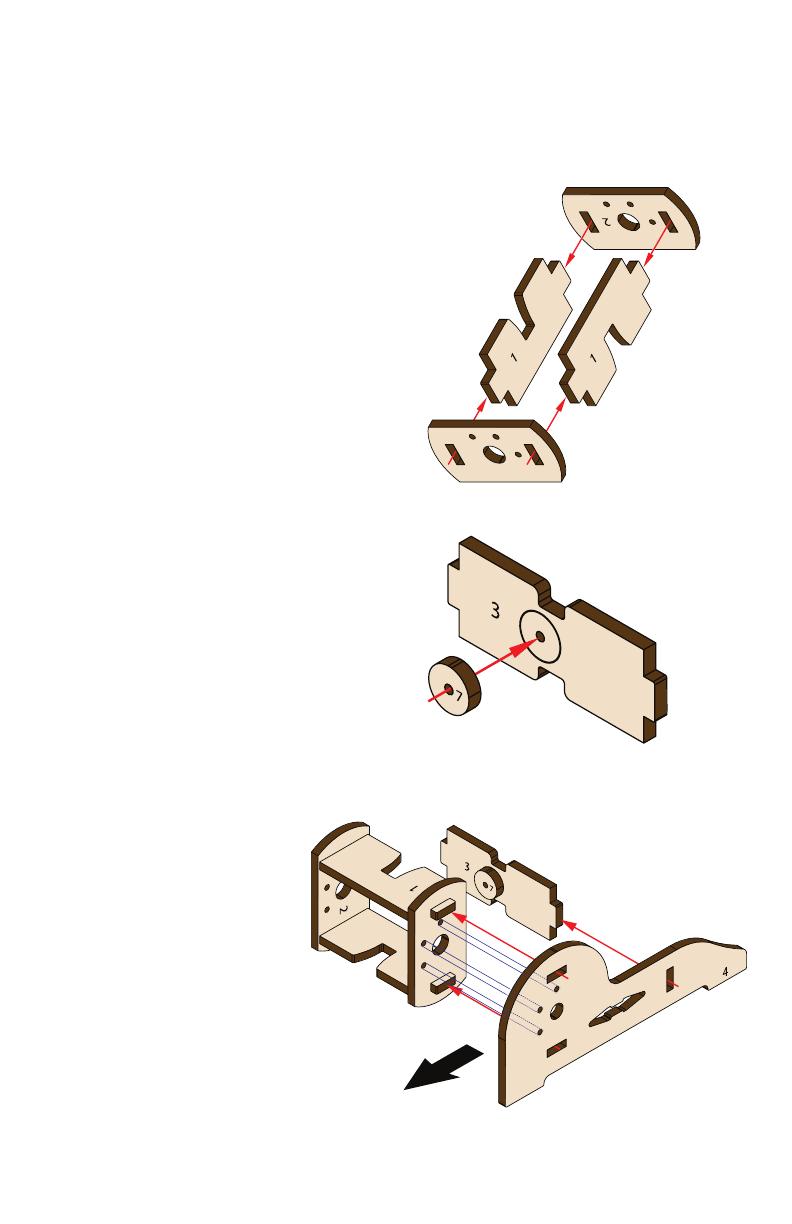
2. Place a Part 2 facedown and glue
the notches of the Part 1 pieces
into the Part 2 as shown – make
sure the grooves on the Part 1s
are facing in opposite directions.
Be sure all the Parts 1 and 2 are
oriented as shown in the image.
3. Glue the other Part 2 on top of
the Part 1s. The small holes on
the Part 2 pieces should be mirror
images. Let dry.
4. Glue Part 7 over Part 3 where the
circle indicates. Be careful not to
get glue in the small hole in the
middle of the two parts. Let dry.
5. Glue the Part 1 notches that
extend from one side of Part 2
into the slots of Part 4. Be sure
the small circles on Part 2 are
matched to the small circles on
Part 4. Also, make sure the groove
on the bottom Part 1 is facing
forward.
6. Now, glue the notch
on one end of Part
3 into the single slot
on the narrow end
of a Part 4. Part 7 on
the assembly should
face the center of the
catapult.
7. Glue the other Part
4 on top of the two
assemblies so the
two Part 4s are even.
Steps 2-3
Step 4
Steps 5-6 Assemble with the three small
holes of Part 2 aligned with the
three small holes on Part 4 as
shown by the blue lines.
Forward
4 Torsion Catapult User Guide 60000 V1122
Make the Launch Arm and Trigger
1. Parts 5 and 6 make the launch arm. Glue the two Part 5s back-to-back.
2. Glue Part 6 into the notch on the end of the Part 5s. Let dry.
3. Parts 8 and 9 make the trigger. Glue them together by tting the slot
in Part 9 into the slot on Part 8. Let dry.
4. On the back of the catapult, screw on the trigger so it points toward
the center of Part 3.
Step 1 Step 2 Step 3
Step 4
Add the String
1. Straighten the paper clip except for
a hook at one end.
2. Locate Part 10 and the string. This
part will help create the loops of
string that will be needed for the
torsion component of the catapult.
3. Take one end of the string and
thread it through the hole on Part
10. Pull out enough string to equal
the length of Part 10.
Step 1
Steps 2-3
Torsion Ballista User Guide 60000 V1122 5
4. Loop the string around Part 10
three times so you have three
complete loops. Pull the string
from the hole so you have two
loose ends.
5. With the string still wrapped
around Part 10, take the two
ends of string and tie them in
a knot.
6. Place a dot of glue on the knot
to hold it in place. Let it dry.
7. Use the paper clip to remove
the knotted and glued string
from Part 10.
8. Using the clip, thread the
string through the big hole on
one side of the catapult, taking
the paper clip out the opposite
hole. Do not pull the string all
the way through – leave a loop
of string hanging out the end.
Insert a Part 11 (keeper) into
the loop.
Steps 4-5
Step 6
Step 8
9. Pull the string tight. Under
the loop with the paper clip,
insert another keeper. Remove
the paper clip. Trim the string
ends.
Step 9
Step 7
6 Torsion Catapult User Guide 60000 V1122
10. Separate the strings in the middle of the catapult into two sections,
keeping an opening between them.
11. From the back of the catapult, insert the launch arm into this opening
as shown. The other end should rest on the back of the catapult body.
Steps 10-11
Steps 13-14
12. Place the catapult so the front is away from you. Holding the keeper
and string on the right side still, give the keeper on the left side one
turn counterclockwise.
13. Next, hold the left side still and turn the keeper on the right one turn
clockwise. Note that these go in the opposite direction – that is what
twists the string, providing torsion.
14. Now repeat this procedure, but just give each side a half turn. Place a
screw into the hole on each side that will enable the screw to best hold
the keeper in place. This will vary depending on how tight the string
is wound. The tightness of the string will determine the tension in the
catapult. The tighter the string, the higher the tension.
Torsion Ballista User Guide 60000 V1122 7
Step 1
Step 2
Operate the Catapult
1. Place the catapult where you wish to launch it. Pull the launch arm
back and secure it with the trigger.
2. Place a projectile on the hole of the launch arm.
3. To launch, pull down the trigger. Tip: Use more tension for heavier
projectiles and less tension for lighter ones.
P.O. Box 1708 • Pittsburg, KS 66762
shop.pitsco.com
Toll-Free Orders 800-835-0686
  • Page 1 1
  • Page 2 2
  • Page 3 3
  • Page 4 4
  • Page 5 5
  • Page 6 6
  • Page 7 7
  • Page 8 8

Pitsco Education W37521 User guide

Type
User guide

Pitsco Education W37521 is an educational tool that allows users to build and operate a functional torsion catapult. With this kit, users can learn about the principles of torsion and how it can be used to launch projectiles. The kit includes all the necessary materials to assemble the catapult, including basswood sheets with laser-cut parts, screws, a paper clip, string, and glue. Additionally, users will need a small screwdriver, scissors, and needle-nose pliers (optional).

Ask a question and I''ll find the answer in the document

Finding information in a document is now easier with AI