Page is loading ...

COMPACT
UNDERWATER
VIEWING
SYSTEM
USER MANUAL

www.MarCumtech.com
- 2 -
RECON5+
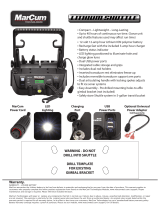
The RECON5+ viewing system comes complete with everything needed to
enjoy the world of underwater viewing. It features a 5” Screen with a
multi-purpose sun shield/screen protector. The camera features both visible
LED lights as well as a stealthy infrared option for viewing in low light
situations. A built in DVR allows for video recording as well as capturing
photos of the action. Incorporated into the camera system are on screen
displays of depth, temperature, and camera direction. A removable weight
and camera-positioning clip come standard with the system. The system is
powered by an internal rechargeable Lithium Ion battery that provides up to
6 hours of continuous run-time. Included with your system are a charger
and cable, protective soft-pack, and camera storage sack. The RECON5+
features a ¼”- 20 insert as well as additional inserts that allow for limitless
mounting options (Mounts not included). These are located behind the
cable storage reel (see “Removing the camera cable storage reel” section).
The charging port and video out jack are located on the rear of the monitor,
and can be accessed by lifting the protective rubber cap.
Display:
• 5” Widescreen LCD Monitor
•
16:9 Aspect Ratio,
Sunlight Readable
• 800 x 480 Pixel Hi-Res Color
Power:
• Rechargeable Internal Lithium
Battery
• (Up-to 6 Hours of Continuous
Run-Time)
• USB Charger & Cable
Display Adjustments:
•
Brightness
•
Sharpness
• Contrast
• Color
• Color Kill
• On Screen Display
• Units
SPECIFICATIONS
Camera:
• 1/3” CMOS Sensor Offers
Optimal Low-Light Performance
• 110° Field of View
• Darkwater Adjustable LED or IR
Lighting
• Color Kill, Color or B/W Image
Options
• 50 ft. Camera Cable
• Removable weight
Additional Features:
• Built-In DVR
• Built-In Sunshield & Screen
Protector
• RCA Video Out
• Soft Pack & Camera Sack
• Removable Camera/Cable
Storage
• 1-Year Warranty
• Supports up to a 32 GB
Micro-SD card
GETTING STARTED
Charging:
The RECON5+ has an on-screen display of the battery status found in the
upper left side of the video image. Once the video image starts the battery
status indicator will detail a series of green bars. Three full green bars will
indicate a full charge.
•
Operating Temperature: -10C
to +40C

www.MarCumtech.com
- 3 -
To charge the RECON5+, power the system off (5 second hold of power
button) and locate the rubber cap on the back of the monitor just to the right
of the cable storage reel. Lift the rubber cap to expose the USB Charging
port. Insert the supplied USB cable and connect it with the supplied
charger, or any USB port. Once the charger is connected to either the wall
outlet or USB port, the charge indicator light (on rear of unit next to A/V
Port) will illuminate – red indicates that the system is charging, green
indicates the system is fully charged. When using the wall outlet there is a
light on the charger that will always be green when plugged in. This light
will indicate there is power being supplied. To verify if the system is
charged, please check the charge indicator light on the rear of the unit.
Once charging is complete, unplug the charger, remove the USB charging
cable from the system, and properly seal the rubber cap. Best practice is to
charge after every use regardless of how far down the battery was
discharged. This will ensure the longest run-time each time the system hits
the water.
OPERATION
The Control panel located on the front right side of system features four
buttons, with one on the left side.
Power Button
The bottom button powers the system on and off. Press the power button to
turn the system on. A start up screen with the MarCum logo will briefly
show, followed by the video image. To turn the system off press and hold
the power button for 5 seconds until the system shuts down.
LED/Up Arrow Button
The LED/Up arrow button serves a dual purpose. When selected it will turn
on and increase the intensity of the LED lights. An on-screen display will be
shown momentarily to indicate the light intensity level selected. There are
three intensity levels and an off selection.
When in the menu section of the system, this button serves as an up
selection.
IR/Down Arrow Button
The IR/Down arrow button serves a dual purpose. When selected it will turn
on and increase the intensity of the Infrared lights. An on-screen display will
be shown momentarily to indicate the light intensity level selected. There
are three intensity levels and an off selection.
When in the menu section of the system, this button serves as a down
selection.
Menu/Enter Button
The Menu/Enter button serves a dual purpose. Pressing once accesses
the Menu system. Once inside the menu system it functions as the enter
button.
Record Button
The Record button serves a dual purpose to both take a picture and record
video. (see “Built-In DVR”)

www.MarCumtech.com
- 4 -
RECON5+ MENU OPTIONS
For ease of use, the menu system on the RECON5+ times out after a 5
second period of inactivity and defaults back to the camera image without
any additional keystrokes required.
Enter the Menu system with a single press of the top Menu/Enter button.
Use the Up or Down arrow buttons to navigate to the desired selection,
followed by the Enter button to enter and change that setting. Repeat this
process within the other menu sub-sections to make adjustments.
Monitor Setting
Brightness - Controls the monitor backlight.
Sharpness – Controls sharpness.
Contrast – Controls Contrast.
Color – Controls Color adjustments.
Color Kill – Gathers a Black & White image.
OSD – Set the on screen displays on or off.
Units – Controls OSD displays in either standard or metric units.
NOTE: Once the desired setting has been adjusted, press enter and
toggle down to the save button and press enter. You must save for changes
to take effect.
System Setting
Time – Set the current time
Date – Set the current date
Format – The micro-SD card must be formatted prior to recording media for
the first time. Once formatted, recording to the card is available. (See
“Formatting the micro-SD card”)
Default – Selecting “Yes” will restore the factory settings.
Version – Shows the current software version the system is operating with.
Calibrate – Select and follow instructions to calibrate the on screen displays
of depth, relative direction, and temperature (see “Calibration”)
Exit
Exit – This selection will exit user out of the Menu main page
RECON5+ FEATURES
Camera Lights
The RECON5+ is equipped with both LED and infrared lighting options.
Each lighting option has multiple intensity levels.
To turn on the LED lights, use the LED/UP button on the control panel.
Pressing this button once will turn the lights on. The on screen display will
show momentarily on the bottom of the monitor. To increase the intensity of
the lights, press the button until you reach the desired intensity level. There
are three settings available and the fourth press will turn the lights off.
The infrared lights offer a stealthy approach because infrared lights are not
visible to the eye. To turn on the infrared lights, use the IR/Down button on
the control panel. Pressing this button once will turn the lights on. An on
screen display will show momentarily on the bottom of the monitor. To
increase the intensity of the lights, press the button until you reach the
desired intensity level. There are three settings available and the fourth

www.MarCumtech.com
- 5 -
press will turn the lights off. Use the camera image along with the monitor
on-screen display to gauge the desired intensity level.
A/V Port
On the back of the monitor there is a rectangular rubber cap that protects
the charging port and the RCA video out jack. Please make sure this cap is
closed when not using the RCA jack to avoid potential water damage.
Utilizing the RCA Jack
There are many anglers with large ice fishing houses that are equipped
with a TV inside. Video is easily sent from the RECON5+ to your TV by
simply running an RCA cable from the RECON5+ to the TV and selecting
the correct input source on the external monitor.
Built-In DVR
The RECON5+ has a built-in DVR that allows you
to capture all the action below. All recorded media is
saved to a micro-SD card (not included). The
RECON5+ will support up to a 32GB Class 10
micro-SD card (be sure the card has a class 10
symbol like the example on the right).
DVR OPERATION
Accessing the micro-SD card
To access the micro-SD card slot, open the rectangular rubber cap on the
back of the unit. The card can be inserted by placing it into the slot and
pressing downwards until it clicks into place. To remove the micro-SD card,
press down on the card. After it clicks and rises from the slot, grab the card
to remove.
Formatting the micro-SD Card
The micro-SD card must be formatted prior to recording media. To format,
insert the micro-SD card into the card slot on the back of the unit. Press the
MENU/ENTER button and select SETTING. In the SETTING sub-menu
select SYSTEM SETTING and use the Up/Down arrows to select FORMAT.
By pressing the Up or Down arrows, set FORMAT to YES and press
MENU/ ENTER. Using the arrows scroll to the SAVE button and press
MENU/ENTER to save the changes.
The micro-SD card MUST be formatted in the RECON5+. Files can be
copied from the RECON5+ to the PC, but you should not copy files onto
the SD card from the PC and should not delete files on the SD Card from
the PC. Files may be deleted on the RECON5+ if desired or the SD can be
reformatted on the RECON5+ after copying files to the PC to “delete all
files”.
Recording Video
To record a video press and hold the record button for approximately 3
seconds until a “REC” with a red circle icon appears in the upper left hand
corner of the screen. This icon will blink while the unit is recording. To stop
the recording, press the REC button again. Once the icon disappears, the
unit is no longer recording.

www.MarCumtech.com
- 6 -
Taking a Photo
The RECON5+ has the ability to take a screen shot photo of what is
currently visible on the screen. To take a picture, complete a quick press of
the REC button. A red circle icon will momentarily appear in the upper left
hand corner of the screen and then disappear, indicating that a picture was
taken. The RECON5+ can take up to 200 photos.
Accessing Media
Previously recorded videos and photos can be accessed by pressing
MENU and then selecting LIBRARY by pressing the MENU/ENTER button.
Once in the Library sub-menu you can select either PHOTO or VIDEO. Use
the Up and Down arrows to cycle through the saved media. The upper left
corner of the screen will display the total amount of videos or photos and
which number you are currently viewing (i.e. 002/004; viewing number 2 of
4 total). Video files will also display the total time duration of the recording.
All video files will automatically start when selected.
When viewing a video, pressing the MENU/ENTER button will display a
menu with three options: Delete, Pause, and Exit. Use the Up and Down
arrows to cycle through these three options and the MENU/ENTER button
to select. If selecting the Delete option, another sub-menu will appear. To
permanently delete the selected media, select Yes.
When viewing photos, pressing the MENU/ENTER button will display a
menu with two options: Delete and Exit. Use the Up and Down arrows to
cycle through these two options and the MENU/ENTER button to select. If
selecting the Delete option, another sub-menu will appear. To permanently
delete the selected media, select YES.
To load your media on your computer or other device you will need to use
an SD card reader to transfer the files. If you are experiencing problems
viewing your videos once loaded on your device, that specific viewer may
not be compatible with the RECON5+ recorded media files.
Recommended media players include: Quicktime, KMPlayer, Mplayer,
GOMPlayer, and VLC. These media players should be downloadable on
your device. Please use one of these players to view all recorded
videos from your RECON5+. Windows Media Player will not support the
RECON5+ media files.
USING YOUR CAMERA
Once you have a working knowledge of the system you can successfully
deploy the Camera in the water. (NOTE: Make sure to remove the
protective plastic film that covers the lens for packaging) The Camera is
equipped with a removable weight system that clips on the bottom of the
camera. The weight can be removed by pressing down the tab facing the
rear of the camera. Be sure the weight clicks into place when replacing it
on the camera.
Atop the RECON5+ camera is a positioning system (three tabs and a clip).
Set the clip to the correct tab to select your viewing angle (see “Camera
Positions”).
The depth of field (distance the camera can see underwater) depends on
the clarity of the water and the available light at the depth the camera is
used. In clear water, the depth can be many feet but in cloudy or murky

www.MarCumtech.com
- 7 -
water the depth of field can be reduced to only a few inches due to particles
suspended in the water. Dirty or murky water and/or low light penetration
can detract from the quality of the color picture. Optimum color quality will
result from clear water and adequate light penetration.
NOTE: The Color kill feature will turn on automatically when the camera’s
light sensor doesn’t detect enough light for optimal color viewing. This can
happen in low light conditions, in deep water, or when the ice is very thick
and/or covered with snow.
Calibration
Calibrating the camera will provide accurate camera direction readings. To
calibrate, first enter the SETTING menu, press MENU/ENTER and enter
the SYSTEM SETTING sub-menu. Using the Up/Down arrows cycle to
CALIBRATE and press MENU/ENTER. An on-screen instructional
message will appear on the screen: “Press the up arrow and rotate the
camera clockwise two full revolutions. Once complete press the down
arrow to save”
Once you press the Up arrow button to start the calibration the screen will
display “calibrating”. After two full revolutions have been achieved press the
down arrow and the screen will display “calibrated” and the process is
complete.
CAMERA POSITIONS
Horizontal
Horizontal viewing is available by setting the camera clip in the back slot
(3rd tab; furthest from camera lens). This view will show a horizontal view
of the water column as a traditional underwater viewing system does.
Down View
The RECON5+ has the ability to be positioned in a down view by removing
the camera clip from the positioning system atop the camera (three tabs).
The camera will then hang vertically from the cable and send images of the
water column below the camera.
Up View
An upward view of the water column is possible with a couple of
adjustments.
First, remove the weight system at the bottom of the camera. The weight
can be removed by lifting the tab facing the rear of the camera and sliding
backwards. Attach the clip to the 1st tab (closest to the camera lens), and
carefully pull the cable though the clip to achieve the desired upward angle.
The slightly upward view allows the RECON5+ to gather more light to
better view the water column in low light situations such as deeper depths,
murky water, or low light periods such as dawn/dusk.
ON-SCREEN DISPLAYS
The RECON5+ camera system features three On-Screen Displays (OSD),
Depth, Camera Direction, and Temperature.
Depth
A depth OSD will display in the lower right hand corner of the screen.
This feature alerts the user of the depth of the camera. Camera depth will
only show when in the water.

www.MarCumtech.com
- 8 -
Outside of water it should read 0. If it does not read 0, a simple powering
off of the system and then powering it back on will reset the reading to 0.
The units can be changed from Standard to Metric, or vice versa in the
MONITOR SETTING menu.
Camera Direction
The direction the camera is facing is displayed in the upper right hand
corner of the screen. This direction will display as directions of the compass
(N, NE, E, etc.) If the camera direction is not accurate it can be calibrated
by following the instructions in the SYSTEM SETTING menu.
NOTE: The camera direction will only be accurate when the camera is in a
horizontal viewing position.
Temperature
The current temperature of the water will display in the lower left hand
corner of the screen. The units can be changed from Fahrenheit to Celsius,
or vice versa in the MONITOR SETTING menu. The camera will not detect
the air temperature correctly.
OPERATING POSITIONS
Handheld
The RECON5+ is a palm-sized system with full sized performance. For
handheld operation simply remove the RECON5+ from the included
soft-pack. Set the camera clip at the desired viewing position and deploy.
Carefully watch the monitor image to avoid damaging the camera in rocks,
submerged vegetation, brush piles or other harmful environments that
could snag, wedge or damage the camera or cable; doing so will void the
warranty.
Body Worn
The Soft-pack supplied with the RECON5+ is designed to allow for hands
free use of the monitor allowing the angler to focus on camera depth and
positioning. Adjustable straps allow for comfort and viewing distance. The
Camera can be deployed and accessed from the rear of the soft-pack,
while the monitor rests securely within a comfortable viewing distance, with
full access to the control panel.
You can also use the Velcro strap on the Cable storage spool as an arm or
wrist mount for increased portability.
Mounted
The RECON5+ features a ¼ 20 insert as well as additional inserts that
allow for limitless mounting options (Mounts not included). These are
located behind the cable storage reel. The ¼”-20 insert is the most
common mounting option for photo/video equipment. The insert port is
located in the center of the cable storage reel and is accessible by
removing the Velcro strap. With the Velcro strap removed the ¼”-20 insert
will be exposed, as will the 4 surrounding inserts that provide limitless
mounting solutions from aftermarket suppliers. You may want to remove
the camera storage reel when used in a mounted solution.

www.MarCumtech.com
- 9 -
Removing the camera cable storage reel
Start by removing all of the camera cable from the cable storage reel. Once
the Cable has been removed, the cable reel can slide out by gentle lifting
on the reel (on the opposite side of the charging/AV port), while
simultaneously sliding in that direction. Once the Cable storage reel is
removed, re-wind the excess cable back onto the reel. To replace the reel
onto the RECON5+, align the tabs furthest from the USB port with the
indented area on the underside of the reel and slide toward the USB Port.
SYSTEM MAINTENANCE
The RECON5+ camera system is manufactured to perform in a wide
variety of environmental conditions. It is recommended when not in use to
store the RECON5+ indoors or in a climate controlled environment. Take
care to avoid leaving your system in the cold, even when heading to the
lake for an outing. The RECON5+ operates using an internal lithium
battery, and this battery can become damaged if left in the cold. For optimal
performance, it is recommended to start with a full charge on the battery
and to insulate the system from the cold during periods of non-use or
transit.
One Year Warranty
MarCum warranties this product to be free from defects in materials
and workmanship for one year from the date of purchase. This
warranty applies to customers who properly complete the online
product registration form found on the MarCum Technologies
Website: www.marcumtech.com/support.
MarCum Technologies will repair or replace any components that fail in
normal use. Failures due to abuse, misuse, unauthorized alteration,
modification, or repair are not covered. The warranty is valid only for the
original owner who purchases the unit from an authorized dealer. An
original sales receipt dated within the warranty period is required for all
warranty claims.
To best serve our customers, MarCum Technologies has set a standardized
battery warranty policy. Battery warranty coverage requires a proof of
purchase. Please see our website, www.marcumtech.com/support for full
details on warranty coverage.
Battery Warnings
Do not immerse the battery in water or sea water. Keep the battery in a
cool dry place when not in use. Do not use or leave the battery near a heat
source (i.e. heater, furnace, fire). Use the battery charger only as directed
when recharging. Do not reverse the positive and negative terminals on the
battery connections. Do not discard the battery in a fire, furnace, or other
combustible space. Do not connect the battery directly to an electrical
outlet. Do not short –circuit the battery by directly connecting the positive
and negative terminals with metal objects. Do not directly solder the battery
or pierce the battery with a nail or other sharp objects. If the battery gives
off an odor, generates heat, becomes discolored or in any way appears
abnormal during use, or while recharging or discharging, immediately stop
using it. If the battery leaks and the battery contents (electrolyte) gets into

www.MarCumtech.com
- 10 -
an eye, do not rub the eye. Instead, flush the eye(s) with clean water and
immediately seek medical attention or it may result in injury to the eye(s).
Do not use the battery in a location where static electricity or magnetic
fields are great or it may result in damage to the battery safety devices.
Do not leave the battery in high temperatures (i.e. in direct sunlight or in a
vehicle in extremely hot weather) or it may overheat and its performance
will be degraded and service life decreased. Tape the battery terminals
prior to disposal to insulate them as discarded batteries may cause fire or
explosion.
HOW TO OBTAIN SERVICE
If your system is malfunctioning, check the support section of our
website. You may find that the solution to your problem is
something you can resolve yourself. If you need to send it in, there
is no need to contact our office. Getting repairs made is as simple
as going to our website, MarCumtech.com clicking the support tab
and then filling out the MarCum Warranty Claim.
Once you have completed and submitted a warranty claim, package the
system as described on the website and ship it to us.
If your system is out of warranty, it is a simple as going to our website and
filling out a MarCum non-warranty claim. Once you have completed the
non-warranty claim, package the system as described on the website and
ship it to us. All non-warranty repair pricing is determined after the system
is received by us.
Some people are more comfortable calling for shipping instructions. During
peak ice season, we sometimes receive a high volume of calls, making it
impossible to get to all customers who phone in. For this reason, strongly
consider using the online forms at www.marcumtech.com/support or using
the "Live Chat" option.
OUR ADDRESS:
MARCUM TECHNOLOGIES
ATTN: SERVICE DEPT.
3943 QUEBEC AVE NORTH
MINNEAPOLIS, MN 55427
Please send your email inquiries to service@marcumtech.com
If you are unable to use email or internet, you may call us at 763-512-3987.
Our office hours are Monday – Friday, 8 – 4 Central Time.
International callers may use 888-778-1208.

www.MarCumtech.com
- 11 -
The customer is responsible for shipping costs associated with returning
the system to MarCum Technologies. MarCum will pay for shipping the
repaired system back to the customer while it is still under warranty. All out
of warranty services will be charged a fee for service and shipping which
must be paid in advance. The unit should be securely packed and shipped
“pre-paid freight” and insured to MarCum Technologies. It is the customer’s
full responsibility to track their products sent out in the mail or other forms
of delivery service. MarCum Technologies will not be liable for packages
lost in route to us. Unless specified otherwise, do not include batteries or
other accessories when returning the product for repair. MarCum
Technologies will not be responsible for lost or damaged accessories.
Turnaround time can vary, on average it is about 1 week.
Manufactured for: Versa Electronics 3943 Quebec Ave N Minneapolis, MN 55427 By: Videotek Company
Limited Bldg 12, Section B, BaoSheng Industrial Area, baiNikeng, PingHu Town, ShenZhen, China

www.MarCumtech.com
- 12 -
www.MarCumtech.com
MarCum Technologies
3943 Quebec Ave N
Minneapolis, MN 55427
MarCum User Manuals are available for downloads from
www.MarCumtech.com
2019-0401
/