Page is loading ...

ITEM #0149289
MODEL #TM-074
OPERATING INSTRUCTIONS
HELPFUL TIPS
SAFETY INFORMATION
CARE AND MAINTENANCE
TIMER
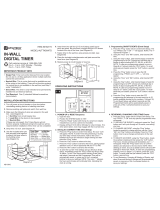
1. Button Layout
1. MANU - Manual Override,
scroll between timer
status options.
2. TIME - Press and hold for
three seconds to set
current time.
3. PROG - Press and hold
for three seconds to begin setting function.
4. < + > - To increase time and day setting.
5. MODE - Press and hold the “MODE” button to
scroll between the different mode settings as the
following table describes.
6. < - > - To reduce time and day setting.
7. RESET - Reset all the functions.
4. MODE Setting
Press MANU button repeatedly to choose the AUTO
mode, then press MODE button to choose between
function: Timer→ Photocell→Timer + Photocell→
Timer (repeat)
The below icons will appear
on the right of display.
• Do not attach a device that exceeds the unit ratings
as described in the Safety Information section of this
manual.
Please read and understand this entire manual before
attempting to assemble, operate or install the product.
SPECIFICATIONS:
14/3 AWG SJTW vinyl cord
RATINGS:
125 V, 60 Hz, 15 A general purpose
125 V, 60 Hz, 15 A resistive
1000 W tungsten
500 W electronic ballast
120 V, 60 Hz, 8.3 A standard ballast
1/3 HP
• Store indoors in dry location.
• Always unplug when not in use.
• Do not unplug by pulling on cord.
Call customer service at 1-866-994-4148,
8 a.m. - 6 p.m., EST, Monday - Thursday,
8 a.m. - 5 p.m., EST, Friday.
SUITABLE FOR USE WITH OUTDOOR
APPLIANCES – RAINTIGHT WHEN MOUNTED
VERTICALLY WITH THE RECEPTACLE FACING
DOWNWARD. NOT FOR WATER IMMERSION.
Federal Communications Commission Interference
Statement
This equipment has been tested and found to comply
with the limits for Class B digital device, pursuant to
part 15 of the FCC Rules. These limits are designed to
provide reasonable protection against harmful
interference in a residential installation. This equipment
generates, uses and can radiate radio frequency
energy and, if not installed and used in accordance
with the instructions, may cause harmful interference to
radio or television reception, which can be determined
by turning the equipment off and on, the user is
encouraged to try to correct the interference by one or
more of the following measures:
• Reorient or relocate the receiving antenna.
• Increase the separation between the equipment and
the receiver.
• Connect the equipment into an outlet on a circuit
different from that to which the receiver is connected.
• Consult the dealer or an experienced radio/TV
technician for help.
This device complies with Part 15 of the FCC Rules.
Operation is subject to the following two conditions: (1)
This device may not cause harmful interference, and
(2) this device must accept any interference received,
including interference that may cause undesired
operation of the device.
FCC Caution: Any changes or modifications not
expressly approved by the party responsible for
compliance could void the user's authority to operate
this equipment.
WARRANTY
TROUBLESHOOTING
• For information on product warranty please call
customer service at 1-866-994-4148, 8 a.m. - 6 p.m.,
EST, Monday - Thursday, 8 a.m. - 5 p.m., EST,
Friday.
• This product is guaranteed to be free of defects for
a limited period of one year form the date of
purchase.
• If the product suddenly malfunctions and is not
damaged by external factors or personal reasons
within the one year warranty limit from the day of
purchase, the product maybe considered for repair.
If the product is damaged due to natural disaster like
fire, lightning, flood, hurricane, etc., the product will
not be considered for repair.
PROBLEM POSSIBLE
CAUSE
CORRECTIVE
ACTION
Lights do
not turn on
at dusk.
Timer is not in a
good area for
light meter to
function as there
is too much
ambient light to
detect darkness.
Move the timer to
another location
where there is no
ambient light.
Lights do
not turn on,
even when
timer is in
“ON”
position.
Lights are not in
“ON” position,
lights are not
functioning, or
timer is not
receiving power.
Be sure that lights
are functional by
plugging them
directly into the
outlet. Be sure that
lights are in “ON”
position if they have
their own switch. Be
sure that timer is
receiving power -
the LED should light
up when plugged
into an outlet and
put in the “ON”
position.
Lights are
flashing
(turning on
and off).
The timer is in
Dusk to Dawn
mode, and the
light from the
plugged-in lights
is affecting the
light sensor.
Move the lights
away from the timer,
or reposition the
timer so that it does
not face the lights.
1
AM
AUTO
RDM MO TU WE TH FR SA SU
ON
OFF
PM
2
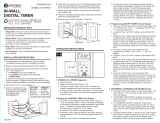
3. Set Current Time
a. Press and hold "TIME"
button to enter the
current time until the MO
flash. First, set the day
of the week; press "+" or
"-" button to set the
correct day.
b. Press the "TIME" button to enter the hour setting.
Press "+" or "-" buttons to set the current hour. Be
sure that AM or PM appears correctly.
c. Press the "TIME" button to enter the minute
setting. Press the "+" or "-" buttons to set the
current minute.
d. Press the "TIME" button to finish setting the
current time and return to normal display.
AM
MO
3
AM
AUTO
MO
4
1. Set the desired day of the week program by
pressing the "+" or "-" button, you can select:
MO TU WE TH FR SA SU(Everyday)→MO TU
WE TH SA SU→MO TU WE TH FR(Monday to
Friday) → SA SU(Weekend)→MO TU WE TH FR
SA SU (repeat).
2. Press "MANU" to enter the hour settings, press
"+" or "-" to set:
MO TU WE TH FR SA SU
OFF
7
1. Set the desired day of the week by pressing "+" or
"-" button: MO TU WE TH FR SA SU→ MO… SU
→MO TU WE TH FR→SA SU→MO TU WE TH
FR SA SU (repeat)
2. After setting the date, please press the MANU
button to adjust the hours.
3. After setting the hours, press the MANU button
again to adjust the minutes.
4. Press PROG button to enter the program OFF
setting, the 1 OFF will appear on the display.
Repeat steps 1 to 3 above to set your desired
OFF time.
5. You may now either press the PROG button to
enter additional programs (up to 8 programs), or
press the TIME button (or wait 15 seconds) to
store your program. Your timer will now show the
current set time and is ready for use.
MO TU WE TH FR SA SU
ON
5
WARNING
2. Reset
Press the “RESET” button to
reset your timer. This will
clear all programmed
settings.
1 2 3
4
7
6
5
MO TU WE TH FR SA SU
ON
6
Display MODE
Timer
ON/OFF at your exact
programmed time. (Please refer
to Step 5 for details.)
ON at dusk or ON immediately;
OFF after 1-12 hours. (Please
refer to Step 6 for details.)
ON at dusk, OFF at your exact
programmed timer. (Please refer
to Step 7 for details.)
Explanation
Timer
+
Photocell
Photocell
Note: You can choose each mode or combined modes
to control your lights.
5. Timer Setting (Program settings, the display appears
icon on the right side.)
Before setting, make sure timer is set to AUTO or
RDM mode.
Press and hold "PROG"
button for three seconds
until the days of the week
flash to begin program
setting.
6. Photocell Setting
Before setting, make sure timer is set to AUTO
mode.
Press “MODE” button to
select the photocell function
(the display will show the
icon on the right side),
then press and hold
“PROG” button for three
seconds until the days of
the week flash to begin
program setting.
Display
d
d:01 to d:12
S:01 to S:12
Explanation
Dusk to Dawn - On at sundown, off at
sunrise.
On at dusk, off 1 to 12 hours later
On immediately, off 1 to 12 hours later
a. When screen shows "d" the Dusk on/Dawn off
function is on.
b. When screen shows "d:01", press MANU
button, then press "+" or "-" button to choose
your desired hours to be off at dusk after the
set hours automaticity. For example, if you set
it to be "d:03", the timer will turn on at dusk and
will turn off after 3 hours.
c. When screen shows "S:01", press MANU
button, then press "+" or "-" button to choose
your desired hours to be off automatically. For
example, if you set it to be "S:05", the timer will
turn on immediately and will turn off after 5
hours.
d. You may now either press the PROG button to
enter additional programs (up to 8 programs),
or press the TIME button (or wait 15 seconds)
to store your program. Your timer will now
show the current set time and is ready for use.
NOTE: Once all programs have been set, the
priority goes to the longest time set.
7. Digital Timer + Photocell Setting
Before setting, make sure timer is set to AUTO
mode.
Press “MODE” button to
select the timer + photocell
function (the display will
appear the icon on
the right side.), then press
and hold “PROG” button for
three seconds until the
days of the week flash to
begin program setting.
1. Set the desired day of the week program by
pressing the "+" or "-" button. You can select
each day individually, Monday to Friday,
Saturday/Sunday, or an entire week to have your
timer turn on at dusk and off at the set time.
2. Press the "MANU" button to enter the “OFF” time
hour setting. Press the "+" or "-" buttons to set
time. Be sure to cycle through until AM or PM
appears correctly.
3. Press the "MANU" button to enter the “OFF” time
minutes setting. Press the "+" or "-" buttons to set
time.
4. You may now either press the PROG button to
enter additional programs (up to 8 programs), or
press the TIME button (or wait 15 seconds) to
store your program. Your timer will now show the
current set time and is ready for use.
Display
ON
OFF
AUTO
RDM
Explanation
Always ON
Always OFF
Timer will turn ON/OFF according to the
program settings.
Run all events (programs) in a Random
mode. This is a security feature in which
ON and OFF times randomly differ ± 30
minutes from the programmed times,
creating a more “lived-in” look. The word
“RDM” appears in the display.
8. Manual Override
Press the MANU button to choose the timer status.
Before initial use, plug the timer in for at least 30
minutes to charge the internal battery. After the screen
displays, the unit is ready for programming.
The device must be mounted in a vertical position with
the receptacle facing downward and with the
receptacle at least 1.4 m above ground level.
AB13568 Printed in China
Page 1 Page 2 Page 3
/