Page is loading ...

INSTALLATION MANUAL ON CISS FOR PRINTER CANON IP 1500
1
Installation Manual on
Continuous ink supply system (CISS)
For printer Canon IP 1500
Thank you for using the “INKSYSTEM” Continuous ink supply system. It is the
best device for an inkjet printer, and it will definitely decrease your printing costs.
Before using this system, please read this manual carefully. The pictures in this manual
may be different with the real ones. Here just for your reference.
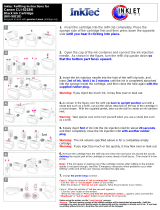
I. Inspection & Unpacking
1. Accessories
1) Continuous ink supply system …………………………………………..1
2) Air Filter …………………………………………………………………1
3) Sponge …………………………………………………………………...1
4) Injector …………………………………………………………………..1
5) Long needle ……………………………………………………………...1
6) Short needle ……………………………………………………………...1
7) Protection clamp …………………………………………………………1
8) Installation Manual ………………………………………………………1
9) Product Warranty ………………………………………………………...1
Pic. 1-1 Pic. 1-2
2. Inspection before installation
Check whether CISS is pulling out, if tube is disconnected.
Please contact local distributor if have found problems.
II. Test printer
1. Check whether printer conditions are normal.
2. Enter nozzle test option (2-1), print nozzle test sheet to see whether nozzle is
normal (2-2
,
2-3).

INSTALLATION MANUAL ON CISS FOR PRINTER CANON IP 1500
2
Pic. 2-1 Pic. 2-2 Pic. 2-3
3. If printer is alright, please print a picture to see the result.
Ill. Installation Procedures
1. Make the system ready
Put this system on the right side of the printer, tidy up ink flow tubes (3-1-1),
pull out all air plug and replace them with air filter with bigger side downward (keep
air plug for next use) (3-1-2). Move tube valve to close position, if you do not close
this valve, ink maybe flow back, leak, or mis-color.
Pic. 3-1-1 Pic. 3-1-2
2. Install the CISS cartridges
Turn the printer on, open it’s cover, cartridge holder will move to the "cartridge
change" position, plug the power source off (3-2-1), take the original cartridge off.
Take cartridge red color, clean them for next use). Install the cartridges according to
the color order; press back the cartridge cover (3-2-2).
Pic. 3-2-1 Pic. 3-2-2 Pic/ 3-2-3

INSTALLATION MANUAL ON CISS FOR PRINTER CANON IP 1500
3
3. Fix iron rack
Use forceps to bend the rack (3-3-1) (This is to let the sponge sticker stick to the
printer body tightly). Tear off the cover of sticker, stick the rack to the printer body
strictly according to the indicated position and size (3-3-2. 3-3-3), do not twist the ink
tube (3-3-4).
Pic. 3-3-1 Pic. 3-3-2 Pic. 3-3-3
4. Check tube length
Move cartridge holder to the left side (3-4-1), then right side (3-4-2) and check
whether ink tube is too long or too short. Move cartridge holder to the cartridge-
changing place and check whether Ink tube will fall on the paper board.
Pic. 3-4-1 Pic. 3-4-2 Pic. 3-4-3
5. Adjust the ink tube length
If step 4 is ok, then there is no need to go through this step.
If the tube length is too short then lengthen it (3-5-1, 3-5-2), if too long then
shorten (3-5-3, 3-5-4). If the tube falls down, you need adjust the angle of sticker to
prevent falling (3-5-5).
Pic. 3-5-1 Pic. 3-5-2

INSTALLATION MANUAL ON CISS FOR PRINTER CANON IP 1500
4
Pic. 3-5-3 Pic. 3-5-4 Pic. 3-5-5
6. Insert cartridge fixation rack
Insert fixation rack and push upward ( 3-6-1, 3-6-2), move cartridge holder to 3-
6-3 position, check if the fixation will touch the printer body or not, this fixation can't
be drop out, it can prevent the cartridge drop out during printing.
Pic. 3-6-1 Pic. 3-6-2 Pic. 3-6-3
7. Test printer operation
Move tube valve to the open position (3-7-1), use a screw or other tools to press
down cover button (3-7-2), plug on power source, turn the printer on, check if the
printer can work normal or not, check if the ink tube will touch the printer data-transfer
wire or not. Close the printer’s cover, check if there is abnormal noise. Select printer
maintenance option (2-1), print nozzle test sheet, if test sheet is normal (2-2), you can
begin printing. If the line is missing (2-3), please clean printer head. If printer head is
still wrong after cleaning, please contact your local distributor.
Pic. 3-7-1 Pic. 3-7-2

INSTALLATION MANUAL ON CISS FOR PRINTER CANON IP 1500
5
IV. Take the used CISS off
During printing, if you need to take the system off, please first take off air filter,
insert back air plug, move tube valve to CLOSE position (4-1-1), Move out cartridge
holder, detach the rack (4-1-2) (can't be too rude to change the shape of rack). Take ink
cartridges out, press back the red cover at 45 degree angle (4-1-3).
Notice: If you do not close the tube valve before taking the cartridge out, or you
do not install the red cover back to cartridge, it maybe result that ink in the cartridges
will flow back to the external tank or flow out from the cartridge nozzle, these case will
damage the second normal use of system.
Pic. 4-1-1 Pic. 4-1-2 Pic. 4-1-3
V. Refill ink
During printing, if you found out that the ink level in the tank is below the red
line, please add ink according to the methods.
VI. Check air balance tube
During printing, if you find some abnormal cases, such as bad output, ink drip
out on paper, then you need to check the air balance tube to see if exist ink. If yes,
please do according to the manual of "ink pump out from balance tube”.
VII. Warnings
1. During printing, please do not take cartridges over than the printer. Please
keep ink tank and printer in the same level.
2
.
During printing, do not inverse, lift up or lower ink tanks.
3
.
Please do not block up ink tanks for curiosity or for fear of less ink
4. Use CISS at clean environment and within the temperature range 15-35
degrees.
VIII. Product Warranty
INKSYSTEM warrants its products to be free from defects in material or
workmanship. Rarely the equipment partly or completely fails within the warranty
period. In these cases we do everything possible to ensure that our customers are
satisfied with the purchase.
The INKSYSTEM CISS installation is free in any of the representative offices.

INSTALLATION MANUAL ON CISS FOR PRINTER CANON IP 1500
6
The warranty repairs are done quickly, with good quality and for free. The
warranty duration is 12 months from the date of retail sale. Every product has a
Warranty Certificate. The transportation of the failed product is provided by its owner.
Please note that the ink and the photo paper are expendable materials and there
can be no returning of unsealed ink tanks and photo paper packages. When defects are
found by the service managers, a replacement for a new product is performed.
Please adhere to the following points to receive a warranty service as soon
as possible:
When accepting the product check if the warranty certificate is filled in
correctly.
Keep the original receipt that contains the date of purchase information.
Adhere to operating conditions that are provided in the User’s Manual, or on the
web-page of the specific product.
Try to avoid mechanical damages when operating the product: chippings, dents,
fractures, scratches, etc.
We cannot provide a warranty repair under several conditions:
If the warranty certificate is wrongly filled in.
If the device has mechanical damages: chippings, dents, fractures, scratches, etc.
If the defect appeared under the circumstances of insuperable forces, accidents,
intended or careless actions of the user or a third party.
If the ink used was not manufactured by “INKSYSTEM” (South Korea)
If the printing limit was exceeded – more than 100 000 prints.
The “INKSYSTEM” Company excludes for itself any liability for incidental,
consequential, indirect, special, or punitive damages of any kind to people, pets or
property if the stated damages have been affected because of rules and operational
conditions / product installation disregard. The Company also excludes any liability for
intentional or careless actions of the user or third parties, for loss of revenue or profits,
loss of business, loss of information or date, or other financial loss arising out of or in
connection with the sale, installation, maintenance, use, performance, failure, or
interruption of the possibility of such damages.

INSTALLATION MANUAL ON CISS FOR PRINTER CANON IP 1500
7
Warranty certificate
(Product)
Continuous ink supply system
(Model Name)
_____________________________________
(Serial №)
_____________________________________
(Date of Purchase)
_____________________________________
(Warranty Period)
1 year from the date of retail purchase
Seller company
SEAL
The warranty conditions are agreed and accepted. No claims against the product appearance
and the list of equipment.
Customer’s signature

INSTALLATION MANUAL ON CISS FOR PRINTER CANON IP 1500
8
Install Nozzle Seal for BCI – 24BK
In order to strengthen the connection of cartridges and the printer head, prevent
air leaking, ink back flowing, ink leaking, we need to add a silicon seal on cartridge
nozzle, the processed are as follows:
1. Clean the seal: Take out 20*20 sponge sticker and seals, tear off the sticker
cover, put seal on the sticker to wipe off the dirt (double sides should be cleaned) (1-
1).
Pic. 1-1
2. Take the printer head out: turn the printer on, open the printer’s cover,
cartridge holder will move to the cartridge change position, take cartridges out (2-1),
lift printer head lock balance (2-2), then you can take out the printer head, place the
printer head on clean paper (2-3) to prevent damage, do not touch the electronic panel.
Pic. 2-1 Pic. 2-2 Pic. 2-3
3. Install the silicon seal: check if the original seal and filter have dirt (3-1), if
yes, please clean them, then use pliers to install the silicon seal on the printer head
according to the shape (3-2), and check if ail seals are in the right position (3-3).
Pic. 3-1 Pic. 3-2 Pic. 3-3
/