Telefunken DPF 9332 Datasheet
- Category
- Digital photo frames
- Type
- Datasheet


1
Non contractual document subject to change in case of typographical errors (Mktg0810) COPYRIGHT SOPEG 2010
The manufacturer reserves the right to modify the product specifications without notice.
ENGLISH
DIGITAL PHOTO FRAME OPERATING INSTRUCTIONS
TELEFUNKEN DPF 9332 DIAMOND
I. Learn about and install your frame .................................................................. 2
1. Box contents ...........................................................................................................2
2. Frame diagrams.......................................................................................................3
3. Remote control........................................................................................................3
4. Installation ...............................................................................................................4
II. 1BUse your frame............................................................................................... 4
1. Selecting a language ...............................................................................................4
2. “ECO LOGIC” mode ................................................................................................4
3. Reading a memory card or a USB key.....................................................................5
III. 2BSelecting the type of files to play ..................................................................... 5
1. Internal memory/Removable media..........................................................................5
2. Photos.....................................................................................................................6
3. Movies.....................................................................................................................6
4. Music ......................................................................................................................6
5. Calendar..................................................................................................................7
6. Copying photos, movies or music to the internal memory or Memory Card..............7
7. Deleting photos .......................................................................................................8
8. Sorting photos.........................................................................................................8
IV. 3BWI-FIP
®
............................................................................................................ 9
1. Wi-Fi Setup..............................................................................................................9
2. Accounts Configuration .........................................................................................11
3. Applications over Wi-Fi ..........................................................................................13
V. 4BSettings ....................................................................................................... 16
VI. 5BConnecting to a computer ............................................................................ 20
VII. 6BSafety instructions ........................................................................................ 21
VIII. 7BWarranty ...................................................................................................... 22
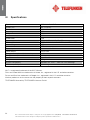
IX. 8BSpecifications............................................................................................... 24

2
Non contractual document subject to change in case of typographical errors (Mktg0810) COPYRIGHT SOPEG 2010
The manufacturer reserves the right to modify the product specifications without notice.
ENGLISH
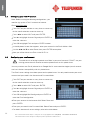
PRELIMINARY NOTICE
During the first use, the animated demo is played. To exit and go to
the frame functions, simply press SETUP
on the remote control, or
press and hold the ◄ (left) key on the digital frame for 3.5 second to
exit the demo mode.
I. Learn about and install your frame
Thank you for your recent purchase of a TELEFUNKEN “DIAMOND Series” digital photo frame. Before using
your device, please consult these operating instructions and keep them so you may refer to them later.
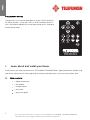
1. Box contents
- 1 digital photo frame
- 1 AC adaptor
- 1 remote control
- 1 dust cloth
- 1 quick start guide

3
Non contractual document subject to change in case of typographical errors (Mktg0810) COPYRIGHT SOPEG 2010
The manufacturer reserves the right to modify the product specifications without notice.
ENGLISH
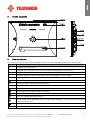
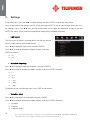
2. Frame diagrams
3. Remote control
All functions can be accessed with the remote control. Press the following keys to access the functions:
Key Function
▲
Navigation up in the menus
◄
Navigation left in the menus and skip to the previous file (photo, music or movie)
▼
Navigation down in the menus
►
Navigation right in the menus and skip to the next file (photo, music or movie)
ENTER Confirm your selection or switch modes
Switch the digital photo frame on or to standby mode
EXIT Exit current menu and return to previous menu
STOP Stop file playback (photo, music or movie) and return to main menu
Mute/unmute sound, in mute mode the mute icon is displayed
Increase volume, the volume level is displayed
(COPY/DEL) Access copy, delete and sort functions (only in main menu)
(ROTATE) Rotate photo clockwise 90°
Enlarge image, press repeatedly to cycle through zoom modes x2, x4, x8 and x16; press again
to return to normal size
Decrease volume, the volume level is displayed
SETUP Access setup menu (Settings) directly

4
Non contractual document subject to change in case of typographical errors (Mktg0810) COPYRIGHT SOPEG 2010
The manufacturer reserves the right to modify the product specifications without notice.
ENGLISH
4. Installation
- Take your frame and its accessories out of their packaging.
- Remove the plastic film protecting the front of the frame.
- Pull the plastic tab protecting the contacts in the remote control.
- Stand the frame in the desired location, pulling the adjustable stand towards you
(see diagram above).
- Connect the electrical cord to the frame in the space provided.
- Plug your frame into an outlet. Your frame will start up automatically.
II. 1BUse your frame
1. Selecting a language
During the first use, the animated demo is played. To exit and go to
the frame functions, simply press the SETUP key on the remote.
The language selection screen then appears.
- Select your language using the arrow keys on the
remote control, then press ENTER.
Once you have selected your language, the frame is ready for use.
Simply insert a memory card or flash drive to begin playback of your
pictures.
Caution: The animated demo is located in the folder named “DEMO”. You must delete it for the frame to
keep benefit of the 2 GB internal memory.
2. “ECO LOGIC” mode
ECO LOGIC mode combines 3 essential elements to reduce energy consumption by over 40% compared
to a standard frame:
- A LED screen, which uses less energy while improving picture quality;
- A low-energy and ‘Energy Star’-certified power adapter;
- A light sensor.
This sensor, on by default, will automatically turn off your picture frame at night and turn it on during the day.
You can deactivate the light sensor in your frame’s system settings menu.

5
Non contractual document subject to change in case of typographical errors (Mktg0810) COPYRIGHT SOPEG 2010
The manufacturer reserves the right to modify the product specifications without notice.
ENGLISH
Caution: Depending on where you place the frame (for example, in furniture or under a shelf), there may not
be enough light to turn on the frame or it may unexpectedly turn off. To reactivate it, simply bring into bright
light for 2-3 seconds.
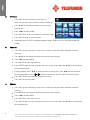
3. Reading a memory card or a USB key
If your frame is off:
- Insert your card or USB key in the space provided.
- Switch on your frame: The slideshow will automatically play the contents of your memory card
or USB key.
If your frame is on and playing the slideshow from the internal memory:
- Your memory card is not automatically detected.
1. Press EXIT to exit the slideshow, the thumbnails will appear.
2. Press EXIT again to exit the internal memory and return to
the Photo menu.
3. Press ▼ to highlight USB or inserted memory card and
press ENTER to display the thumbnails on the media.
4. Press ENTER to display the selected photo in full screen
mode.
5. Repeatedly press ENTER to choose between Single, Slide with music and Slide photo only modes.
6. Press EXIT to exit the slideshow, the thumbnails will appear.
III. 2BSelecting the type of files to play
1. Internal memory/Removable media
If no media has been inserted, the slideshow from the internal memory will launch automatically whenever
the frame is turned on.
If there is a memory card or a flash drive inserted when the frame is turned on, the card’s content will be
played. In this case, you can switch between the card and the internal memory as follows:
- Keep pressing EXIT on your remote to go to the select media screen.
- Press ▲/▼ on the remote to select the media you want to play.
- Press ENTER to confirm.

6
Non contractual document subject to change in case of typographical errors (Mktg0810) COPYRIGHT SOPEG 2010
The manufacturer reserves the right to modify the product specifications without notice.
ENGLISH
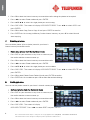
2. Photos
- Press EXIT on your remote as many times as
necessary for the media selection screen to come up.
- Press ▲/▼ on the remote to select the media you
want to play.
- Press ◄/► to select Photo.
- Press ENTER to access the photos in thumbnail mode.
- Press ENTER again to start playback.
- Repeatedly press ENTER to choose between Single, Slide with music and Slide photo only
modes.
3. Movies
- Press EXIT on your remote as many times as necessary for the media selection screen to
come up.
- Press ▲/▼ on the remote to select the media you want to play.
- Press ◄/► to select Movie.
- Press ENTER to show the movie list.
- Press ENTER again to start playback of the first movie file or select with ▲/▼ to start playback
of the desired movie.
- During playback, press ▲/▼ to select previous or next movie, press ◄/► for fast rewind or
fast forward modes. Press
/ to adjust the volume, or press MUTE to mute/unmute.
- Press ENTER key to pause, press again to resume.
- Press EXIT to exit the mode.
4. Music
- Press EXIT on your remote as many times as necessary for the media selection screen to
come up.
- Press ▲/▼ on the remote to select the media you want to play.
- Press ◄/► to select Music.
- Press ENTER to show the music list.
- Press ENTER again to start playback of the first music file or select with ▲/▼ to start playback
of the desired title.

7
Non contractual document subject to change in case of typographical errors (Mktg0810) COPYRIGHT SOPEG 2010
The manufacturer reserves the right to modify the product specifications without notice.
ENGLISH
- During playback, press ▲/▼ to select previous or next music. Press / to adjust the
volume, or press MUTE to mute/unmute.
- Press ENTER key to pause, press again to resume.
- Press EXIT to exit the mode.
5. Calendar
- Press EXIT on your remote as many times as necessary for the media selection screen to
come up.
- Press ◄/► to select Calendar.
- Press ENTER to enter the calendar preview screen, the slideshow automatically starts.
- Press ENTER again to enter full screen mode, repeatedly press ENTER to toggle between
Single and Slide photo only modes. Press the ► or ◄ to skip to the next or previous photo.
- Press EXIT to exit the full screen mode.
Note:
If you have set the alarm, an alarm icon will show on the Calendar screen.
6. Copying photos, movies or music to the internal memory or Memory Card
Copy your photos, movies or music in the thumbnail mode
Using this method, you can copy all or a selection of photos, music
or movies and possibly resize photos to the frame’s resolution in
order to optimize internal memory capacity.
The procedure is similar for all file types sowe will describe it for
photos only.
- Copying photos
1. Press EXIT on your remote as many times as necessary for
the media selection screen to come up.

8
Non contractual document subject to change in case of typographical errors (Mktg0810) COPYRIGHT SOPEG 2010
The manufacturer reserves the right to modify the product specifications without notice.
ENGLISH
2. Press ▼ to select the internal memory or removable media storing the photos to be copied.
3. Press ◄/► to select Photo mode and press ENTER.
4. Press ▲/▼/◄/► to select the single photo you want to copy.
5. Press COPY/DEL. The screen will display COPY/DELETE/SORT. Press ◄/► to select COPY and
press ENTER.
6. Press ▼ to select Copy One or Copy All and press ENTER to confirm.
7. Press ENTER for Yes to copy to Memory Card or Internal memory, or press ▼ to select No and
abort copying.
7. Deleting photos
You can delete photos (all or a choice) stored in your frame’s
internal memory/removable media.
- Delete your photos from the thumbnail mode
1. Press EXIT on your remote as many times as necessary for
the media selection screen to come up.
2. Press ▼ to select the internal memory or removable media.
3. Press ◄/► to select Photo mode and press ENTER.
4. Press ▲/▼/◄/► to select the single photo you want to delete.
5. Press COPY/DEL. The screen will display COPY/DELETE/SORT. Press ◄/► to select DELETE and
press ENTER.
6. Press ▼ to select Delete One or Delete All and press ENTER to confirm.
7. Press ENTER for Yes to delete or press ▼ to select No to abort deleting.
8. Sorting photos
You can sort the photos stored in your frame’s internal memory/removable media.
- Sort your photos from the thumbnail mode
1. Press EXIT on your remote as many times as necessary for
the media selection screen to come up.
2. Press ▼ to select the internal memory or removable media.
3. Press ◄/► to select Photo mode and press ENTER.
4. Press COPY/DEL. The screen will display
COPY/DELETE/SORT. Press ◄/► to select SORT and press ENTER.

9
Non contractual document subject to change in case of typographical errors (Mktg0810) COPYRIGHT SOPEG 2010
The manufacturer reserves the right to modify the product specifications without notice.
ENGLISH
5. Press ▼ to select 6 PIC, 12 PIC or 30 PIC to display 6, 12 or 30 thumbnails and press ENTER to
confirm.
IV. 3BWI-FIP
®
Before first time using the Wi-Fi function of the photo frame, follow the steps below to set up the Wi-FiP
®
P
connection and make the required account configurations, so that you can use the available web services in
Wi-Fi List.
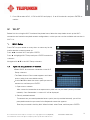
1. Wi-Fi Setup
Press EXIT on your remote as many times as necessary for the
media selection screen to come up.
Press ◄/► to select Wi-Fi and press ENTER.
Press ► to highlight Wi-Fi Setup and press ENTER to enter the
submenu.
Navigate with ▲/▼ in the Wi-Fi Setup submenu.
1.1 If you are using automatic IP network
- Select DHCP for automatic connection in the Wi-Fi
Setup submenu.
- The Select Access Point screen appears and shows
access points that are available nearby.
- Use the ▲/▼ to select the access point you want to
connect to, and then press ENTER.
1. Open access network
After successful connection to an open access point with no password (security-disabled
network) “Your Connection is successful” will be displayed.
2. Security enabled network
To connect to a password-protected access point (security-enabled network), you will be
prompted to enter the password in the Keyboard screen that appears.
Enter the password in the Key field. When finished, select Done, and then press ENTER.

10
Non contractual document subject to change in case of typographical errors (Mktg0810) COPYRIGHT SOPEG 2010
The manufacturer reserves the right to modify the product specifications without notice.
ENGLISH
After entering the correct password “Your Connection is successful” will be displayed.
If you enter a wrong password “Connection failure Please try again” will be displayed.
- Once the connection is established, the icon
will be
flashing in the top right corner of the screen. The IP
address, Gateway, DNS server and MAC address will
be shown at the bottom of the screen.
- When you have set up Wi-Fi
P
®
P connection using DHCP,
the photo frame will connect to the Wi-Fi network
automatically every time it is powered on.
Tips: On-screen keyboard use
- Press the ◄/►/▲/▼ to select an item, press ENTER to confirm.
- Select shift and press ENTER to toggle between uppercase and lowercase.
- Select Backspace and press ENTER to cancel your input.
- Select space and press ENTER to input a space.
- To go to the next field or move among fields, select Done and then press ENTER.
1.2 If you are using static IP connection
- Select Static IP Address in the Wi-Fi Setup menu.
- The Choose AP screen appears.
- Use the keyboard to enter your IP address, Subnet Mask, Gateway and DNS Server settings.
- When finished, select Done and then press ENTER.
- Once the connection is established, the icon
will be flashing in the top right corner of the
screen. The IP address, Gateway, DNS server and MAC address will be shown at the bottom of
the screen.
- When you have set up Wi-Fi
P
®
P connection using Static IP Address, the photo frame will save the
settings you have entered in the Choose AP page.
However, every time the photo frame is powered on, you
need to select Done in the Choose AP page and press
ENTER repeatedly to manually connect to the Wi-Fi
network.

11
Non contractual document subject to change in case of typographical errors (Mktg0810) COPYRIGHT SOPEG 2010
The manufacturer reserves the right to modify the product specifications without notice.
ENGLISH
Tips: On-screen keyboard use
- Press the ◄/►/▲/▼ to select an item, press ENTER to confirm.
- Select NEXT and press ENTER to move the cursor forwards.
- Select Prev and press ENTER to move the cursor backwards.
- To go to the next field or move among fields, select Done and then press ENTER.
- Select
and press ENTER to cancel your last input.
1.3 Wi-Fi connection status
- Return to the Wi-Fi setup submenu and select Wi-Fi
check.
- Press ENTER to display the check menu, connection
errors and connection will be shown.
- Re-connect to access point or reset the Wi-Fi setup if an
error occurs.
2. Accounts Configuration
2.1 Configuring your Picasa™ account
Note: Before making the following configurations, you need
to sign up for a Picasa™ account on Internet.
Go to
HTUwww.picasa.google.comUT
- Press EXIT on your remote as many times as necessary
for the media selection screen to come up.
- Press ◄/► to select Wi-Fi and press ENTER.
- Press ► to highlight Account Cfg and press ENTER to
enter the submenu.
- Press ▼ to highlight Picasa and press ENTER to enter.
- In the Keyboard screen that appears, enter your account in the Account field.
- Use the ◄/►/▲/▼ to select Done, then press ENTER to move to the next field.
- Enter your password in the Password field.
- Use the ◄/►/▲/▼ to select Done, then press ENTER to complete.
- Now you will be able to use Picasa in the Wi-Fi List.

12
Non contractual document subject to change in case of typographical errors (Mktg0810) COPYRIGHT SOPEG 2010
The manufacturer reserves the right to modify the product specifications without notice.
ENGLISH
2.2 Configuring your Flickr™ account
Note: Before making the following configurations, you
need to sign up for a Flickr™ account on Internet.
Go to
HTUwww.flickr.comUH
- Press EXIT on your remote as many times as necessary
for the media selection screen to come up.
- Press ◄/► to select Wi-Fi and press ENTER.
- Press ► to highlight Account Cfg and press ENTER to
enter the submenu.
- Press ▼ to highlight Flickr and press ENTER to enter.
- In the Keyboard screen that appears, enter your account in the Email Address field.
- Use the ◄/►/▲/▼ to select Done, then press ENTER to complete.
- Now you will be able to use Flickr in the Wi-Fi List.
2.3 Configuring your email account
To avoid the risk of losing important email data in your email account, DO NOT use your
existing personal email account to receive photo emails on this photo frame.
You may create a new Gmail (referred to as Google Mail in some countries/regions) email account
and use it for best compatibility with this photo frame.
The Gmail server settings have been preset on the photo frame. You only need to enter your email
account and password in the Account and Password fields.
- Press EXIT on your remote as many times as necessary
for the media selection screen to come up.
- Press ◄/► to select Wi-Fi and press ENTER.
- Press ► to highlight Account Cfg and press ENTER to
enter the submenu.
- Press ▼ to highlight Mail Config and press ENTER to
enter the Email configuration.
- Enter your account in the Account field. Select Done and
press ENTER.
- Enter your password in the Password field. Select Done and press ENTER.
- For details about email server settings, refer to the table below:

13
Non contractual document subject to change in case of typographical errors (Mktg0810) COPYRIGHT SOPEG 2010
The manufacturer reserves the right to modify the product specifications without notice.
ENGLISH
Gmail™ (Referred to as Google Mail in some countries/regions)
POP Serv: pop.gmail.com
POP Port:
995
SSL: 1 (Non-zero = Yes, 0 = No)
SMTP Serv: smtp.gmail.com
SMTP Port: 465
Account:
Your Gmail account (no need to enter @gmail.com)
Password: Your password
Depending on server settings, emails may be deleted from server after received by the photo frame.
If you want to use other email account, please contact your network administrator or network
service provider for the email settings.
3. Applications over Wi-Fi
Ensure that your photo frame is connected to a Wi-Fi network.
Press EXIT on your remote as many times as necessary for the media selection screen to come up.
Press ◄/► to select Wi-Fi and press ENTER.
Press ► to highlight Wi-Fi List and press ENTER to enter the submenu.
Navigate with ▲/▼ in the Wi-Fi List submenu.
If you already configured the Flickr and Picasa accounts, then they will be highlighted, otherwise, they will
stay dark.
3.1 Weather
- Press ▼ to highlight Weather and press ENTER to enter the Weather menu, the system will
automatically show a four-day weather forecast.
- Press ENTER again to enter the name of the city you prefer and press ENTER again to confirm.
- The photo frame will retrieve the weather of the new city.
3.2 Email
- Press ▼ to highlight Email and press ENTER to enter the Email menu. The inbox is displayed.
Press the ◄/► to highlight the desired mode.
3.2.1 Receiving photo emails
- Press ► to highlight Inbox and press ENTER to confirm.
- The “Checking email…” message appears accordingly. If no Email was ever received the inbox
is blank.

14
Non contractual document subject to change in case of typographical errors (Mktg0810) COPYRIGHT SOPEG 2010
The manufacturer reserves the right to modify the product specifications without notice.
ENGLISH
- The Photo frame will automatically check for incoming Emails every 5 minutes.
- When you have incoming photo email(s), the “Downloading E-mail images …” message
appears.
- Once the download completes, downloaded photo(s) will be saved into the internal memory of
the photo frame.
- After receiving an Email a list of Emails is displayed.
- Press the ▲/▼ to highlight the desired Email to be opened. Press ENTER to open the Email.
NOTE:
- Do not disconnect the power of the photo frame during email receiving. Otherwise, internally
memory may crash, causing a loss of data in memory.
- If there is insufficient free space in the internal memory, photo(s) downloaded from the email(s)
may not be saved.
- When the “Downloading E-mail images…” message appears, all the current activities on the
photo frame, such as copying music and photos, will be interrupted and stopped. Manually
resume the unfinished activities after email downloading is complete.
3.2.2 Sending a photo by email
- Press ► to highlight Send Mail and press ENTER.
- Press the ▲/▼ to select the source of the photo you want to send and press ENTER to
access the photo viewer menu.
- In the photo viewer menu use ▲/▼/◄/► to select the desired image and press ENTER.
- When the Send Mail option appears, press ENTER.
- Select Yes and then press the ENTER to continue.
a. To look for history of email address sent before, select Directory inquiries, use ▲/▼ to
select an email address, and then press ENTER.
b. To enter the email address directly, select Keyboard to display the virtual keyboard for
entering the Email address.
- Once you have entered an email address, press the ENTER to proceed. The “Sending photo
mail…” message appears.
- When the photo has been sent successfully, the “Send Success” message appears.
- If the photo is not sent successfully, the “Send Fail ” message appears on the screen. Please
verify the email address you entered.
- The photo frame automatically adds the new email address in the “Send Mail directory”.

15
Non contractual document subject to change in case of typographical errors (Mktg0810) COPYRIGHT SOPEG 2010
The manufacturer reserves the right to modify the product specifications without notice.
ENGLISH
3.3 Using Picasa™
- Press ▼ to highlight Picasa and press ENTER.
- The screen will display public web albums that have been created on your Picasa™ account.
- Press ▲/▼/◄/► to select an album if you have multiple ones.
- Press ENTER to enter the selected album.
- To play photos in full screen single photo mode, press ENTER.
- To start running slideshow, press ENTER again.
- Press EXIT to exit.
Note:
- Once the Picasa™ account is set up, it will be highlighted.
- To copy a photo, select the photo in thumbnail mode and press the COPY/DEL to select Copy
One to copy the selected image to Internal Memory or Memory Card, then press ENTER to
proceed.
3.4 Using Flickr™
The photo frame is limited to access public photos from Flickr™ account owners over the age of 18.
For details, review the terms and conditions of use on Flickr’s web site.
- Press ▼ to highlight Flickr and press ENTER.
- The screen will display public web albums that have been created on your Flickr™ account.
- Press ▲/▼/◄/► to select an album if you have multiple ones.
- Press ENTER to enter the selected album.
- To play photos in full screen single photo mode, press ENTER.
- To start running slideshow, press ENTER again.
- Press EXIT to exit.
Note:
- Once the Flickr™ account is set up, it will be highlighted.
- To copy a photo into Internal Memory/ Memory card, select the it from thumbnail mode and
press COPY/DEL to select Copy One, then press ENTER to proceed.

16
Non contractual document subject to change in case of typographical errors (Mktg0810) COPYRIGHT SOPEG 2010
The manufacturer reserves the right to modify the product specifications without notice.
ENGLISH
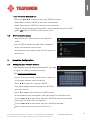
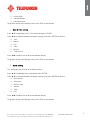
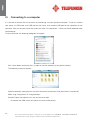
V. 4BSettings
In the main menu, press the ◄/► to select Settings and press ENTER to enter the setup menu.
You can also access the settings menu by simply pressing the SETUP key on your remote. When you are in
the settings menus, the ▲/▼ keys on the remote allow you to select the parameter to adjust, and the
ENTER key allows you to choose the appropriate setting for the selected parameter.
- Light sensor
This sensor, on by default, will automatically turn off your picture
frame at night and turn it on during the day.
Press ▲/▼ to highlight Light sensor and press ENTER.
Press ▲/▼ to choose between the below settings, and press
ENTER to confirm.
On
Off
- Slideshow frequency
Press ▲/▼ to highlight Slideshow frequency and press ENTER.
Press ▲/▼ to choose between the below settings, and press ENTER to confirm.
5 s
10 s
30 s
1 min
1 hour
1 day
To go back to the main Settings menu, press EXIT on the remote.
- Transition effect
Press ▲/▼ to highlight Transition effect and press ENTER.
Press ▲/▼ to choose between the below settings, and press ENTER to confirm.
No effect
Random
Fade out Fade in

17
Non contractual document subject to change in case of typographical errors (Mktg0810) COPYRIGHT SOPEG 2010
The manufacturer reserves the right to modify the product specifications without notice.
ENGLISH
Left to Right
Horizontal open
Horizontal close
To go back to the main Settings menu, press EXIT on the remote.
- Date & Time setting
Press ▲/▼ to highlight Date & Time setting and press ENTER.
Press ▲/▼ to choose between the below settings, and press ENTER to confirm:
Year
Month
Day
Hour
Minute
Time Format
Press ◄/► to adjust the value of the selected setting.
To go back to the main Settings menu, press EXIT on the remote.
- Alarm setting
This setting lets you activate or disable the alarm.
Press ▲/▼ to highlight Alarm setting and press ENTER.
Press ▲/▼ to choose between the below settings, and press ENTER to confirm:
Alarm on/off
Alarm hour
Alarm minute
Volume
Tone
Day
Press ◄/► to adjust the value of the selected setting.
To go back to the main Settings menu, press EXIT on the remote.

18
Non contractual document subject to change in case of typographical errors (Mktg0810) COPYRIGHT SOPEG 2010
The manufacturer reserves the right to modify the product specifications without notice.
ENGLISH
- Languages
You can change the operating language for your frame at any time in this menu.
Press ▲/▼ to highlight Language and press ENTER.
Press ▲/▼ to choose between the below settings, and press ENTER to confirm.
English
French
Dutch
Italian
Netherlands
Portuguese
Spanish
To go back to the main Settings menu, press EXIT on the remote.
- On/Off schedule
This setting lets you activate or disable programmed automatic start-up for your TELEFUNKEN frame.
Press ▲/▼ to highlight On/Off schedule and press ENTER.
Press ▲/▼ to choose between the below settings, and press ENTER to confirm:
Auto On/Off
Auto on hour
Auto on minute
Auto off hour
Press ◄/► to adjust the value of the selected setting.
To go back to the main Settings menu, press EXIT on the remote.
- Display
Press ▲/▼ to highlight Display and press ENTER.
Press ▲/▼ to choose between the below settings, and press ENTER to confirm
Brightness
Contrast
Press ◄/► to adjust the value of the selected setting.
To go back to the main Settings menu, press EXIT on the remote.

19
Non contractual document subject to change in case of typographical errors (Mktg0810) COPYRIGHT SOPEG 2010
The manufacturer reserves the right to modify the product specifications without notice.
ENGLISH
- Photo view options
Press ▲/▼ to highlight Photo view options and press ENTER.
Press ▲/▼ to choose between the below settings, and press ENTER to confirm:
Original
Fit to screen
Press ◄/► to adjust the value of the selected setting.
To go back to the main Settings menu, press EXIT on the remote.
- Copy option
Press ▲/▼ to highlight Copy option and press ENTER.
Press ▲/▼ to choose between the below settings, and press ENTER to confirm:
Original size
Reduce size
Press ◄/► to adjust the value of the selected setting.
To go back to the main Settings menu, press EXIT on the remote.
- Default settings
Press ▲/▼ to highlight Default settings and press ENTER.
Press ▲/▼ to choose between the below settings, and press ENTER to confirm.
EXIT
OK (If “OK”, then the settings will reset to the default software version)
To go back to the main Settings menu, press EXIT on the remote.
- Clear internal memory
Press ▲/▼ to highlight Clear internal memory and press ENTER.
Press ▲/▼ to choose between the below settings, and press ENTER to confirm.
EXIT
OK (If “OK”, then all internal data will be deleted)
To go back to the main Settings menu, press EXIT on the remote.
Page is loading ...
Page is loading ...
Page is loading ...
Page is loading ...
Page is loading ...
-
 1
1
-
 2
2
-
 3
3
-
 4
4
-
 5
5
-
 6
6
-
 7
7
-
 8
8
-
 9
9
-
 10
10
-
 11
11
-
 12
12
-
 13
13
-
 14
14
-
 15
15
-
 16
16
-
 17
17
-
 18
18
-
 19
19
-
 20
20
-
 21
21
-
 22
22
-
 23
23
-
 24
24
-
 25
25


Telefunken DPF 9332 Datasheet
- Category
- Digital photo frames
- Type
- Datasheet
Ask a question and I''ll find the answer in the document
Finding information in a document is now easier with AI
Related papers
-
Telefunken B55U546A User manual
-
-
Telefunken TE391BE Datasheet
-
-
-
Telefunken DPF 10933 6 Owner's manual
-
-
-
Telefunken DPF 9323 Owner's manual
-
Other documents
-
Sencor SDF 871 B User manual
-
COBY electronic DP-562 User manual
-
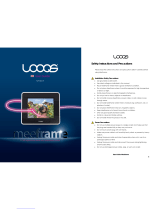 LOOQS Mee Frame User manual
-
Transcend TS-PF700W User manual
-
-
Transcend Information PF810 User manual
-
-
Audiovox DPF808 - Digital Photo Frame User manual
-
Magnasonic 07MF121 User manual
-
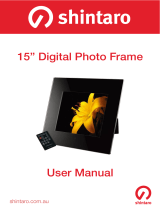 Shintaro SHDPF15V1 User manual

