Page is loading ...


Thank you for choosing ROAD ANGEL Gem
+
As our roads become busier, more congested and more regulated, staying alert to road
and traffic conditions is a challenge to everyone. Even the most conscientious driver can
have a momentary lapse of concentration that could easily lead to an accident or a fine
and points.
ROAD ANGEL Gem+ is specially designed to be a simple-to-use addition to any vehicle,
to alert and warn you in advance of known danger areas. In the comprehensive ROAD
ANGEL Gem+ database, which is automatically updated whilst you drive, are stored
Police, Local Authority and Department of Transport designated danger spots, including
accident blackspots and safety camera locations.
Using the latest Global Positioning Satellite (GPS) technology, ROAD ANGEL Gem+
compares your position with the known danger spot locations and gives you an audible
and visual warning as you approach them. An accurate GPS speedometer in the display
gives you time to adjust your driving to the approaching danger.
With over 250,000 miles of road around the UK, knowing the speed limit is often
guesswork. Gem+ also has an onboard database of road speed limits, so you will know
what the speed limit is, at a glance. Join other ROAD ANGEL Gem+ users in guarding
your life and livelihood.
The safety of you and your passengers is our prime consideration, and we trust that for
all the miles you drive, your ROAD ANGEL Gem+ will enhance the safety and enjoyment
of your journey. In the event of an accident or incident, you can contact the emergency
services at the press of a button using eAssist™, a feature unique to the ROAD ANGEL
Gem+.
We are pleased to have you as a valued customer and hope you will be delighted with
your fully integrated ROAD ANGEL Gem+. Having listened to our customers we think the
new features will make this product your perfect driving companion.
ROAD ANGEL Group Ltd.

i
Quick Start Guide
IMPORTANT! As soon as possible, please register your ROAD ANGEL Gem+ and
purchase subscriptions at: www.roadangelgroup.com. Until you do so, the unit cannot
update its database with the latest road speed and camera information and eAssist™ will
not function.
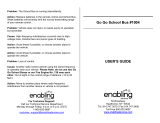
1. Mount the ROAD ANGEL Gem+ in
your vehicle.
2. Switch the unit on.
Power button
Use the supplied dash mount pad (it has an adhesive
backing). The dash mount can be locked in place by
twisting the outer perimeter 30° anticlockwise.
Connect ROAD ANGEL Gem+ to your vehicle’s cigar
socket using the supplied cable and adapter.
Until the battery charge reaches the minimum level required
to run the internal software (this might take up to an hour)
your ROAD ANGEL Gem+ displays a splash screen with a
battery charging progress indicator.
TIP: Use the mains
charger to speed
up this step.
Charge the unit at
home for 24 hours
if possible.
3. The ROAD ANGEL Gem+ searches for
satellites to establish its location.
4. ROAD ANGEL Gem+ is ready for use!
IMPORTANT! Until the unit has received a SIM update and
has GPRS connectivity, it will be unable to update its
database with the latest road speed and alert information.
TIP: Make
sure the unit
has a clear
view of the
sky, away
from obstacles
such as tall
buildings and
over-hanging
trees.
GSM signal
strength
GPRS signal/
SIM updated
Database
updating

ii
Road Speed Data
For many years, you have been asking us to help you understand the current legal
speed limit of the roads you are driving, regardless of the presence of a safety camera or
obvious road signage. However, once we started looking into this we were amazed that
there is currently no definitive digital speed limit database for the UK’s roads.
With over 250,000 miles of roads, collecting all of this data ourselves would have been
an enormous job costing millions of pounds and, much like painting the Forth Bridge,
would need constant attention year on year.
For the ROAD ANGEL Gem+ we’ve teamed up with Navteq™, owned by Nokia, to use
the road speed limit database supplied as part of their navigation product suite. This
ensures that we have all the major roads covered and get to hear when a new road or
dual carriageway is being built. We realise that the data supplied by Navteq is not 100%
accurate as local authorities are free to amend national speed limit recommendations as
they see fit.
This is why we have created SpeedShare™ which lets you, our customers; suggest new
or revised road speed limits at the press of a button.
We have been doing something similar with our Professional Connected and Vantage
customers for the last few years using our CameraShare™ feature, as it gives us
10,000’s of eyes and ears out there – all happy to tell us when a new safety camera has
been installed or a mobile camera van has parked up.
Once you report an anomaly with the road speed database, our dedicated team
investigate the piece of road in question and adjust, where appropriate, the speed limit in
our master database, ready to download to you the next time you perform an update.
Over time, we are confident that we will start to develop the only truly accurate picture of
legal road speed limits in the UK. Thank you in advance for helping us in this endeavour.

iii
Contents
Quick Start Guide i
Road Speed Data ii
1. Introduction 1
Unpacking the Box 3
Warranty 4
Battery Power and Recharging 4
Controls and Connectors 5
Front view 5
Rear view 6
2. Registration 7
Charge the Unit 7
Register your Unit Online 7
Subscriptions 8
The SIM Update 9
3. Installation 10
Security 10
Mounting the Unit 11
Attaching the Power Lead 12
Hardwiring 13
4. Getting Started 14
Switching On for the First Time 14
Normal Use 15
Alternative Screen 16
5. Alerts 17
Advisory Colour Coding 18
Examples of alerts and advisory colour coding 19

iv
6. Customising ROAD ANGEL Gem+ 21
Audio Options 22
Alert Options 23
Display Options 24
Unit Data 25
7. Adding Danger Zones 26
Adding New Locations 26
Deleting an alert from your personal database 26
8. eAssist™ 28
Manual Activation 28
Automatic Activation 29
Speaking to the SOC Operator 29
9. Updating the Database 31
The ROAD ANGEL Database 31
Automatic Updates by GPRS 31
Updating by PC 32
10. Background Information 33
About Global Positioning Satellites (GPS) 33
Our Camera Database 33
Laser Detection 34
How mobile laser traps operate 34
How the enforcement officer chooses which vehicles to target 34
ROAD ANGEL Gem+ and the Law 34
Targeting Explained 35
Short range targeting 35
Long range targeting 36
Following a vehicle being targeted 36
Speed Cameras and Hazards 37

1
1. Introduction
ROAD ANGEL Gem+ is a standalone GPS camera and accident blackspot locator. It
uses the latest global positioning satellite technology (see page 31) to give you audible
and visual alerts as you approach hazardous sections of road:
Accident blackspots (as designated by the Police and Local Authorities)
Safety cameras
Mobile roadwork cameras
Average speed monitoring zones
Mobile safety vans
Mobile laser guns
Primary schools, congestion charging zones and unprotected level crossings
With over 250,000 miles of road around the UK, knowing the speed limit is often
guesswork, that’s why Gem+ also has an onboard database of road speed limits.
Provided by Navteq™, the road speed information is presented in a circular road speed
sign at the bottom left of the device.
By using mobile phone technology, Gem+ also allows you to both share the LIVE
locations of mobile safety camera vans, and to suggest new or revised road speed limits.
CameraShare™ and SpeedShare™ are two unique features to Road Angel, and
empower you to keep yourself, and other ROAD ANGEL users, safe on the roads.
eAssist™ allows you to connect to emergency services through a Secure Operating
Centre (SOC) in the event of an accident or incident. Simply press the eAssist™ button
to speak with the SOC operator through a microphone built into the ROAD ANGEL
Gem+. Your ROAD ANGEL Gem+ communicates your precise location to the SOC
operator (in areas with good GPS coverage).
eAssist™ can also be triggered automatically by a collision. The Gem+ device has an
onboard ‘g-meter’ that measures your vehicle’s acceleration or deceleration. If the g-
force is above a certain threshold indicative of a collision, the SOC is automatically
contacted unless you cancel the eAssist™ call within 10 seconds.

2
IMPORTANT!
ROAD ANGEL Group Ltd sell ROAD ANGEL Gem+ as a road safety device. Driving within the
speed limits at all times and within the limitations of the road condition and your abilities is
paramount. The directors of ROAD ANGEL Group Ltd take no responsibility for the use of
ROAD ANGEL Gem+ for purposes other than those stipulated.
Placement
Position your ROAD ANGEL Gem+ as low as possible on the dashboard (see page 11) so
that it does not impair your all-round visibility: we recommend you use either a central
position or by the A-post. The device should be mounted securely and all cables must be
trained via locations that do not impact any vehicle controls and importantly, do not impede
the intended operation of any Air Bag zones. Do not leave the device in position when you
leave the vehicle unattended, both for security reasons (see page 10), and to avoid heat
damage resulting from direct sunlight.
MOT Examinations
For vehicles undertaking MOT examinations, ROAD ANGEL or any dashboard mounted
device should either be removed, or adhere to the rules and regulations on positioning. This
normally restricts placement within the swept (windscreen wiper) area of the screen, located
as low as practical to minimise potential loss of visibility.
Safety
ROAD ANGEL driver safety systems are designed with the sole purpose of making drivers
more aware of vehicle speed, the environment and potential hazards ahead. To ensure ROAD
ANGEL provides this information effectively and without distraction, devices incorporate
both visual and verbal instructions on the potential hazard, along with in some cases, colour
coded screens to remove the need for the driver to take their eyes from the road ahead.
Under no circumstances should ROAD ANGEL products be operated by the driver whilst the
vehicle is in motion. ROAD ANGEL devices are aimed at increasing driver awareness and
should always be considered secondary to the primary purpose of driving the vehicle.
eAssist™
Please note that the eAssist™ function is not designed to save your life, nor act as a
replacement to existing safety and / or emergency services. It is designed to complement
existing protocols and provide extra peace of mind for drivers. We do not guarantee that
eAssist™ will work 100% of the time, due to factors outside of ROAD ANGEL Group’s control
(see page 30 for more details).

3
Unpacking the Box
Empty all the parts out of the box and familiarise yourself with each item. Each pack
contains:
*please note that actual items may differ slightly to what appears in the image as the image is for representative purposes only.
12V/24V cigarette socket
charger
Connects unit to cigarette socket
for in-car power and trickle
charge.
USB cable
Connects Gem+
to mains charger, car
charger or PC USB port.
ROAD ANGEL Gem+
Dash mount cradle
Mains charger
with connector for
USB cable

4
Warranty
Your ROAD ANGEL Gem+ is guaranteed for one year from the date of purchase from all
manufacturing defects that occur with normal use. If your unit fails to perform as
specified in these instructions, please visit:
https://www.roadangelgroup.com/warranty.aspx
Battery Power and Recharging
ROAD ANGEL Gem+ is a cable-free device; it can operate independently using power
from its internal rechargeable battery for up to 3 hours. You can also power ROAD
ANGEL Gem+ directly from the cigarette socket in your vehicle.
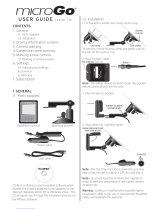
Less than 20% Charging 20% 40% 60% 80% Full
The unit’s battery level is indicated by the battery icon on the left side of the display (see
page 15). The number of blocks shown indicates the current battery strength. You can
charge the battery using either the in-car cigarette lighter adapter or the mains charger.
There is no need to wait until the battery is completely flat, unlike some rechargeable
devices. During the last 30 minutes (approx) of battery life, you will receive 3 separate
warnings that the battery is low. The third and final warning is issued moments before
the battery is completely drained and the unit shuts down.
When the unit is switched off and not in use, a full charge will last for up to a week. If the
battery is completely discharged, it may take up to an hour to recharge to the minimum
level required before the ROAD ANGEL Gem+ can start (see page 7).
IMPORTANT!
Before you start to use your new ROAD ANGEL Gem+, we recommend that you fully
charge it to preserve battery life and performance. For optimised charging, use the
mains charger. It will take longer to recharge the battery if the unit is in use. In addition,
the in-car cigarette lighter adapter provides a less efficient ‘trickle’ charge. It may take 24
hours to fully charge a unit in this way compared with only 4 hours using the mains
charger.

5
Controls and Connectors
This section shows the main features of your ROAD ANGEL Gem+.
Front view
Scroll up
Scroll through
menu options.
On/Off/Menu
Long press
switches unit
on/off; short
press when on
opens settings
menu.
Scroll down
Scroll through
menu options.
Dash mount
cradle
Mounting pad to
secure unit to
dashboard
(adhesive
backing).
Visor
Reduces glare
on the screen.
Store button
Add new
camera,
blackspot or
road speed
zone to
database.
OK button
Accept menu
options.
eAssist button
Contact eAssist
operator.
Magnetic base
Secures ROAD
ANGEL Gem+
to dash mount
cradle.

6
Rear view
USB connector
Connect to mains charger or
cigarette lighter adapter using
supplied cable.
Laser sensor
Detects laser speed measurement
devices targeting front of vehicle.

7
2. Registration
Charge the Unit
With the unit switched off, connect it to the mains
charger and charge the internal battery. Until the
battery charge reaches the minimum level required to
run the internal software (this might take up to an
hour), your ROAD ANGEL Gem+ displays a splash
screen with a battery charging progress indicator.
When the battery is fully charged, the battery charge
indicator (see page 15) is green.
The 100% marker on this screen states the unit has enough power to turn on not that it is
full charged.
Register your Unit Online
1. Go to www.roadangelgroup.com
2. Click on the Registration link.
3. Follow the on-screen instructions.
As part of this registration process, you will be prompted to purchase subscriptions for
the safety camera & blackspot and road speed limit updates.
You can also register by phone: call 01327 855586 (Mon-Fri 9am-5.30pm).
IMPORTANT!
To get the full benefit of up-to-the-minute safety information, you should put the unit on
charge, register online and then wait for a SIM update. As part of this process, you will be
prompted to purchase subscriptions to the safety camera & blackspot and road speed
limit databases. Having a valid subscription will ensure you have the very latest
information on your device.

8
Subscriptions
Your ROAD ANGEL Gem+ uses the award-winning ROAD ANGEL camera and accident
blackspot database. It is critical to the operation of your ROAD ANGEL Gem+ that your
unit updates regularly and so continued subscription is essential. Current subscription
rates can be found at www.roadangelgroup.com.
Why do you need to subscribe for updates?
With constant additions to the ROAD ANGEL camera and accident blackspot
database (1000+ sites per year), the benefit of your ROAD ANGEL Gem+ and the
protection it provides will be dramatically reduced if you fail to remain subscribed. In
this instance, your automatic updates will be disabled.
It is critical to the operation of your ROAD ANGEL Gem+ that your unit updates
regularly.
How do you subscribe?
You can choose from 12 or 36 month subscription plans, paying by credit or debit card
during the registration process.
Please be aware that all subscriptions are non-refundable and non-transferable.
How long will it take to activate your subscription?
Following the purchase of your subscriptions, you will start receiving automatic updates
to the safety camera & blackspot database, and be able to download updates to the road
speed limit database via PC, within 24 hours (following SIM activation by Orange – see
below).
Do you need valid subscriptions to use eAssist™?
Yes, eAssist™ will not work unless your unit has a valid subscription which will be
included when you subscribe to the safety camera and blackspot database. Once these
expire you will not only lose access to the database and the ability to update your unit
but eAssist™ will cease to work until such date that these are renewed.

9
The SIM Update
1. Switch on your ROAD ANGEL Gem+ by pressing the button on the front
of the unit. Place the unit in a location where there is a GSM signal as
indicated by the icon on the screen.
2. When your unit has been registered, it will receive a SIM update from Orange within
the next 24 hours (as long as the unit is on and has a GSM signal). The unit will then
restart.
3. When the unit has completed the SIM update, the bars by the
GSM/GPRS icon turn green to indicate GPRS connectivity.
4. Your unit will now perform a database update as indicated by the
‘communicating’ icon:

10
3. Installation
We recommend that you install your ROAD ANGEL Gem+ on the dashboard of your
vehicle, using the supplied dash mount cradle. This has been designed for secure
mounting and quick release.
ROAD ANGEL Gem+ requires a clear view of the sky to receive information from GPS
satellites. We highly recommend that ROAD ANGEL Gem+ is positioned in the centre of
the front windscreen, low down, just above the dashboard (see page 2). If screen glare is
a problem in this position, try installing the unit beside the driver's “A-pillar”. Check that
the GPS reception operates correctly in this position.
UV/solar reflective screens block GPS signals from entering the vehicle and may affect
the operation of your ROAD ANGEL Gem+. Please allow extra time for your unit to
acquire its position. Heated screens can also affect GPS signal strength.
IMPORTANT!
Security
Owing to the high number of thefts, we strongly recommend that you remove your ROAD
ANGEL Gem+ from view when you leave your vehicle. Before storing the unit (for example, in
the glove compartment), ensure that it is switched off to avoid the possibility of accidentally
triggering the eAssist™ feature.
Please contact ROAD ANGEL Group Ltd if your unit is stolen or lost. Each ROAD ANGEL
Gem+ is identified by a unique serial number on the back. We can use this number to block
the unit from being updated. Any attempt to do so removes all the data from the device and
renders it useless. We can also detect any attempt to re-register it.

11
Mounting the Unit
ROAD ANGEL Gem+ is supplied with a dash mount cradle allowing you to mount the
unit directly on the dashboard. Ensure that your ROAD ANGEL Gem+ is not located
close to any heater vents.
1. Clean the area where you want to attach the dash mount cradle. Allow the area to
dry.
2. Peel the backing from the adhesive on the base of the dash mount cradle.
3. Press the dash mount cradle firmly onto the dashboard.
4. Leave the dash mount cradle for 24 hours so the adhesive can set properly.
5. Attach the ROAD ANGEL Gem+ onto the dash mount cradle.
6. Adjust the angle and position of the unit so that you have a clear view of the screen
when driving.

12
Locking the Mount
If you have secured the mount in your vehicle, twist the outer perimeter approximately
30° anticlockwise to lock the mount.
Please note – the base of the mount can only be rotated once attached to your
dashboard.
If the mount is not yet secured, you’ll see that the outer perimeter has two layers that
move independently of each other. Twist the top layer anticlockwise whilst holding the
bottom and the mount will lock.
We recommend unlocking the mount before trying to reposition your device.

13
Attaching the Power Lead
1. Take the power lead, and plug it into the USB port on the back of the unit.
2. Route the power cable to the cigarette lighter socket. Ensure that it does not
interfere with any of the vehicle's controls or airbag modules. If you use your
cigarette lighter socket for any other devices, a dual adaptor may be used.
You are now ready to use the unit for the first time.
Hardwiring
To hardwire ROAD ANGEL Gem+ into your vehicle, purchase a compatible hardwire
accessory socket from www.roadangelgroup.com; wire this into the power system and
use with the supplied cable. Select the Hardwire Mode option in the Display Options (see
page 24) if you want your unit to switch on automatically when it detects power.
IMPORTANT!
ROAD ANGEL Gem+ has a 5V regulator built into its power cable. If the cable is cut and
used to hardwire the unit into the vehicle, you will damage the ROAD ANGEL Gem+ and
void your warranty.
Consult an auto electrician if you are unsure how to carry out this procedure as incorrect
hardwiring may affect the validity of vehicle and product warranty. Consult vehicle
manufacturer if in doubt.

14
4. Getting Started
Switching On for the First Time
1. Find a location with a clear view of the sky (away from obstacles such as tall
buildings and overhanging trees – these may delay or prevent satellite acquisition).
2. Switch on the ROAD ANGEL Gem+ by pressing the power button
for about two seconds.
3. If you skipped registration (see page 7) your ROAD ANGEL Gem+ will
not have updated its database and the screen will show the registration prompt.
Press the MENU button to continue (please register as soon as possible).
4. ROAD ANGEL Gem+ will now try to
identify its location by acquiring
information from GPS satellites. This
may take a few minutes. During the
procedure, the unit displays the
“Searching for Satellites” screen.
5. With further use, the unit should
establish your location within 1-2
minutes of being switched on.
6. When ROAD ANGEL Gem+ has
established its position, the display shows your speed (0 if you are stationary) and
the speed limit for your current location.
/