Gold Bond 50001052 Installation guide

Type
Installation guide
ESTIMATING MATERIALS
Quickly determine how much drywall will be needed to complete your
project. Be sure to allow 10% to 15% overage for cutting and piecing.
GRIDMARX
®
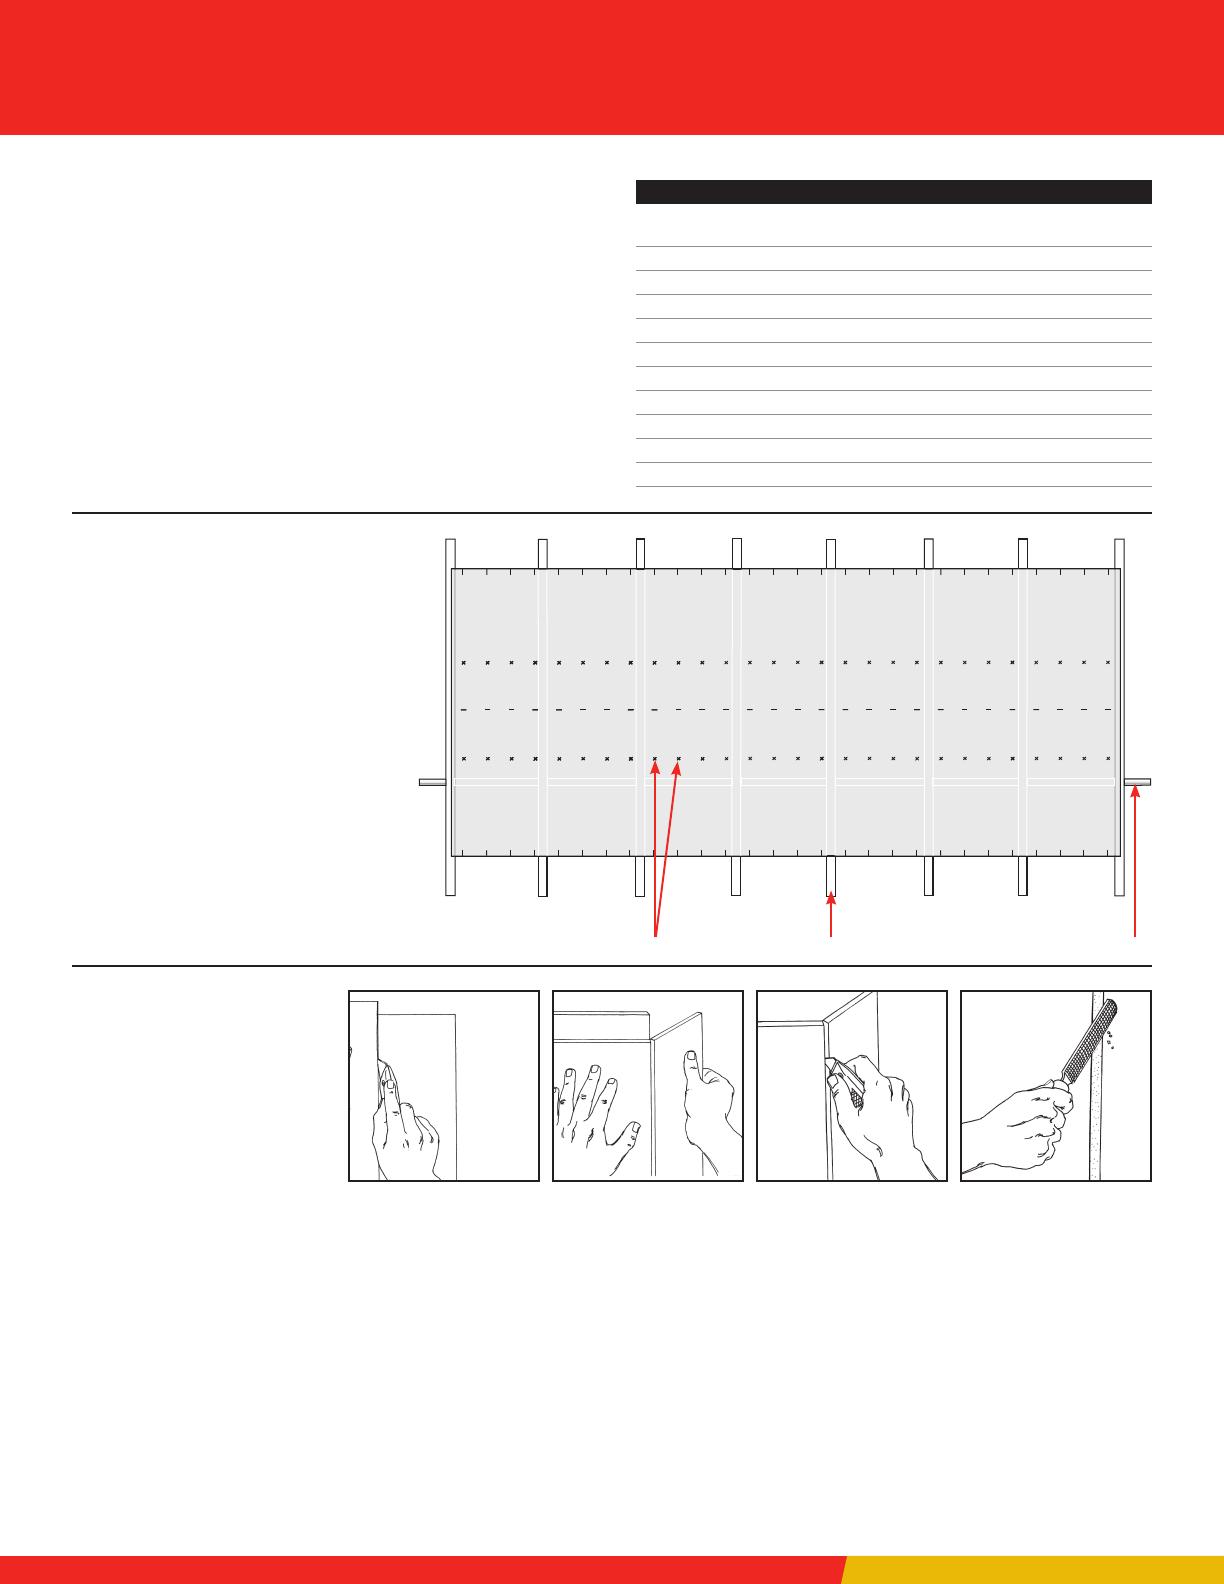
To help simplify installation, drywall products
come standard with GridMarX guide marks
printed right on the paper surface. These
marks align with standard building dimensions
and help you quickly identify fastener lines
for studs and make accurate cuts without
having to draw any lines.
When applying the board horizontally,
GridMarX serve as a reference mark to help
identify the location of framing members
behind the drywall. For example, if the
framing member is located 2" to the right
of the GridMarX reference mark at the top
edge of the board, it will be located 2" to the
right down the face of the board.
Drywall Installation
Sq. Ft. of Drywall Size
Wall/Ceiling 4' x 8' 4' x 12' # of Nails # of Screws
100 4 3 168 90
200 7 5 294 150
300 10 7 420 240
400 13 9 546 300
500 16 11 672 390
600 19 13 798 456
700 22 15 924 528
800 25 17 1050 600
900 29 19 1218 696
1000 32 21 1344 768
GridMarX
spaced 4" apart
Studs spaced
16" o.c.
Represents a
pipe or wiring
CUTTING DRYWALL
Cut drywall to t short walls,
doorways and openings for
electrical outlets, etc. Measure
carefully and mark with a pencil.
Snap board along the score
over the edge of a solid
support. (A quick action
produces the best results.)
Using utility knife, cut
through back paper.
Smooth the rough edges
with a rasp.
Installation instructions continued next page.
HANDLING AND STORAGE
Store at and o the oor. Keep dry prior to installation.
Using a straightedge and
utility knife, score the
drywall on the face paper
side along the pencil line(s).
111362 REV. 02 21
Drywall Installation (continued)
HELPFUL HINTS
Align all electrical outlets,
heating ducts, etc., so
they will be ush with the
drywall surface.
Helpful Hint: Use the
GridMarX as a reference
point to locate and cut
drywall for electrical
outlet boxes, which are
generally located 16" up
from the oor.
Start with proper
framing. Be sure studs
are straight to provide
adequate nailing surface
at adjoining walls.
CEILINGS
Start with ceiling,
applying drywall at right
angles to joists. Use panel
lifter or a temporary
T-brace to support weight.
Stagger butt end (cut end)
joints so joint does not
extend across the ceiling.
Never place a butt end
next to a tapered edge.
Nail or screw drywall to
the joists. The GridMarX
guide marks are spaced 4"
apart. Use the GridMarX to
gauge your nail spacing.
Space nails not to exceed
7", (a minimum of 3/8" and
a maximum of 1/2" from
drywall edge). Screws
should be spaced no more
than 12" apart on ceilings.
Slightly recess the nail or
screw head. Indent face
paper without tearing it.
WALLS
Abut top row of upper
sidewall panels
horizontally to ceiling.
Using the GridMarX, locate
where the studs fall at
the bottom of the board
in relation to the marks.
Use this as a guide. Space
nails 8" or screws 16"
apart, starting at the
center of the panel and
working outward toward
the perimeter.
Hold the lower sidewall
panel snugly against
upper panel. A panel lifter
(as shown) will help hold
the panel until fastened.
Begin fastening near
the center of board and
proceed to the outside.
Note: For added strength
when applying drywall to
studs, consider drywall
adhesive in addition to
nailing or screwing.
BUILDING YOUR
OWN T-BRACES
When installing drywall
to ceilings, you may
nd it helpful to have
T-braces” to hold the
drywall panels in place
while driving nails or
screws. Start with two
2x4 wood uprights that
are 1/2" longer than the
oor-to-ceiling height.
Nail a 3' piece of 1x4
board to the long boards.
Wedge the T-braces
between oor and panel
and you’re ready to fasten
the drywall to the ceiling
joists.
Note: Renting a panel
lifter is recommended for
safety.
nationalgypsum.com
National Gypsum Company is the exclusive service provider for products
manufactured by Gold Bond Building Products, LLC, PermaBASE Building
Products, LLC, and ProForm Finishing Products, LLC.
  • Page 1 1
  • Page 2 2

Gold Bond 50001052 Installation guide

Type
Installation guide

Ask a question and I''ll find the answer in the document

Finding information in a document is now easier with AI