Page is loading ...

OWNER’S MANUAL
SWASH ECOSEAT 101
Swash
®
Eco seat

Attach Proof of Purchase to This Page
Adjunte prueba de compra a esta página
Joindre une preuve d’achat à cette page

1
CONTENTS
PRODUCT INFORMATION
Safety Information ...................Page 2
Product Features ....................Page 2
Product Dimensions ..................Page 3
Product Parts ........................Page 4
PRODUCT INSTALLATION
Installation Parts .....................Page 5
Connecting Cold Water Supply ........Page 5
PRODUCT OPERATION
Swash Operation ....................Page 8
MAINTENANCE & TECHNICAL INFO
Technical Specifications ..............Page 9
Swash Cleaning .....................Page 10
Nozzle Cleaning .....................Page 10
Troubleshooting .....................Page 11
Warranty ............................Page 12
Contact ............................Page 13
Español ............................Page 15
Français ............................Page 29

22
PRODUCT INFORMATION
SAFETY INFORMATION
PRODUCT FEATURES
Use this product only for its intended use as directed in this manual.
Do not disassemble, repair or modify the product - service should
only be performed by a certified Brondell representative.
Do not submerge or spray water directly on or into the product.
Do not stand or drop heavy objects on this product and do not insert
any object into openings or hose.
Do not pull or stress the water supply hose.
Do not use harsh brushes or abrasive detergents to clean the
product, use only mild soap and a soft cloth for cleaning.
Hygienic Dual Wash Wands
The Swash uses two hygienic wash wands: one for posterior
cleansing and the other for feminine cleansing.
Non-Electric Operation
No electricity is required to use the Swash. All Swash functions are
operated by the convenient jog dial control and household
water pressure.
Easy Installation
No special tools, professional plumber, or electrical outlet required
for installation.
Ergonomic Design
The slow-close ergonomic lid and seat are designed to ensure the
most comfortable experience.
Self-cleaning Hygienic Wands
Before and after each use, the wash wands self-clean to help stay
free of build-up or debris.

33
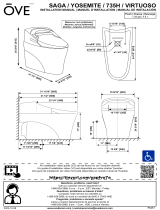
Elongated Top View
Round Top View
Required Distance Between
Mounting Holes
PRODUCT DIMENSIONS
PRODUCT INFORMATION (CONT.)
3.375 in 16.375 in
7.625 in 13.5 in 13.75 in
3.375 in
14.75 in
8.125 in
5.5 in
13.5 in 13.875 in

44
PRODUCT PARTS
1. Lid
2. Seat
3. Wash Wands
a. Posterior Wand
b. Front Wand
4. Cold Water Inlet
5. Wash Control Knob
6. Quick Release Button
7. Mounting Plate
6
1
3
a
b
4
4
5
5
7
2

55
INSTALLATION PARTS
1. Mounting Bolt (2)
2. Barrel Nut (2)
3. Mounting Plate
4. Adjustable Bracket
1
5
2
3
6
4
5. T-Valve Connector With Washer
6. 27.5” Cold Water Braided Metal Hose
7. Teflon Tape
7
PRODUCT INSTALLATION
CONNECTING COLD WATER SUPPLY
1. Existing Toilet Seat Removal
a. Lift hinge covers and use a screwdriver to remove the mounting bolts.
b. Remove the toilet seat.
Please read these instructions carefully before installing the Swash. Failure to do so could result
in flooding, leaking or damage to the product.
NOTE: Steps may vary by type of seat and toilet.

66
PRODUCT INSTALLATION (cont.)
CONNECTING COLD WATER SUPPLY (CONT.)
3. Connect T-valve to the Toilet Tank Fill Valve
a. Place the Rubber Washer into the T-valve.
b. Install the T-valve with the rubber washer to the incoming
water connection on the bottom of your toilet tank.
4. Connect the water supply line coming from the wall to the
bottom of the T-valve.
NOTES:
• The T-valve connects to the fill valve directly under
your toilet tank - it does not connect at the wall.
• Only connect to the toilet cold water supply line.
• If your water supply line is rigid, you may need to
replace it before continuing.
Steps 3-4
Step 3a
toilet tank
t-valve
cold water
supply line
NOTES:
• You may wish to place a container under the tank to
catch any excess water.
• Do not continue without completing the above steps.
• Failure to do so could result in flooding, leaking or
damage to the Swash.
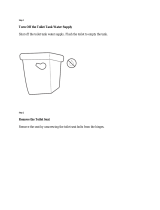
2. Turn o Water Supply Valve and flush toilet
a. Turn Water Valve o to stop the flow of water.
b. Flush toilet and hold down handle to completely
empty tank.
c. Disconnect Water Supply Hose from toilet tank.
Do not disconnect from the Water Supply Valve.
Step 2c

77
CONNECTING COLD WATER SUPPLY (CONT.)
5. Install Mounting Plate
a. Place Adjustable Mounting Plate over mounting holes
on toilet, rubber side faces down, curved edge faces
toward the toilet tank.
b. Place the Adjustable Brackets groove side down on
the center of the square opening in the Mounting Plate,
then insert Mounting Bolts through the Adjustable
Brackets and through the bolt holes in your toilet.
Be sure that the square Mounting Bolt Head is flush
with the sides of the Adjustable Bracket.
c. Slide Barrel Nut onto Mounting Bolts under the toilet
bowl and tighten to keep mounting plate in place.
Steps 5b & 5c
8. Connect the open end of the Bidet Hose to the T-valve.
6. Attach the Swash to the Mounting Plate
a. Set the Swash flat on the toilet bowl in front of the
Mounting Plate and slide Swash onto plate until it is
secure and “clicks” into place.
b. If the Swash appears too short or too long for the toilet,
adjust the Mounting Plate accordingly. To adjust the
Mounting Plate, loosen Barrel Nuts underneath the
toilet and slide Swash forward or backwards as needed.
Once the Swash is lined up properly, tighten Barrel Nuts
to hold in place.
7. Connect the Bidet Hose to the Cold Water Inlet
a. Connect the Bidet Hose to the Cold Water Inlet.
Hand-tighten to secure. Take care not to twist the bidet
hose, excessively bend it, or strip the plastic screw
threads when screwing the hose onto the bidet seat.
9. Turn on water supply
a. Open the main water supply valve slowly
and check for leaks.
b. Wait 5 minutes, check again, and if there are no
leaks, continue.
Step 6a
Step 7a
Step 8
NOTES:
• If you follow the mounting directions in 6b and your
seat still won’t mount flush with the lip of your toilet,
depending on the width of your toilet’s bolt spread,
you can insert the bolts through the top brackets
above the main brackets on your Mounting Plate to
move your seat up another ¾ inches.

88
PRODUCT OPERATION
SWASH OPERATION
With the intuitive Wash Control Dial on the right-hand side of
your seat, you can easily select your wash settings and water
pressure using these instructions:
Front Cleansing
For front (feminine) wash, turn the dial clockwise (or roll it
forward) while seated. The further the dial is turned, the
stronger the water pressure will be.
Self-Cleaning Nozzles
The nozzles will initially go through a brief self-clean as you
turn the dial between front cleansing and rear cleansing and
will last as long as the dial is in that position.
O
To close o the valve and stop the flow of water, turn the dial
back to its original center position so that the indicator hash
on the dial aligns with the top notch on the body of the seat.
(Non-shaded area represents active setting.)
Rear Cleansing
For rear (posterior) wash, turn the dial counterclockwise
(or roll it back) while seated. The further the dial is turned,
the stronger the water pressure will be.

99
PRODUCT SPECIFICATIONS
TECHNICAL SPECIFICATIONS
S101 SWASH ECOSEAT
Model
Ecoseat Ambient Temperature
Supply Water Pressure
14 psi – 100 psi
Dimensions
Elongated: 14.39 in x 20.03 in x 2.55 in
Round: 14.34 in x 18.47 in x 2.55 in
Weight
Elongated: 4.3 lbs / Round: 4.5 lbs
Seat / Lid Weight Limit
330 lbs / 330 lbs

1010
MAINTENANCE
SWASH CLEANING
NOZZLE CLEANING
Use a soft, damp cloth and mild cleanser (such as dish soap, Simple Green or Windex) to wipe
down the seat. DO NOT scrub or use harsh, abrasive products to clean the Swash. DO NOT use
thinner, benzene, acidic chemicals, chloride, or hydrochloric acid detergent. This may result in
corrosion to the metal parts, discoloration, or scratches to the bidet body.
To clean the nozzles, gently pull them out from inside of the seat manually and use a soft cloth or
toothbrush to clean o any build up. Clean front and rear nozzles in the same manner.
NOTE:
• Be cautious of leaving home and beauty products in contact with the bidet seat, the result
of which can be irreversible discoloration. Most stains can be removed using a 1:1 mix
of rubbing alcohol and water and a soft cloth or towel. Be cautious of home and beauty
products (including but not limited to various hair and air freshener sprays, lotions, body
wash, skin tanners, body butters, and oils) that come in contact with the seat. Wash o any
substances that come in contact with the seat as soon as possible.

1111
TROUBLESHOOTING
Problem Possible Cause(s) Solution(s)
Low water flow or
spray pressure
1. Water supply valve not
opened fully
2. Nozzles dirty
3. External bidet filter
1. Check that the water supply valve at
wall is fully open.
2. Clean nozzles
(see maintenance section).
3. If you have an external bidet filter
like SWF44, check and replace
if necessary.
Nozzles do not
function properly
1. Nozzles are dirty
2. Water pressure is too low
3. External bidet filter
1. Clean nozzles
(see maintenance section).
2. Check water supply valve at wall to
fully open.
3. If you have an external bidet filter
like SWF44, check and replace
if necessary.
Water leaks from
areas other than
the nozzles
1. Water leaking from the T-valve
2. Water leaking from the bidet
hose connection
1. Make sure that the rubber gasket is
inserted correctly into the T-valve.
2. Make sure that the bidet hose is
correctly connected and tight. Check
any rubber washers and do
not overtighten.
If the bidet appears to be operating abnormally, please review the troubleshooting tips before
calling the Brondell Service Center as most issues are easily resolved with a few simple steps.
If you are unable to resolve the issue after checking the following items, please call the Service
Center at 888-542-3355, Mon–Fri, 9am–5pm PST, or email us at [email protected].
Check before continuing:
• Make sure main water supply valve is open.
• Confirm there are no leaks from hoses or water supply.
After checking items above, refer to the following troubleshooting chart for additional solutions.

1212
WARRANTY
BRONDELL products are backed by some of the most comprehensive warranties in the industry.
BRONDELL warrants that all products (excluding consumable items) shall be free from defects in
material and workmanship under normal use and service.
Swash Ecoseat Residential One-Year Limited Warranty
100% Coverage of all parts and labor for the entire product (excluding consumable filters) for the first
year from original date of purchase.
Swash Ecoseat Commercial Warranty
Warranty period one year from original purchase date for all BRONDELL products. Warranties may
not apply to products that are used for heavy commercial, hospital, or other high use non-
residential applications.
Exclusions and Limitations
1. BRONDELL warrants its products to be free from manufacturing defects under normal use and service.
This warranty is extended only to the ORIGINAL PURCHASER.
2. BRONDELL’s obligations under this warranty are limited to repairs or replacement, at BRONDELL’s
option, of products or parts found to be defective, provided that such products were properly installed
and used in accordance with instructions. BRONDELL reserves the right to make such inspections as
may be necessary in order to determine the cause of the defect. BRONDELL will not charge for labor or
parts in connection with warranty repairs for the first year from date of purchase on all products except
those that may be subject to commercial use limitations.
3. BRONDELL is not responsible for the cost of removal, return (shipping) and/or re-installation of
products. This warranty does NOT apply to:
• Damage or loss which occurs during shipment.
• Damage or loss sustained through any natural or man-made causes beyond the control of
BRONDELL, including but not limited to fire, earthquake, floods, etc.
• Damage or loss resulting from sediments or foreign matter contained in a water system.
• Damage or loss resulting from negligent or improper installation including installation of a unit in
a harsh or hazardous environment.
• Damage or loss resulting from removal, improper repair, modification of the product, or improper
maintenance including damage caused by chlorine or chlorine related products.
4. This warranty gives you specific legal rights. You may have other rights which vary from state to state.
THIS WRITTEN WARRANTY IS THE ONLY WARRANTY MADE BY BRONDELL. REPAIR OR REPLACEMENT
AS PROVIDED UNDER THIS WARRANTY SHALL BE THE EXCLUSIVE REMEDY AVAILABLE TO THE
PURCHASER. BRONDELL SHALL NOT BE RESPONSIBLE FOR LOSS OF USE OF THE PRODUCT OR
FOR OTHER INCIDENTAL, SPECIAL, FOR CONSEQUENTIAL DAMAGES OR EXPENSES INCURRED
BY THE PURCHASER OR FOR LABOR OR OTHER COSTS DUE TO INSTALLATION OR REMOVAL OR
COSTS OF REPAIRS BY OTHERS, OR FOR ANY OTHER EXPENSE NOT SPECIFICALLY STATED ABOVE.
EXCEPT TO THE EXTENT PROHIBITED BY APPLICABLE LAW, ANY IMPLIED WARRANTIES, INCLUDING
THAT OF MERCHANTABILITY, ARE EXPRESSLY LIMITED TO THE DURATION OF THIS WARRANTY.
SOME STATES DO NOT ALLOW LIMITATIONS, SO THE ABOVE LIMITATION AND EXCLUSION MAY NOT
APPLY TO YOU.
How to Obtain Service
To obtain repair service under this warranty, you must contact an authorized BRONDELL Service Center
to obtain an RMA (Return Merchandise Authorization) number. Proof of purchase in the form of a copy of
the original receipt must accompany the returned unit for the warranty to be valid. Take or ship the unit
pre-paid to the closest BRONDELL authorized service center along with the RMA number and
proof of purchase.
To obtain the RMA number and locate the BRONDELL Service Center location nearest you, please call
1-888-542-3355, Mon–Fri, 9am–5pm PST.

13
CONTACT:
Brondell, Inc.
PO Box 470085
San Francisco, CA 94147-0085
Phone: 1-888-542-3355
Email: [email protected]
Web: www.brondell.com
For questions, contact Brondell Customer Service:
1-888-542-3355, Monday – Friday, 9am – 5pm PST
MANUFACTURED BY:
Brondell
PO Box 470085
San Francisco, CA 94147-0085
Please retain receipt records for any warranty claims.
Made in China

MANUAL DEL USUARIO
SWASH ECOSEAT 101

1515
INFORMACIÓN DEL PRODUCTO
Información de Seguridad ............Página 16
Características del Producto ..........Página 16
Dimensiones del Producto ............Página 17
Partes del Producto ..................Página 18
INSTALACIÓN DEL PRODUCTO
Piezas de Instalación .................Página 19
Conectar el Suministro de Agua Fria ...Página 19
FUNCIONAMIENTO DEL PRODUCTO
Uso Del Asiento Swash ...............Página 22
MANTENIMIENTO E INFORMACIÓN TÉCNICA
Especificaciones Técnicas ............Página 23
Limpieza del Swash ..................Página 24
Limpieza de la Boquilla ...............Página 24
Solución de Problemas ...............Página 25
Garantía ............................Página 26
Contacto ...........................Página 27
Inglés ..............................Página 1
Français ............................Página 29
ÍNDICE

1616
INFORMACIÓN DEL PRODUCTO
INFORMACIÓN DE SEGURIDAD
CARACTERÍSTICAS DEL PRODUCTO
Use este producto solo para el fin para el que ha sido diseñado,
según se describe en este manual.
No desarme, repare o modifique el producto - el mantenimiento
solamente debe ser realizado por un representante certificado
de Brondell.
No sumerja o rocíe agua directamente sobre el producto o
dentro de él.
No se pare o deje caer objetos pesados sobre el producto y no
inserte ningún objeto en las aberturas o la manguera.
No jale o tensione la manguera de suministro de agua.
No utilice cepillos duros o detergentes abrasivos para limpiar el
producto, solamente use jabón suave y un paño suave
para limpiar.
Tubos de avado igiénico uales
El Swash usa dos tubos higiénicos de lavado: uno para limpieza
posterior y otro para limpieza femenina.
Funcionamiento no léctrico
No se requiere electricidad para usar el Swash. Todas las
funciones del Swash son operadas por un práctico control de
mando y la presión de agua del hogar.
Fácil Instalación
No se requieren herramientas especiales, plomeros
profesionales o tomas de corriente para la instalación.
Diseño Ergonómico
La tapa ergonómica de cierre lento y el asiento están diseñados
para asegurar una cómoda experiencia.
Tubos de igiene con unción de utolimpieza
Antes y después de cada uso los tubos de lavado se limpiarán
automáticamente para permanecer libres de acumulaciones
o impurezas.

1717
Vista Superior Alargada
Vista Superior Redonda
Distancia Requerida Entre los
Orificios de Montaje
DIMENSIONES DEL PRODUCTO
3.375 in 16.375 in
7.625 in 13.5 in 13.75 in
3.375 in
14.75 in
8.125 in
5.5 in
13.5 in 13.875 in

1818
PARTES DEL PRODUCTO
1. Tapa
2. Asiento
3. Tubos de limpieza
a. Tubo posterior
b. Tubo frontal
4. Entrada para agua fría
5. Perilla de control de lavado
6. Botón de rápida liberación
7. Placa de montaje
INFORMACIÓN DEL PRODUCTO (continuación)
6
1
3
a
b
4
4
5
5
7
2
/