WARNING
To reduce the risk associated with choking, do not allow children under 3 years of age to have access to small parts during
the installation of this product. The disposable filter cartridge should be replaced every 6 months at the rated capacity, or sooner if
a noticeable reduction in flow rate occurs.
For the maximum benefit of your filtration system, GE Appliances recommends the use of GE Appliances-branded filters only.
Using GE Appliances-branded filters in GE Appliances and Hotpoint® refrigerators provides optimal performance and reliability. GE
Appliances filters meet rigorous industry standards for safety and quality that are important for products that are filtering your water.
GE Appliances has not qualified non-GE Appliances-branded filters for use in GE Appliances and Hotpoint refrigerators and there is
no assurance that non-GE Appliances-branded filters meet GE Appliances standards for quality, performance and reliability.
If you have questions, or to order additional filter cartridges, visit our website at gewaterfilters.com or call
GE Appliances Parts and Accessories, 877.959.8688. In Canada, call 866.777.7627.
NOTICE
To reduce the risk associated with ingestion of contaminants:
Ŷ'RQRWXVHZLWKZDWHUWKDWLVPLFURELRORJLFDOO\XQVDIHRURIXQNQRZQTXDOLW\ZLWKRXWDGHTXDWHGLVLQIHFWLRQEHIRUHDQGDIWHUWKH
system. Systems certified for cyst reduction may be used on disinfected water that may contain filterable cysts.
NOTICE
To reduce the risk associated with ingestion of contaminants:
Ŷ5HDGDQGIROORZXVHLQVWUXFWLRQVEHIRUHLQVWDOODWLRQDQGXVHRIWKLVV\VWHP
Ŷ,QVWDOODWLRQDQGXVH0867FRPSO\ZLWKDOOVWDWHDQGORFDOSOXPELQJFRGHV
Ŷ'RQRWLQVWDOOLIZDWHUSUHVVXUHH[FHHGVSVLN3D,I\RXUZDWHUSUHVVXUHH[FHHGVSVL
(552 kPa)
, you must install a
pressure-limiting valve. Contact a plumbing professional if you are uncertain how to check your water pressure.
Ŷ'RQRWLQVWDOOZKHUHZDWHUKDPPHUFRQGLWLRQVPD\RFFXU,IZDWHUKDPPHUFRQGLWLRQVH[LVW\RXPXVWLQVWDOODZDWHUKDPPHU
arrester. Contact a plumbing professional if you are uncertain how to check for this condition.
Ŷ'RQRWLQVWDOORQKRWZDWHUVXSSO\OLQHV7KHPD[LPXPRSHUDWLQJZDWHUWHPSHUDWXUHRIWKLVILOWHUV\VWHPLV)&
Ŷ3URWHFWILOWHUIURPIUHH]LQJ'UDLQILOWHUZKHQWHPSHUDWXUHVGURSEHORZ)&
Ŷ&KDQJHWKHGLVSRVDEOHILOWHUFDUWULGJHHYHU\VL[PRQWKVRUVRRQHULI\RXREVHUYHDQRWLFHDEOHUHGXFWLRQLQZDWHUIORZUDWH
Ŷ)DLOXUHWRUHSODFHWKHGLVSRVDEOHILOWHUFDUWULGJHDWUHFRPPHQGHGLQWHUYDOVPD\OHDGWRUHGXFHGILOWHUSHUIRUPDQFHDQGFUDFNVLQWKH
filter housing, causing water leakage or flooding.
Ŷ7KLV6\VWHPKDVEHHQWHVWHGDFFRUGLQJWR16)$16,DQG3IRUWKHUHGXFWLRQRIWKHVXEVWDQFHVOLVWHGEHORZ7KH
concentration of the indicated substances in water entering the system was reduced to a concentration less than or equal to the
SHUPLVVLEOHOLPLWIRUZDWHUOHDYLQJWKHV\VWHPDVVSHFLILHGLQ16)$16,DQG3
XWFE System is certified by
,$30257DJDLQVW16)$16,
Standards 42, 53, 401 and P473 for
the reduction of claims specified on
the performance data sheet and at
iapmort.org.
PLATINUM SEAL
WATER QUALITY
I
A
P
M
O
R
E
S
E
A
R
C
H
A
N
D
T
E
S
T
I
N
G
™
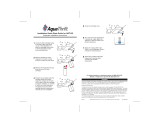
INSTALLING THE FILTER IN A MULTI-DOOR
BOTTOM FREEZER REFRIGERATOR
1. Open the filter cartridge housing by
pulling the door open.
2. Line up the ports on the filter with
the ports on the filter cartridge
holder, and gently insert the filter.
3. Slowly turn the filter to the
right until it stops. DO NOT
OVERTIGHTEN. As you turn the
filter, it will automatically adjust itself into position. The filter will
move about a ¼ turn or 90 degrees, until the filter cannot be
turned, and the label faces outward.
4. Slowly push the filter up into the
clips.
5. Close the filter cartridge housing
by gently pushing the door closed
until the tabs lock into place.
6. Continue following instructions
shown in Purging the Filter and
Reset Filter Change Indicator
Sections.
PURGING THE FILTER
For dispenser models - Run water from the dispenser for 2
gallons (approximately 5 minutes) to clear the system. Water may
spurt out and air bubbles may be visible during the process. If
water is not flowing, check to make sure the filter has been fully
rotated to the right. Use a large pitcher or sports bottle to catch
the water spray. NOTE: It is normal for water to appear discolored
during the initial system flush. Water color will return to normal
after the first few minutes of dispensing.
For icemaker-only models - Discard the first bin of ice to allow
air to purge from the system. A newly installed filter cartridge will
cause water to spurt into the icemaker body, which could lead to
ice droplets around the icemaker area. NOTE: It is normal for
these droplets and initial ice production to appear discolored
during the initial system flush. Ice color will return to normal after
the first bin of ice production.
RESET FILTER CHANGE INDICATOR
For Bottom Freezer and Side-by-Side models - Press and hold
the RESET WATER FILTER button on the dispenser for three
seconds. On select models, filter reset will be automatic when
new filter is installed.
For Multi-Door Bottom Freezer models - When dispensing
water, press the button underneath the Confirm Filter Change
message. On select models, filter reset will be automatic when
new filter is installed.
XWFE Water Filter Cartridge Continued
2