Page is loading ...

Halloween Figurine Assembly Instructions
The model number of your item is printed on the side of your carton.
Always use this number to identify your item.
Thank you for your purchase of this quality Halloween decor. With proper use and care, your
Halloween decor will provide you with years of enjoyment. Please follow the instructions on
how to assemble and disassemble your item. If you should have any problems with your item,
or you have any questions, DO NOT return it to the place of purchase. Please call our toll-free
number: 1-888-840-4559 and a customer service representative will assist you. Enjoy your
Holiday!
Part
Qty
Base (A)
1
Support Poles (B)
3
Torso Frame (C)
1
Right Leg (D)
1
Left Leg (E)
1
Costume (F)
1
Right Arm (G)
1
Left Arm (H)
1
Head (I)
1
Horse Head (J)
1
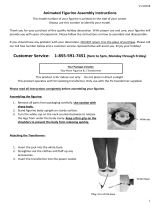
Step 1: Setting Up the Frame
Attach 3 Support Poles (B) to the base (A) as shown. Secure by aligning the quick-connect
push button into the pre-drilled holes. Attach the Torso Frame (C) as shown by aligning the
quick-connect push button into the pre-drilled holes.
B
C
A
D
E
F
G
I
H
J
A
B
B
B
C

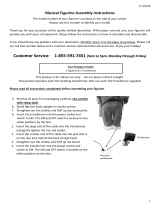
Step 2: Adding the Legs, Costume, and Arms
Attach the Legs (D & E) as shown into the hole on the torso fame. Lower the Costume (F) over
the torso frame. Slide Right Hand (G) up through the right sleeve and slide the forked-hook
into the hole on the torso frame and repeat for the Left Hand (H) on the left side. Attach the
hook and loop fastener on the hands to the sleeve.
Step 3: Adding the Head and the Horse Head
Set the Head (I) on the torso frame and into the hole. Repeat this step for the Horse Head (J)
and attach the hook and loop fastener to the collar. Carefully connect the connector jack
wire from the function box into the head. Connect the UL Adapter and “Try Me” Button at the
function box and run this down through the costume and out the back.
Operating Instructions:
There are 3 settings, which can be adjusted on the main function control box on the torso
frame:
1. ON1: This will activate the item
2. OFF/TRY ME: This will only activate the item when the try me button is pushed
3. ON2: This will allow the item to be activated by sound (like trick or treaters!). The item
will run through one cycle when it is sound activated.
The function control box also has a volume button. Adjust the volume to your liking!
D
E
F
G
H
I
J

WARNINGS
1. This product is for indoor or covered outdoor use only. Do not place in
direct sunlight.
2. This product is for decoration only and is not a toy. Please use caution with
children under the age of 8.
3. Do not position the decoration near candles, sources of heat, or in direct
sunlight.
4. The decoration cannot be connected to the power supply directly.
5. Decoration should be on a level, stable surface to prevent it from falling
over
6. This product is fragile and should be assembled with care.
7. Please follow the steps and requirements specified in the instruction to
ensure safety and reliability during the installation.
8. Do not break, cut or alter the power supply cord.
9. Do not attempt to repair the wiring with staples or nails.
10. Do not place the cable under a carpet or rug as it may get damaged.
11. Ensure that the cable is in a secure location where it is not a hazard.
12. Do not connect the decoration to the power supply while it is still in the
packaging.
13. Please switch off the transformer when not in use.
14. Do not leave electric decoration unattended while operating in the ON
position.
15. Do not over load the transformer.
Storage tips: We suggest saving the carton for storing your figurine. Store in a
cool, dry area where the temperature does not exceed 100⁰F.
/