Bosch BSG81030/14 User manual
- Category
- Vacuum cleaners
- Type
- User manual
This manual is also suitable for
Page is loading ...
Page is loading ...

1
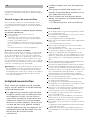
de Sicherheitshinweise . . . . . . . . . . . . . . . . . . 2 Gebrauchsanweisung . . . . . . . . .37
en Safety information. . . . . . . . . . . . . . . . 3 Instruction manual . . . . . . . .42
fr Consignes de sécurité . . . . . . . . . . . . . 5 Notice d'utilisation . . . . . . . .47
it Norme di sicurezza . . . . . . . . . . . . . . . . . . . 6 Istruzioni per l'uso . . . . . . . . . . .52
nl Veiligheidsvoorschriften. . . . . . . . . . . . . . . 8 Gebruiksaanwijzing . . . . . . . . . . .57
da Sikkerhedsanvisninger . . . . . . . . . . . . . . . . 9 Brugsanvisning . . . . . . . . . . . . . .62
no Sikkerhetsanvisninger . . . . . . . . . . . . . . . 11 Bruksanvisning . . . . . . . . . . . . . .67
sv Säkerhetsanvisningar . . . . . . . . . . . . . . . . 12 Bruksanvisning . . . . . . . . . . . . . .72
fi Turvaohjeet . . . . . . . . . . . . . . . . . . . . . . . . 14 Käyttöohje . . . . . . . . . . . . . . . . . .77
es Consejos y advertencias de seguridad . . 15 Instrucciones de uso . . . . . . . . . .82
pt Indicações de segurança . . . . . . . . . . . . . 17 Instruções de utilização . . . . . . .87
el Υποδείξεις ασφαλείας. . . . . . . . . . . . . . . . 18 Οδηγίες χρήσης . . . . . . . . . . . . . .92
tr Güvenlik bilgileri. . . . . . . . . . . . . . . . . . . . 20 Kullanım kılavuzu . . . . . . . . . . . . .97
pl Wskazówki dotyczące bezpieczeństwa . . 22 Instrukcja obsługi . . . . . . . . . . .102
hu Biztonsági útmutató . . . . . . . . . . . . . . . . . 24 Használati utasítás . . . . . . . . . .107
bg Указания за безопасност . . . . . . . . . . . . 26 Инструкция за ползване . . . . .112
ru Правила техники безопасности . . . . . . . 28 Инструкция по эксплуатации . .117
ro Instrucţiuni de siguranţă . . . . . . . . . . . . . 30 Instrucţiuni de folosire . . . . . . .122
uk Настанови щодо безпеки . . . . . . . . . . . . 32 Інструкція з експлуатації . . . . .127
135 . . . . . . . . . . . . . . . . . . . . . . . . . . . . . . . . . . . . 35 . . . . . . . . . . . . . . . . . ar
Page is loading ...

3
Please keep this instruction manual. When passing the
vacuum cleaner on to a third party, please also pass on
this instruction manual.
Intended use
This vacuum cleaner is intended for domestic use and
not for commercial use. Only use this vacuum cleaner
in accordance with the instructions in this instruction
manual.
In order to prevent injuries and damage, the vacuum
cleaner must not be used for:
Vacuum-cleaning persons or animals
Vacuuming up:
- hazardous, sharp-edged, hot or glowing sub-
stances.
- damp or liquid substances.
- highly flammable or explosive substances and
gases.
- ash, soot from tiled stoves and central heating
systems.
- toner dust from printers and copiers.
Spare parts, accessories, dust bags
Our original spare parts, original (special) accessories
and original dust bags are designed to work with the
features and requirements of our vacuum cleaners. We
therefore recommend that you only use our original
spare parts, original (special) accessories and original
dust bags. This will ensure that your vacuum cleaner
has a long service life and that the quality of its clea-
ning performance will remain consistently high throug-
hout.
!
Please note: Using unsuitable or inferior-quality
spare parts, (special) accessories and dust bags can
damage your vacuum cleaner. Damage caused by the
use of such products is not covered by our
guarantee.
Safety information
This vacuum cleaner complies with the
recognised rules of technology and the
relevant safety regulations.
The appliance may be used by children
over the age of 8 years and by persons
with reduced physical, sensory or
mental capacity or by persons with a
lack of experience or knowledge if they
are supervised or have been instructed
on the safe use of the appliance and the
have understood the potential dangers
of using the appliance.
Children must never play with the
appliance.
en
! Bitte beachten
Die Netzsteckdose muss über eine Sicherung von
mindestens 16A abgesichert sein.
Sollte die Sicherung beim Einschalten des Gerätes
einmal ausgelöst werden, so kann dies daran liegen,
dass gleichzeitig andere Elektrogeräte mit hohem
Anschlusswert am gleichen Stromkreis angeschlos-
sen sind.
Das Auslösen der Sicherung ist vermeidbar, indem
Sie vor dem Einschalten des Gerätes die niedrigste
Leistungsstufe einstellen und erst danach eine höhe-
re Leistungsstufe wählen.
Hinweise zur Entsorgung
Verpackung
Die Verpackung schützt den Staubsauger vor
Beschädigung auf dem Transport. Sie besteht aus
umweltfreundlichen Materialien und ist deshalb
recycelbar. Entsorgen Sie nicht mehr benötigte
Verpackungsmaterialien an den Sammelstellen für
das Verwertungssystem »Grüner Punkt«.
Altgerät
Altgeräte enthalten vielfach noch wertvolle
Materialien. Geben Sie deshalb Ihr ausgedientes
Gerät bei Ihrem Händler bzw. einem Recyclingcenter
zur Wiederverwertung ab. Aktuelle Entsorgungswege
erfragen Sie bitte bei Ihrem Händler oder Ihrer
Gemeindeverwaltung.
Entsorgung Filter und Staubbeutel
Filter und Staubbeutel sind aus umweltverträglichen
Materialien hergestellt. Sofern sie keine Substanzen
enthalten, die für den Hausmüll verboten sind, kön-
nen sie über den normalen Hausmüll entsorgt wer-
den.
Allgemeine Hinweise
Zubehör
Das Aussehen Ihres Zubehörs (Düse, Saugrohr, etc.)
kann bei gleicher Funktionsweise von den Abbildungen
in dieser Gebrauchsanweisung abweichen.
Hinweise zum Energielabel
Bei diesem Staubsauger handelt es sich um einen
Universalstaubsauger.
Für das Erreichen der deklarierten Energieeffizienz und
Reinigungsklasse auf Teppich und Hartboden verwen-
den Sie bitte die umschaltbare Universaldüse.
Die Berechnungen basieren auf der Delegierten
Verordnung (EU) Nr. 665/2013 der Kommission vom
3. Mai 2013 zur Ergänzung der Richtlinie 2010/30EU.
Alle in dieser Anweisung nicht genauer beschriebe-
nen Verfahren wurden auf Basis der DIN EN 60312-
1:2014 ausgeführt.

4
!
Please note
The mains socket must be protected by at least a 16
amp circuit breaker.
If a circuit breaker is tripped when you switch on
the vacuum cleaner, this may be because other elec-
trical appliances which have a high current draw are
connected to the same power circuit.
To prevent the circuit breaker from tripping, select
the lowest power setting before switching the appli-
ance on, and increase the power only once it is run-
ning.
Disposal information
Packaging
The packaging is designed to protect the vacuum
cleaner from being damaged during transportation.
It is made of environmentally friendly materials and
can therefore be recycled. Dispose of packaging that
is no longer required at an appropriate recycling
point.
Old appliance
Old appliances still contain many valuable materials.
Therefore, please take appliances that have reached
the end of their service life to your retailer or recyc-
ling centre so that they can be recycled. For current
disposal methods, please enquire at a retailer or
your local council.
Disposal of filters and dust bags
Filters and dust bags are manufactured from envi-
ronmentally friendly materials. Provided they do not
contain substances that are not permitted in house-
hold waste, you can dispose of them with your nor-
mal household waste.
General information
Accessories
Your accessories (nozzle, suction pipe, etc.) may look
different from but work in the same way as those
depicted in the illustrations in this instruction manual.
Notes on the energy label
This vacuum cleaner is a general purpose vacuum clea-
ner.
To achieve the declared energy efficiency and cleaning
performance class on carpet and hard floor, please use
the interchangeable universal nozzle.
These calculations are based on the delegated regula-
tion (EU) no. 665/2013 established by the commissi-
on on 3rd May 2013 as a supplement to Directive
2010/30/EU.
All of the procedures in these instructions that are
not described in more precise detail were listed
based on DIN EN 60312-1:2014.
Cleaning and user maintenance must
never be carried out by children without
supervision.
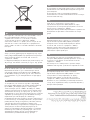
Plastic bags and films must be kept out
of the reach of children before disposal.
=> Risk of suffocation.
Proper use
Only connect and use the vacuum cleaner in accor-
dance with the specifications on the rating plate.
Never vacuum without the dust bag or dust contai-
ner, motor protection or exhaust filter.
=> This may damage the vacuum cleaner.
Always keep the vacuum cleaner away from your
head when using nozzles and tubes.
=> This could cause injury!
When vacuuming stairs, the appliance must always
be positioned below the user.
Do not use the power cord or the hose to carry or
transport the vacuum cleaner.
For safety reasons, if this appliance's mains power
cable becomes damaged, it must be replaced by the
manufacturer, their after-sales service department or
a similarlyqualified person.
If using the appliance for longer than 30 minutes,
pull out the power cord completely.
When disconnecting the appliance from the mains,
pull on the plug itself to remove it; do not pull on
the power cord.
When the cable is being automatically rewound,
ensure that the mains plug is not thrown towards
persons, body parts, animals or objects. => Use the
mains plug to guide the power cord.
Do not pull the power cord over sharp edges or
allow it to be-come trapped.
Pull out the mains plug before carrying out any work
on the vacuum cleaner.
Do not operate the vacuum cleaner if it is damaged.
Unplug the appliance from the mains if a fault is
detected.
For safety reasons, only authorised after-sales
service personnel are permitted to carry out repairs
and fit replacement parts to the vacuum cleaner.
Protect the vacuum cleaner from the weather,
moisture and sources of heat.
Do not pour flammable substances or substances
containing alcohol onto the filters (dust bag, motor
protection filter, exhaust filter, etc.).
The vacuum cleaner is not suitable for use on
construction sites.
=> Vacuuming up building rubble could damage the
appliance.
When not in use, switch off the appliance and pull
out the mains plug.
At the end of its life, the appliance should immedia-
tely be rendered unusable, then disposed of in an
appropriate manner.
Page is loading ...
Page is loading ...
Page is loading ...
Page is loading ...
Page is loading ...
Page is loading ...
Page is loading ...
Page is loading ...
Page is loading ...
Page is loading ...
Page is loading ...
Page is loading ...
Page is loading ...
Page is loading ...
Page is loading ...
Page is loading ...
Page is loading ...
Page is loading ...
Page is loading ...
Page is loading ...
Page is loading ...
Page is loading ...
Page is loading ...
Page is loading ...
Page is loading ...
Page is loading ...
Page is loading ...
Page is loading ...
Page is loading ...
Page is loading ...
Page is loading ...
Page is loading ...
Page is loading ...
Page is loading ...
Page is loading ...
Page is loading ...

41
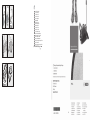
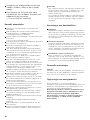
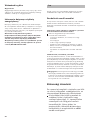
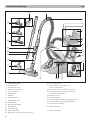
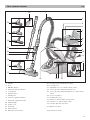
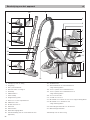
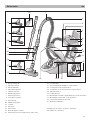
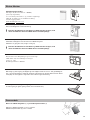
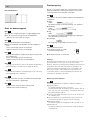
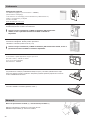
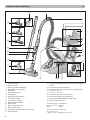
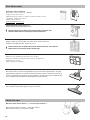
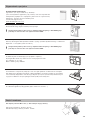
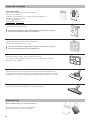
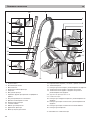
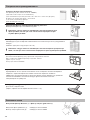
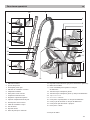
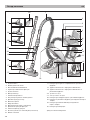
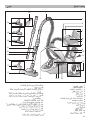
Your vacuum cleaner en
1 Handle
2 Hose
3 ON/OFF button
4 Dust bag change indicator
5 Locking tab
6 Exhaust filter*
7 Parking aid
8 Suction regulation button
9 Dust bag compartment lid
10 Exhaust grille
11 Power cord
12 dust bag
13 Filter bracket
14 Motor protection filter
15 Storage aid (on underside of unit)
16 Locking lever
17 Adjustable floor tool with locking collar*
18 Telescopic tube with adjusting sleeve*
19 Telescopic tube with adjusting sleeve and locking
collar*
20 Accessory holder
21 Combination tool
22 Hard-floor brush with locking collar*
23 Pet hair tool with locking collar*
24 Pet hair upholstery nozzle*
25 Mattress nozzle*
*Dependent on model
1
14 13
1516
5
7
8
11
10
12
2
3
4
6*
9
17*
20
18*
19*
21
17*
24*
23*
22*
25*

42
en
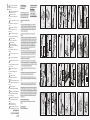
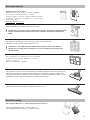
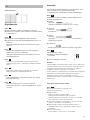
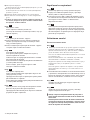
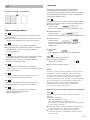
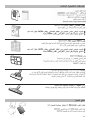
Fold out picture pages.
Setting up
Figure
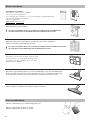
a) Insert the flexible hose adapter into the air intake open-
ing and allow it to engage.
b) To remove the flexible hose, press the two lugs together
and pull the tube out.
Figure
a) Align and connect the handle and the telescopic tube.
b) Push the handle straight into the telescopic tube until it
engages.
To release the connection, squeeze the collar sleeve and
pull the handle out.
Figure
Push the telescopic tube straight into the
connecting piece of the floor tool until it engages.
To release the connection, squeeze the locking collar
and pull the telescopic tube out.
Figure
Press the adjusting sleeve in the direction of the
arrow and adjust the telescopic tube to the length
required.
Figure
Fasten the accessory holder to the suction pipe and
insert the combination tool from above.
Figure
Holding the power cord by the plug, pull out the required
length and plug the plug into the mains socket.
Figure
To switch your vacuum cleaner on and off, press the
On/Off button in the direction of the arrow.
7
6
5
4*
3*
2*
1
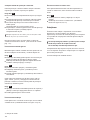
Vacuuming
You have bought an extremely powerful device. The high-
est suction setting is therefore only recommended for
heavily soiled, short-pile carpets and hard floors.
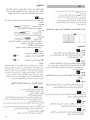
Figure
The required suction power can be selected by adjusting
the suction regulator.
䡲
Low
suction range:
For vacuuming delicate fabrics, e.g. curtains.
䡲
Moderate
suction range:
For daily vacuuming of lightly soiled floors.
䡲
High
suction range:
For vacuuming durable floor coverings, hard floors and
for heavily soiled surfaces.
䡲
Turbo range:
For vacuuming stubborn dirt and very heavily soiled sur-
faces.
Figure
Adjusting the floor tool:
a) For vacuuming rugs and carpets =>
b) For vacuuming hard floors =>
Caution!
Floor tools are subject to a certain amount of wear,
depending on the type of hard floors you have
(e.g. rough, rustic tiles). Therefore, you must check
the underside of the floor tool at regular intervals.
Worn undersides of floor tools may have sharp edges
that can damage sensitive hard floors, such as parquet
or linoleum. The manufacturer does not accept any
responsibility for damage caused by worn floor tools.
Vacuuming with accessories
Figure
Remove the combination tool upwards
out of the accessory holder.
a)Crevice nozzle
For vacuuming in crevices and corners.
For difficult-to-reach places, the combination tool
can be extended in two stages by pulling out the
crevice nozzle like a telescope.
䡲
Pull out the crevice nozzle in two stages until it audi-
bly clicks into place.
䡲
The crevice nozzle can be pushed back together by
releasing the telescopic locks (press in the direction
of the arrow).
b)Upholstery nozzle
For cleaning upholstered furniture, curtains, etc.
10
9
8

43
c)Hard furnishings brush
For window frames, cabinets, profiles, etc.
䡲
Fold up the upholstery nozzle in the direction of the
arrow.
䡲
The brush ring is extended by turning in the direc-
tion of the arrow.
䡲
The brush ring must be turned back in and the
upholstery nozzle folded back up before the combi-
nation tool is inserted into the accessory holder.
Figure
Mattress nozzle
For vacuuming mattresses, upholstery etc.
(attach to handle or suction pipe as required).
Figure
Pet hair upholstery nozzle
䡲
For easy and thorough removal of pet hair (attach to
handle or suction pipe as required).
䡲
To clean the pet hair upholstery nozzle, simply vacuum
using the handle.
Figure
Pet hair tool
Floor tool for easy and thorough vacuuming of pet hair.
Push the telescopic tube into the connecting piece of the
pet hair tool until it engages.
Press on the locking collar and pull out the telescopic
tube to disconnect.
To clean, simply vacuum the tool using the suction
pipe/handle.
Figure
Hard-floor brush
For vacuuming hard floor coverings (tiles, parquet floor-
ing, etc.)
Push the telescopic tube into the connecting piece of
the hard-floor brush until it engages.
Press on the unlatching sleeve and pull out the telescop-
ic tube to disconnect.
Figure
You can use the parking aid on the back of the vacuum
cleaner if you wish to stop vacuuming for a short time.
Slide the plastic lug on the tool connector into the
groove at the back of the vacuum cleaner.
15
14*
13*
12*
11*
When the work is done
Figure
䡲
Switch the vacuum cleaner off and unplug the power
cord from the mains.
䡲
Tug the power cord and let go. The cable then rewinds
automatically.
䡲
To reactivate or deactivate the cable brake, quickly tug
the power cord.
Figure
To store or transport the vacuum cleaner, use the stor-
age aid on the underside of the vacuum cleaner. Stand
the vacuum cleaner up on its end. Slide the plastic lug
on the floor tool into the groove on the underside of the
unit.
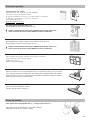
Changing the dust bag and filters
Replacing the dust bag
Figure
䡲
If the dust bag change indicator flashes red when the
floor tool is lifted from the floor and the highest
suction power setting has been selected, the dust
bag must be changed, even though it may not yet be
full.
Even if the dust bag is not full, it may still need
changing, due to the type of dust which has been
vacuumed.
If the dust bag is not changed, despite the “replace
dust bag indicator” flashing red, after a while the
indicator remains permanently lit in red and the
vacuum cleaner switches back to the lowest power
setting.
The vacuum power setting cannot be changed until
you have switched the appliance off and on again.
䡲
Open the dust bag compartment lid by moving the
dust compartment locking lever in the direction of
the arrow.
Figure
Seal the dust bag by pulling the self-seal tap and then
remove it.
Figure
Insert a new dust bag into the holder and close the dust
bag compartment lid.
!
Caution: the dust bag compartment lid will only close
when the disposable or textile filter are inserted.
If the dust bag change indicator is still lit after the
dust bag has been changed, please check whether
the nozzle, tube or flexible hose are blocked.
20
19
18
17
16

44
Replacing the active carbon filter*
If your vacuum cleaner is fitted with an active carbon filter,
this must be replaced once a year.
Figure
䡲
Remove the active carbon filter and dispose of it with
the household rubbish.
䡲
Insert a new active carbon filter. (See Figures 22, 23, 24
for changing the filters)
Care
Always switch off the vacuum cleaner and disconnect the
power cord from the mains before cleaning the appliance.
The vacuum cleaner and plastic accessories can be cleaned
with a commercial plastic cleaner.
!
Do not use a scourer, glass-cleaning agent or all-pur-
pose cleaning product.
Never immerse the vacuum cleaner in water.
The dust compartment can, if necessary, be cleaned with a
second vacuum cleaner or simply wiped with a dry cloth or
dusting brush.
Subject to technical modifications.
25*
Cleaning the motor protection filter
The motor protection filter should be cleaned regularly by
knocking out the dirt and rinsing.
Figure
䡲
Open the dust bag compartment lid (see Figure 18).
䡲
Pull out the motor protection filter in the direction of the
arrow.
䡲
Clean the motor protection filter by tapping it.
䡲
If it is very dirty, the motor protection filter should be
rinsed.
The filter must then be left to dry for at least 24 hours.
䡲
After cleaning, insert the motor protection filter into the
appliance as far as it will go and close the dust bag
compartment lid.
!
Caution: The vacuum cleaner must not be operated
without the motor protection filter.
You can obtain a new motor protection filter on request as
a spare part from the after-sales service. (see Spare parts,
page 41 )
Changing the micro-hygiene filter*
The micro-hygiene filter should be replaced with every new
replacement filter pack (after 4 dust bags) and at least
once a year.
Figure
䡲
Press the locking tab in the direction of the arrow to
unlatch the exhaust grille and open it.
䡲
Unlatch and remove the filter frame by pressing the tab
in the direction of the arrow.
Figure
䡲
Remove the foam and micro-hygiene filter.
䡲
Dispose of the micro-hygiene filter and fit a new micro-
hygiene filter.
䡲
Clean the foam and replace in the filter frame.
If you have used the vacuum cleaner for fine dust particles
(such as plaster or cement), clean the motor protection fil-
ter by tapping it and, if necessary, replace the motor protec-
tion filter and the micro-hygiene filter.
Figure
䡲
Slide the filter frame under the two retaining ribs and
push in the direction of the arrow until it engages.
䡲
Close the exhaust grille.
Replacing the Hepa filter*
If your vacuum cleaner is fitted with a HEPA filter,
this must be replaced once a year. (See figures 22 and 24
for changing the filter)
24
23*
22
21
*
Dependent on model

45
Optional accessories
Replacement parts
Replacement filter pack
Filter type P (Spare part no.: 468264)
("For high suction power"/
"for top performance and excellent cleaning quality")
Content: 4 dust bags with fasteners
1 micro-hygiene filter
www
.dust-bag-bosch.com
Textile dust bag (permanent dust bag) BBZ10TFP
Reusable bag with Velcro (R) fastener.
!
Caution: avoid a combination of textile dust bag and HEPA filter
because this considerably reduces the service life of the HEPA filter.
HEPA filter (class H12) BBZ151HF
Recommended for allergy sufferers. Ensures very clean exhaust air.
Replace once a year (see figures 19 and 21 )
!
Caution: avoid a combination of cloth filter and HEPA filter because this
considerably reduces the service life of the HEPA filter.
Bionic filter / AirFresh System BBZ11BF
Additional filter for reducing unpleasant odours
Please replace the filter once it begins to lose its effect (after approx. 1 year)
Reference number: 468637
Microsan exhaust filter (1) and motor protection filter (2)
Microsan exhaust filter (1): product code 483332
Motor protection filter (2): product code 187622
12
Hard-floor brush BBZ123HD
For vacuuming hard floors (parquet flooring, tiles, laminate, etc.)
TURBO-UNIVERSAL
®
brush BBZ102TBB
All in one brushing and vacuuming of short-pile pile rugs and carpets and all hard floor
coverings. Especially suitable for picking up pet hair. The brush roller is driven by the air
flow through the vacuum cleaner. No separate electrical connection is needed.
Page is loading ...
Page is loading ...
Page is loading ...
Page is loading ...
Page is loading ...
Page is loading ...
Page is loading ...
Page is loading ...
Page is loading ...
Page is loading ...
Page is loading ...
Page is loading ...
Page is loading ...
Page is loading ...
Page is loading ...
Page is loading ...
Page is loading ...
Page is loading ...
Page is loading ...
Page is loading ...
Page is loading ...
Page is loading ...
Page is loading ...
Page is loading ...
Page is loading ...
Page is loading ...
Page is loading ...
Page is loading ...
Page is loading ...
Page is loading ...
Page is loading ...
Page is loading ...
Page is loading ...
Page is loading ...
Page is loading ...
Page is loading ...
Page is loading ...
Page is loading ...
Page is loading ...
Page is loading ...
Page is loading ...
Page is loading ...
Page is loading ...
Page is loading ...
Page is loading ...
Page is loading ...
Page is loading ...
Page is loading ...
Page is loading ...
Page is loading ...
Page is loading ...
Page is loading ...
Page is loading ...
Page is loading ...
Page is loading ...
Page is loading ...
Page is loading ...
Page is loading ...
Page is loading ...
Page is loading ...
Page is loading ...
Page is loading ...
Page is loading ...
Page is loading ...
Page is loading ...
Page is loading ...
Page is loading ...
Page is loading ...
Page is loading ...
Page is loading ...
Page is loading ...
Page is loading ...
Page is loading ...
Page is loading ...
Page is loading ...
Page is loading ...
Page is loading ...
Page is loading ...
Page is loading ...
Page is loading ...
Page is loading ...
Page is loading ...
Page is loading ...
Page is loading ...
Page is loading ...
Page is loading ...
Page is loading ...
Page is loading ...
Page is loading ...
Page is loading ...
Page is loading ...
Page is loading ...
Page is loading ...

139
AE
DE Garantie
Bundesrepublik Deutschland
siehe letzte Seite.
Ausland: Für dieses Gerät gelten die von der
Vertretung unseres Hauses in dem Kaufland
herausgegebenen Garantiebedingungen.
Einzelheiten hierüber teilt Ihnen der Händler, bei
dem Sie das Gerät gekauft haben, auf Anfrage
jederzeit mit.
Zur Inanspruchnahme von Garantieleistungen ist
in jedem Fall aber die Vorlage des Kaufbeleges
erforderlich.
GB Conditions of guarantee
For this appliance the guarantee conditions as set
out by our representatives in the country of sale
apply. Details regarding same may be obtained
from the dealer from whom the appliance was
purchased. For claims under guarantee the sales
receipt must be produced.
FR Conditions de garantie
A l’étranger, les conditions de garantie applicables
à cet appareil sont celles s’accordées par la filiale
du pays concerné.
Celles-ci peuvent être fournies par le Revendeur
auprès duquel vous avez acheté l’appareil ou
directement auprès de notre filiale. Si vous aviez
besoin d’utiliser la garantie, la présentation de la
facture d’achat sera nécessaire.
IT Condizioni di garanzia
Per questo apparecchio valgone le condizioni di
garanzia stabilite dalla ns. Rappresentanza nella
rispettiva Nazione.
Il venditore dell’apparecchio è a disposizione per
ulteriori chiarimenti. La garanzia viene riconosciuta
soltanto se accompagnata da regolare documento
fiscale di acquisto rilasciato dal venditore.
NL Garantievoorwaarden
Voor het aangeschafte apparaat gelden de
garantievoorwaarden welke door de vertegen-
woordiging van de moederorganisatie in het land
van aankoop zijn uitgegeven.
Eventuele bijzonderheden hiervoor zal de leveran-
cier, waarbij het apparaat is gekocht, desgevraagd
verschaffen.
Om aanspraak te kunnen maken op eventuele
garantie is het overleggen van de aankoopbon met
koopen/of leverdatum vereist.
DK Garanti
Garantiebestemmelserne er ikke vedlagt, men
fremsendes ved henvendelse til Bosch
kundeservice. I øvrigt henvises til købelovens
bestemmelser.
NO Leveringsbetingelse
I Norge gjelder NEL’s leveringsbetingelser. Disse
kan De få hos Deres forhandler eller direkte ved
vårt hovedkontor.
SE Konsumentbestämmelser
I Sverige gäller av EHL antagna konsument-
bestämmelser.
FI Takuuaika
Kodintekniikan tuotteille annetaan vähintään
kahdentoista (12) kuukauden takuu tuotteesta
riippuen. Takuuaika määritellään kunkin
tuotteen osalta erikseen ja se on voimassa
annetun määräajan tuotteen ostop. Tuotteen
tietyille osille voidaan antaa em. määräajoista
poikkeava takuu.
PT Condições de Garantia
Para este aparelho são válidas as condições de
garantia emitidas pela nossa representação no
pais da aquisição. Mais detalhes poderão ser
facultados pelo revendedor onde foi adquirido o
aparelho.
Para recorrer aos serviços de garantia é
imprescindivel a apresentacão da Factura de
Compra e bem assim, do documento de Garantia.
ES Condiciones de garantia
A este aparato son aplicables las condiciones de
garantia acordadas por la representación de
nuestra firma en el pais de compra. Para más
detalles sirvanse dirgir al correspondiente
establecimiento del ramo en que se ha comprado
el aparato. En caso de hacer uso de la garantia es
necesario presentar el correspondiente
comprobante de compra.
TR Garanti Șartları
Bu cihaz için satıșın gerçekleștigi ülkedeki temsil
cilig˘imiz tarafindan berlilenen garanti șartları
geçerlidir. Garanti șartları ile ilgili detaylı bilgi için;
cihazın satın alındıg˘ı bayiye ya da Tüketici
Danıșma Merkezimize bașvurabilirsiniz. Garanti
kapsamlndaki taleplerinize cevap verilebilmesi için
Yetkili Servismize, cihaza ait faturayı veya okunaklı
fotokopisini göstermeniz gerekmektedir.
PL Gwarancja
Dla urza˛dzenia obowia˛zuja˛ warunki gwaran-
cyjne wydane przez nasze przedstawjcielstwo
w kraju zakupu. O szczególach mo´zecie sie˛
Pa´nstwo dowledzie´c u sprzedawcy, u którego
dokonano zakupu urza˛dzenia. Przy korzystaniu
ze ´swiadcze´n gwarancyjnych wymagane jest
przedlo´zenie dowodu zakupu.
Page is loading ...

141
1. ) (''&%$% #"! !'" " "" '" # $%" #$ $$ (24)
% " % %%" % % "' ""'" $% %% "% "'. " %
" % ''&%$% """ % % % %% "% "' $% " ""'"
& #" !
.
EL
BOSCH
Πανελλήνιο τηλέφωνο εξυπηρέτησης πελατών:
18182 (αστική χρέωση για τα μεγάλα αστικά κέντρα)
Εξυπηρέτηση πελατών:
Αθήνα: 17ο χλμ Εθνικής οδού Αθηνών - Λαμίας & Ποταμού 20, Κηφισιά
Θεσσαλονίκη: Χάλκης - Πατριαρχικό Πυλαίας, 57001, Θέρμη
Πάτρα: Χαραλάμπη & Ερενστρώλε
Κρήτη: Εθνικής Αν τιστάσεως 23 & Καλαμά, Ηράκλειο
Κύπρος: Αρχ. Μακαρίου Γ’ 39, Έγκωμη - Λευκωσία - Παγκύπριο τηλ.: 77778007
2. - " &!"& (& ( & & !' !&, (" " () %)"%*# %"! +&# )# (('"$#,
&&%&"! ) () )# "&&# )# (" &%$ %"! +& '&! )# & !'& ( &()# '"
"%& & !'* # ( %) &&%(! '&! "&, # & +%!&, %& $"# '%).
&& ) ) "() +!& & !(*"! ) "++*)() "&! ) )
%"! +& )# (('"$# & " &! & ) %"%$ '& &('"$ )# '&! ! " &&"+& ! &
'&'$ $(), %&&() "+'& ( &(), ) $)() )+! $()# )# (('"$#, &'& %%)%)
( $)() & (& ) "(! )& & ) BSH ,%%# , $ & "+""# &+ "#
# !&'# )%"' !'* "*& # $ !&)()# )# ()# '%
3. !* #!)* ! # &#"! ,# ))! &, !*$ ('!')(#%$ ! ('" #) * &*#&%$
&#"! ,' #(*&*(# ('! !* # #,,+*)*$, ! - )" !* "$ ( * ! # )" !*
)#,# ) !*$ BSH -&&$ - ' ! #")(#)#" # )( !* %)* ,"'
!* ' ('!')(#)!*(#, $ ' #" )* ,"' '!'&&'(!"( %
!* #,')'.
4. 3# ('&+! !'" ' !* #,,+*)* " #)#"$ ('" " ( " )#! !'" # !* #!' !
! $ $ #")(#% )! #!'&*!% % $ ! - )" !* "$ !*$ BSH -&&$ -
5. ! ##"! ! # $ ! ( !
! #) ! BSH $ $.
6. $ ##"! ! " ! # #
! (.. !).
7. " !! ! ,
! !.
8. 2 '00/.-. ' ,+*/%'&:
- 1&-,'#(, '%+%"$( ) ,++"&-$/( $# *++ "+ -' ,%"$ service
. '$#-&$$%.$ + %. BSH 1**( 1
- $( ")-., #'"$*&,) ")-., '&"&- ) *'&%$#"0!+ %$# "$%$( ,+% %"$ . -/ $ ' %&(
$.0!'( $# '"&$%+& -%+ '0'&"!&+ ")-.( ,+&/) -%+ -'%&, 00"++ ")-.(, -#'"&*++$
%.( *.'*$/(
/*+.( %.( -#-,'#)( , %.( %-.( %.( -#-,'#)( ,*.
- "$%+ ' #-+0 -%$ +"& -'&"(.
- .&( $# "$,+*$/%+& ''&,%&, + +-%"+(, '" ) #0"+-!+, %&, *'$, .-&'(
++%+"+(, *$( %-'&( %$# &,%/$# +"$)( "'/+%$(, ) $$&$)$%' *0$ $# '!+& "+ + %$
*'0$ %$# ,+%+-,'#+-%) ) %$# '$#-&$$%.$# -#'"0'!$#.
9.
.
10. "!#!#$ $ ##" %! # ! ! $ #$ $ "!
#$#$ $ !!! #" ! &#$ ( $ #$ #%)
$ BSH & &
11. $ ! ! " ##"! !
.
12. " !!
!.

142
Dieses Gerät ist entsprechend der europäischen
Richtlinie 2012/19/EU über Elektro- und
Elektronikaltgeräte (waste electrical and electronic
equipment - WEEE) gekennzeichnet.
Die Richtlinie gibt den Rahmen für eine EU-weit gültige
Rücknahme und Verwertung der Altgeräte vor.
This appliance is labelled in accordance with European
Directive 2012/19/EU concerning used electrical and
electronic appliances (waste electrical and electronic
equipment - WEEE). The guideline determines the
framework for the return and recycling of used
appliances as applicable throughout the EU.
Cet appareil est marqué selon la directive européenne
2012/19/UE relative aux appareils électriques et
électroniques usagés (waste electrical and electronic
equipment - WEEE).
La directive définit le cadre pour une reprise et une
récupération des appareils usagés applicables dans les
pays de la CE.
Questo apparecchio dispone di contrassegno ai sensi
della direttiva europea 2012/19/UE in materia di
apparecchi elettrici ed elettronici (waste electrical and
electronic equipment - WEEE).
Questa direttiva definisce le norme per la raccolta e il
riciclaggio degli apparecchi dismessi valide su tutto il
territorio dell’Unione Europea.
de
en
fr
it
Dit apparaat is gekenmerkt in overeenstemming met de
Europese richtlijn 2012/19/EU betreffende afgedankte
elektrische en elektronische apparatuur (waste
electrical and electronic equipment - WEEE).
De richtlijn geeft het kader aan voor de in de EU
geldige terugneming en verwerking van oude
apparaten.
Dette apparat er klassificeret iht. det europæiske
direktiv 2012/19/EU om affald af elektrisk- og
elektronisk udstyr (waste electrical and electronic
equipment - WEEE).
Dette direktiv angiver rammerne for indlevering og
recycling af kasserede apparater gældende for hele EU.
Dette apparatet er klassifisert i henhold til det
europeiske direktivet 2012/19/EU om avhending av
elektrisk- og elektronisk utstyr (waste electrical and
electronic equipment – WEEE).
Direktivet angir rammene for innlevering og gjenvinning
av innbytteprodukter.
Denna enhet är märkt i enlighet med der europeiska
direktivet 2012/19/EU om avfall som utgörs av eller
innehåller elektroniska produkter (waste electrical and
electronic equipment - WEEE).
Direktivet anger ramarna för inom EU giltigt
återtagande och korrekt återvinning av uttjänta
enheter.
Tämän laitteen merkintä perustuu käytettyjä sähkö- ja
elektroniikkalaitteita (waste electrical and electronic
equipment - WEEE) koskevaan direktiiviin 2012/19/EU.
Tämä direktiivi määrittää käytettyjen laitteiden
palautus- ja kierrätys-säännökset koko EU:n alueella.
Este aparato está marcado con el símbolo de cumpli-
miento con la Directiva Europea 2012/19/UE relativa a
los aparatos eléctricos y electrónicos usados
(Residuos de aparatos eléctricos y electrónicos RAEE).
La directiva proporciona el marco general válido en
todo el ámbito de la Unión Europea para la retirada y
la reutilización de los residuos de los aparatos eléctri-
cos y electrónicos.
nl
da
no
sv
fi
es
Page is loading ...
Page is loading ...
Page is loading ...
Page is loading ...
Page is loading ...
Page is loading ...
Page is loading ...
Page is loading ...
Page is loading ...
Page is loading ...
-
 1
1
-
 2
2
-
 3
3
-
 4
4
-
 5
5
-
 6
6
-
 7
7
-
 8
8
-
 9
9
-
 10
10
-
 11
11
-
 12
12
-
 13
13
-
 14
14
-
 15
15
-
 16
16
-
 17
17
-
 18
18
-
 19
19
-
 20
20
-
 21
21
-
 22
22
-
 23
23
-
 24
24
-
 25
25
-
 26
26
-
 27
27
-
 28
28
-
 29
29
-
 30
30
-
 31
31
-
 32
32
-
 33
33
-
 34
34
-
 35
35
-
 36
36
-
 37
37
-
 38
38
-
 39
39
-
 40
40
-
 41
41
-
 42
42
-
 43
43
-
 44
44
-
 45
45
-
 46
46
-
 47
47
-
 48
48
-
 49
49
-
 50
50
-
 51
51
-
 52
52
-
 53
53
-
 54
54
-
 55
55
-
 56
56
-
 57
57
-
 58
58
-
 59
59
-
 60
60
-
 61
61
-
 62
62
-
 63
63
-
 64
64
-
 65
65
-
 66
66
-
 67
67
-
 68
68
-
 69
69
-
 70
70
-
 71
71
-
 72
72
-
 73
73
-
 74
74
-
 75
75
-
 76
76
-
 77
77
-
 78
78
-
 79
79
-
 80
80
-
 81
81
-
 82
82
-
 83
83
-
 84
84
-
 85
85
-
 86
86
-
 87
87
-
 88
88
-
 89
89
-
 90
90
-
 91
91
-
 92
92
-
 93
93
-
 94
94
-
 95
95
-
 96
96
-
 97
97
-
 98
98
-
 99
99
-
 100
100
-
 101
101
-
 102
102
-
 103
103
-
 104
104
-
 105
105
-
 106
106
-
 107
107
-
 108
108
-
 109
109
-
 110
110
-
 111
111
-
 112
112
-
 113
113
-
 114
114
-
 115
115
-
 116
116
-
 117
117
-
 118
118
-
 119
119
-
 120
120
-
 121
121
-
 122
122
-
 123
123
-
 124
124
-
 125
125
-
 126
126
-
 127
127
-
 128
128
-
 129
129
-
 130
130
-
 131
131
-
 132
132
-
 133
133
-
 134
134
-
 135
135
-
 136
136
-
 137
137
-
 138
138
-
 139
139
-
 140
140
-
 141
141
-
 142
142
-
 143
143
-
 144
144
-
 145
145
-
 146
146
-
 147
147
-
 148
148
-
 149
149
-
 150
150
-
 151
151
-
 152
152
-
 153
153
-
 154
154


Bosch BSG81030/14 User manual
- Category
- Vacuum cleaners
- Type
- User manual
- This manual is also suitable for
Ask a question and I''ll find the answer in the document
Finding information in a document is now easier with AI
in other languages
- italiano: Bosch BSG81030/14 Manuale utente
- français: Bosch BSG81030/14 Manuel utilisateur
- español: Bosch BSG81030/14 Manual de usuario
- Deutsch: Bosch BSG81030/14 Benutzerhandbuch
- русский: Bosch BSG81030/14 Руководство пользователя
- Nederlands: Bosch BSG81030/14 Handleiding
- português: Bosch BSG81030/14 Manual do usuário
- dansk: Bosch BSG81030/14 Brugermanual
- polski: Bosch BSG81030/14 Instrukcja obsługi
- Türkçe: Bosch BSG81030/14 Kullanım kılavuzu
- svenska: Bosch BSG81030/14 Användarmanual
- suomi: Bosch BSG81030/14 Ohjekirja
- română: Bosch BSG81030/14 Manual de utilizare
Related papers
-
Bosch BSB2884 User manual
-
-
Bosch BGS41800/02 User manual
-
-
Bosch BGS31430/03 User manual
-
-
-
Bosch BGS5ECOGB Owner's manual
-
-