1. FirstassemblethesizeCBilcoDoorinaccordancewiththeinstallation
instructionsintheDoorpackage.
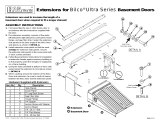
2.Theextensionassemblyconsistsofthreeparts:leftsidepanel,rightsidepanel,
andcoverpanel.Withthenon-angedportionoftheextensionsidepanelsfacing
upwardandtheovalholesfacingthebasementdoorasshown,fastenthe
extensionsidepanelstothebackangleoftheBilcoDoorsidepieceswiththe
1/4“x1/2”boltsandnutsprovided.
3.Installcoverpanelsoanges overlapthesidepanelsandtheheaderange
oftheBilcoDoor.Securethiswith1/4“x1/2”bolts,withnutsoninside.
4.FollowBasementDoorinstructionsforinstallationofextensionheaderagainst
masonrybuildingortotitproperlyundertheshinglesorclapboardsona
framebuilding.
5. Usingholesprovidedatbottomofeachsidepanel,fastenextensiontoconcrete
usingtheslottedhex-headscrewsasdescribedinBasementDoorinstructions.
(note: 24” & 30” sides panels have two holes, 12” & 18” side panels have one hole
and 6” side panels have no holes as concrete anchorage is not required).
6. WhencaulkingaroundtheexterioroftheBilcoDoorandextensionbesureto
caulkwheresidepiecesjoinextension.
7. Important:Extensionpanelsmustbepaintedwithinforty-vedaysofinstallationSeeClassicSeriesbasementdoor
installationinstructionsforcompletepaintinginstructions.
Installation Instructions
Size C Bilco Basement Door Extensions
(Usedtoincreasethelengthwhenrequiredtotalongerstairwell)
Extension Shipping
Size Weight
6” 26lbs.
12” 41lbs.
18” 58lbs.
24” 73lbs.
30” 91lbs.
HardwareSupplied
withExtension
(13)1/4”x1/2“roundheadbolts
(13)1/4”nuts
(8)#12slottedhexheadscrews
(8)Plasticshields
(4)Springnuts
CoverPanel
LeftSidePanel
Caulkwhereupper
partofsidepiecejoins
extension(bothsides)
RightSidePanel
BasementDoor
HeaderFlange
PrintedinUSA©2010,TheBilcoCompany,NewHaven,CT06505
7/10
MSC38Rev.2
Imagine...
What Bilco can do for your basements
Customer Service
(800)854-9724
www.bilco.com
Connectside
panelanges
withovalholesto
basementdoor
Anchor
angeon
bottom


