Page is loading ...

S.
M.
No.
1·2370
HOW
TO
SERVICE
EASTMAN
KODAK
COMPANY,
ROCHESTER
4,
N.Y.

TABLE
OF
CONTENTS
DISASSEMBL
Y
Service Tools Required
.....•.
•.
..
Shutter
.....•.............•....
Range Finder Actuating Lever Link
.•.
Direct
View
Finder
Cover
•.•••.....
Trigger
Button Housing Complete
•..
Page
No.
2
3
Counter
Dial
Housing
Complete....
. 3
Counter
Dial
Assembly and
Safety
Control Stop
Pawl.
. . . . . . . . . • . . 3
Range Finder
Plate.
. . . . . . . . . • • . . 3
Parts on Mechanism
Plate.
. . . . . . . . 5
Removal
of
Shutter. . . . . . . . . . . . . . 5
Focusing
Tube.
. . . . . . . . . . . . . . . . . 5
Mechanism
Plate.
. . . . . . . . . . . • . . . 6
Film Spool Housings
and
Spacers.
. . 6
Back
Complete.
. . . . . . . . . . . . . . . . . 6
CYCLE
OF OPERATION
Winding
the Mechanism
Without
the
Use
of
Film. . • . . . . • . • . . • • . . . . . 8
Mechanics
of
the
Winding
Cycle...
. 8
REPAIR
AND ADJUSTMENT
New
Style Focusing
Dial.
. . . . . . . . .
10
Camera
Case
and
Associated Parts. • 13
REPAIR
AND ADJUSTMENT (Cont'd)
Page
No.
Mechanism
Plate.
• • • . . . . . • . • • • . . 13
Adjusting Synchronization. . . . . . . . • 14
Optical
Adjustments
to
Range Finder 16
REASSEMBLY
Back
Complete......
.
.••••.•....
19
Film Spool Housings
and
Spacers. . . . 19
Mechanism
Plate.
. . . . . . . . . . . . . . .
19
Focusing Tube Assembly. . . . . . . . . . • 19
Replacement
of
Shutter.
. . . . • . . . • •
19
Parts on Mechanism
Plate.
. • . • • . • . 19
Range Finder
Plate.
. . . . • . . • • . • • .
20
Range Finder Actuating Lever Link .
..
21
Counter Dial Assembly
and
Safety
Control Stop
Pawl.
• . • . . . • • • •
..
2 1
Counter Dial Housing
Complete.....
21
Trigger
Button Housing
Complete.
.•
21
Direct
View
Finder
Cover.
. • . . . . .
..
21
Depth-of-Focus Scale . . . • . . . . . . . . .
22
Focusing the Lens. • • • • • • . . • . • . •
•.
22
CORRECTIVE
MAINTENANCE
Trouble, Cause,
and
Remedy
Chart.
.
23
• The sequence
given
in the section on disassembly
is
recommended
for
complete
disassembly
of
the
camera.
However,
many
parts
and/or
assemblies can
be
re-
moved
without
strict
regard
to
this
chronological
order.
For
example:
To
replace
the
EYELET
LENS
(figure
5),
it
would
be
necessary
to
remove
only
the COVER ASSEMBLY
(figure
2)
by
removing
the
retaining
screws
and
the PARALLAX
FRAME
(figure
5)
by
removing the
two
eyelet
FRAME SCREWS.
Underlined
words
in the
text
indicate
nomenclature which
appears
on illustrations.
Such nomenclature, when
not
followed
by
a
direct
figure
reference,
will
be
found
on the
figure
indicated
in the last
preceding
figure
reference.

SERVICE TOOLS REQUIRED (See
figure
23).
In
following
these
instructions
it
is
understood
that
the
right
side
referred
to
is
the one to the
serviceman's
right
when the
camera
is
held
in
the
picture-taking
position.
Part
No.
Nomenclature
274
Crooked
file
501-A
Shutter
retaining
collar
wrench
501-B
Focusingtube
re-
taining
collar
wrench
501-C
Offset
screw-
driver
501-0
Wrench
501-E
Wrench
501-1 Bending tool
501-L
Offset
screw-
501-0
501-V
501-W
611
driver
Clamp
Ground
glass
and
spring
clamp
Shutter
protector
block
Special
jeweler's
screwdriver
blade
SAFETY
LATCH
BLADE
ASSEMBLY
BLADE
STUD
NUT
Application
For
filing the
depth-of-focus
scale
frame
shoulder
on the
direct
view
finder
cover
For
removing
the
shutter
from
the
camera
For
removing
the
focusing
tube
assembly
from
the
cam-
era
case
For
adjusting
the
range
find-
er
prisms
For
focusing
the
range
finder
objective
lenses
For
adjusting
the
range
find-
er
prisms
For
bending
the
trigger
plate
or
the
trigger
bell
crank
For
various
screws
For
removing
the
front
lens
and
mount
from
the
shutter
For
focusing
For
use
in
protecting
the
shut-
terand
lens
when
they
are
re-
moved
from
the
camera
For
removing
and
replacing
the
terminal
nut on the
flash
terminal
assembly
SHUTTER.
If
the
repairs
to
be
made
involve only the
shut-
ter,
the
shutter
complete
(figure
9)
can
be
removed
from
the
camera
without
disassembling
the
camera.
Refer
to page 5.
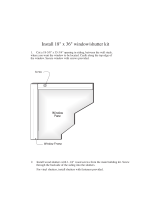
RANGE FINDER ACTUATING LEVER LINK.
The
range
finder
actuating
lever
link
(figure
1)
is
located
inside
the
camera.
The
end of the
link
toward
the
back
of the
camera
is
slotted
and
slides
forward
and
back
as
the
focusing
tube
assembly
(figure
9)
is
moved
in
and
out.
NOTE:
It
is
not
necessary
to
remove
the
range
finder
actuating
lever
link
un-
less
the
range
finder
plate
is
to
be
re-
moved.
If
the
range
finder
plate
must
be
removed,
ex-
tend the
focusing
tube to the
limit
of
travel
and
remove
the
camera
back.
Insert
the
blade
of a
jeweler's
scr
"
ewdriver
in
the key
slot
of the link,
and
pull
the
link
back
to
disengage
it.
Remove
the link.
Retract
the
focusing
tube to the
closed
pOSition.
LEVER
LINK
NUT
LINK
COUPLET
BAR
STUD
ADJUSTING
SCREW
BRACKET
Figure
1
1

2
FRAME
~
~
SCALE
COVER
ASSEMBLY
Figure
2
DIRECT VIEW FINDER COVER ASSEMBLY
(See
figure
2)
.
Remove
the
four
direct
view
finder
screws;
two
under
the
view
finder
and
range
finder
windows on
the
back
of
the
direct
view
finder
cover
assembly,
and two
next
to
the
range
finder
windows on
the
front
of
the
cover.
It
is
not
necessary
to
remove
the
two
depth-of-focus
scale
frame
screws
unless
the
depth-of-focus
scale
is
to
be
replaced.
Lift
off
the
direct
view
finder
cover,
being
care-
ful
to
lift
it
straight
up.
KEY
KNOB
SCREW
~
o-
SPRING
a SPACING
KEY
COMPLETE
Figure
4
PLATE
SCREW
HOUSING
SCREW
~
TRIGGER BUTTON
Fi
re
3
CAUTION:
If
the
cover
is
pulled off
at
an
angle,
it
will
strike
the
parallax
frame
assembly
and
may
bend
it
out
of
adjust-
ment.
Do
not
remove
the
focusing
dial
unless
neces-
sary.
However, if the focusing
dial
must
be
removed
proceed
as
follows: Unhook the
dial
spring
from
the
bracket
screw
and
lift
off the
dial
and
spring.
Then
if
necessary,
remove
the
bracket
from
the
mechanism
plate
by
removing
the
two holding
screws.
COUNTER KNOB SCREW
~
WASHER
'iT
~
DIAL~_
.
..
..
I '"
~
3
' ..
~
..
. '<I'
.
Fi
re
5
FRAME
SCREW
\
~
A
X FRAME
EY
ELET
LENS

NOTE:
Refer
to page 10
for
instructions
on the
range
finder focusing
dial
that
is
held on
the
bracket
post
by a
screw
.
TRIGGER BUTTON
HOUSING
COMPLETE
(See
figure
3)
.
The
range
finder
plate
complete
(figure
6)
can
be
removed
from
the
camera
with the
trigger
but-
ton housing
complete
(figure
3)
still
attached
to
it
.
Remove the
three
trigger
button housing
screws
and
remove
the
trigger
button housing
complete.
This
will
free
the
exposure
indicator
tube, which
is
inserted
in
the
range
finder
plate
directly
above
the
red
signal,
and the
exposure
indicator
tube
can
be
lifted off.
Lift
off the
trigger
button
leak
light
washer.
If
necessary
,
also
remove
the
trigger
buShIiig1eak
light
washer,
which
is
cemented
to the
range
finder
plate-.--
COUNTER DIAL HOUSING
COMPLETE
(See
figure
4)
.
Remove the key knob
screw
and lift off the key
knob. -
--Remove
the
three
counter
dial
housing
screws
and
lift
off the
counter
dial
housing
complete
together
with the
origin
plate
and
the
two
origin
plate
screws.
CAM
STOP
PAWL
Remove
the
key
post
spring
washer
. Note
that
-
this
washer
is
placed
on the key
post
with
the
con-
cave
side
upward. Some
cameras
also
have a
flat
key
post
spacing
washer.
This
is
to
prevent
the
key
knob
from
wobbling
as
it
is
turned.
COUNTER DIAL ASSEMBLY
AND
SAFETY CON-
TROL STOP PAWL (See
figure
5).
The
range
finder
plate
can
be
removed
from
the
camera
with the
counter
dial
assembly
and
the
safety
control
stop
pawl
still
fastened
to
it.
However, if
they
are
left
on, the
counter
dial
assembly
must
be
turned
to
any
number
except"O"
in
order
to move
the end of the
safety
control
stop
pawl
(figure
6)
away
from
the
safety
control
cam
complete.
Hold down
the
counter
dial
with the
fingers
, and
remove
the
counter
knob
screw
(figure
5).
Lift
off
the
counter
knob
washer,
the
counter
dial
assembly,
and
the
counter
knob
spring.
Unhook the
straight
end
of
the
safety
control
stop
pawl
spring
(figure
6)
from
the
projecting
lug
on the
range
finder
plate.
Remove the
safety
con-
trol
stop
pawl
stud.
Lift
off the
safety
control
stop
pawl
spring
and
the
safety
control
stop
pawl.
RANGE FINDER
PLATE.
Remove the
range
finder
plate
screw
(figure
6),
PLATE
SCREW
LEVER
PIN
AND
LEVER
Figure
6
3

CAM
Figure
7
located
directly
in
front
of
the
ra
n
ge
finder
eye-
piece
and
under
the
parallax
frame
assembly.
If
the
screw
cannot
be
turned
without
removing
the
parallax
frame
assembly,
be
sure
to note the
posi-
tion
of
the
parallax
frame
assembly
before
remov-
ing
the
two
range
finder
eyelet
frame
screws
(fig-
ure
5)
, which hold
the
parallax
frame
assembly
and
the
range
finder
eyelet
lens
assembly
to
the
range
finder
plate.
On
reassembly
, the
parallax
frame
assembly
must
be
replaced
in the
same
relation
to
the
range
finder
reflection
guard
(figure
6)
.
CAUTION:
The
parallax
frame
assembly
is
made
of
thin
metal
and
must
be
han-
dled
with
care
.
It
should
not
be
rem
oved
unless
necessary.
If
the
counter
dial
was
left
on
the
range
finder
plate,
te
.
mporarily
replace
the
key knob on the key
post
and follow
through
the
cycle
of
operation
of
the
camera
as
described
on
page
8
until
the
cutout
on
the
safety
control
cam
faces
toward
the
counter
dial.
Remove
the two
screws
which
hold
the
range
finder
plate
to the
case,
one
at
each
end of
the
range
finder
plate
.
Remove
the
range
finder
actuating
lever
link
if
it
has
not
been
removed
(see
figure
1)
If
the
focusing
dial
was
removed,
proceed
as
fol-
lows-with
the
focusing tube
assembly
all
the
way
in,
turn
the
range
finder
cam
assembly
counterclock
-
wise
until
the
first
tooth of the
gear
on the
cam
is
4
COUPLER
ARM
opposite
the
end of
the
cam
follower
assembly
.
This
will
allow
the
range
finder
actuating
lever
assembly
(figure
1)
to
pass
through
the
hole
in
the
mechanis
m
plate
assembly
(figure
7).
Lift
off
the
range
finder
pIa
te,
together
with
the
range
finder
optics.
The
shutter
setting
lever
pin
and
lever
assembly
(figure
6)
will
come
off with
the
range
finder
plate
and c
an
be
pulled
out
through
the
slot
in
the
range
finder
pla
te
.
If
the
focusing
dial
was
not
removed
,
proce
ed
as
follows-with
the
focusing
tube
all
the
way
in
,
turn
the
focusing
dial
clockwise
;
at
the
same
time
lift
up on
the
range
finder
plate.
This
will
allow
the
range
finder
actuating
lever
assembly
to
pass
through
the
hole in
the
mechanism
plate
and
the
range
finder
plate
,
together
with
the
range
finder
optics
which
can
be
lifted
off.
As
soon
as
the
range
finder
plate
is
removed
, the
range
finder
couplet
bar
(figure
1)
beneath
the
mech-
anism
plate
will
drop
down. In
order
to p
reve
nt
the
range
finder
adjusting
screwbracketfrom
ca
tch-
ing on
the
couplet
bar
and
throwing
the
range
f
inder
out of
adjustment,
turn
the
upper
range
finder
cou-
pler
arm
(figure
7)
toward
the
back
of
the
ca
mera
.
Then
push
up on the
couplet
bar,
and
turn
the cou-
pler
arm
back
toward
the
camera
until
it
fits
in
the
slot
in
·the
mechanism
plate.
Wedge
it
in
place.
The
wedging
is
most
conveniently
accomplish
ed by

WASHER
----...::
GEAR
q;:->
~
Figure
8
inserting
a
small
tapered
wood
block
in
the
channel
to
the
left
of
the
coupler
arm
in which the
top
of
the
camera
back
fits.
NOTE:
The
lower
(unbroken) edge of
the
couplet
bar
must
fit
in
the
slot
be-
tween
the
range
finder
adjusting
screw
(figure
1)
and
the
range
finder
adjusting
screw
lock
stud.
PARTS
ON
MECHANISM
PLATE.
Unhook
the
safety
lever
spring
(figure
13)
where
it
hooks on
the
safety
lever
assembly
stud
near
the
end
of
the
assembly.
Remove
the
safety
lever
retaining
nut
and
lift
off the
safety
lever
assembly.
Lift
off
the
safety
control
cam
complete
(figure
8)
and
the
key
complete
together
with
the
key
post
washer
and the
key
post
gear.
Remove
the
gear
shaftSCrew
(figure
7).
Lift
off
the
safety
control
idler
gear.
Remove
the
trigger
plate
bell
crank
stud
and
lift
off the
trigger
plate
bell
crank
(figure
13).
REMOVAL OF
SHUTTER
(See
figure
9).
Disconnect
the
contact
wire
on the
left
side
of
the
focusing
tube guide
assembly.
Using
special
tool No.
501-A,
take
the
initial
tension
off
the
shut-
ter
retaining
ring.Remove
the
retaining
ring
by
turn-
ing
it
the
rest
of the way with a
jeweler's
screw-
driver.
Then
carefully
draw
the
shutter
out of the
focusing
tube;
at
the
same
time
guide
the
contact
wire
through
the
holes
in
the
focusing
tube guide
assembly
and
shutter
light
guard.
The
wire
should
be
pushed
through
the
holes
at
the
same
time
the
shutter
is
being
pulled out
of
the
focusing
barrel.
The
shutter
retaining
ring
will
remain
on the
shutter.
Disconnect
the
ground
wire
from
the
right
side
of
the
focusing tube guide
assembly
and
guide the
wire
through
the
hole
in
the
guide
plate
at
the
same
time
that
the
shutter
light
guard
is
being
removed
from
the
focusing
tube.
CAUTION:
The
shutter
light
guard
is
made
of
thin
metal
and
must
be
handled
with
care.
If
it
is
bent
by
rough
han-
dling,
it
may
bind on the
shutter
operat-
ing
disk
and
cause
faulty
operation
of
the
shutter
or,
in
severe
cases,
jamming
of
the
camera.
FOCUSING TUBE.
Remove
the
two
focusing
tube guide
screws
(fig-
ure
9).
These
are
the
two
screws
underneath
the
shutter
operating
lever
slide
on the
focusing
tube
guide
assembly.
Remove
the
four
lower
focusing tube guide
screws
(figure
10) to ft-ee
the
focusing
tube guide
RETAINING RING lEVER
AND
END
ASSEMBLY
INSERT
--L
FOCUSING
TUBE
lOCK
SCREW
GUIDE ASSEMBLY
GUIDE SCREW
Figure
9
5

assembly,
the
focusing
tube guide
lug
assembl~,
the
two
focusing
tube
guide
lug
screws,
and
the
gui e -
lug
spring.
If
necessary,
the
focusing
tube guide
lug
assembly
can
be
disassembled
from
the
focus-
ingtube
guide
assemblyby
removing
the two
focus-
ing tube guide
lug
screws.
CAUTION:
Unless
it
is
necessary
to
ad-
just
the
shutter
operating
lever
lugs,
do
not
disturb
the two
lower
operating
lever
lug
screws
or
the two
slide
lug screw8."
Remove
the
focusing
tube
retaining
ring
lock
screw
(figure
9).
Use
special
tool
No. 501-B
to
loosen
the
focus-
ing
tube
insert
retaining
ring
and
unscrew
the
insert
retaining
ring.
Turn
the
focusing
tube
back
in
ap-
proximately
half way.
Then
grasping
the
case
in
one hand,
work
the
focusing
tube out of
the
case
with
the
other
hand,
using
no
more
pressure
on the
case
or
focusing
tube than
is
necessary.
MECHANISM
PLATE
(See
figure
11).
Remove the
four
retaining
screws
which hold
the
two
neck
strap
brackets
in
place.
Remove
the two
mechanism
plate
holding
screws,
one
just
in
front
of the
key
post
bushing,
the
other
about
the
same
distance
in
back
of the
trigger
button.
The
mechanism
plate
assembly
is
sealed
to
the
case
with
heavy
black
lacquer,
and to
separate
the
two
assemblies,
it
is
necessary
to
break
the
seal.
First
try
to
lift
up
the
mechanism
plate
by
finger
pressure
at
the
ends,
being
careful
to
push
the
plate
as
nearly
straight
up
as
possible
in
order
to
avoid
bending
the
safety
control
driving
shaft
assembly
where
it
passes
through
the
mechanism
plate.
If
the
mechanism
plate
is
sealed
to the
case
too
tightly
to
come
loose
with
finger
pressure,
hold
the
camera
against
the
body to
absorb
the
shock,
place
a
block
of
fiber
or
soft
wood
against
the
end
of
the
mechanism
plate
near
the
key
post
bushing,
and
tap
the
block
gently
until
the
seal
is
broke~
loose.
GUIDE LUG ASSEMBL
Figure
10
DISK
6
CA
UTION:
Do
not
place
the
block
against
the
key
post
bushing
or
the
bushing
may
be
forced
out of
position
.
Repeat
the
procedure
at
the
other
end of the
mechanism
plate
to
break
the
seal
completely.
Then
work
the
mechanism
plate
off the
case,
pushing
it
as
nearly
straight
up
as
possible.
The
safety
con-
trol
driving
shaft
will
come
off with
the
mechanism
plate
.
Removal
of
the
mechanism
plate
will
free
the
left
and
right
case
film
rollers,
the
range
finder
couplet
bar
shaft
, the
range
finder
couplet
bar,
and
the
range
finder
couplet
bar
spring.
These
parts
can
be
lifted
out if they do not
fall
out.
FILM
SPOOL HOUSINGS AND SPACERS
(See
figure
11).
The
left
and
right
spool
housing
assemblies
are
sealed
to
the
bottom
of
the
case
with
heavy
black
lacquer
in
the
same
manner
that
the
mechanism
plate
was
sealed
to the top
of
the
case
.
Break
the
seal
by
working
the
spool
housing
back
and
forth
slightly
with the
fingers
and
then
lift
off the
spool
housings.
Remove
the
three
bottom
plate
retaining
screws
(the
right-hand
screw
is
the one
nearest
the
back
frame).
The
bottom
plate
is
nowfreefrom
the
case.
Remove
the
left
and
right
mechanism
plate
spacers
by
removing
the two holding
screws.
BACK
COMPLETE
(See
figure
12).
Remove
the two
tension
pad holding
screws
and
lift
off the film
tension
pad
assembly.
Remove
the
seven
window
cover
retaining
screws
and
lift
off the window
slide
cover
assembly.
Grasp
the window
slide
sprmg
with a
pair
of
tweezers
and pull
it
toward
the top
of
the
back
.
If
necessary,
use
a No. 50
drill
to
rem
ove the
turned-over
portion
of
the
window
slide
butt
on be-
ing
careful
not to
drill
any
deeper
than
is
nece
ssary
LU
G SCREW
GUID
E ASSEMBLY

DRIVING
SHAFT
ROLLER
CASE
SPACER
SPOOL HOUSING
SPOOL TENSION
=-_-COUPLET
BAR
_ SPRING
SHAFT
Figure
11
7

PAD
ASSEMBLY
~---PIN
SLIDE
BUTTON
Figure
12
WINDING
THE
MECHANISM WITHOUT THE USE
OF
FILM.
Whenever
the
mechanism
is
wound
without
film
in the
camera.
the following
procedure
must
be
fol-
lowed.
Never
turn
the
safety
control
driving
shaft
except
in
this
sequence:
FIRST
STEP
.
With
the
focusing
tube
assembly
extended
at
least
to
infinity
and
the
exposure
counter
dial
(if
it
has
not
been
removed
from
the
camera)
set
on
any
number
except
"0,"
turn
the winding
key
knob one
full
turn
beyond
the
pOint
where
a
distinct
click
is
heard
,
indicating
that
the
shutter
has
been
cocked.
If
the winding
key
knob
turns
freely
without
cocking
the
shutter
, follow
through
the
second
,
third
, and
fourth
steps
and
then
start
the
cycle
over
again
with
the
first
step.
When
the
first
step
is
performed
for
the
second
time,
the
shutter
willcock
anda
distinct
click
will
be
heard.
SECOND
STEP
.
With' a
jeweler's
screwdriver
,
push
in the
safety
latch
(figure
1)
above
the
upper
left
corner
ortIie
back
frame
and
turn
the
safety
control
driving
shaft
assembly
(figure
11) with the
thumb
until
a
click
is
heard
..
During
the
course
of
turning
the
driving
shaft
assembly,
the
exposure
counter
dial
will
ad-
vance
to
the
next
number
.
THIRD
STEP.
Again
holding
the
safety
latch
in,
turn
the
wind-
ing
key knob
until
it
locks.
This
will
require
only
a
fraction
of
a
turn.
8
to
push
the
window
slide
button
through
toward
the
outside
of the
back.
Lift
off
the
window
slide.
With
the
blade
of a
small
screwdriver,
push
down
the
film
roller
pin
at
the top end
of
the
back
film
roller
far
enough'So
that
the
pin
can
be
dis-
engageaTrom
the
bearing
hole
in
the
back.
Lift
off
the
back
film
roller
together
with
the
film
roller
pin
and
the
film
roller
pin
spring.
Remove
the
spring
by
drawing
out
the
film
roller
pin
from
the
end
of
the
film
roller.
Remove
the
four
hinge
grip
guide
retaining
screws,
two
at
each
end of
the
back,
and
lift
off
the
two
hinge
grip
guides.
With a
pair
of
pliers,
pull
out
the
four
hinge
grips,
being
careful
to
pull
them
straight
out
with
a
firm,
steady
tension.
CAUTION: If
the
hinge
grips
are
twisted
or
pulled
out
at
an
angle,
they
may
be
damaged
or
broken.
When the
hinge
grips
are
removed,
the
four
hinge
pins
and
the
two
hinge
pin
springs
will
be
free
and
they
can
be
removed
by
releasing
the
hinge
latches
which hold
them
in
place
.
FOURTH
STEP.
Push
down on
the
trigger
button.
This
will
re-
lease
the
shutter
and
enable
the
cycle
to
be
repeated.
MECHANICS
OF
THE
WINDING
CYCLE.
Proper
adjustment
of
the
camera
requires
a
thorough
understanding
of
the
way
the
mechanism
functions
during
the
winding
cycle.
When
the
range
finder
plate
is
removed,
as
shown
in
figure
13
, the
movement
of the
various
parts
can
be
observed.
The
cycle
of
winding
the
mechanism
without
film
discussed
on
this
page
can
now
be
analyzed
.
CAUTION:
Whenever
the
winding
cycle
is
followed
through
with the
range
finder
plate
removed
from
the
camera
,
it
is
extremely
important
to
observe
three
precautions:
first,
the
focusing
tube
as-
sembly
must
be
fully
extended;
second
,
the
vertical
slot
in
the
trigger
button
must
face
toward
the
left
front
corner
of the
camera
case
at
all
times;
and
third,
the
lower
(unbroken)
edge of the
range
finder
couplet
bar
(figure
11)
must
be
in
the
slot
between
the
range
finder
adjusting
screw
(figure
1)
and
the
range
finder
adjusting
screw
lock
stud.
FIRST
STEP
As
the
key
knob
(figure
4) is
turned,
the
key
post
gear
(figure
8)
is
turned
by
the
pin on
the
key
com-
plete.
The
key
post
gear
then
turns
the
shutter

setting
gear
assembly
(figure
7).
The
shutter
setting
gear
is
keyed
to
the
shutter
setting
gear
shaft
assembly
(figure
1)
,
which
extends
through
the
mechanism
plate.
Underneath
the
mechanism
plate
the
roller
on
the
shaft
makes
contact
with
the
shutter
setting
blade
assembly
and
as
the
shaft
is
rotated
,
forces
the
shutter
setting
blade
assembly
over
to
the
right
and
cocks
the
shutter.
The
shutter
setting
blade
assembly
bears
against
the
left
shut-
ter
operating
lever
lug
(figure
10),
whic1iln
turn
bears
against
the
shutter
operating
lever
and
end
assembly.
As
the
winding
key
knob
is
turned
beyond
the
point
where
the
shutter
is
cocked
,
the
roller
on
the
shutter
setting
gear
shaft
assembly
moves
back
toward
the
key
knob
and
the
shutter
setting
blade
assembly
is
returned
to
its
original
position
by
the
shutter
setting
guide
spring
(figure
13), which
is
looped
over
the
pin
on
the
shutter
s
etting
blade
which
extends
through
the
mechanism
plate
and
the
shutter
setting
lever
light
guard
on top
of
the
mechanism
plate
.
When
the
shutter
s
etting
gear
assembly
has
turn-
ed
until
the
cutout
portion
of
the
gear
is
next
to
the
key
post
gear
,
the
shutter
setting
gear
spring
pulls
the
gear
around
and
locks
it
against
the
shutter
s
et-
STOP
LEVER
SPRING
ting
gear
stop
lever
which
is
pulled
toward
the
shut-
-
ter
setting
gear
by
the
shutter
setting
stop
lever
spring
.
The
locking
is
done
by
means
of
the
stud
which
projects
downward
from
the
shutter
setting
gear
and
the
projecting
lug on
the
shutter
setting
gear
stop
lever
.
The
cutout
portion
of
the
shutter
s
etting
gear
is
still
next
to
the
key
post
gear
,
so
that
until
the
shutter
setting
gear
stop
lever
is
moved
out
of
the
way
by
the
safety
lever
assembly
later
in
the
cycle,
the
winding
key
knob
can
be
turn-
ed
without
turning
the
shutter
setting
gear
assembly.
This
position
of
the
mechanism
is
the
one
illustrated
in
figure
13
.
SECOND
STEP
.
When
the
safety
latch
(figure
7)
is
pushed
in
and
the
safety
control
driving
shaft
assembly
is
turned
with
the
thumb
,
the
s
afety
control
gear
on
the
top
of
the
safety
control
driving
shaft
also
turns
.
The
safety
control
idler
gear
. no
longer
locked
by
the
safety
latch
,
turns
and
transmits
the
action
of
the
safety
control
driving
shaft
to
the
gear
on
the
safety
control
cam
complete
.
The
gear
turns
until
the
slot
in
the
disk
ju
st
above
the
gear
is
opposite
the
left
end
of
the
safety
lever.
The
safety
lever
is
un-
der
tension
from
the
safety
lever
spring
(figure
13)
and
at
this
point
the
spring
will
pull
the
upper
prong
TRIGGER BUTTON
BELL
CRANK
LIGHT
GUARD
Figure
13
9

on
the
left
end
of
the
safety
lever
assembly
into the
slot.
The
safety
control
driving
shaft
assembly
will
stop
turning
unless
it
is
forced.
With film in the
camera,
the top edge of the
back
makes
contact
with the
safety
latch,
holding
it
in, and the
safety
control
driving
shaft
is
turned
by
the
film
as
the
film
is
drawn
past
by
the winding
key
knob.
Thus,
in
actual
use
of
the
camera,
the
secondpart
of the
operating
cycle
overlaps
the
first
part
of
the
cycle
and
the
prong
on the
safety
lever
falls
into
the
slot
shortly
after
the
shutter
is
cocked.
THIRD
STEP.
When the
safety
latch
is
again
held
in
and the
winding key knob
is
turned,
the
lower
prong
on the
left
end of the
safety
lever
assembly
is
engaged
be-
tween the
teeth
of
the
key
post
gear.
Turning
the
winding key knob now
forces
the
safety
lever
as-
semblytoward
the
right.
As the
safety
lever
moves,
the
right
end
pushes
the
trigger
lock
spring
out of
the
slot
in
the
trigger
button.
Atthe
same
time
the
black
spring
on
the
left
end
of
the
safety
lever
assembly
moves
up
past
the
first
step
on the
safety
lever
spring
stop
plate
and
locks
on the
second
step.
Also
at
the
same
time,
the
second
studfrom
the
left
end of
the
safety
lever
pushes
the
shutter
set-
ting
gear
stop
lever
away
from
the
stud
on the
shut-
ter
setting
gear.
This
allows the
shutter
setting
gear
spring
to
pull
the
shutter
setting
gear
around
so
that
the
stud
is
on the
other
side
of
the
project-
ing lug on
the
stop
lever.
The
first
gear
tooth
after
the
cutout
portion
is
now engaged with the
key
post
gear,
and
the
shutter
setting
gear
is
in
position
to
turn
and
cock
the
shutter
when the
cycle
is
repeated.
NEW STYLE FOCUSING DIAL.
The
range
finder
mechanism
has
been
improved.
If
any
trouble
is
encountered,
the
range
finder
mech-
anism
parts
should
be
changed to the new
style
parts
listed
below.
The
old
style
mechanism
parts,
illus-
trated
in
figure
14
,
are
no
longer
available
.
NEW PARTS REQUIRED.
Part
No.
Part
Name
78793
Anti-back
lash
gear
screw
105612 Range
finder
cam
assembly
103632
Cam
follower
spring
post
No. Reqd.
1
105615
Focusing
scale
bracket
assembly
103636
Focusing
scale
pinion
105611
Cam
follower
arm
106030 Range
finder
cam
follower
screw
103629
Anti-back
lash
gear
103630 Anti-back
lash
gear
spring
103637
Focusing
scale
74111 Range
finder
cam
spring
screw
78849 Range
finder
cam
follower
spring
59044
Focusing
scale
screw
105619
Cam
return
spring
59044
Cam
follower
arm
screw
66860
Focus
scale
bracket
screw
10
1
1
1
1
1
1
1
1
1
1
1
1
1
1
1
FOURTH
STEP.
When
the
trigger
button
is
pushed
down,
the
lower
end
bears
against
the
trigger
bell
crank
underneath
the
mechanism
plate.
As
the
lower
end of
the
bell
crankis
forced
downward, the
stud
on
the
upper
end
of the
bell
crank
forces
the
trigger
plate
(figure
1)
to
the
left
and downward,
releasing
the
shutter.
The
trigger
plate
bears
against
the
right
shutter
operat-
ing
lever
lug
assembly,
which
in
turn
bears
against
the
shutter
operating
lever
and end
assembly.
As
the
trigger
plate
moves
to
the
left,
the
ver-
tical
edge
of
the
plate,
which extends up through
the
mechanism
plate,
bears
against
the
longer
end
of
the
trigger
plate
bell
crank
(figure
13),forcing the
short-
er
end
of
the
trigger
plate
bell
crank
against
the
safety
lever
assembly
near
the
right
end. Since
the
safety
lever
assembly
is
mounted on one
pivot
stud,
the
left
end
moves
in the
opposite
direction;
and
as
the
black
spring
on
the
safety
lever
assembly
slips
past
the
second
step
on
the
safety
lever
spring
stop
plate,
the
safety
lever
spring,
assisted
by
the
trigger
lock
spring,
pulls
the whole
safety
lever
assembly
back
to
the
left.
In a
properly
adjusted
camera,
the
black
spring
on the
safety
lever
as-
sembly
slips
off the
second
step
on
the
safety
lever
spring
stop
plate
at
the
exact
instant
the
shutter
is
released.
As
pressure
on
the
trigger
button
is
relaxed,
the
trigger
plate
spring
pulls
the
trigger
plate
back
to
its
original
position
and the
trigger
lock
spring,
no
longer
held out
by
the
safety
lever
assembly,
drops
into the
slot
in
the
trigger
button and
prevents
it
from
being
depressed
again
until
the
cycle
is
repeated
and
the
spring
is
again
pushed
out.
DISASSEMBLY OF THE FOCUSING DIAL.
Remove
the
range
finder
actuating
lever
link
(figure
1)
by
first
removing
the
back
of
the
camera.
Extend
the
focusing tube
assembly
(figure 9) out to
the
limit
of
travel.
Insert
the
blade
of
a
jeweler's
screwdriver
in
the key
slot
of
the link, and pull
the
link
back
to
disengage
and
remove
it.
Retract
the
focusing
tube to the
closed
position. Remove
the
direct
view
finder
cover
assembly
(figure
2)
by
re-
moving
the
four
direct
view
finder
screws.
Lift
off the
direct
view
finder
cover,
being
careful
to
lift
it
straight
up.
CAUTION:
If
the coveF
is
pulled off
at
an
angle
it
will
strike
the
parallax
frame
and
may
bend
it
out of
adjustment.
Remove
the
range
finder
focusing
dial
by un-
hooking the
dial
spring
from
the
shouldered
bracket
screw.
Lift
off the
dial
and
spring.
~move
the key knob
screw
(figure 4) and
lift
off
the
key knob. Remove the
three
counter
dial
housing
screws
and
lift
off the
counter
dial
housing
complete.
Remove
the
key
post
spring
washer
and
the
flat
key
post
spaCing
washer
if
one
is
used
on
the
camera
.

Remove
the
parallax
frame
assembly
and
the
eyelet
lens
assembly
(figure
5)
by
removing
the
two
range
finder
eyelet
frame
screws.
Remove the
range
finder
plate
screw
(figure 6).
Unhook
the
cam
follower
spring
(figure 14)
from
the
range
finder
cam
assem~Remove
the
cam
follower
screw
and
carefully
lift
off the
cam
fol-
lower
assembly.
Remove the focus
scale
bracket
by
removing
the two holding
screws.
Remove
the
right
objective
lens
mount
assembly
by
first
loosening the two
objective
lens
mount
re-
taining nuts with tool No. 501-D.
Then
pry
off
the
lens
(straight
up) with a
jeweler's
screwdriver.
Remove the two
screws
which hold
the
range
finder
plate
to
the
case,
one
at
each
end
of
the
range
finder
plate.
With
the
focusing tube
assembly
all
the
way in,
turn
the
range
finder
cam
assembly
counterclock-
wise
until
the
first
tooth
of
the
gear
on the
cam
is
approximately
QPposite the
front
post
of
the
right
objective
lens
mount
assembly.
This
will allow the
range
finder
actuating
lever
assembly
(figure
1)
to
pass
through
the
hole in the
mechanism
plate.
Lift
off
the
range
finder
plate.
The
shutter
setting
lever
pin
and
lever
assembly
(figure
6)
will
come
off with
the
range
finder
plate
and
canbe
pulled out through
the
slot
in the
range
finder
plate
.
Remove the
range
finder
actuating
lever
assem-
bly
(figure
1)
by
removing
the
screw
which holds
the
lever
assembly
to the bottom
of
the
range
finder
cam
assembly.
Lift
out
tne
range
finder
cam
as-
sembly.
REASSEMBLY OF
NEW
STYLE FOCUSING DIAL.
Replace
the
range
finder
plate
assembly
on the
CAM
ASSEMBLY
OWER
SCREW
BRACKET
Figure
14
camera
and
secure
it
in
place
with the two holding
screws.
Turn
the focusing tube
assembly
all
the
way in.
Place
a
protective
covering
over
the
erect-
ing
and
coincidence
prism
assembly
(figure14).
To
provide
clearance
for
the
additional
parts
to
be
added
to
the
range
finder
cam
assembly,
mill
down the top of the
range
finder
cam
bushing
(fig-
ure
15) .040 inch
(+
.020
or
- .010).
To
make
the
cam
follower
spring
level
with
the
ramp
of
the
cam
assembly,
file
down
the
top of the
left
front
objective
lens
mount
post
.106"( +.050-.050).
Center
punch
and
drill
with a No.
55
drill
the
top
of
the
left
front
objective
lens
mount
post.
Drill
deep
enough to hold
the
cam
follower
spring
screw.
Tap
the
drilled
hole with
an
.080 tap.
To
allow
clearance
for
the
cam
follower
screw,
file
off the
left
rear
objective
lens
mount
post
at
a
45°
angle
or
half
through.
Tolerance
is
-:030
on
each
side
at
a 45°
angle.
To
allow
clearance
for
the
protruding
end
of
the
anti-
back
lash
gear
(figure 17),
file
the
shoulder
of
the
direct
view
finder
cover
between the points
(A)
and (B)
as
shown in
figure
16, .045
for
width
of
.437 (.218
each
side
of
center).
Tolerances
are
+ .050
or
- .000.
Remove
the
range
finde'r
plate
by
removing
the
two holding
screws.
Fit
the
range
finder
cam
assembly
in the
bush-
ing on
the
range
finder
plate.
Attach
the
range
finder
actuating
lever
assembly
to the
bottom
of
the
cam
with the holding
screw.
Turn
the
cam
to
se
e
that
it
operates
properly.
Fit
the
range
finder
plate
down
over
the
mech-
anism
plate
and
insert
but
do not
tighten
the two
range
finder
plate
holding
screws.
FRONT
POST,
LEFT
Figure
15
11

Figure
16
CAUTION: Make
sure
the
focusing
tube
assembly
is
retracted.
H
it
is
extended
beyond
the
infinity
setting,
the
stud
on
the
range
finder
actuating
lever
assem-
bly
will
go
on
the
camera
on
the
wrong
side
of
the
range
finder
adjusting
screw
(figure
1).
Turn
the
counter
dial
assembly
(figure
5)
to
any
number
except
"0"
in
order
to move
the
end of
the
safety
control
stop
pawl
(figure
6)
away
from
the
safety
control
cam
complete.
Also,
the
cutout
on
the
safety
control
cam
complete
must
face
toward
the
counter
dial
assembly.
To
turn
it
to
the
proper
position,
follow,
as
far
as
necessary,
the
cycle
of
operation
of
the
camera
as
discussed
on
page
8.
fOLLOWER
POST
SPRING SCREW
Figure
17
12
CAM
ASSEMBLY
GEAR
Iflr{
C#~
GEAR SPRING
Insert
the
shutter
setting
lever
pin
and
lever
assembly
in
the
slot
in
the
back
of
the
range
finder
plate
with
the
pOint
facing
toward
the
left
front
corner
of
the
camera
case.
Move the
lever
around
until
the hole
in
the
lever
is
under
the
hole
for
the
range
finder
plate
screw;
then
carefully
press
down
the
range
finder
plate
and
seat
the
lever
on the
bushing
which
holds
in
place
the
shutter
setting
lever
light
guard
(figure
13).
Then
tighten
the
two
range
finder
plate
screws
and
replace
and
tighten
the
long
range
finder
plate
screw.
Attach
one end of
the
cam
return
spring
(figure
17) to
the
left
front
post
of
the
objective
lens
mount
assembly
with
the
cam
spring
screw
and
the
other
end to
the
lip
on the
cam
assembly.
Replace
the
right
objective
lens
mount
assembly
and
secure
it
in
place
by
tighteni!1g the two
objec-
tive
lens
mount
nuts
with
tool
No. 501-D.
Remove
the
right
end
prism
assembly
from
the
old
style
cam
follower
assembly
and
fit
the
prism
assembly
to
the
new
style
cam
follower
assembly.
Replace
the
cam
follower
assembly
on the
cam
fol-
lower
post
and
secure
the
assembly
with the hold-
ing
screw.
Insert
the
cam
follower
screw
into
the
hole
near
the end of
tbe
cam
follower
arm
and
turn
the
screw
until
the end of the
cam
follower
arm
does
not
strike
the
gear
teeth
of
the
cam
assembly.
It
may
be
necessary
to
bend
the
end of
the
cam
follower
arm
so
that
the
screw
will
ride
against
the
smooth
edge of
the
cam
assembly.
Place
the new
focusing
scale
bracket
in
place
and
secure
it
with the holding
screw
and
the
cam
follower
spring
post.
Attach
one
end
of
the
cam
follower
spring
(figure
18) to
the
post
under
the
cam
follower
arm
and
the
other
end to
the
cam
fol-
lower
spring
post.
Place
the
focusing
scale
pinion on
the
pinion
post
and
mesh
the
teeth
of
the
pinion with the
teeth
of
the
cam
assembly.
The
teeth
should
mesh
with
Figure
' 18

Figure
19
a
mlnImum
of
play
between
the
gears.
If
there
is
excessive
play
or
binding
of
the
gear
teeth
move
the
focusing
scale
bracket
until
the
condition
is
corrected.
Then
remove
the
pinion
from
the
post.
Place
the
anti-back
lash
gear
(figure
17)
over
the
gear
on
the
cam
assembl~e
sure
the
anti-
back
lash
gear
fits
tight
against
the
cam
assembly
gear.
If
it
does
not
fit
tight,
ream
out
the
hole
in
the
anti-back
lash
gear.
Check
for
burrs
on
the
gear
by
turning
it
on
the
cam
assembly.
Set
the
anti-back
lash
gear
spring
over
the
anti-back
lash
gear
with
the
center
loop of
the
spring
over
the
end of
the
cam
assembly
shaft.
Fit
the
short
end
of
the
spring
against
the
protruding
end of the
anti-
back
lash
gear
and
the
long end of
the
spring
against
the
gear
and
the
cam
assembly.
Secure
the
spring
in
position
with
the
spring
holding
screw.
Turn
the
anti-back
lash
gear
against
spring
tension
(counter-
clockwise)
until
three
teeth
of the
anti-back
lash
gear
extend
beyond
the
first
tooth on
the
cam
as-
sembly
gear.
Set
the
pinion
on
the
post
and
mesh
it
with the
teeth
on
the
cam
and
anti-
back
lash
gear.
-
Attach
the
focusing
dial
(figure
18)
to
the
focus-
ing
scale
pinion with
the
holding
screw.
The
com-
pleted
focusing
dial
reassembly
is
shown
in
figure
19.
Set
the
direct
view
finder
cover
on the
range
finder
plate
and
check
to
make
sure
the
focusing
dial
operates
smoothly
and
that
the
dial
is
centered
in
the
depth-of-focus
scale
frame
window.
Then
lift
off
the
finder
cover
and
remove
the
focusing
scale
and holding
screw.
Replace
th~
parallax
frame
assembly
and
the
range
finder
eyelet
lens
assembly
and
fasten
them
with
the
two
range
finder
eyelet
frame
screws.
The
eyelet
lens
assembly
should
go on
first
with
the
frame
toward
the
rear;
make
sure
that
it
is
straight
and
that
it
is
pushed
as
far
toward
the
front
of
the
camera
as
it
will
go.
Extend
the
focusing
tube and
make
sure
the
anti-
back
lash
gear
does
not
strike
the
parallax
adjusting
screw.
If
it
does,
file
off
the
corner
which
strikes
the
screw.
In
removing
the
right
end
prism
assembly
from
the old
style
cam
follower
assembly
and
replacing
_
it
on
the
new
style
cam
follower
assembly,
the
range
finder
may
be
moved out of
adjustment.
For
adjust-
ments
to the
range
finder
see
page
16.
Set
the
range
finder
on infinity by looking
at
an
object
at
least
200
feet
away.
Then
replace
the
focusing
dial
on
the
pinion with
the
infinity
indica-
tion
facing
toward
the
front
of
the
camera.
Secure
the
dial
in
position
with the holding
screw.
Set
the
direct
view
finder
cover
on
the
range
finder
plate
and
fasten
it
with
the
four
retaining
screws.
To
adjust
the
focus
of
the
lens
refer
to page 22.
CAMERA CASE AND ASSOCIATED PARTS.
TRIPOD
NUTS (See
figure
11).
If
the
threads
have
been
stripped
from
one of
the
tripod
nuts,
remove
the
bottom
plate
as
described
on
page
6.
NOTE:
It
is
not
necessary
to
remove
the
shutter,
focusing
tube,
or
focusing
tube
guide.
Using
a punch with a
head
approximately
1/32
inch
in
diameter,
knock out
the
old
tripod
nut
from
inside
the
case.
To
do
this,
rest
the
case
on a
block
of wood with a
hole
slightly
larger
than
the
tripod
nut
drilled
in
it.
Place
a new
tripod
nut
in
position,
and
with
the
case
resting
on a
flat
metal
block,
turn
over
the
flange which holds
the
tripod
nut in
position.
This
is
conveniently
done by
using
a
screwdriver
with a
blade
about
1/8
inch
wide,
ground down
so
that
the
end
is
about
1/32
inch
thick.
FOCUSING TUBE ASSEMBLY (See
figure
9).
If
the
inside
focusing
tube
binds
in
the
outside
tube,
smear
the
inside
focusing
tube with
any
light
oil
and
sprinkle
powdered
graphite
liberally
over
it.
Worktthe
inside
and
outside
tube
together
until
they
turn
freely,
starting
the
inside
tube on
different
threads
of
the
outside
tube.
Clean
off
the
parts
of
the
focusing
tube
assembly
with
carbon
tetrachloride
and
reassemble.
The
same
procedure
can
be
followed if
the
outside
focus-
ing tube
binds
on
the
focusing
tube
insert.
WARNING:
Carbon
tetrachloride
is
a
volatile
solvent.
Use
it
with
adequate
ventilation.
A void
frequent
or
prolonged
breathing
of
the
vapors.
MECHANISM
PLATE.
The
following
repairs
to the
mechanism
plate
assembly
(figure
7)
can
be
made
only with
the
mech-
anism
plate
removed
from
the
camera.
SHUTTER SETTING BLADE ASSEMBLY
(See
figure
1).
If
the
shutter
setting
blade
assembly
is
bent
and
is
binding,
remove
the
guide
rod
clamping
screw
(figure
7). With a
jeweler's
screwdriver,
break
the
upper
guide
rod
(figure
1)
loose
at
the
clamp
screw
end
and push
it
out
through
the
holes
in
the
mechanism
plate.
Remove
the
three
shutter
setting
blade
stud
nuts.
Then
remove
the
range
finder
actuating
lever
link
nut
and
the
,
range
finder
actuating
lever
link
washer
on the end of
the
shutter
setting
blade
assembly
13

which
projects
toward
the
trigger
button
end of
the
mechanism
plate.
If
the
shutter
setting
blade
assembly
cannot
be
straightened
so
that
it
works
freely,
replace
it,
fit-
ting
the
pin
on
the
top
of
the
new
assembly
through
the
hole
in
the
shutter
setting
lever
light
guard
(fig-
ure
13).
Replace
the
three
shutter
setting
blade
stud
nuts,
the
range
finder
actuating
lever
link
washer,
and
the
range
finder
actuating
lever
link
nut.
Put
a
little
powdered
graphite
on the
slide
slots
of the
shutter
setting
blade
assembly
and
work
the
blade
assembly
back
and
forth
to
make
sure
there
is
no binding.
The
blade
assembly
should
slide
under
its
own weight
as
the
mechanism
plate
is
tilted.
Then
blow off
the
excess
graphite,
and
shel-
lac
in
place
the
three
shutter
setting
blade
stud
nuts
and
the
range
finder
actuating
lever
link
nut.
Replace
the
upper
guide
rod
with
the
slotted
end
toward
the
back
of
the
mechanism
plate
and
fasten
it
with the
guide
rod
clamping
screw.
Hook the
shutter
setting
guide
spring
over
the
pin
on
the
shutter
setting
blade
assembly
which
extends
up
through
the
shutter
setting
lever
light
guard.
TRIGGER
PLATE
AND TRIGGER.
If
the
trigger
plate
(figure
7)
is
bent,
do not
at-
tempt
to
straighten
it,
but
replace
it
with a new
part.
On top
of
the
mechanism
plate,
release
the
trig-
ger
plate
spring
(figure
13)
where
it
hooks
around
the
lug
on the
vertical
edge
of the
trigger
plate
which
projects
through
the
slot
in the
mechanism
plate.
The
trigger
plate
is
now
free
and
it
will
drop
off
the
underside
of
the
mechanism
plate
.
If
the
trigger
button
is
damaged,
release
it
by
pulling
back
on
the
trigger
lock
spring.
Replace
the
trigger
button with a new
part.
Assemble
the new
trigger
plate
to
the
mechanism
plate
by
fitting
the
hole
in
the end of
the
trigger
plate
over
the
trigger
plate
stud
on
the
trigger
bell
crank
assembly
with which
the
lower
end
of
the
trigger
button
makes
contact.
Then,
fit
the
project-
ing
vertical
edge of
the
trigger
plate
through
the
slot
in
the
mechanism
plate,
and
hook
the
trigger
plate
spring
over
the
lug
near
the
trigger
button.
NOTE: In
some
cases,
it
maybe
neces-
sary
to
ream
out
the
hole
in
the
end of
the
trigger
plate
in
order
to
make
it
fit
over
the
trigger
plate
stud
without
bind-
ing.
The
trigger
plate
should
fit
snugly
but
must
turn
freely
on the
stud.
ADJUSTING SYNCHRONIZATION.
TESTING SYNCHRONIZATION.
Whenever
the
synchronization
is
in
doubt,
it
must
be
checked
in
the
following
three
ways
before
it
can
be
assumed
to
be
in
correct
adjustment.
First
check
the
synchronization
by
following
through
the
winding
cycle
with
the
focusing
tube
as-
semblyextended
tothe
infinity
position.
If
the
cam-
era
is
not
properly
synchronized
with
the
focusing
tube
assembly
in
the
infinity
position,
adjust
it
as
described
in
the
next
paragraph
on
adjusting.
When
synchronization
is
perfect
at
the infinity
position,
extend
the
focusing
'tUbe
assembly
to
the
14
limit
of
travel
and
again
check
synchronization.
If
the
shutter
is
now
released
later
than
the
winding
mechanism,
the
trigger
plate
does
not
extend
as
far
to the
left
at
the
front
as
it
does
at
the
back
.
To
correct
this
trouble,
use
special
tool
No. 501-1
to
grasp
the
trigger
plate
where
the
vertical
section
of
the
plate
extends
through
the
slot
in
the
range
finder
couplet
bar
(figure
1). Bend
the
trigger
plate
just
enough to
synchronize
the
camera
at
the
fully
extended
(3
1/ 2-foot)
position
of
the
focusing
tube
assembly.
Then
recheck
the
synchronization
at
the
infinity
position.
CAUTION: Only a
very
slight
bending
of
the
trigger
plate
is
required
.
Be
care-
ful not to
use
excessive
force
.
When
synchronization
is
perfect
at
both
the
in-
finityand
3 1/
2-foot
positions,
cock
the
shutter
with
the
shutter
setting
lever
pin
and
lever
assembly
(figure
6).
This
lever
moves
the
black
spring
on
the
safety
lever
assembly
up until
it
locks
on the
first
instead
of
the
second
step
on the
safety
lever
spring
stop
plate
(figure
13).
Then
slowly
depress
the
trigger
button
with a
straight
downward
pres-
sure
.
If
the
black
spring
on the
safety
lever
assem-
bly
does
not
slip
off
the
first
step
at
the
exact
in-
stant
the
shutter
is
released,
adjust
the
safety
lever
spring
stop
plate
as
described
on
page
15.
NOTE:
If
the
range
finder
plate
is
off
the
camera,
the
shutter
setting
lever
pin
and
lever
assembly
can
be
used
by
hold-
ing
it
down
over
the
bushing
which holds
the
shutter
setting
lever
light
guard
in
place.
The
wider
prong
should
be
to the
left
of
the
pin
on
the
shutter
setting
blade
assembly
which
extends
through
the
mechanism
plate
and
through
the
shutter
setting
lever
light
guard.
ADJUSTING SYNCHRONIZATION WITH
THE
SHUTTER OPERATING
LEVER
OR THE
RIGHT SHUTTER OPERATING
LEVER
LUG.
(See
figure
10).
If
the
synchronization
is
only
slightly
off,
it
can
be
adjusted
by moving
the
right
shutter
operating
lever
lug
assembly.
This
adjustment
can
be
made
with
the
range
finder
plate
on the
camera.
Loosen
the
lower
operating
lever
lug
screw
and
the
slide
lug
screw
which hold the
right
shutter
op-
erating
lever
lug. Move
the
lug to
the
right
to
re-
lease
the
shutter
sooner
or
to the
left
to
release
it
later.
After
tightening
the
screws,
shellac
the
heads
to
prevent
them
from
working
loose.
CAUTION:
Do
not
move
the
shutter
op-
erating
lever
lug
so
far
to
the
right
that
the
trigger
plate
fails
to
make
solid
con-
tact
with
the
lug when
the
trigger
button
is
pushed
down.
If
only the
bottom
edge
of the
trigger
plate
touches
the
lug,
the
plate
may
slip
over
the top of
the
lug
and
get
jammed
between
it
and
the
bot-
tom
surface
of
the
mechanism
plate
.
If
it
is
not
possible
to
obtain
proper
synchro-
nization
of
the
camera
by
moving
the
right
shutter
operating
lever
lug,
adjust
the
black
spring
on the
safety
lever
assembly
as
described
in
the
next
par-
agraph
on page 15.

ADJUSTING SYNCHRONIZA TION WITH THE
SPRING
ON
THE
SAFETY
LEVERASSEMBLY
If
it
is
not
possible
to
obtain
sufficient
adjust-
ment
of the
synchronization
by moving the
right
shutter
operating
lever
lug,
it
is
necessary
to
ad-
just
the
black
spring
on the
safety
lever
assembly.
This
adjustment
can
only
be
made
with the
range
finder
plate
removed
from
the
camera.
If
the
spring
is
slipping
off the
second
step
on the
safety
lever
spring
stop
plate
before
the
shutter
is
released,
use
a
pair
of
flat-nosed
pliers
to
bend
it
toward
the
safety
lever,
while
if the
spring
hangs on the
step
too long, bend
it
away
from
the
safety
lever.
ADJUSTING THE SAFETY
LEVER
SPRING STOP
PLATE
(See
figure
13).
If
the
camera
is
perfectly
synchronized
for
nor-
mal
operation
but
is
not
releasing
properly
when
the
shutter
has
been
cocked with the
manual
shutter
setting
lever
pin
and
lever
assembly,
adjust
the
safety
lever
spring
stop
plate.
If
only a
very
slight
adjustment
is
required,
in-
sert
the
blade
of
a
screwdriver
between
the
side
of the
stop
plate
and
the
mechanism
plate.
Force
either
the
first
or
second
step
at
the
exact
instant
the
shutter
is
released.
Make
certain
that
the two
safety
lever
spring
stop
plate
retaining
screws
are
tight
and
shellac
the
screw
heads
to
prevent
any
possible
movement
of
the
stop
plate.
Then
recheck
the
synchronization
at
all
points
as
described
on
page 14.
If
anything
more
than
a
very
slight
adjustment
of the
safety
lever
spring
stop
plate
is
required,
remove
the
safety
lever
assembly
as
described
on
page 5,
and
scribe
around
the
stop
plate
to
record
its
position.
Then
remove
the two
safety
lever
spring
stop
plate
screws
and
pry
up the
stop
plate.
Remove and
discard
the dowel in the
safety
lever
stop
plate.
Put
shellac
under
the
stop
plate
and
replace
it
in
the
same
position
it
occupied
before,
usingthe
scribed
lines
as
a guide.
Replace
the two
safety
lever
spring
stop
plate
screws
and
replace
the
safety
lever
assembly
as
described
on
page
20
.
Now, by
inserting
the
blade
of a
screwdriver
be-
tween the
side
of
the
stop
plate
and
the
mechanism
plate,
move
the
stop
plate
as
required
to
make
the
black
spring
on
the
safety
lever
assembly
drop
off
either
the
first
or
second
step
at
the
exact
instant
the
shutter
is
released.
Make
certain
that
the two
safety
lever
spring
stop
plate
screws
are
tight
and
shellac
the
screw
heads
to
prevent
any
possible
movement
of
the
stop
plate.
Then
recheck
the
syn-
chronization
at
all
points
as
described
on page 14.
ADJUSTING THE COCKING
OF
THE SHUTTER
(See
figure
10).
The
cock.ing of the
shutter
is
controlled
by
the
adjustment
of
the
left
shutter
operating
lever
lug.
If
the
front
end of the
shutter
operating
lever
and
end
assembly
is
not
moving
far
enough
to
the
left
to
cock
the
shutter
completely,
loosen
the
lower
operating
lever
lug
screw
and
the
slide
lug
screw
which hold
the
left
shutter
operating
lever
lug. Move
the
lug a
little
farther
to
the
left
and tighten the
screws.
The
lug
should
be
adjusted
so
that
the
shut-
ter
is
setting
slightly
ahead
of
the
winding
mech-
anism.
After
checking
the
adjus
tment
by following
through
the
winding
cycle
as
described
on
page
8,
-
shellac
the
heads
of the
screws
to
prevent
them
from
working
loose.
CAUTION: Do not
move
the lug
so
far
to the
left
that
the
front
end of the
shut-
ter
operating
lever
and
end
assembly
will
be
forced
beyond the
point
at
which
it
cocks
the
shutter.
If
this
happens,
the winding key knob
will
turn
hard
when
the
shutter
is
being
cocked
.
ADJUSTING THE
SAFETY
LEVER(See
figure
20).
Correct
adjus
tment
of the
safety
lever
ass
embly
is
extremely
important
to
proper
operation
of the
camera.
Whenever
it
is
necessary
to
install
a new
safety
lever
assembly,
fit
it
to the
camera
by the
following
procedure.
These
instructions
should
also
be
consulted
if
trouble
is
experienced
with the op-
eration
of the old
safety
lever
and
it
is
to
be
adjus
ted
rather
than
replaced.
Inspect
the
bottom
of
the
safety
lever
for
burrs.
If
the
surface
is
not
perfectly
smooth,
use
a fine
stone
to
remove
any
roughness.
Also
make
sure
there
are
no
burrs
on the end of the
spring
at
(C).
Bend
the whole
safety
lever
a
little
so
that
point
(E)
is
slightly
higher
than
point
(A)
or
point
(G).
This
will
bring
the
top of the
safety
lever
in
contact
with the
safety
lever
retaining
nut
and
prevent
any
possibility
of
loose
operation
of the
safety
lever.
Bend the
black
spring
down
far
enough
between
points
(C) and
(D)
to
insure
positive
engagement
of
the end
of
the
spring
at
(C) with the
steps
on the
safety
lever
spring
stop
plate.
If
necessary,
bend the
lever
up
from
point
(A)
to point (B)
in
order
to
raise
the top
prong
suffi-
ciently
so
that
it
will
clear
the
gear
on the
safety
control
cam
complete
(figure
7).
The
prong
must
not touch the
teeth
of the
gear.
It
may
also
be
nec-
essary
to bend the
lever
slightly
toward
the
back
of
the
camera
between
points
(A)
(figure
20)
and
(B)
in
order
to
allow
the top
prong
of the
safety
lever
to
make
positive
contact
with the
slot
in the
disk
just
above the
gear.
Bend
the
safety
lever
down
slightly
between
points
(F) and (G).
This
will
bring
the
right
end
of
the
safety
lever
down in
contact
with the
mechanism
plate
so
that
the
trigger
lock
spring
cannot
slip
under
the end.
If
any
difficulty
is
experienced
with
the
trigger
lock
spring
jumping
over
the
top of
the
safety
lever
assembly,
it
may
be
advisable
to
make
a fine
slot
in
the
end of the
safety
lever
at
(G)
with
a knife
stone.
The
slot
will
form
a
recess
for
the
spring
and
prevent
it
from
slipping
over
the top of
the
lever.
c
A
~
/
E F
Figure
20
15

OPTICAL
ADJUSTMENTS TO RANGE FINDER.
NOTE:
It
is
preferable
to
correct
opti-
cal
defects
(figure
21)
in
the
range
finder
system
in
the
order
named
.
ONE
FIELD
IS
SMALlE
R THAN THE OTHER.
This
condition
is
due to
tilting
of
the
erecting
prism
forward
or
backward,
usually
caused
by
a
severe
jar
to the
camera
.
The
focus of one
or
both
fields
may
also
be
affected.
Remove
the
two
range
finder
eyelet
frame
screws
(figure
5)
and
the
parallax
frame
assembly
.
Then
fasten
the
range
finder
eyelet
lens
assembly
in
place
again
with the two
range
finder
eyelet
frame
screws.
Loosen
the
erecting
prism
retaining
screws
(fig-
ONE
FIELD
SMALLER
THAN
THE
OTHER
A
SHADOW
IN
ANY
OF
THE
OUTSIDE
EDGES
EITHER
FIELD
OUT
OF
FOCUS
DIVIDING
LINE
TIPPED
/
VERTICAL
LINES
TIPPED
IN
ONE
FIELD
DIVIDING
LINE
TOO
THICK
HALVING
INCORRECT
16
PART
OF TRIANGULAR
TEST
OBJECT MISSING
PART
OF
TRIANGULAR
TeST
OBJECT
APPEARS
IN
BOTH
FIELDS
Figure
21
-
ure
22) on
either
side
of
the
erecting
and
coincidence
prism
assembly;
special
tool
No
.
501-C
will
be
found
convenient
for
the
right-hand
screw
.
Tilt
the
prism
assembly
forward
or
backward
until
the
di-
vidingline
is
centered
up and down
and
the
two
fields
are
of
equal
size.
After
tightening
the
retaining
screws,
put
a
small
amount
of
shellac
on
the
heads
to
prevent
the
screws
from
working
loose.
Again
remove
the two
range
finder
eyelet
frame
screws,
replace
the
parallax
frame
assembly,
and
replace
the
eyelet
frame
screws
.
DIVIDING LINE
TIPPED.
This
condition
is
very
similar
to
that
described
in
the
paragraph
above.
Instead
of
tilting
forward
or
backward,
the
erecting
prism
has
tilted
sideways
.
Make
the
adjustment
in
the
same
manner
and
be
sure
to
shellac
the
heads
of
the
retaining
screws
to
prevent
recurrence
of
the
trouble.
A
SHADOW
IN
ANY
OF
THE OUTSIDE EDGES.
A shadow
may
be
due
to bending of the
range
finder
reflection
guard
(figure
6)
so
that
it
is
cutting
into the
beam
of
light.
If
the
reflection
guard
has
not
been
bent,
make
sure
that
the
range
finder
re-
flection
guard
screw
is
tight
and
is
not
allowing
the
guard
to
slip
out of
position
in
any
direction.
In
this
case,
tighten
the
screw
and
shellac
the
head
to
prevent
it
from
working
loose
again
.
If
no
obstruction
can
be
located
in
the
affected
beam,
the
erecting
prism
may
not
be
perfectly
lined
up with the
coincidence
prism.
Loosen
the two
erecting
prism
retaining
screws,
adjust
the
erect-
ing
prism
so
that
it
is
the
same
distance
from
the
coincidence
prism
at
both
sides,
and
tighten
and
shellac
the
screws
.
VERTICAL LINES ARE
TIPPED
IN
ONE
FIELD.
Lines
are
Tipped
in
Lower
Field.
If
the
lines
are
tipped
clockwise
as
shown
in
figure
21,
use
special
tool No.
501-E
to
tighten
the
large
end
prism
bracket
screw
(figure
22) on
the
end
prism
assembly
.
In
most
cases
it
will
be
neces-
sary
to
tighten
the
screw
only
very
slightly.
If
no
result
is
obtained,
loosen
very
slightly
the
center
one
of
the
three
smaller
end
prism
bracketscrews
directly
above
the
large
screw.
Working
the two
screws
in
conjunction
with
each
other,
straighten
the
vertical
lines.
After
making
the
adjustment,
shellac
both
screw
heads
.
If
the
lines
are
tipped
counterclockwise,
follow
the
same
general
proce-
dure,
but
tighten
the
upper
sc
rew,
and
if
necessary,
loosen
the
lower
one.
Lines
are
Tipped
in
Upper
Field.
If
the
lines
are
tipped
clockwise,
tighten
slightly
the
small
end
prism
bracket
screw
in
the
center
of
the
right
end
prism
assembly
mount
directly
above
the
large
end
prism
bracket
screw.
If
no
result
is
obtained,
loosen
very
slightly
the
large
screw
and
work
the two
screws
in
conjunction
with
each
other
to
straighten
the
vertical
lines.
Then
shellac
both
screw
heads.
If
the
lines
are
tipped
counterclock-
wise,
follow
the
same
general
procedure,
but
tighten
the
lower
screw,
and
if
necessary,
loosen
the
upper
one.

NOTE:
After
an
adjustment
has
been
made
to
correct
tipped
vertical
lines,
it
will
probably
be
necessary
to
correct
the
halving
also
.
EITHER
FIELD
OUT OF FOCUS.
The
focus of
each
field
is
controlled
by
the
posi-
tion
of
its
objective
lens
mountassembly
.
The
left-
hand
lens
mount
assembly
controls
the
lower
(sta-
tionary)
field,
while
the
right
-hand
lens
mount
as-
sembly
controls
the
upper
(movable)
field.
If
it
is
necessary
to
adjust
the
right-hand
lens
mount,
the
focusingdialmut
be
removed.
To
make
an
adjust
ment,
use
special
tool No.
601-D
to
loosen
the
two
objective
lens
mount
nuts
on
the
objective
lens
mount
assembly
concerned
and
move
it
forward
or
backward
until
the
field
is
in
perfect
focus.
After
making
the
adjustment,
correct
the
halving
as
de-
scribed
in
the
paragraph
below,
and
shellac
the
nuts
to
lock
them
in
place.
HALVING
IS
INCORRECT.
The
halving
or
height
adjustment
is
best
tested
on a
triangular
test
object.
When
the
halving
is
in-
correct,
the
sides
of
the
test
object
will
appear
to
be
broken
even
when
the
range
finder
is
set
for
the
correct
distance
.
This
effect
is
due to
incorrect
adjustment
of one
of
the
objective
lens
mount
as-
semblies
;
if
there
is
too
much
vertical
separation
between
the
two
lenses
a
section
of the
triangle
will
be
missing,
while
if
there
is
not
enough,
the
same
part
of
the
triangle
will
appear
in
both
fields.
See
figure
21.
Part
of
Triangular
Test
Object
Missing.
Without
loosening
the
objective
lens
mount
nuts,
gently
tap
down
the
right-hand
objective
lens
mount
assembly
or
raise
the
left-hand
objective
lens
mount
assembly
by
gently
prying
it
up with
the
blade
of a
screwdriver
. When
the
adjustment
is
correct,
shel-
-
lac
the
nuts
in
place.
If
any
adjustment
is
to
be
made
to
the
right-hand
objective
lens
mountassem-
bly, the
focusing
dial
must
be
removed
.
NOTE:
Neither
of
the
two
objective
lens
mount
assemblies
should
be
raised
or
lowered
to
the
extent
that
it
is
not
rea-
sonably
well
centered
in
its
front
win-
dow on the
direct
view
finder
cover
as-
sembly
(figure
2).
For
this
reason,
it
is
advisable
to
replace
the
cover
assem-
bly
temporarily
before
making
the
ad-
justment.
The
lens
assembly
which
it
is
preferable
to
adjust
can
then
be
se-
lected
on
the
basis
of
its
centering
in the
front
window.
Part
of
Triangular
Test
Object
Appears
in Both
Fields.
Follow
the
same
general
procedure
as
that
given
in
the
preceding
paragraph,
but
raise
the
right
-hand
objective
lens
mount
assembly
or
lower
the
left-
hand
objective
lens
mount
assembly.
DIVIDING LINE TOO THICK.
Severe
climatic
conditions
sometimes
cause
separation
of
the
two
triangular
coincidence
prisms.
If
this
is
the
case
,
replace
the
coincidence
prism
assembly
complete.
Too
thick
a
dividing
line
may
also
be
due to
in-
correct
position
of
the
small
aligning
mask
under
the view
finder
mask
at
the
back
of
the
direct
view
finder
cover
assembly.
Move
the
mask
up
or
down
until
the
dividing
line
is
of
the
desired
thickness;
then
apply
a
small
amount
of
shellac
to
the
mask
to
prevent
it
from
slipping
out of
place.
NOTE:
Great
care
should
be
taken
with
this
adjustment
because
it
may
have
a
tendency
to
affect
the
clarity
and
bright-
ness
of both
fields.
PRISM ASSEMBLY
Figure
22
17

BACK
COMPLETE
(See
figure
12).
Place
the
two
hinge
latches
in
position,
one
at
each
end
of
the
back,
and
fasten
them
with
the
two
hinge
screws.
Place
the
two
hinge
pin
springs
and
the
four
hinge
pins
in
position
and hold
them
in
place
with
the
hinge
latches
at
either
end of
the
back.
The
hinge
pins
must
be
turned
so
that
the
holes
are
in
position
to
receive
th€
hinge
grips.
Using
adhesive
tape
to
protect
the
finish
on the
hinges,
force
the
four
hinge
grips
into
place
with a
pair
of
blunt-nosed
pliers
.
Replace
the
two
hinge
grip
guides,
one
at
each
end of
the
back,and
fasten
them
with
thefour
hinge
grip
guide
retaining
screws.
Replace
the
film
roller
pin
spring
in
the
open
end of
the
back
film
roller
and
insert
the
film
rol-
ler
pin
with
the
smafI'eii(f""turned out.
Put
the
solid
end
orthe
film
roller
in
the
bearing
hole
at
the
left
bottom
corner
of
the
back;
then,
with a
small
screw-
driver,
push
the
film
roller
pin
far
enough into
the
roller
to
allow
the
small
end of
the
pin
to
be
engaged
in
the
bearing
hole
at
the
top
of
the
back.
If
the
window
slide
button
was
disassembled
from
the
back,
place
the
window
slide
in
place
with
the
window
slide
button
extending
through
it.
Rest
the
back
on a
metal
block
covered
with
adhesive
tape
to
protect
the
finish
on the
outer
end
of
the
window
slide
button,
and
turn
over
the
inner
end
of
the
button
with a
small
hammer
.
With
the
window
slide
covering
the
round hole
through
the
back,
slide
the
window
slide
spring
under
the
window
slide
with the
straight
end
resting
against
the
nearer
side
of
the
window
slide
button
and
the
curved
portion
of
the
spring
over
the
spring
stud.
Push
the
short
end of
the
spring
down
so
that
it
rests
against
the
side
of
the
recess
provided
for
the
spring.
Replace
the
window
slide
cover
assembly
and
fasten
it
with
the
seven
window
cover
retaining
screws.
Replace
the
film
tension
pad
assembly
with
the
large
hole
over
the
film
window
and
fasten
it
with
the
two
tension
pad holding
screws.
FILM
SPOOL HOUSINGS, AND SPACERS
(See
figure
11).
Replace
the
left
and
right
mechanism
plate
spacer
and
fasten
them
with
the
two
case
screws.
---
With
the
bottom
.
plate
in
position
beneath
the
case,
place
the
spool
tension
over
the
centering
stud
of
the
film
roller
bracket.
Fasten
it
with one
of
the
bottom
plate
screws.
The
right-hand
plate
screw
is
inserted
through
the
right-hand
spool
bracket
and
secured.
The
bottom
plate
washer
is
put
in
position
over
the
hole
in
the
center
of
the
18
case
and
fastened
with
the
remaining
bottom
plate
screw.
With
the
blade
of a
small
screwdriver,
scrape
out
the
channels
in
the
bottom
of
the
case
where
the
bottom
edges
of
the
spool
housings
are
to
fit.
Apply
black
wood
lacquer
dope
to
the
channels.
NOTE:
The
lacquer
dope
functions
as
a
filler
; wood
lacquer
dope
should
there-
fore
be
used
in
preference
to
metal
lac-
quer
dope
because
it
has
a
higher
per-
centage
of
solids.
If
only
clear
dope
is
available,
add
carbon
black
to
it
so
that
no
light
will
be
transmitted.
If
neither
clear
nor
black
lacquer
dope
is
available,
use
regular
black
wood
lacquer
without
thinning.
Place
the
left
and
right
spool
housing
assemblies
in
position
in
the
case.
Set
each
housing
in
its
channel
by
placing
a wood
or
fiber
block
on top of
the
spool
housing
and
tapping
the
block
gently.
MECHANISM
PLATE
(See
figure
11).
With
the
blade
of a
small
screwdriver,
scrape
out
the
channels
in
the
bottom
of
the
mechanism
plate
into which
the
top
edges
of
the
spool
housings
are
to
fit.
Apply
black
wood
lacquer
dope to
the
tops
of
the
spool
housings.
Refer
to
the
preceding
paragraph.
Place
the
right-hand
case
film
roller
in
place
.
This
roller
can
be
distinguished
from
the
left-hand
casefilm
rollerby
the
double
shoulder
ateach
end.
Lower
the
mechanism
plate
and
the
safety
con-
troldriving
shaft
assembly
down on
the
case,
fitting
the
driving
shaft
into
the
left-hand
hole
of
the
case
and
the
right-hand
case
film
roller
into the
right-
hand hole
in
the
mechanism
plate.
CAUTION:
The
safety
control
driving
shaft
assembly
must
work
freely,
and
care
should
be
taken
not
to bend
the
shaft
where
it
passes
through
the
mechanism
plate.
Replace
one
mechanism
plate
holding
screw
near
the
trigger
button
.
This
will
hold
the
right
end of
the
mechanism
plate
down
so
that
the
right-hand
case
film
roller
will not
jump
out
while
the
left-
hand
case
film
roller
is
being
replaced.
Lift
up the
left
end of the
mechanism
plate
enough to
slip
the
left-hand
case
film
roller
into
the
holes
in
the
case
and
mechanism
plate
in
which
it
rests.
Now
re-
place
the
remaining
mechanism
plate
holding
screw
in
the
hole
in
front
of
the
key
post
bushing.
Where
they
come
together,
coat
the
edges
of
the
mechanism
plate
and
the
top
of
the
case
with
black
wood
lacquer
dope.
Then
place
the
two
neck
strap
bracke
,
ts
in
place
and
fasten
them
with
the
four
re-
taining
screws.
/