AW-PW22

Metra AW-PW22, 44-PW22 User manual

  • Hello! I am an AI chatbot trained to assist you with the Metra AW-PW22 User manual. I’ve already reviewed the document and can help you find the information you need or explain it in simple terms. Just ask your questions, and providing more details will help me assist you more effectively!
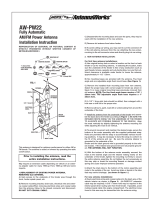
AW-PW22
Fully Automatic
AM/FM Power Antenna
Installation Instruction
MOTOR
ASSEMBLY
METAL STRAP
DRAIN TUBE
MAST TUBE
RETAINER
G
ASKETSGASKETS
F
IXED ANGLE BASES
M
OUNTING SPACER
M
OUNTING NUT
M
OUNTING WASHER
1
“ (25mm) HOLE
F
LUSH ADJUSTABLE
A
NGLE BASE
3’
8
15’
2
3’
30’
7/8” / (22mm) HOLE
C
OAXIAL CABLE
U
NDERSIDE
OF FENDER
5/8” / 16mm HOLE
ELECTRICAL
W
IRES
FIG. 1
This antenna is designed for optimum performance for either AM or
FM bands. The antenna is raised or lowered by operating the radio
on/of
f switch.
C
) Disassemble the mounting base and save the parts, they may be
used with the installation of the new antenna.
D
) Remove old antenna from below fender.
E
) To avoid cutting car wiring, you may want to cut the connector off
o
f the old antenna removed from the car, attaching the new anten-
na wiring to the old connector wires and directly plug into car wiring.
2
. NEW ANTENNA INSTALLATION:
F
or first time antenna installations:
A) Use original factory hole or select a location on the front or back
f
ender of car for mounting antenna. In selecting the location, make
sure the underside of the fender is free of any obstruction such as
weld beads, braces, gussets and sub-fender.Also, be sure that suf-
f
icient clearance is available under fender to house the antenna,
approximately 11-1/2” / 29cm.
B
) Six mounting bases are provided with the antenna. Five fixed
angle and one adjustable angle flush mount base.
(See Figure 1).
C) Remove the installed flush mounting base from new antenna.
S
elect the proper base with correct angle for fender (as shown in
figure
1) or reuse original mounting base previously re
moved from
old antenna.
NOTE: The five fixed angle bases require a 7/8” /
22mm hole. The adjustable angle flush base requires a 1”
25mm hole.
D) A 1/8” / 3mm pilot hole should be drilled, then enlarged with a
hole saw or drill bit to the proper size.
E) Remove all burrs, paint, road dirt or undercoating from around the
underside of the hole.
F) Install the antenna from the underside of the fender and assem-
ble the base above the fender according to
Figure 1. BE SURE THE
RETAINER RESTS EVENLY ON THE UNDERSIDE OF THE FENDER
TO ALLEVIATE ANY POSSIBLE DAMAGE TO THE VEHICLE. Align
the mast vertically by slightly tightening the antenna mounting nut
while adjusting the mast to be vertical.
G) To prevent movement and maintain the desired angle, secure the
bottom of the motor assembly with the supplied perforated strap.
Holes are provided with the strap to accommodate various mount-
ing positions. It may be necessary to bend the strap to conform to
the fit of the antenna and car
. Be sure the antenna retainer is
grounded to the underside of the
fender and the black ground wire is gr
ounded properly to the vehi-
cle chassis. If the retainer and ground wire are not properly ground-
ed,
THE ANTENNA WILL NOT FUNCTION.
H) With the bottom of the antenna motor assembly secured, the
mast at the desired angle and the retainer resting evenly on the
underside of the fender, tighten the mounting nut firmly to secure
the entir
e antenna assembly
. Do not tighten the nut excessively as
this may strip or break the mounting threads or damage contact
spring and cause improper antenna operation.
I) Attach the drain lube to the bottom of the motor assembly and
route to the outside of the car. Avoid any kinks or bends in the tube
that may r
estrict drainage.
(as shown in figur
e 1.)
For new antenna installations:
J) Route electrical wiring and coaxial cable into the dash ar
ea of the
vehicle interior as shown in
Figur
e 2.
(44-PWEC157 extension
cable may be required). A 5/8” / 16mm hole may be required in the
interior panel when routing wire from front fender. If possible, avoid
r
outing coaxial cable into engine compartment. The electrical noise
found in this area may be transmitted into the antenna wiring.
Prior to installing the antenna, read the
entire installation instructions.
May require an extension cable depending on vehicle or an anten-
na adapter cable for many 1995-up For
d, 1988-up GM and some
imports.
1.REPLACEMENT OF EXISTING POWER ANTENNA,
REMOVING OLD ANTENNA.
A) Gain access to the underside of the fender ar
ea through the
trunk, fender splash panel, etc.
B) Remove mounting bracket, drain tube, electrical wire and anten-
na coaxial cable.When removing electrical wires and coaxial cable
from the antenna, follow to the closest connector and disconnect.
DO NOT CUT COAXIAL CABLE.
1
R
EPRODUCTION OF EDITORIAL OR PICTORIAL CONTENT IS
S
TRICTLY PROHIBITED WITHOUT WRITTEN CONSENT OF
METRA/ROADWORKS
TM
3
. ANTENNA WIRING
For first time antenna installations:
A
)
R
adios with switched antenna wire:
C
onnect blue wire from
antenna to the switched antenna wire from radio (normally blue) as
s
hown in
F
igure 2.
C
onnect coaxial cable from antenna to radio.
B) The red power wire from antenna can be connected at fuse block.
(
as shown in figure 2) battery, or hot side of ignition switch or any
o
ther +12 volt “constant on” location.
4
. MAST REPLACEMENT
Contact dealer for mast replacement model number.
A) Remove antenna mounting nut (Figure A)
B
) To remove mast, turn radio switch on to raise antenna. Remove
mast, serrated plastic cable and contact spring. Save and clean
c
ontact spring for re-use.
N
ote which side of antenna serrated
c
able is facing (Figure B).
C)
Insert serrated cable of new mast into the housing. Stop when
resistance is felt, approximately 12” 30mm. The serrated side of
cable must duplicate original direction.
D) Turn radio switch off to lower antenna until serrated cable catch-
e
s. It may be necessary to cycle antenna several times (by turning
r
adio switch on and off) until cable catches the gear mechanism and
retracts (Figure C).
E
) Reinstall mast into housing and place contact spring onto mast
with flanged end up (Figure D).
F) Reinstall antenna mounting nut and tighten.
G
) The mast may only retract or extend halfway. Cycle several times
(by turning radio switch on and off) until the mast fully extends and
r
etracts.
2
I
MPOR
TA
NT NOTES
1. Maintenance: For best operation and reception, periodically
c
lean mast (while fully extended) with a damp cloth, approximately
once a month. Do not oil or grease antenna or motor assembly.
2
.
P
ower antenna is designed to withstand extremely cold temper-
atures, but under severe icing conditions, the antenna could fail to
e
xtend or retract. Should this occur, turn the radio on and off three
o
r four times to help free the antenna mast. The antenna motor will
not be damaged if mast does not extend. A special clutch protects
t
he motor from
possible damage.
3. Remember to retract antenna when entering a car wash, garages
or low clearance areas.
4. There are no serviceable parts in the motor assembly and it
should not be taken apart. Warranty will be invalid if damage is
caused by unauthorized accessories, disassembly or for wiring
methods other than those recommended.
5. Periodically inspect drain tube for blockage or kinks.
6. Use a 5 amp fuse in case of replacement to avoid damage to the
motor.
LIMITED WARRANTY
A
ntennaworks warrants to the original retail purchaser of this product. Should this product prove to be defective in material or workmanship within 1 year
f
rom the date of original purchase, it will be repaired for replaced (at Antennaworks option) without charge for parts or labor.
T
his warranty does not apply to any product or part thereof, which has been changed through alteration, misuse, neglect, accidents, mishandling, unrea-
sonable use, improper installation, or accident in shipment. This warranty does not extend to the elimination of car static or motor noise. Costs incurred
f
or removal or replacement within the terms of this warranty, the defective product, with proof of purchase, first should be returned to the original place of
p
urchase. If that is not possible, the defective product must be delivered, transportation prepaid to Antennaworks at the address shown below. A letter
explaining the details of the problem must be enclosed. Antenna must be returned to Antennaworks complete. Any missing parts will be replaced and
b
illed at current pricing. Repairs or replacement will be made and the product will be returned as soon as possible.
Before returning the item for repair or service, verify that the product itself is defective, as errors in wiring or in adherence to following installation direc-
t
ions may be the problem.
Product materials and specifications are subject to change without notice.
THIS WARRANTY IS IN LIEU OF ANY OTHER WARRANTIES, EXPRESS OR IMPLIED, AND METRA/ANTENNAWORKS SHALL NOT BE LIABLE FOR
A
NY INCIDENTAL OR CONSEQUENTIAL DAMAGES DUE TO THE BREACH OF ANY EXPRESS OR IMPLIED WARRANTY. ANY IMPLIED WARRAN-
T
Y OF MERCHANTABILITY IS LIMITED IN DURATION TO THE 1 YEAR WARRANTY PERIOD SPECIFIED ABOVE. UNDER NO CIRCUMSTANCES
SHALL ANTENNAWORKS BE LIABLE FOR ANY INCIDENTAL OR CONSEQUENTIAL DAMAGES FOR BREACH OF THIS WARRANTY.
No person or representative of Metra /Antennaworks is authorized to assure for Antennaworks any liability otherwise expressed herein in connection with
the sale of this product.
Some states do not allow limitations on how long an implied warranty lasts or the exclusion or limitation of incidental or consequential damage so the
a
bove limitations or exclusion may not apply to you.This warranty gives you specific legal rights and you may also have other rights which vary from state
t
o state.
GARANTIE LIMITEE
7
Metra Electronics offre à l’acheteur original de ce produit une garantie contre les défauts dans les matières et la fabrication. Si ce produit devait être
défectueux au cours d’une période de un an à computer de la date originale d’achat. Metra s’engage à le réparer ou a le remplacer (a la discrétion de
Metra) et ce, sans frais pour les pièces.
Cette garantie ne s’applique pas sur un produit ou une pièce ayant subi de modifications, une utilisation inappropriée, de la négligence, un incident, une
mauvaise manipulation, un emploi abusif, une installation inappropriée ou in accident lors de l’expédition. Cette garantie ne couvre pas l’élimination de
statiques du véhicule ou de bruits du moteur, ni les couts encourus pour l’enlèvement ou i’ installation du produit, ni les dommages aux autres acces-
soires ou autres systèmes électrique du véhicule. Cette garantie ne s’applique pas non plus a un produit a un produit qui n’a pas fait l’objet d’un entre-
tien conforme aux instructions sur j’installation et l’utilisation fournies par Metra.
Pour obtenir une réparation ou un remplacement selon les clauses de cette garantie, le produit défectueux doit d’abord être retourne, accompagne d’une
preuve d’achat, à l’ endroit original de l’achat. Si cela n’est pas possible, veuillez communiquer avec le service du soutien technique de Metra Electronics
au 1-800-221-0932 (poste 2416). Si le produit est défectueux, vous recevrez un numéro d’autorisation pour la remise et une adresse ou vous pourrez
retourner le produit défectueux. Une lettre expliquant, en détails, le problème doit être jointe.
Avant de retourner un article aux fins de réparation, s’assurer que c’est bien le produit qui est défectueux et non un mal-fonctionnement du a une erreur
dans le câblage ou a une installation n’étant pas conforme aux instructions.
Matières et spécifications du produit sous réserve.
CETTE GARANTIE REMPLACE TOUTES AUTRES GARANTIES, EXPLICITES OU IMPLICITES ET METRA DECLINE TOUTE RESPONSABILITE
QUANT AUX DOMMAGES DIRECTS OU ACCESSOIRES CAUSES PAR UN MANQUEMENT A TOUTES AUTRES GARANTIE EXPLICTES OU
IMPLICITES.
TOUTE GARANTIE IMPLICITE DE L’A-PROPOS DE L’UTILISATION DE LA MARCHANDISE SE LIMITE A LA PERIODE DE UN (1) AN
INDIQUEE PLUS HAUT. EN AUCUN CAS, METRA NE PEUT ETRE TENUE RESPONSIBLE DE TOUS DOMMAGES DIRECTS OU ACCESSORIES
CAUSES PAR UN MANQUEMENT A CETTE GARANTIE DE UN (1) AN.
Aucune personne et aucun représentant de Metra ne sont autorises, durant la vente du produit, a’ assurer, au nom de Metra, toute autre responsabilité
que celles expliquées dans cette garantie.
Certaines provinces ne permettent pas de limitation de la durée d’une garantie implicite ni l’exclusion ou la limitation pour les dommages directs ou acces
-
soires. Par conséquent, il se peut que les limites ou exclusions plus haut indiquées ne s’appliquent pas à vous. Cette garantie vous donne certain
doit particulier, il se peut que vous ayez d’autres qui varient d’une province à l’autre.
/