La Crosse Technology WS-8120U Quick Setup Manual
- Type
- Quick Setup Manual

1
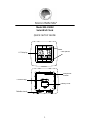
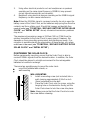
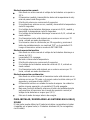
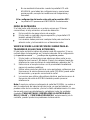
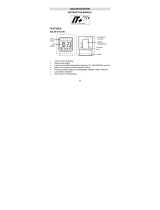
Model WS-8120U
Solar Wall Clock
QUICK SETUP GUIDE
LCD display
Solar panels
%
Function keys
Battery cover
Wall mount
location
Foldable stands

2
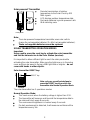
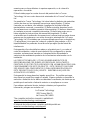
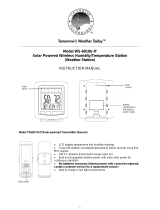
Solar-powered Transmitter:
Remote transmission of outdoor
temperature to the Solar Clock by 915
MHz signals
LCD displays outdoor temperature data
Recharge batteries by solar-powered cells
Wall mounting case
Note:
The solar-powered temperature transmitter uses solar cells to
charge the rechargeable batteries (2 x AAA rechargeable batteries).
Those rechargeable batteries cannot be replaced.
SOLAR TRANSMITTER OPERATION MODES
Important:
Users need to press the reset key to activate the solar transmitter
and link the transmission to the Solar Station (receiver).
It is important to allow sufficient light to reach the solar panel while
activating the solar transmitter. Make sure the lights are on in the setup
room and the solar panel is facing a 60W light bulb or brighter - do not
cover with hands or other objects.
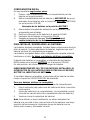
Solar transmitter RESET key:
The solar transmitter has 3 operations modes:
Normal Operation Mode:
This mode occurs when the battery voltage is higher than 2.5V.
The transmitter will measure and transmit the temperature data to
the solar wall clock every 8 seconds.
The environment brightness is checked every 5 seconds
If a dark environment is detected, it will measure and transmit the
temperature every 16s.
Note: only use a small pointed pen to
press the RESET key to re-active the
transmitter into Normal Operation Mode.
Solar panel
RESET key

3
If the battery voltage is dropped lower than 2.8V, it will measure and
transmit the temperature every 16s
If battery voltage is dropped lower than 2.4V, will go into Idle mode.
If the solar transmitter is placed into a dark environment for 72
hours, will goes into Stop mode.
If the user cover the solar cell for 10 seconds and press the reset
button, "StP" will be displayed on the LCD. Then the transmitter
enters STOP mode.
Idle Operation Mode:
This mode occurs when the battery voltage drops lower than 2.4V
LCD is turned off.
Does not perform temperature measurement and transmission.
The environment brightness is checked every 5 seconds
If battery voltage is raised higher than 2.5V, will go into Normal
mode
If the solar transmitter is placed into a dark environment for 72
hours, will goes into Stop mode.
Stop Operation Mode:
This mode occurs when the solar transmitter is placed into a dark
environment for 72 hours or the user covers the solar cell for 10
seconds and presses the RESET button.
The transmitter is in a standby state. The unit does not perform any
operations and LCD is off.
Under a bright condition, press the reset button to wake up the
transmitter into normal operation mode (battery voltage is higher
than 2.5V).
This is the most power saving mode.
TO INSTALL / REPLACE BATTERY IN THE SOLAR CLOCK
The Solar Clock can use either the included 2 x alkaline rechargeable
battery (charged by solar panel) or 2 x AA alkaline battery (non-
rechargeable; not included).
INITIAL SETUP
It is very important to follow these steps:
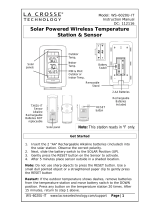
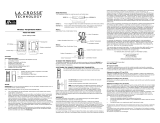
1. First, remove the label covering over the battery compartment on
the back.
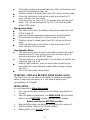
2. Open the battery compartment, and MAKE SURE that the battery
switch is in the BATTERY position (not the SOLAR position).
Battery switch in the BATTERY position
3. Now locate the battery insulator tab, and gently pull to remove it.
4. Slide the battery switch to the SOLAR position
5. Battery switch in the SOLAR position

4
6. Continue to section titled “Setup After Changing/Installing the
Battery in the Solar Clock ”
TO INSTALL / REPLACE BATTERY
The included alkaline rechargeable batteries should provide you with
many years of service. If your batteries need to be replaced, we suggest
you use 2 fully charged the AA Alkaline.
Rechargeable batteries should be fully charged before inserting into clock.
Alkaline rechargeable batteries must be used.
If you choose to use non-rechargeable batteries, the battery switch MUST
be moved to the BATTERY position (not the SOLAR position). In this
position, the solar cells do not charge the batteries.
REGARDLESS OF THE TYPE OF BATTERIES INSTALLED, THE
BATTERY SWITCH MUST BE IN THE BATTERY POSITION WHEN
THE BATTERIES ARE INSERTED.
If rechargeable batteries are used, the Battery switch should be moved to
the SOLAR position AFTER it is has been inserted.
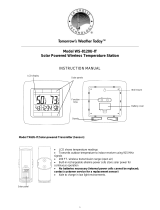
To use non-rechargeable alkaline batteries:
1. Remove the included rechargeable AA batteries from the
compartment.
2. Use the switch to select the alkaline battery (see below).
3. Insert the batteries into the compartment, observing the correct
polarity (see marking inside battery compartment.
4. Replace battery cover
Note: For best performance, batteries should be replaced at least once
every 2 years to maintain the best running accuracy. Ensure that the
batteries used are new and the correct size.
Use switch to
select which type
of battery will be
used before
inserting the
battery into the
compartment
Battery
compartment
cover

5
Please help in the preservation of the environment and return
used batteries to an authorized depot.
SETUP AFTER CHANGING/REPLACING THE BATTERY IN THE
SOLAR CLOCK
1. After powering up the Solar Clock, all LCD segments will light up
briefly and it will show the time (12:00), indoor temperature, date,
and indoor humidity.
2. After the batteries are inserted, the Solar Clock will start receiving
data signal from the solar transmitter. The outdoor temperature data
should then be displayed on the Solar Clock. If this does not happen
after 2 minutes, the batteries will need to be removed from both
units and reset from step 1.
3. The distance between the Solar Clock and the transmitter should
not be more than 330 feet (100m) (TBA) to ensure sufficient 915
MHz transmission. (see notes on “Positioning” and “915 MHz
Reception”).
Note: When changing the battery:
1. Be careful that it does not spring free from the contacts.
2. Press any button 20 times with the battery removed.
3. Always wait at least 10 minutes after removing battery before
re-inserting; otherwise start up problems may occur.
TO SET THE TIME
Note: the time will be displayed with “AM” or “PM” for the time from 12:00
until 11:59.
1. Press and hold the SET key for 3 seconds to enter the time setting
mode.
2. The hour digits will start flashing.
3. Set the desired hours by pressing and releasing the + key followed
by pressing the SET key.
Rechargeable Alkaline
battery switch position
Primary Alkaline
battery switch position

6
4. Now the minute digits will start flashing.
5. Set the desired minutes by pressing and releasing the + key. If the +
key is held, the units will increase by 5.
6. Press the SET key again to confirm and enter the Solar Mode
setting.
SOLAR MODE
The Solar Mode is used for saving the power consumption of the
rechargeable battery (Default setting ON):
1. The characters “ON” or “OFF” will start flashing. By use of the +
key select “ON” or “OFF” to set the solar mode.
2. Press and release the SET key to exit the setting mode and switch
back to the normal display mode.
If the solar mode setting is ON:
The surrounding environment brightness is checked every 5
seconds
LCD will automatically turn OFF if the environment is too dark
LCD will automatically turn ON if the environment is bright
enough
No information will be displayed when the LCD is OFF, but all the
settings and operations will remain, except for the temperature
and humidity measurements.
If the solar mode setting is OFF:
LCD will remain ON constantly.
STOP MODE
If the Solar Clock is placed in a dark environment for 72 hours continually,
the clock will go to the stop mode:
The most power saving condition.
The Solar Clock will not perform any operation and the LCD will also
be OFF.
Users need to press any key to wake up the Solar Station and to re-
activate the transmission with the solar transmitter.
915MHZ RECEPTION CHECK FOR OUTDOOR SOLAR
TRANSMITTER
The Solar Clock will receive the outdoor data every 48 seconds. If the
temperature data is not being received 2 minutes after setting up (or the
display shows “- - -”), then please check the following points:
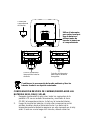
1. The distance of the Solar Clock or outdoor transmitter should be at
least 6 feet (2 meters) away from any interfering sources such as
computer monitors or TV sets.
2. Avoid placing the receiver onto or in the immediate proximity of
metal window frames.

7
3. Using other electrical products such as headphones or speakers
operating on the same signal frequency (915MHz) may prevent
correct signal transmission and reception.
4. Neighbors using electrical devices operating on the 915MHz signal
frequency can also cause interference.
Note: When the 915 MHz signal is received correctly, do not re-open the
battery cover of the Solar Clock, as the batteries may spring free from the
contacts and force a false reset. Should this happen accidentally then
reset all units (see “TO INSTALL / REPLACE BATTERY IN THE SOLAR
CLOCK” and “INITIAL SETUP” above) otherwise transmission problems
may occur.
The maximum transmission range is 330 feet (100 m) (TBA) from the
outdoor transmitter to the Solar Clock (in open space). However, this
depends on the surrounding environment and interference levels. If no
reception is possible despite the observation of these factors, all system
units have to be reset (see “TO INSTALL / REPLACE BATTERY IN THE
SOLAR CLOCK” and “INITIAL SETUP”).
POSITIONING THE SOLAR CLOCK:
Before permanently mounting, ensure that the Solar Clock is able to
receive 915MHz signals from the desired location. In addition, the Solar
Clock should be placed in a bright environment for the rechargeable
batteries to be able to recharge.
There are two possible ways to mount the solar clock:
use of the foldable table stands, or
wall mounting
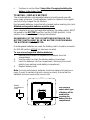
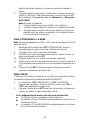
WALL MOUNTING
1. Install a mounting screw (not included) into a
wall—leaving approximately 3/16 of an inch
(5mm) extended from the wall.
2. Place the Solar Clock onto the screw, using the
hanging hole on the backside. Gently pull the
Solar Clock down to lock the screw into place.
Note: Always ensure that the Solar Clock locks onto
the screw before releasing.

8
POSITIONING THE SOLAR TRANSMITTER:
It is important to place the solar transmitter in a bright environment for the
rechargeable batteries to be able to recharge.
The solar transmitter can be placed onto any flat surface or wall mounted
using the bracket which doubles as a stand or wall mount base.
To wall mount: Secure the bracket onto a desired wall using the screws
and plastic anchors.
Clip the solar transmitter onto the bracket.
Note: The mounting surface can affect the transmission range.
If, for instance, the unit is attached to a piece of metal, it may
then either reduce or increase the transmitting range. For this
reason, we recommend not to place the unit on any metal
surfaces or in any position where a large metal or highly
polished surface is in the immediate vicinity (garage doors,
double glazing, etc.). Before securing in place, please ensure
that the Solar Clock can receive the 915MHz signal from the
solar transmitter at the positions that you wish to place them.
WARRANTY INFORMATION
La Crosse Technology, Ltd provides a 1-year limited warranty on this product
against manufacturing defects in materials and workmanship.
This limited warranty begins on the original date of purchase, is valid only on
products purchased and used in North America and only to the original
purchaser of this product. To receive warranty service, the purchaser must
contact La Crosse Technology, Ltd for problem determination and service
procedures. Warranty service can only be performed by a La Crosse
Technology, Ltd authorized service center. The original dated bill of sale must
be presented upon request as proof of purchase to La Crosse Technology, Ltd
or La Crosse Technology, Ltd’s authorized service center.
La Crosse Technology, Ltd will repair or replace this product, at our option and
at no charge as stipulated herein, with new or reconditioned parts or products if
found to be defective during the limited warranty period specified above. All
replaced parts and products become the property of La Crosse Technology, Ltd
and must be returned to La Crosse Technology, Ltd.
Replacement parts and products assume the remaining original warranty, or
ninety (90) days, whichever is longer. La Crosse Technology, Ltd will pay all
expenses for labor and materials for all repairs covered by this warranty. If
necessary repairs are not covered by this warranty, or if a product is examined
which is not in need or repair, you will be charged for the repairs or
examination.
The owner must pay any shipping charges incurred in getting your La Crosse
Technology, Ltd product to a La Crosse Technology, Ltd authorized service
center.

9
Your La Crosse Technology, Ltd warranty covers all defects in material and
workmanship with the following specified exceptions: (1) damage caused by
accident, unreasonable use or neglect (including the lack of reasonable and
necessary maintenance); (2) damage occurring during shipment (claims must
be presented to the carrier); (3) damage to, or deterioration of, any accessory or
decorative surface; (4) damage resulting from failure to follow instructions
contained in your owner’s manual; (5) damage resulting from the performance
of repairs or alterations by someone other than an authorized La Crosse
Technology, Ltd authorized service center; (6) units used for other than home
use (7) applications and uses that this product was not intended or (8) the
products inability to receive a signal due to any source of interference.
This warranty covers only actual defects within the product itself, and does not
cover the cost of installation or removal from a fixed installation, normal set-up
or adjustments, claims based on misrepresentation by the seller or performance
variations resulting from installation-related circumstances.
LA CROSSE TECHNOLOGY, LTD WILL NOT ASSUME LIABILITY FOR
INCIDENTAL, CONSEQUENTIAL, PUNITIVE, OR OTHER SIMILAR
DAMAGES ASSOCIATED WITH THE OPERATION OR MALFUNCTION OF
THIS PRODUCT. THIS PRODUCT IS NOT TO BE USED FOR MEDICAL
PURPOSES OR FOR PUBLIC INFORMATION. THIS PRODUCT IS NOT A
TOY. KEEP OUT OF CHILDREN’S REACH.
This warranty gives you specific legal rights. You may also have other rights
specific to your State. Some States do no allow the exclusion of consequential
or incidental damages therefore the above exclusion of limitation may not apply
to you.
For warranty work, technical support, or information contact:
La Crosse Technology
2817 Losey Blvd. S.
La Crosse, WI 54601
The complete instruction manual is available at:
www.lacrossetechnology.com/support
Le manuel d'instruction complet est disponible sur:
www.lacrossetechnology.com / support
El manual de instrucciones completo está disponible en:
www.lacrossetechnology.com / support
All rights reserved. This handbook must not be reproduced in any form, even in
excerpts, or duplicated or processed using electronic, mechanical or chemical
procedures without written permission of the publisher.
This handbook may contain mistakes and printing errors. The information in this
handbook is regularly checked and corrections made in the next issue. We accept no
liability for technical mistakes or printing errors, or their consequences.
All trademarks and patents are acknowledged.
EJMA8120L210
Printed in China

10
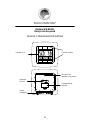
Pantalla LCD
Paneles solares
Modelo WS-8120U
Reloj solar de pared
GUÍA DE CONFIGURACIÓN RÁPIDA
%
Teclas de
función
Ubicación de
montaje en la pared
Cubierta de las
baterías
Bases
plegables

11
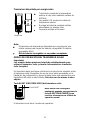
Panel solar
Transmisor alimentado por energía solar:
Transmisión remota de la temperatura
exterior al reloj solar mediante señales de
915 MHz
La pantalla LCD muestra los datos de
temperatura exterior
Recarga las baterías mediante células
alimentadas por energía solar
Caja para montaje en la pared
Nota:
El transmisor de temperatura alimentado por energía solar usa
células solares para cargar las baterías recargables (2 baterías
recargables AAA).
Dichas baterías recargables no se pueden reemplazar.
MODOS DE OPERACIÓN DEL TRANSMISOR SOLAR
Importante:
Los usuarios deben presionar la tecla de restablecimiento para
activar el transmisor solar y vincular la transmisión a la estación
solar (receptor).
Es importante dejar que llegue suficiente luz al panel solar mientras activa
el transmisor solar. Asegúrese de que las luces estén encendidas en la
habitación de configuración y de que el panel solar esté apuntando a una
bombilla de 60 vatios o más brillante. No cubra con las manos ni otros
objetos.
Tecla RESET (REESTABLECER) del transmisor solar:
El transmisor solar tiene 3 modos de operación:
Nota: Utilice sólo un bolígrafo
puntiagudo pequeño para presionar la
tecla de RESTABLECIMIENTO para
reactivar el transmisor en el Modo de
operación normal
Tecla RESET

12
Modo de operación normal:
Este modo se activa cuando el voltaje de las baterías es superior a
2,5 V.
El transmisor medirá y transmitirá los datos de temperatura al reloj
solar de pared cada 8 segundos.
El brillo del entorno se revisa cada 5 segundos.
Si se detecta un entorno oscuro, medirá y transmitirá la temperatura
cada 16 segundos.
Si el voltaje de las baterías disminuye a menos de 2,8 V, medirá y
transmitirá la temperatura cada 16 segundos.
Si el voltaje de las baterías disminuye a menos de 2,4 V, entrará en
modo inactivo.
Si el transmisor solar está ubicado en un entorno oscuro por 72
horas, entrará en modo de detención.
Si el usuario cubre la célula solar por 10 segundos y presiona el
botón de restablecimiento, se mostrará "StP" en la pantalla LCD.
Luego el transmisor entra en modo de DETENCIÓN.
Modo de operación inactiva:
Este modo se activa cuando el voltaje de las baterías disminuye a
menos de 2,4 V.
La pantalla LCD se apaga.
No mide ni transmite la temperatura.
El brillo del entorno se revisa cada 5 segundos.
Si el voltaje de las baterías aumenta a más de 2,5 V, entrará en
modo normal.
Si el transmisor solar está ubicado en un entorno oscuro por 72
horas, entrará en modo de detención.
Modo de operación en detención:
Este modo se activa cuando el transmisor solar está ubicado en un
entorno oscuro por 72 horas o el usuario cubre la célula solar por 10
segundos y presiona el botón RESET.
El transmisor está en un estado de modo de espera. La unidad no
realiza ninguna operación y la pantalla LCD está apagada.
Bajo una condición brillante, presione el botón de restablecimiento
para reactivar el transmisor en el modo de operación normal (el
voltaje de las baterías es mayor que 2,5 V).
Este es el modo de mayor ahorro de energía.
PARA INSTALAR / REEMPLAZAR LAS BATERÍAS EN EL RELOJ
SOLAR
El reloj solar puede utilizar las 2 baterías alcalinas recargables incluidas
(cargadas por el panel solar) o 2 baterías alcalinas AA (no recargables;
no incluidas).

13
CONFIGURACIÓN INICIAL
Es muy importante seguir estos pasos:
7. Primero, retire la etiqueta que cubre el compartimiento para las
baterías en la parte posterior.
8. Abra el compartimiento para las baterías y ASEGÚRESE de que el
interruptor de las baterías esté en la posición BATTERY (BATERÍA)
(no en la posición SOLAR).
Interruptor de las baterías en la posición BATTERY
9. Ahora ubique la lengüeta de aislamiento de las baterías y jale
suavemente para retirarlas.
10. Deslice el interruptor de las baterías a la posición SOLAR.
11. Interruptor de las baterías en la posición SOLAR.
12. Continúe en la sección llamada “Configuración tras el
cambio/instalación de las baterías en el reloj solar”
PARA INSTALAR / REEMPLAZAR LAS BATERÍAS
Las baterías alcalinas recargables incluidas deben proporcionarle muchos
años de servicio. Si debe reemplazar las baterías, sugerimos que use 2
baterías alcalinas AA completamente cargadas.
Las baterías recargables deben estar completamente cargadas antes de
insertarse en el reloj. Se deben usar baterías alcalinas recargables.
Si decide usar baterías no recargables, el interruptor de las baterías
DEBE moverse a la posición BATTERY (no a la posición SOLAR).
En esta posición, las células solares no cargan las baterías.
INDEPENDIENTEMENTE DEL TIPO DE BATERÍAS INSTALADAS, EL
INTERRUPTOR DE LAS BATERÍAS DEBE ESTAR EN LA POSICIÓN
BATTERY AL INSERTAR LAS BATERÍAS.
Si se utilizan baterías recargables, el interruptor de las baterías se debe
mover a la posición SOLAR DESPUÉS de insertarlas.
Para usar baterías alcalinas no recargables:
4. Retire las baterías AA recargables incluidas del compartimiento.
5. Use el interruptor para seleccionar las baterías alcalinas (consulte a
continuación).
3. Inserte las baterías en el compartimiento, con la polaridad correcta
(consulte las marcas dentro del compartimiento para las baterías).
4. Vuelva a colocar la cubierta de las baterías
Nota: Para obtener un mejor rendimiento, se deben reemplazar las
baterías una vez cada 2 años como mínimo a fin de mantener una mejor
precisión de funcionamiento. Asegúrese de que las baterías que se
utilizan sean nuevas y del tamaño correcto.

14
Contribuya a la preservación del medio ambiente y lleve las
baterías usadas a un depósito autorizado.
CONFIGURACIÓN DESPUÉS DE CAMBIAR/REEMPLAZAR LAS
BATERÍAS EN EL RELOJ SOLAR
1. Después de alimentar el reloj solar, todos los segmentos de la
pantalla LCD se encenderán brevemente y mostrarán la hora
(12:00), la temperatura interior, la fecha y la humedad interior.
2. Luego de insertar las baterías, el reloj solar comenzará a recibir
señales de datos desde el transmisor solar. Los datos de la
temperatura exterior deberían aparecer en este momento en el reloj
solar. Si esto no ocurre luego de 2 minutos, deberá retirar las
Utilice el interruptor
para seleccionar qué
tipo de batería se
utilizará antes de
insertar la batería en
el compartimiento
Cubierta del
compartimento
de baterías
Posición primaria del
interruptor de baterías
alcalinas
Posición del interruptor
para baterías alcalinas
recargables

15
baterías de ambas unidades y comenzar nuevamente desde el
paso 1.
6. La distancia entre el reloj solar y el transmisor no debe superar los
100,58 m (330 pies) (TBA) para garantizar una transmisión de 915
MHz suficiente. (Consulte las notas en “Ubicación” y “Recepción
de 915 MHz”).
Nota: Al cargar las baterías:
4. Tenga cuidado de que no se suelte de los contactos.
5. Presione cualquier botón 20 veces con las baterías retiradas.
6. Siempre espere al menos 10 minutos después de retirar las
baterías antes de volver a insertarlas; de lo contrario podrían
ocurrir problemas de arranque.
PARA CONFIGURAR A LA HORA
Nota: La hora se mostrará con “AM” o “PM” para la hora desde las 12:00
hasta las 11:59.
7. Mantenga presionada la tecla SET (CONFIGURAR) durante 3
segundos para acceder al modo de configuración de hora.
8. Los dígitos de la hora comenzarán a destellar.
9. Establezca las horas deseadas presionando y soltando la tecla + y
luego presionando la tecla SET.
10. Ahora los dígitos de los minutos comenzarán a destellar.
11. Establezca los minutos deseados presionando y soltando la tecla +.
Si se mantiene presionada la tecla +, las unidades aumentarán de 5
en 5.
12. Presione la tecla SET nuevamente para confirmar y acceder al
modo de configuración del Modo solar.
MODO SOLAR
El Modo solar se utiliza para ahorrar el consumo de energía de la batería
recargable (configuración predeterminada ENCENDIDO):
2. Los caracteres “ON” (ENCENDIDO) u “OFF” (APAGADO)
comenzarán a destellar. Utilizando la tecla + seleccione “ON” u
“OFF” para establecer el modo solar.
2. Presione y suelte la tecla SET para salir del modo de configuración
y volver a cambiar al modo de pantalla normal.
Si la configuración del modo solar está en la posición ON:
El brillo del entorno se revisará cada 5 segundos.
La pantalla LCD se APAGARÁ automáticamente si el entorno es
demasiado oscuro.
La pantalla LCD se ENCENDERÁ automáticamente si el entorno
es lo suficientemente brillante.

16
No se mostrará información cuando la pantalla LCD esté
APAGADA, pero todas las configuraciones y operaciones
permanecerán, excepto las mediciones de temperatura y
humedad.
Si la configuración del modo solar está en la posición OFF:
La pantalla LCD permanecerá ENCENDIDA constantemente.
MODO DE DETENCIÓN
Si el reloj solar está ubicado en un entorno oscuro por 72 horas
consecutivas, el reloj entrará en el modo de detención:
Es la condición de mayor ahorro de energía.
El reloj solar no realizará ninguna operación y la pantalla LCD
también estará APAGADA.
Los usuarios deben presionar cualquier tecla para reactivar la
estación solar y la transmisión con el transmisor solar.
VERIFICACIÓN DE LA RECEPCIÓN DE 915MHZ PARA EL
TRANSMISOR SOLAR PARA EXTERIORES
El reloj solar recibirá los datos del exterior cada 48 segundos. Si no se
reciben datos de temperatura en 2 minutos después de la configuración
(o la pantalla muestra “- - -”), verifique los siguientes puntos:
1. El reloj solar o el transmisor para exteriores deben estar a una
distancia de al menos 1,83 metros (6 pies) de cualquier fuente de
interferencia como monitores de computadoras o aparatos de TV.
2. Evite colocar el receptor sobre o en la proximidad inmediata de
marcos de ventana metálicos.
3. Utilizar otros productos eléctricos como auriculares o altavoces que
funcionan en la misma frecuencia de señal (915 MHz) puede evitar
la transmisión y recepción correcta de la señal.
4. Los vecinos que utilizan dispositivos eléctricos que funcionan en la
frecuencia de señal de 915 MHz también pueden provocar
interferencia.
Nota: Cuando se reciba correctamente la señal de 915 MHz, no vuelva a
abrir la cubierta de las baterías del reloj solar, ya que las baterías se
pueden soltar de los contactos y forzar un falso restablecimiento. En caso
de que esto ocurra accidentalmente, restablezca todas las unidades
(consulte “PARA INSTALAR / REEMPLAZAR LA BATERÍA EN EL
RELOJ SOLAR” y “CONFIGURACIÓN INICIAL” anteriormente), de lo
contrario, pueden producirse problemas de transmisión.

17
El rango de transmisión máximo es de 100,58 m (330 pies) (TBA) desde
el transmisor exterior al reloj solar (en un espacio abierto). Sin embargo,
esto depende entorno y de los niveles de interferencia. Si la recepción no
es posible a pesar de la observación de estos factores, todas las
unidades del sistema se deben restablecer (consulte “PARA INSTALAR /
REEMPLAZAR LA BATERÍA EN EL RELOJ SOLAR” y
“CONFIGURACIÓN INICIAL”).
UBICACIÓN DEL RELOJ SOLAR:
Antes de montar permanentemente, asegúrese de que el reloj solar
pueda recibir señales de 915 MHz desde la ubicación deseada. Además,
el reloj solar se debe colocar en un entorno brillante para que las baterías
recargables se puedan recargar.
Hay dos formas posibles para montar el reloj solar:
Usar las bases para mesa plegables, o
Mediante el montaje en la pared
MONTAJE EN LA PARED
3. 1.Instale un tornillo de montaje (no incluido) en una
pared, dejando aproximadamente 4,76 mm (3/16”)
extendidos desde la pared.
4. Coloque el reloj solar en el tornillo, utilizando el
orificio para colgar en la parte posterior. Empuje
suavemente el reloj solar hacia abajo para fijar el
tornillo en su lugar.
Nota: Asegúrese siempre de que el reloj solar quede fijo
en el tornillo antes de soltarlo.

18
UBICACIÓN DEL TRANSMISOR SOLAR:
Es importante colocar el transmisor solar en un entorno brillante para que
las baterías recargables se puedan recargar.
El transmisor solar se puede colocar sobre cualquier superficie plana o
montarse en la pared con la abrazadera que sirve tanto como soporte y
como base para montaje en la pared.
Para montar en la pared: Fije la abrazadera en la pared deseada con
los tornillos y anclas de expansión de plástico.
Fije el transmisor solar en la abrazadera.
Nota: La superficie de montaje puede afectar el rango de
transmisión. Si, por ejemplo, la unidad se fija a una pieza de
metal, es posible que ésta reduzca o aumente el rango de
transmisión. Por este motivo, recomendamos no colocar la
unidad sobre superficies de metal o en cualquier posición
cercana a una superficie de metal de gran tamaño o muy pulida
(puertas de garaje, vidrio doble, etc.). Antes de fijarlo en su lugar,
asegúrese de que el reloj solar pueda recibir la señal de 915
MHz del transmisor solar en las ubicaciones en que desee
colocarlo.
INFORMACIÓN SOBRE LA GARANTÍA
La Crosse Technology, Ltd proporciona 1 año de garantía limitada para este
producto contra defectos de fabricación en los materiales y la mano de obra.
Esta garantía limitada tiene vigencia a partir de la fecha de compra original, es
válida sólo para los productos comprados y utilizados en América del Norte y
únicamente para el comprador original de este producto. Para obtener el
servicio de garantía, el comprador debe ponerse en contacto con La Crosse
Technology, Ltd para determinar cuál es el problema y los procedimientos de
servicio. Sólo el centro de servicio autorizado de La Crosse Technology, Ltd
puede llevar a cabo el servicio de garantía. A solicitud de La Crosse
Technology, Ltd, se debe presentar la factura original con fecha como prueba
de la compra en La Crosse Technology, Ltd o en el centro de servicio
autorizado de La Crosse Technology, Ltd.
La Crosse Technology, Ltd reparará o reemplazará este producto, según
nuestro criterio y sin cargo, como se estipula aquí, con productos o piezas
nuevas o reacondicionadas si presentan defectos durante el período de
garantía limitada antes especificado. Todos los productos o piezas de repuesto
son propiedad de La Crosse Technology, Ltd y deben devolverse a La Crosse
Technology, Ltd.
Los productos y las piezas de repuesto están garantizados por el resto del
período original de la garantía, o noventa (90) días, el que sea más prolongado.
La Crosse Technology, Ltd pagará todos los gastos de mano de obra y
materiales para todas las reparaciones cubiertas por esta garantía. Si las
reparaciones necesarias no están cubiertas por la garantía, o si un producto se

19
examina pero no tiene defectos ni requiere reparación, se le cobrará la
reparación o la revisión.
El dueño debe pagar los costos de envío del producto de La Crosse
Technology, Ltd a un centro de servicio autorizado de La Crosse Technology,
Ltd.
Su garantía La Crosse Technology, Ltd cubre todos los defectos de materiales
y mano de obra con las siguientes excepciones especificadas: (1) daños
causados por accidente, uso indebido o negligencia (incluida la falta de
mantenimiento necesario y razonable); (2) daños ocurridos durante el envío
(las reclamaciones se deben presentar al transportista); (3) daños o deterioros
en cualquier accesorio o superficie decorativa; (4) daños que surjan por no
haber seguido las instrucciones del manual del propietario; (5) daños
ocasionados por la realización de reparaciones o alteraciones por parte de una
persona que no pertenezca a un centro de servicio autorizado de La Crosse
Technology, Ltd; (6) unidades que se hayan utilizado para fines no domésticos;
(7) aplicaciones y usos para los cuales no se diseñó este producto; u (8) la
imposibilidad de los productos de recibir señal por algún tipo de fuente de
interferencia.
Esta garantía sólo cubre defectos reales en el producto en sí y no cubre el
costo de instalación o retiro de una instalación fija, configuración o ajustes
normales, reclamaciones basadas en la tergiversación del vendedor o
variaciones de rendimiento producto de circunstancias relacionadas con la
instalación.
LA CROSSE TECHNOLOGY, LTD NO ASUMIRÁ NINGÚN TIPO DE
RESPONSABILIDAD POR DAÑOS ACCIDENTALES, RESULTANTES,
PUNITIVOS O DE OTRO TIPO ASOCIADOS CON LA MANIPULACIÓN O MAL
FUNCIONAMIENTO DE ESTE PRODUCTO. ESTE PRODUCTO NO DEBE
SER USADO PARA FINES MÉDICOS O PARA INFORMACIÓN PÚBLICA.
ESTE PRODUCTO NO ES UN JUGUETE. MANTENGA ALEJADO DEL
ALCANCE DE LOS NIÑOS.
Esta garantía le otorga derechos legales específicos. Es posible que tenga
otros derechos específicos según su estado. Algunos estados no permiten la
exclusión o limitación de los daños accidentales o resultantes, de modo que es
posible que la exclusión o limitación anterior no se aplique en su caso.
Para obtener asistencia técnica, trabajos cubiertos por la garantía o
información, póngase en contacto con:
La Crosse Technology
2817 Losey Blvd. S.
La Crosse, WI 54601
The complete instruction manual is available at:
www.lacrossetechnology.com/support
El manual de instrucciones completo está disponible en:
www.lacrossetechnology.com/support/

20
Todos los derechos reservados. No se debe reproducir este manual de modo alguno,
ni extraer fragmentos, duplicar o procesar con procedimientos electrónicos,
mecánicos o químicos sin la autorización por escrito de la editorial.
Este manual puede presentar imprecisiones o errores de impresión. La información
de este manual se verifica regularmente y las correcciones se realizarán en la próxima
edición. No nos hacemos responsables por errores técnicos o de impresión, o de las
consecuencias de este tipo de errores. Se reconocen todas las marcas registradas y
patentes.
Impreso en China
EJMA8120L210
-
 1
1
-
 2
2
-
 3
3
-
 4
4
-
 5
5
-
 6
6
-
 7
7
-
 8
8
-
 9
9
-
 10
10
-
 11
11
-
 12
12
-
 13
13
-
 14
14
-
 15
15
-
 16
16
-
 17
17
-
 18
18
-
 19
19
-
 20
20


La Crosse Technology WS-8120U Quick Setup Manual
- Type
- Quick Setup Manual
Ask a question and I''ll find the answer in the document
Finding information in a document is now easier with AI
in other languages
- español: La Crosse Technology WS-8120U
Related papers
-
La Crosse Technology 314-152B Operating instructions
-
 La Crosse Technology WS-6020U-IT User manual
-
 La Crosse Technology WS-8120U-IT User manual
-
La Crosse Landshark User manual
-
 La Crosse Technology WS-6010 Owner's manual
-
-
 La Crosse Technology WS-6010U-IT User manual
-
-
 La Crosse Technology WS-9009U User manual
-
 La Crosse Technology WS-6010U-IT User manual


Other documents
-
 La Crosse Clock 433-3841LS User manual
-
-
Silvercrest SFPW 360 B1 User manual
-
HoMedics DWS-320 Instruction book
-
-
-
-
Zenith SL-6037-WH - Heath - Wireless Command User manual
-
-
Pioneer SE-DIR800C Owner's manual
