Page is loading ...

MODEL: MNREMIX
USER
MANUAL
DJ MIXER PARTY SYSTEM

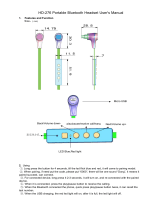
AUX Cord
(Jack: 3.5mm; Length: 5’)
PACKAGE CONTENTS
THANK YOU FOR
CHOOSING MONSTER
Monster REMIX
User Manual &
Quick Start Guide
(Incl. Warranty Statement)
Remote Control
(Batteries Included)
AC Power Cord
(Length: 6'6")
FM Antenna
(Length: 6'6")
Wireless Microphone
(Batteries Included)
Included with your purchase:
Congratulations on your Monster REMIX speaker!
Please take your time to explore all of the features
and utilities we have built into this product.
We put all of our products through rigorous testing
and quality control. For your peace of mind, we oer
a one-year limited warranty against manufacturing
defects and workmanship. Please refer to the
warranty section of the user manual for more details.
For more information on all of our products,
please visit: MyMonsterAudio.com
FOLLOW US:
@MyMonsterAudio
@MyMonsterAudio
@MyMonsterAudio

PRODUCT CONTROLS
1-2
POWER
Power
3
Standby
AUDIO
Volume
3
Mute
USB
4
Microphone
5
Bluetooth Pairing
NFC Pairing
Bluetooth/NFC Controls
6
FM Radio
AUX
7
Headphone
Line-In
Bass & Treble
TABLE OF CONTENTS
FEATURES
Party FX
8
Pro, Horn, & Lazer FX
DJ FX
FX Volume
Lights
Dimmer
TROUBLESHOOTING
9
SPECIFICATIONS
IMPORTANT SAFETY INSTRUCTIONS
10
LIMITED WARRANTY
11
WARNING STATEMENTS 12

LIGHTING
MODE
BASS
TREBLE
FX LEVERFX LEVER
HORN
DJ FX
ARTY FXP
1
Top Panel Diagram
Back Panel Diagram
Top Panel
Back Panel
1. Party FX Button
2. Pro Button
3. Horn Button
4. Lazer Button
5. DJ FX Button
6. Input A Volume Slider
7. FX Lever
8. Input B Volume Slider
9. Mic 1 Input
10. Mic 2 Input
11. LED Digital Display
12. Mic 1 Volume Knob
13. WL/Mic 2 Volume Knob
14. Echo Depth Knob
15. Eect Volume Knob
16. Bass Knob
17. Treble Knob
34. AUX Audio RCA Input
35. FM Antenna Input
36. Power Switch
37. AC Input
1
34
36
35
6
12 13
14 15
16
18
20
3130
33
32
21
24 25
22 23
27 2826
29
19
17
9 10
87
32
11
4 5
PRODUCT CONTROLS
18. Input A Mode Button
19. Input B Mode Button
20. Input A Play/Pause Button
21. Input B Play/Pause Button
22. Input A Next Button
23. Input B Next Button
24. Input A Previous Button
25. Input B Previous Button
26. USB A Input
27. Lighting Model Button
28. Headphone Mode Button
29. USB B Input
30. Volume/Multi Dial
31. Headphone Input
32. Line-In Audio Input
33. Standby Button
37

2
Remote Diagram
Controls
1. Standby
2. Light Mode
3. AUX-A Select
4. USB-A Select
5. BT-A Select
6. BT-A Disconnect
7. Repeat (Ch. A)
8. LED Dimmer
9. Trebel +
10. Trebel -
11. Bass +
12. Bass -
13. Line-In (Ch. B) Select
14. USB-B Select
15. BT-B Select
16. BT-B Disconnect
17. Repeat (Ch. B)
PRESET
1
4
6
18
20
22
28
23
24
25
26
31
33
3
5
7
19
21
27
29
30
13
14
15
16
17
8
9
10
11
12
2
32
18. FM Tunning +/Forward
19. Main Volume +
20. Play/Pause(Ch. A)
21. Mute
22. FM Tunning -/Rewind
23. Forward
24. Play/Pause(Ch. B)
25. Main Volume -
26. Previous
27. FM Auto Preset
28. Next Track (Ch. A)/
FM Channel +
29. Previous Track (Ch. A)/
FM Channel -
30. FM Audio Input
31. Previous Track (Ch. B)
32. Next Track (Ch. B)
33. FM Preset
34. (Ch. A) Number Pad
35. (Ch. B) Number Pad
34 35
When you see this icon in the manual, it means
the action can only be performed by using the
remote control.

3
POWER
Power
1 Connect the speaker to
an external power source
using the included AC
power cable.
2 Toggle the POWER switch
to the "ON" position.
"WELCOME" will appear on
the LED display. The speaker
will connect to the last selected
audio source.
• Toggle the POWER switch
to the "OFF" position to
turn the speaker o.
AUDIO
Volume
• Rotate the VOLUME/MULTI
dial to adjust the main
volume level of the speaker.
Press the VOL+ or VOL - button.
The LED display will show "MAIN"
and the current volume level.
• INPUT (A or B) volumes can
be independently adjusted
by using the corresponding
volume sliders.
(-) (-)
(+) (+)
(-)
(+)
(Rotate)
(Slide)
(Press)
(Press)
(Press)
(Press)
Standby
1 Press the "STANDBY"
button to put the speaker
into low-power mode.
Press the "STANDBY" button.
"STANDBY" will appear on the
LED display. The STANDBY
button will glow RED.
• Press the STANDBY button
again to wake up the speaker.
Press the STANDBY button again.
"WELCOME" will appear on
the LED display. The speaker
will connect to the last selected
audio source.
or
or
(Push)
(Rotate)
Mute
• Press the MUTE button to
mute all speaker audio.
The LED display will show "MUTE"
and the current volume level.
• Press the MUTE button
again to turn speaker audio
back on.
• Rotate the VOLUME/MULTI dial to
turn speaker audio back on.
(Push)
(Push)
The speaker will automatically enter standby
after ~15 min. of inactivity or lack of connection.
Standby mode can be manually enabled in any mode.

4
USB
1 Press the INPUT (A or B)
button to cycle through
audio sources and select the
USB input (USBA or USBB).
Press the USB-A or USB-B button.
The LED display will show
"USBA" or "USBB".
2 Insert your USB drive into
the USB A or USB B input.
The speaker will automatically
begin playing.
• Press the PLAY/PAUSE
(A or B) button to pause or
resume the current track.
Press the PLAY/PAUSE (A or B) button.
The LED display will show
"PLAY PAUS E ".
• Press the NEXT (A or B)
button to skip to the next track.
Press the NEXT (A or B) button.
The LED display will show "NEXT".
• Press the PREVIOUS (A or B)
button to restart or skip to the
previous track.
(Press)
or
(Press)
(Press)
(insert)
Press the PREVIOUS (A or B) button.
The LED display will show "PREV".
• Press the REWIND (A or B) button to
rewind the current track.
• Press the FORWARD (A or B) button
to fast forward on the current track.
• Use the NUMBER buttons to input
the track you want to play.
• Press the REPEAT (A or B) button to
cycle through the playback modes:
Random (RAND) = play all
tracks in random order
Single (SING) = repeat current track
All (ALL) = repeat all tracks
(Press)
(A)
(A)
(B)
(B)
(A) (B)
(Press)
(Press) or
or
or
(Press)
(Press)
(A)
or
or
or
or
or
or
(B)
(Press)
(A) (B)
(Press)
or
or
(Press)
(Press)
(A) (B)
The USB inputs will only play audio files on a
USB drive. To stream audio from a smart device, use
the BLUETOOTH, AUX, or LINE IN inputs.

5
AUDIO CONT.
NFC Pairing (Android Only)
1 Enable NFC on your
music device.
2 Press the INPUT (A or B)
button to cycle through
audio sources and select
Bluetooth (BT-A / BT-B).
Press the BT-A or BT-B button to
select the Bluetooth input.
The LED display will show "BT-A"
or "BT-B" and blink in pairing mode.
3 Place your music device
directly on the speaker’s
NFC logo until paired.
The speaker will make audible
confirmation. LED display will
stop blinking.
(Press) or
or(Press)
~30 feet max connection range after pairing.
Devices out of range may suffer disruption or
loss of signal.
MONSTER REMIX A
MONSTER REMIX B
(Press) or
or(Press)
3 ft.
Bluetooth Pairing
1 Place your music device
within 3 feet of the speaker.
Make sure Bluetooth is enabled
on your device.
2 Press the INPUT (A or B)
button to cycle through audio
sources and select Bluetooth
(BT-A / BT-B).
Press the BT-A or BT-B button.
The LED display will show
"BT-A" or "BT-B" and blink in
pairing mode.
3 Select "MONSTER REMIX A
or MONSTER REMIX B" on
your music device's Bluetooth
menu to pair with the speaker.
The speaker will make audible
confirmation. LED display will
stop blinking.
Microphones
1 Connect a microphone to the
MIC (1 or 2 ) input.
2 Rotate the MIC1.VOL or
the WL/MIC2.VOL knob
to increase or decrease the
volume level.
• Rotate the ECHO knob to
adjust echo depth.
or
or
(-)
(-)
(Rotate)
(Connect)
(Rotate)
(+)
(+)
The included wireless microphone will
automatically connect to MIC 2.

6
(Press)
(Press)
(Press)
(A)
or
or
or
or
or
(B)
(Press)
(A)
(A)
(B)
(B)
(Press)
or
or
(Press)
(Press)
(A) (B)
Bluetooth/NFC Controls
• Press the PLAY/PAUSE
(A or B) button to pause or
resume the current track.
Press the PLAY/PAUSE (A or B) button.
The LED display will show
"PLAY PAUS E ".
• Press the NEXT (A or B)
button to skip to the next track.
Press the NEXT (A or B) button.
The LED display will show "NEXT".
• Press the PREVIOUS (A or B)
button to restart or skip to the
previous track.
Press the PREVIOUS (A or B) button.
The LED display will show "PREV".
• Press DISCONNECT
(A or B) to disconnect
the corresponding
Bluetooth device.
FM Radio (Input A Only)
1 Connect the included FM
antenna to the FM INPUT
on the back panel.
2 Press the INPUT A button to
cycle through audio sources
and select the radio function.
Press the FM button.
The LED display will show the
last-selected FM radio frequency.
3 Press the PREVIOUS or
NEXT (INPUT A) button to
change the radio frequency.
Press and hold the button to
scan frequencies.
Press the TU+ / TU- buttons to
change radio frequency. Press and
hold the TU+ / TU- buttons to
scan frequencies.
• Save a radio station by pressing the
PRESET button, followed by entering
a two-digit channel (01-40) on the
INPUT A NUMBER PAD.
• Press the FM.AUTO button to scan
for strong radio frequencies and
automatically save them into the first
available preset channels (01-40).
The LED display will show the
two-digit channel number.
• Press CH+ / CH- to cycle through
your saved radio preset channels.
(Press)
(Press) (Enter Ch.)
(Press)
(Press or
Press & Hold)
(Press or
Press & Hold)
(Press)
(Press)
PRESET
You may have TWO Bluetooth devices active
at once: one in INPUT A, one in INPUT B.

7
AUDIO CONT.
Line-In (Input B Only)
1 Connect your music device
via the LINE IN port.
2 Press the INPUT B button to
cycle through audio sources
and select the LINE input.
Press the LINE button.
The LED display will show
"LINE." Only audio device
functions are available in LINE-
IN mode. Speaker functions will
not work.
(Press)
(Connect)
(Press)
(Press)
Headphones
1 Connect your external
device via the
HEADPHONES input.
2 Press the HEADPHONES
MODE button to cycle through
which input you want to hear
through your headphones.
The LED display will show the
current headphone input:
INPUT A, INPUT B or INPUT AB.
3 Rotate the VOLUME/
MULTI dial while in
headphone mode to
change the volume of the
selected input.
(-)
(+)
(Rotate)
(Connect)
(Press) or
or
(Press)
Bass & Treble
• Rotate the TREBLE knob
to increase or decrease the
treble level (+8 to -8).
Press the TREB+ or TREB- button.
The LED display will show the
currently selected treble level.
• Rotate the BASS knob to
increase or decrease the
bass level (+8 to -8).
Press the BASS+ or BASS- button.
The LED display will show the
currently selected bass level.
(-)
(-)
(Rotate)
(Rotate)
(+)
(+)
BASS
TREBL
AUX (Input A Only)
1 Connect an analog
audio device via the
AUX (RCA) input.
2 Press the INPUT A button
to cycle through audio
sources and select AUX A.
Press the AUX A button.
The LED display will show "AUXA."
Only audio device functions are
available in AUX mode. Speaker
functions will not work.
(Press)
(Press)
(Connect)

FX LEVERFX LEVER
ARTY FXP
8
DJ FX
DJ FX
1 Press the DJ FX button to
cycle through the sound
eects: SCRATCH, REVERB,
BEAT BOX, YEAH 1, BRING
IT, YEAH 2, and COME ON.
2 While DJ FX mode is
still engaged, rotate the
VOLUME/MULTI dial to
trigger the selected sound
eect.
(Rotate)
(Press)
HORN
PRO, HORN, & LAZER FX
1 Press the PRO, HORN, and
LAZER button to trigger
the sound eect (in any
audio mode).
(Press)
FEATURES
LIGHTING
MODE
Lights
• Press the LIGHTING MODE
button to cycle through the
RGB lighting modes.
Press the LIGHT button.
R= Red
G= Green
B= Blue
RG= Red/Green
RB= Red/Blue
GB= Green/Blue
RGB= Red/Green/Blue
AUTO= various combinations
DEMO= responds to music beat
OFF= no lights
(Press)
Dimmer
(Press)
Press the DIMMER button
to change the LED display
brightness level (1 to 5).
The LED display will show the
current brightness level. The
speaker defaults to level 3 on
power-up and wake-up.
The speaker will exit the light mode after ~3
seconds of inactivity.
(Press)
MAX
PART FX
PARTY FX
1 Press the PARTY FX button
to cycle through the sound
eects: SIREN, VECTOR,
FIREWORK, RAINING, and
POWER UP.
2 Engage the FX LEVER
partway to trigger the selected
PARTY FX sound eect.
• Push the FX LEVER to its
highest point to activate the
"MAX" (explosion) eect.
The LED display will show "MAX."
(Press)
(Slide)
FX Volume
• Rotate the EFFECT VOL
knob to increase or decrease
the volume level of ALL
sound eects. (00-22).
The LED display will show the
current sound eect volume level.
(-)
(Rotate)
(+)

9
General
Bluetooth
®
Version 4.2
Power Input AC 120V~,60Hz
Speaker Drivers
1" Tweeter, 3" Woofer,
& 10” Subwoofer (x2)
THD + Noise ≤3%
Cabinet Material Plastic/Metal
Dimensions (W x H x D) 11.8” x 33.5” x 15”
Weight ~35 lbs.
Frequency 35Hz-20KHz ±3dB
Operating Temperature
Operating Temperature Range 32F° - 104F°
Operating Humidity Range 40~90% RH
Storage Temperature Range -13F° to 158F°
SPECIFICATIONS
Speaker is
not powering
on
• Make sure AC POWER adapter is fully inserted into the
unit (See pg. 2)
Buttons
are not
responding
• Reset the speaker by turning the power OFF, and then
back ON. (See pg. 2)
• Unplug the AC POWER adapter, then plug it back in.
(See pg. 2)
No music is
playing
• Make sure the speaker is set to the same source as your
audio device. If you are playing audio via AUX IN jack,
make sure the speaker is in AUX IN mode, etc.
(See pg. 3-5)
• Make sure the VOLUME level is high enough on your
audio device as well as the speaker.
Bluetooth
®
audio quality
is poor
• Move your music device closer to the speaker.
• Remove objects that may be interfering with the wireless
connection.
Bluetooth
®
/
NFC device is
not pairing
• Verify that the speaker and your device have
BLUETOOTH
®
mode active. (See pg. 3)
• Make sure the speaker and/or your device is not already
paired with another device.
• Check that the speaker is in pairing mode. (See pg. 3)
• Turn the speaker OFF, and then back ON. Press and
hold the BLUETOOTH
®
button to manually enter pairing
mode. (See pg. 3)
Contact our
support team
for additional
services
Call: 1-800-976-0677
Email: support@mymonsteraudio.com
Hours of Operation:
Monday - Friday: 7:00 am - 4:00 pm (PST)
Saturday - Sunday: CLOSED
TROUBLESHOOTING

10
IMPORTANT SAFETY INSTRUCTIONS
1) Read these instructions – All the safety and operating instructions
should be read before this product is operated.
2) Keep these instructions – The safety and operating instructions
should be retained for future reference.
3) Heed all warnings - All warnings on the appliance and in the
operating instructions should be adhered to.
4) Follow all instructions – All operating and use instructions should
be followed.
5) This apparatus can be used in wet location conditions after
disconnected the AC Mains supply and closing the water
proof cap for the AC inlet. It must not be used in wet location
conditions when charging. Do not use this apparatus near water-
The appliance should not be used near water or moisture – for
example, in wet basement or near a swimming pool.
6) Clean only with dry cloth.
7) Do not block any ventilation openings, install in accordance with
the manufacturer’s instructions.
8) Do not install near any heat sources such as radiations, heat
registers, stoves, or other apparatus (including amplifiers) that
produce heat.
9) Do not defeat the safety purpose of the polarized or grounding
plug. A polarized plug has two blades with one wider than the
other. A grounding plug has two blades and a third grounding
prong. The wide blade or the third prong is provided for your
safety. If the provided plug does not fit into your outlet, consult an
electrician for replacement of the obsolete outlet.
10) Protected the power cord from being walked on or pinched
particularly at plugs, convenience receptacles, and the point
where they exit from the apparatus.
11) Only use attachments/accessories specified by the manufacturer.
12) Use only with the cart, stand, tripod, bracket,
or table specified by the manufacturer, or sold
with the apparatus. When a cart or rack is used,
use caution when moving the cart/apparatus
combination to avoid injury from tip-over.
13) Unplug this apparatus during lighting storms or when unused for
long periods of time.
14) Refer all servicing to qualified service personnel. Servicing is
required when the apparatus has been damaged in any way, such
as power-supply cord or plug is damaged, liquid has been spilled
or objects have fallen into the apparatus, the apparatus has been
exposed to rain or moisture, does not operate normally, or has
been dropped.
15) Mains plug is used as the disconnect device, the disconnect
device shall remain readily operable.
16) Do not install this equipment in a confined or building-in space
such as a book case or similar unit, and remain a well ventilation
conditions at open site. The ventilation should not be impeded by
covering the ventilation openings with items, such as newspapers,
table-cloth, curtains, etc.
17) No naked flame sources, such as lighted candles, should be
placed on the apparatus.
18) Attention should be drawn to the environmental aspects of
battery disposal.
WARNING: The batteries shall not be exposed to excessive heat such
as sunshine, fire or the like.
CAUTION: Danger of explosion if battery is incorrectly replaced.
Replace only with the same or equivalent type.
Protective earthing terminal. The apparatus should be
connected to a mains socket outlet with a protective
earthing connection.
Protective earthing terminal. The apparatus should be
connected to a mains socket outlet with protective earthing
connection.
TROUBLESHOOTING

11
Model: MNREMIX
LIMITED WARRANTY
This Monster-branded product, marketed as new, in the original carton to the original
purchaser (“Product”), is warranted by Russell Distribution Company, LLC against
manufacturing defects in materials and workmanship for a limited warranty period
of Ninety (90) Days for Labor and One (1) year for Parts. This Limited Warranty is
conditioned upon proper use of Product by you, the Purchaser.
This Limited Warranty does not apply to store display products and product sold as
a ‘marked down” special, in as is condition, ‘close outs”, “liquidation and clearance
sales”, “open box”, products missing accessories, or no fault found.
Proof of purchase in the form of a Bill of Sale, Receipt or Receipted Invoice is
evidence the Product is within the limited warranty period. The Bill of Sale, Receipt
or Receipted Invoice must be presented as a pre-condition to obtaining the limited
warranty service.
This limited warranty begins on the original date of purchase and is valid only on
Products purchased through authorized dealers and used In the United States, and
Puerto Rico, by the original Purchaser. To receive warranty service, the Purchaser
must first contact us for problem determination and service procedures. The original
dated bill of sale, receipt or receipted invoice must be presented upon request as
proof of purchase.
We will repair your product or if repairs cannot be made, we will replace it at no
charge with the same or similar product. If the Product is defective as specified
in this limited warranty during the limited warranty period, we may use new or
remanufactured parts to repair the Product. All replaced parts and products become
our property and must be returned to us. Replacement parts and products assume
the remaining original limited warranty, or ninety (90) days, whichever is longer.
Product freight must be prepaid by you, the original Purchaser and shipped in either
its original packaging or packaging aording an equal degree of protection. We will
not be responsible for or obligated to replace damaged Products.
If the Product is received damaged, it is your responsibility as the consumer to file a
claim against the carrier. We will only store the damaged Product for 30 days and
reserve the right, in our sole discretion, to dispose of the damaged Product or ship it
back to you at your expense after 30 days.
This limited warranty covers manufacturing defects in materials and workmanship
encountered in normal, and except to the extent otherwise expressly provided for
in this statement noncommercial use of this Product, and shall not apply to the
following, including, but not limited to: Damage which occurs in shipment; delivery
and installation; applications and uses for which this Product was not intended;
altered Product or serial numbers; cosmetic damage or exterior finish: accidents,
abuse, neglect, fire, water, lightning or other acts of nature; use of products,
equipment, systems,utilities, services, hardware, supplies, accessories, applications,
installations, repairs, external wiring or connectors not supplied or authorized by us
or the manufacturer, which damage this Product result in service problems: incorrect
electrical line voltage, fluctuations and surges: customer adjustments and failure to
follow operating instructions, cleaning, maintenance and environmental instructions
that are covered and prescribed in the instruction book; reception problems and
distortion related to noise, echo, interference or other signal transmission and
delivery problems; burned-in images. Uninterrupted or error-free operation of the
Product is not warranted.
THERE ARE NO EXPRESS OR IMPLIED WARRANTIES OTHER THAN THOSE
LISTED AND DESCRIBED ABOVE, AND NO WARRANTIES WHETHER EXPRESS
OR IMPLIED, INCLUDING, BUT NOT LIMITED TO, ANY IMPLIED WARRANTIES
OF MERCHANTABILITY OR FITNESS FOR A PARTICULAR PURPOSE, SHALL
APPLY AFTER THE EXPRESS WARRANTY PERIODS STATED ABOVE, AND NO
OTHER EXPRESS WARRANTY OR GUARANTY GIVEN BY ANY PERSON, FIRM OR
CORPORATION WITH RESPECT TO THIS PRODUCT SHALL BE BINDING ON US.
REPAIR OR REPLACEMENT AS PROVIDED UNDER THIS LIMITED WARRANTY
IS YOUR EXCLUSIVE REMEDY AS THE CONSUMER. WE SHALL NOT BE LIABLE
FOR ANY INCIDENTAL, OR CONSEQUENTIAL DAMAGES FOR BREACH OF
ANY EXPRESS OR IMPLIED WARRANTY ON THIS PRODUCT; EXCEPT TO
THE EXTENT PROHIBITED BY APPLICABLE LAW, ANY IMPLIED WARRANTY
OF MERCHANTABILITY OR FITNESS FOR A PARTICULAR PURPOSE ON THIS
PRODUCT IS LIMITED FOR THE DURATION OF THIS LIMITED WARRANTY THIS
LIMITED WARRANTY SHALL NOT EXTEND TO ANYONE OTHER THAN THE
ORIGINAL PURCHASER OF THIS PRODUCT, IS NONTRANSFERABLE AND STATES
YOUR EXCLUSIVE REMEDY.
Some states do not allow limitations on how long an implied warranty lasts, or
the exclusion or limitation of incidental or consequential damages, so the above
limitations or exclusions may not apply to you. This limited warranty gives you
specific legal rights, and you may also have other rights, which vary from state to
state. Any provision contained herein which is found contrary to state or local laws
shall be deemed null and void and the remaining provisions shall continue in full
force and eect.
To obtain warranty service, please contact technical support with questions
Phone: 1-800-976-0677 • Email: support@mymonsteraudio.com
DO NOT return this product to the store. Visit: MyMonsterAudio.com

FCC WARNING STATEMENT
IC WARNING STATEMENT
This device complies with Part 15 of the FCC Rules. Operation is subject to the following two
conditions:
FCC RADIATION EXPOSURE STATEMENT This equipment complies with FCC radiation exposure limits set forth for an uncontrolled environment. In order to avoid the possibility of exceeding
the FCC radio frequency exposure limits, Human proximity to the antenna shall not be less than 20cm (8 inches) during normal operation.
Prevent re and shock hazards. Do not use extension cords
or outlets that expose plug blades. Do not expose cables and
plugs to rain or moisture.
Do not attempt to perform any servicing that is not included
in the operating instructions. Do not attempt to replace the
battery, as incorrect installation can cause re or explosion.
For service, contact qualied service personnel.
Do not remove cover or back of product. There are no user-
serviceable parts inside. Attempting to modify controls or
performance beyond manufacturer specications may result in
hazardous exposure to radiation.
A lightning ash and arrowhead
within an equilateral triangle is
intended to alert the user to the
presence of insulated “dangerous
voltage” within the product’s
enclosure that may be of sucient
magnitude to constitute a risk of
electric shock to persons.
An exclamation point within an
equilateral triangle is intended
to alert the user to the presence
of important operation and
maintenance (servicing)
instructions in the literature
accompanying the appliance.
WARNING: TO REDUCE THE RISK
OF ELECTRIC SHOCK DO NOT
REMOVE COVER (OR BACK),
NO USER SERVICEABLE PARTS
INSIDE REFER SERVICING TO
QUALIFIED SERVICE PERSONNEL.
CAUTION
RISK OF ELECTRIC SHOCK
DO NOT OPEN
WARNING
1) This device may not cause harmful interference, and
2) This device must accept any interference received, including interference that may cause
undesired operation.
NOTE 1: This equipment has been tested and found to comply with the limits for a Class B digital device, pursuant to part 15 of the FCC Rules. These limits are designed to provide
reasonable protection against harmful interference in a residential installation. This equipment generates, uses and can radiate radio frequency energy and, if not installed
and used in accordance with the instructions, may cause harmful interference to radio communications. However, there is no guarantee that interference will not occur in a
particular installation. If this equipment does cause harmful interference to radio or television reception, which can be determined by turning the equipment o and on, the user is
encouraged to try to correct the interference by one or more of the following measures:
• Reorient or relocate the receiving
antenna.
• Increase the separation between the
equipment and receiver.
• Connect the equipment into an outlet
on a circuit dierent from that to which
the receiver is connected.
• Consult the dealer or an experienced
radio/TV technician for help.
NOTE 2: Any changes or modications to this unit not expressly approved by the party responsible for compliance could void the user's authority to operate the equipment.
This device complies with Industry Canada’s licence-exempt RSSs. Operation is subject to the
following two conditions:
1) This device may not cause interference; and
2)
This device must accept any interference, including interference that may cause undesired
operation of the device.
12

MUSIC WITHOUT LIMITS
1-800-976-0677 • [email protected] • MyMonsterAudio.com
Monster and the Monster logo are registered trademarks of Monster Inc., and it’s subsidiaries in the U.S. and other countries, used under license.
The Bluetooth
®
word mark and logos are registered trademarks owned by Bluetooth
®
SIG, Inc. Other trademarks and trade names are those of their respective owners.
The N-Mark is a trademark or registered trademark of NFC Forum, Inc. in the United States and in other countries.
/